Uncategorized

pexels felicity tai 7951238 How to Prevent Spray Paint Drips: A Comprehensive Guide

How to Prevent Spray Paint Drips: A Comprehensive Guide

Spray painting can be an efficient and effective method to achieve a smooth, professional-looking finish. However, one of the common issues many individuals face is the dreaded spray paint drip. These drips can mar the finished product, making the object appear messy or unprofessional. Thankfully, with the right techniques and precautions, these drips can be avoided.

To prevent spray paint drips, maintain a distance of 10-12 inches from the surface, use steady side-to-side motions, apply thin, even coats, and avoid painting in high humidity or extreme temperatures. Always shake the can well before use.

How to Prevent Spray Paint Drips

In this comprehensive guide, we will delve into the methods and best practices to ensure a drip-free spray painting experience.

1. Proper Preparation is Key

Surface Cleaning: Before any painting begins, ensure the object’s surface is clean. Remove dust, grime, or grease as these can interfere with the paint’s adhesion, potentially leading to drips.

Priming: Using a primer will not only help the paint adhere better but also allow for a smoother application, reducing the chances of drips. Choose a primer that’s suitable for the material you’re painting.

2. Choosing the Right Paint

Different projects require different types of paint. Ensure you are using the correct type for your project. For example, some paints are specifically designed for metal, while others are better for wood or plastic.

3. Proper Spray Painting Technique

Distance: Hold the spray can approximately 10 to 12 inches away from the surface. If you’re too close, the paint will pool, and if you’re too far, it might not cover effectively, tempting you to overspray.

Test Spray: Always spray a test patch on cardboard or another disposable surface. This helps you gauge the spray pattern and adjust your technique.

Motion: Use steady, even, side-to-side sweeping motions. Begin and end each stroke off the object, releasing the nozzle at the end of each pass to prevent buildup.

Overlap: Each pass should overlap the previous by about one-third, ensuring a consistent coating without excessive buildup.

4. Applying Thin Coats

It’s tempting to apply a thick coat to finish the job quickly, but this is a primary cause of drips. Instead, opt for multiple thin coats, allowing each to dry as recommended by the manufacturer before applying the next. This approach provides a smoother finish and significantly reduces the risk of drips.

5. Pay Attention to the Environment

Temperature: Ideally, spray paint when the temperature is between 50°F and 90°F. Too cold, and the paint can thicken and not spray evenly; too hot, and it may dry too rapidly, leading to an uneven finish.

Humidity: High humidity can prolong drying times, increasing the risk of drips. It’s best to paint on a day with relative humidity below 85%.

Wind: If working outdoors, be cautious on windy days. Wind can cause the paint to overspray or accumulate unevenly.

6. Using the Right Equipment

Nozzle: Ensure the spray nozzle is clean and unclogged. A clogged nozzle can cause splattering or uneven spray, increasing the risk of drips.

Protective Gear: While not directly related to preventing drips, wearing appropriate gear like gloves, masks, and goggles can allow you to focus on the task without being distracted by paint on your skin or inhaling fumes.

7. Addressing Drips Immediately

Even with precautions, a drip might occasionally occur. If you notice a drip, don’t wait for it to dry. While the paint is still wet, you can often smooth out the drip with a foam brush. If the paint has already dried, you’ll need to sand it down and reapply paint.

8. Storing Spray Cans Properly

Store spray paint cans in a cool, dry place, and always shake them well before use. This ensures the paint inside is mixed properly and sprays evenly.

Conclusion

Achieving a drip-free finish when spray painting is a combination of preparation, technique, and environmental awareness. By focusing on each step of the process and being mindful of the factors that can lead to drips, you can significantly reduce the risk and ensure a smooth, professional-looking outcome. Whether you’re a beginner or a seasoned DIY enthusiast, these tips can help you master the art of drip-free spray painting.

Frequently asked questions

1. Why do I get drips when spray painting?

Drips occur due to over-application, holding the can too close, or using paint in unfavorable conditions like high humidity. Proper technique and environment management reduce this risk.

2. How do you keep spray paint from going everywhere?

Use masking tape and drop cloths or newspapers to protect surrounding areas. Additionally, maintaining the right distance and using controlled, steady motions prevent overspray.

3. How do you fix paint drips before it dries?

Immediately smooth out wet drips with a foam brush or gently blot with a clean cloth. If semi-dry, lightly scrape off using a scraper or flat tool.

4. Should I sand before spray painting?

Yes, sanding before spray painting helps ensure a smooth surface and improves paint adhesion. Use fine-grit sandpaper and wipe clean after.

5. How do you seal spray paint?

After the paint is fully dry, apply a clear sealer or varnish. Choose a sealer compatible with your paint type, and spray in thin, even layers for protection and a polished finish.

pexels jesus silvosa 18079742 How Much Does it Cost to Paint a Car Hood? The Ultimate Blog

How Much Does it Cost to Paint a Car Hood? The Ultimate Blog

When it comes to car hoods, we all know it’s more than just your engine cover! It’s an expression of your style and personality. 

And if you’re someone like me with an eye for aesthetics, a scratched, dented, or faded car hood is probably the last thing you want. 

Since you’re on this page, you may be considering having your hood repainted to keep looking at its best. But how much does it cost to paint a car hood?

The cost of a car hood paint job varies depending on various factors, including the hood, the type of paint you choose, the quality of the work, and whether you choose to DIY or hire a pro. However, you can generally expect to pay anywhere from $200 to $1,000 for a professional paint job.

Since you need to have a budget planned before getting your car hood repainted, I am here with this comprehensive blog.

Ready to learn the factors that affect the cost of a car hood paint job and enjoy some tips on how to get the best possible price? 

Keep scrolling!

Factors Affecting the Cost of a Car Hood Paint

Multiple factors come into play that can affect the cost of a car hood paint job:

  • The size of your hood/model of your car: Different cars have different sizes of hoods. The larger your hood, the more expensive it will be to paint. 
  • The extent of the damage: Minor damage, like a few scratches or dents, only requires touch-ups and won’t cost you an arm and a leg. But severely damaged hood like that damaged from an accident or hail damaged hood will cost you a lot more than minor dents. You first need to fix the additional repairs before getting your hood repainted, which increases the price exponentially. 
  • The type of paint you choose: The type of paint you choose will also affect the cost of your paint job. For example, premium paint will cost more than standard paint. Moreover, metallic looks would empty your pockets more than solid color paint. 
  • The quality of the work: The quality of the work will also affect the cost of your paint job. A high-quality paint job will cost more than a lower-quality paint job.
  • The location of the body shop/labor cost: The location of the body shop can also affect the cost of your paint job. Body shops in major cities charge more than body shops in rural areas. This is because labor rates vary from region to region due to living costs and economic factors. Moreover, expertise and reputation also affect the price of the labor. Skilled professionals often charge higher for their services. 
  • Customization and artwork: Custom paint designs and artworks are always exciting options for showing off your personality. However, these unique looks come at the cost of more labor wages, creativity, and time, contributing to higher costs. The complexity of designs will finalize the price. You can expect the price for intricate artwork to surpass $2000.
  • Color change: Another factor that makes its place in the list is color change. If you plan to repaint your car hood the same color it is, it won’t cost you as much as changing the color completely might cost you. 
  • DIY vs. professional: If you want to be a little adventurous this time, go ahead! Painting a car hood is a fun job and will save you lots of money, too, compared to professionally painting it (duh!).

How Much Does it Cost to Paint Car Hood? 

First, you need to decide if it’s a DIY job or if you’re hiring a professional. There’s a drastic difference in the price of the two. 

My suggestion: If it’s a simple paint job where you must repaint because your hood is faded or just a few scratches need a touch-up, do it yourself. But if it’s a job that demands a lot of skills, many dents to repair, or your insurance is covering pay for the paint job, hire a professional.  

Here’s a breakdown for each:  

Average Price to Paint Car Hood Yourself

The cost involved in painting the car hood yourself involves the following:

  1. Paint and Primer 

The cost of paint and primer will vary depending on the type of paint you choose and the amount you need. For example, a gallon of high-quality automotive paint can cost around $100. 

For priming the hood, my personal favorite is Rust-Oleum 260510 Automotive 2-in-1 Filler & Sandable Primer. The easy-to-use spray gives a super smooth result and excellent adhesion. The best part? It’s light on the pocket!

And for the paint, I can place my bets without blinking an eye on Dupli-Color Perfect Match Automotive Spray Paint. The paint is specially formulated to exactly match the original factory-applied coating. Just choose your vehicle type from the drop-down menu, and there you have it, a color where you won’t be able to distinguish the touch-ups from the original. 

Here is our list of the 10 best spray paints for car exteriors if you need to explore more options. 

  1. Tools and Supplies

You will also need to purchase some tools and supplies for painting, such as sandpaper, brushes, rollers, and masking tape. These supplies can cost around $50.

  1. Labor

The labor cost of painting a car hood yourself is the time you spend sanding, priming, painting, and clear coating the hood. This can vary depending on your skill level and the time to devote to the project.

So, in total, a DIY car hood painting can cost you anywhere between $100 to $300. This means we can estimate the price to be around $200 on average. 

Average Cost to Paint a Car Hood if You Hire a Professional 

As discussed above, the cost to paint a car hood professionally depends on various factors like the type of paint, quality of the job, the location of the body shop, customization, etc. Here are different price points for car hood paint jobs: 

  • Low-quality paint job: $200 – $500
  • Standard paint job: $500 – $800
  • High-quality paint job: $800 – $1,000

Pros and Cons to Paint Your Car Hood 

Now that you have an idea about how much it costs to paint a car hood, whether it’s a DIY job or hiring a professional, it is always essential to weigh the pros and cons of everything so you can make an informed decision. 

The below tables will help you measure the outcomes and see which one outweighs the other as per your preference. 

Pros and Cons of DIY Car Hood Painting

ProsCons
Less expensiveMay not be able to achieve professional-quality results
More time-consumingRisk of making mistakes
Can customize the paint jobMay need to purchase specialized tools
Can accommodate your scheduleMay not have the expertise or experience to do the job correctly

Pros and Cons of Hiring a Professional to Paint Your Car Hood

ProsCons
Guaranteed quality resultsMore expensive
Less time-consumingIt can be challenging to find a trustworthy and skilled professional.
No need to purchase specialized toolsMay not be able to accommodate your schedule
Expertise and experienceRisk of damage to your car

Tips for Getting a Better Deal

Whether you’ve planned to do-it-yourself or pay your nearest body shop a visit, here are some tips to help you get the best out of your decision. 

DIY Tips for Painting a Car Hood:

  • Research and invest in quality paint products and equipment to achieve better results and durability.
  • Practice on a test surface before painting your car hood to refine your technique.
  • Properly clean and prepare the surface for the paint to ensure a smooth finish.
  • Follow online tutorials and guides to learn best practices for car painting.
  • Choose a suitable environment with minimal dust and debris for painting.

Tips for Getting a Car Hood Professionally Painted:

  • Get multiple quotes from reputable auto shops to compare prices and services.
  • Look for seasonal discounts or promotions offered by auto body shops.
  • Ask for referrals or read reviews to find a reliable and skilled painter.
  • Consider opting for a local shop instead of big chain establishments for potentially better deals.
  • Inquire about any additional services or packages that might offer better value for money.

FAQs

Can you repaint just the hood of the car?

Yes, you can repaint just the hood of a car. However, it is important to do the prep work properly so that the new paint will adhere properly.

Can you spray paint a car hood?

Yes, you can spray-paint a car hood. However, it is important to use high-quality paint and apply it in thin, even coats.

How much does it cost to paint a BMW hood?

Since BMW is a luxurious car, the cost to paint a BMW hood is heftier than ordinary car hood painting jobs. You can expect to pay anywhere between $1000 to $1500. 

Can you paint part of a car hood?

Yes, you can paint part of a car hood. However, it is important to mask off the surrounding areas so that the new paint does not get on them.

How much does Maaco charge to paint the hood?

Maaco is a body shop chain known for its lowest price. They can give you a quote anywhere between $200 to $1500 or above. However, I highly recommend reading the reviews of the nearest Maaco franchise, as they have mixed reviews.  

Wrap Up

To sum up, the cost of painting a car hood can vary depending on several factors, such as the paint type, the complexity of the job, and whether you choose to go the DIY route or hire a professional. While painting it yourself may save some bucks, remember that quality tools and products are crucial for a satisfactory outcome. On the other hand, enlisting a skilled professional ensures a polished finish but might come with a slightly heftier price tag. However, in general, you can expect to pay anywhere from $200 to $1,000. 

So, whether you’re a seasoned DIY enthusiast or seeking the expertise of a pro, take your time, do your research, and make the best choice for your car’s hood transformation. 

Have any questions or personal experiences to share? Drop your comments below – I’d love to hear from you.

Happy painting!

PS: here’s another article to learn about the cost of painting car rims, in case you need it! 🙂

Black Golden Elegant Happy Birthday Poster Facebook Post Landscape 940 × 521 px 5 How To Make Sage Green: Customize Colors Like A Pro

How To Make Sage Green: Customize Colors Like A Pro

Sage green resonates with feelings of tranquility, renewal, and progress. It makes you feel closer to nature and creates a sense of balance whether it’s used on a painter’s canvas or added to your home’s décor.

The only problem is that it isn’t a regular color you can find in your painting arsenal, and more than often, it needs to be created from scratch. So, how to make sage green color?

There are different ways to make sage green; the easiest one is mixing a dash of grey color with green. However, you will need to experiment with other color combinations, such as yellow/ blue and yellow/ blue/ red, to achieve a full array of sage hues.

Mixing colors in the right ratio is key to achieving the perfect shade of sage. I will tell you how to create a customized sage green color palette using your existing paints. So buckle up because I have several tricks up my sleeve that you’ll love.

Let’s begin with the basics!

What Is Sage Color Like?

Sage green color sits comfortably on the color wheel nestled between yellow and green, but it is predominantly a shade of green. Looking at it, you will find that sage is a gray-green hue that resembles dried sage leaves.

Since the color is connected to green, it symbolizes purity, calmness, freshness, and prosperity. It’s no wonder sage green has been hailed as a favorite in the home décor industry.

The calming visual properties of sage green combined with its timeless appeal means it can be incorporated creatively in traditional as well as contemporary spaces. So, if you want to spruce up your home or workplace interior, sage green is an excellent option to consider.

What colors make sage green?

If you’re wondering what two colors make sage green, the simple answer is green and grey. However, you should keep in mind that sage green has several shades that can be achieved by mixing other color combinations.

As sage is primarily green, you can also create it by mixing yellow and blue and tweaking the ratios to get the perfect sage color. If you’re satisfied with the initial dark sage green, you’re ready to start painting, but if you need to adjust its brightness, white paint is your best bet.

Mixing red with blue and yellow is another way to get sage color. But you should be careful adding red to the mix as it can quickly overpower the color.

Pro Tip: There are more than one ways to make sage green color, so don’t give up until you’ve given each of them a fair chance.

3 Ways To Make Sage Green Paint

If you want to create a customized sage green color palette, all you need are a few paints, a palette, and a mixing knife. Here, I will discuss three ways you can achieve the beautiful sage hue using the existing paints in your arsenal.

It’s time to mix things up!

Method 1

For this method, you’ll need four colors: blue, yellow, white, and black.

  • Mix one part blue with two parts yellow to make the color green.
  • Make a dark grey color with one part white and ½ part black. Remember that you can darken the color with just a dash of black but lightening it will require a lot of white paint, so add the black gradually.
  • Add a little grey color that you’ve made to some of the green on the palette.
  • Slowly mix the two colors to achieve the perfect hue and intensity.

Pro Tip: Work with primary colors to make the green shade, as it will allow you more control over the final result.

Method 2

This method only requires two colors: blue and yellow.

  • Mix one blue and two yellow parts to create the base for your sage green color.
  • Add more yellow to the mix to brighten up the color.
  • You can play around with different quantities of green and yellow to get the perfect shade of sage green you’re looking for.

Pro Tip: You can add white color to the paint mix if the color isn’t light enough for your preference.

Method 3

For this method, you need red, yellow, and blue.

  • Take two parts of yellow and mix it with one part of blue for a basic green color.
  • Separate a small amount of the green color you created on a clear side of the palette.
  • Add one part of red to the separated green color and mix until you get brownish-red paint.
  • Now, gradually add the brownish-red paint to the green color for the perfect shade of sage green.

Pro Tip: Do not add red directly to the green color, as too much of it can overpower the color mix leaving you no choice but to start over.

How do you darken sage green?

If you’re not happy with the sage green color and wish it was a little darker or more neutral-toned, don’t fret because the solution is pretty simple.

All you need to do is add some grey color to the sage green, and the shade will instantly darken and look more subdued. Just make sure to introduce grey gradually so it doesn’t ruin the color you’ve already created.

Pro Tip: Adding grey will darken sage green but dull its brightness and intensity.

How to make light sage green paint?

You can lighten sage green paint by adding white to the mix. However, it will also make the color appear more subtle and muted.

If you don’t want to compromise the color’s brightness, you can add a lighter shade of green to reduce the color’s intensity but still maintain its freshness.

How To Create Sage Green Digitally?

If you want to nail the exact sage green color in your digital designs, it’s important to know its color code and identification across various systems.

The Hex code of sage green is #B2AC88, and if you’re working in an RGB colorspace, the percentage representation of the color is 70% red, 67% green, and 53% blue.

For a print project, you will need percentages for CMYK colorspace- 0% cyan, 3% magenta, 24% yellow, and 30% black.

Here are a few popular shades of sage green that you can explore in your digital creations.

Shade NameHex codeRGBCMYK Color Code
Sage green#b2ac88178, 172, 1360, 30, 24, 30
Surf spray#aabfb8170, 191, 18411, 0, 4, 25
Desert sage#aaae9f170, 174, 1592, 0, 9, 32
Green lily#b5c6b4181, 198, 1809, 0, 9, 22
Laurel Green#acbaa1172, 186, 1618, 0, 13, 27
Sagebrush#51747081, 116, 11230, 0, 3, 55
Celadon Green#b2c1a2178, 193, 1628, 0, 16, 24
Silt Green#adc3b7173, 195, 18311, 0, 6, 24
Eucalyptus#9cab9e156, 171, 1589, 0, 8, 33

What is the best color combination for sage green?

The on-trend shade of sage green is having its moment in the spotlight as more and more homeowners are incorporating it into their living spaces. This muted color can transform your home into a peaceful haven for relaxation and attune your workplace to nature and equilibrium.

Since the color is inspired by nature, it works beautifully with natural and earthy materials and textures. It can be paired with different types of wood furniture and various materials like rattan and jute.

Here are my top 5 sage green color combinations.

Sage Green With Earthy Browns

Black Golden Elegant Happy Birthday Poster Facebook Post Landscape 940 × 521 px 5 How To Make Sage Green: Customize Colors Like A Pro

There is something about earthy browns that instantly soothes your nerves and makes you feel grounded, but when you combine its properties with sage green, all its effects are amplified.

This color combination is perfect for homes in bustling cities as it provides a grounding connection to nature. 

You could pair a sage green throw with an earthy brown or light ash neutral-toned bedspread to invite warmth into your bedroom. You could also add sage green accents to a kitchen with earthy brown cabinets.

Sage Green With Black

Black Golden Elegant Happy Birthday Poster Facebook Post Landscape 940 × 521 px 7 How To Make Sage Green: Customize Colors Like A Pro

Here’s a color combination that demands attention for all the right reasons!

Black is a neutral color that highlights any color you pair it with, and sage green and black make for a dynamic space. This powerful color combination looks indulgent, modern, and chic and can add personality to any room.

There are several ways to use sage green with black. You could design your study or workstation in the color combination to invite positive energy. Or design your living room using the two colors for a modern and fresh appeal.

Sage Green With White

Black Golden Elegant Happy Birthday Poster Facebook Post Landscape 940 × 521 px 6 How To Make Sage Green: Customize Colors Like A Pro

Not a fan of black for home interiors, but still want sage green to shine against a neutral backdrop? White walls are the answer you’re looking for!

White compliments sage green exceptionally and creates a fresh and calm ambiance in living spaces.

Whether you place sage green accent furniture against white walls or redo your kitchen with sage cabinets and white marble tops, the result will make you feel alive and happy!

Sage Green With Muted Orange

Sometimes, all you need is a pop of color to brighten up your space, and what better color to liven things up than warm shades of orange?

Muted orange compliments sage green very well and can be used to create some drama in an otherwise boring room. However, you shouldn’t go overboard with orange, or the sage green will lose its soothing effect in the chaos.

Instead, use warm shades of orange sparingly across the room. For example, you could add orange floor cushions against a sage green wall or place a tangerine throw on your sage green sofa.

Just remember, less is more when mixing up these two colors.

Sage Green With Dark Stone

Sage green fits right in with natural materials like hardwood floors, stone tile, butcher-block countertops, and other natural finishes.

Dark stone compliments the sage color and provides a feeling of freshness and groundedness. This color combination looks exceptional in kitchens, where dark stone can be used on counters, islands, and cabinetry, and sage green can be used on walls.

What I love about these two colors is that they can be used to create various kitchen styles, from rustic to more contemporary.

What acrylic colors make sage green?

If you need sage green acrylic paint for a project, mixing up different hues should be fun, allowing you to add depth and dimension to your painting.

Start by using sap green as the base and add zinc white, raw sienna, and ultramarine blue to the base color for sage green.

Initially, sap green was derived from buckthorn berries; since the color was organic, it wasn’t permanent enough. However, you don’t need to worry about that anymore, as sap green is now made using modern pigments that deliver lasting results.

Add a heading How To Make Sage Green: Customize Colors Like A Pro

Quick Guide For Making Sage Green With Acrylic Paint

  • Place pea-sized amount of sap green, zinc white, raw sienna, and ultramarine blue on your palette.
  • Using a palette knife, place half of the zinc white on a separate end of the palette.
  • Mix a quarter of the sap green into the separated zinc white.
  • Carefully add just a dash of raw sienna to this mix and combine the three colors until you achieve a uniform shade.
  • Match the sage green to the color of your preference and make small adjustments until you’re happy with the results.
  • If you want to intensify the hue, add a little more saps green.
  • If you want to subdue the sage green and make it more earthy, add another dash of raw sienna.
  • Suppose the color is too dark; you can lighten it up with some zinc white.
  • If you prefer a cooler shade of sage green, add a little aquamarine blue to change the tone of the color.

Pro Tip: It can be tricky to add very small quantities of paint, so the best way to get the littlest possible amount is to dip your palette knife in a blob of paint and pull it out upright. The color you have sticking to your palette knife should be enough to do the trick.

FAQS

How do you make sage green food coloring?

Suppose you want sage green frosting for your forest-themed cake; you can make the color easily with food coloring. Add 6 drops of yellow and 2 drops of blue food coloring to the frosting to make a base color. Then add one small drop of brown to achieve the perfect shade of sage green.

How to mix sage green oil paint?

Mixing colors with oil paints is easier since it remains wet for longer. Simply mix two parts of yellow oil paint with one part of blue to get a base color. You can then experiment with red, yellow, and grey colors to get your preferred sage green shade.

How to make green with paint?

Green can be made using the primary colors yellow and blue, and you can tweak the amount of the two in your mix to achieve different shades of green.

Conclusion

Sage green is a unique color that symbolizes years of wisdom and the Universe’s truth. Using it for your home’s interior can evoke feelings of satisfaction and balance, something we all need at the end of a busy day.

Sage green also enhances the aesthetic appeal of your artwork when used creatively, so don’t be shy to grab some colors and start mixing them up to create a personalized sage green palette.

pexels cottonbro studio 5599645 How Long Does Chalk Paint Take To Dry - Things You Must Know

How Long Does Chalk Paint Take To Dry – Things You Must Know

I didn’t know chalk paints existed until my neighbour told me about them. They had recently painted their house, which was a sight to watch. I couldn’t resist trying out this incredibly vibrant chalk paint look, and thus I pulled out my car and headed to the store to buy some chalk paint.

Chalk paint will take about 15 minutes to dry but makes you wait an entire day; that is, 24 hours in between, you can apply a second coat or top it up with wax.  

My money went down the drain. I ruined how my walls previously looked. It took a couple of weeks to fix the mess I had created, but all I wished for was that if I had known how long to wait between coats, the picture would’ve been much better.

How long does chalk paint take to dry?

Chalk paint is one of the fastest-drying wall paints. It dries to touch within 15 minutes of application and takes about a day to cure fully. The rule is to wait 24 hours before applying the next coat. 

However, numerous other factors can make chalk paint dry faster or slower than average. The thickness of your paint coat also affects the time it will require to dry completely. A thick layer dries slower, while a thin layer dries faster. Moreover, humidity levels, temperature, and exposure to sunlight can also affect the drying time of your paint. 

Does chalk paint dry darker or lighter?

Paints dry the same color they are presented in the sample. They may appear darker in the shade due to the wetness of the paint, but once they have completely dried, they will match the original shade.

Chalk paints appear to dry lighter because they are matte finish type. Such paints are non-reflective and absorb most of the light, making them appear dull. Chalk paints, exterior paints, and eggshell paints are some types of paints that become lighter on drying. 

How to Use Chalk Paint correctly – Things to know

Before you get your hands on the expensive chalk paints, here are a few things you need to know. We don’t want your money going down the drain and your happy DIY family painting day turning into a bad one.

  • Wipe down the dust off the surface with a damp cloth
  • Sand out slippery or laminate surfaces to ensure adequate adhesion
  • Dry the paint appropriately before the second coat or the wax top coat.
  • Wax your paint for longevity and protection.

Waxing Chalk Paint

As the name suggests, chalk paints leave a dry texture. If that seems boring, you can apply wax as a top coat, which you will find at the same store you purchased your chalk paint. This buttery consistency wax will not only add shine but also protect the paint from daily wear and tear. Moreover, a waxed surface can easily be cleaned compared to bare chalk paint.

Chalk paints on different surfaces

Just like all paints, chalk paints behave differently on different surfaces. However, the best part is that they do not require special prepping. Chalk paints can be applied directly to any surface.

Circle Infographic Diagram SWOT Analysis How Long Does Chalk Paint Take To Dry - Things You Must Know
Metal 24 HoursChalk paint can easily be applied on metallic surfaces. It will dry out in about an hour, but make sure you let it sit for a long time to adhere to the surface completely. A metallic surface requires a minimum of 2 paint coats. If you don’t know how long chalk paint should dry before applying polycrylic, let me tell you, the final coat must also sit for another 24 hours.
Wood1-3 HoursWooden surfaces absorb more paint if they aren’t prepped and primed. It is natural to wonder how long chalk paint takes to dry on wood. It takes about 1 – 3 hours, depending on how much paint the wood has absorbed. Painting furniture with chalk paint can create an outstanding finish if you remember to follow the rule of 24 hours gap between coats.
Concrete 15 – 20 MinutesWalls are usually made up of concrete. Chalk paint dries within 15 minutes after a coat is applied to the concrete. No special prepping or expensive primers are needed. Chalk paints can work equally efficiently on their own.
Glass24 HoursLike metal, concrete, and wood, chalk paints are used over glass, too. Glass is a smooth and slippery surface; many wonder whether you sand between coats of chalk paint or before you begin applying the first quote. Since paint from glass chips off quicker, sanding makes it last longer, and thus we recommend you do so.

Frequently Asked Questions

How long does chalk paint take to dry completely?

Chalk paint dries quickly after application. It takes about 15 minutes for the chalk paint to dry. However, you must wait 24 hours between painting the second coat to ensure that the paint has properly adhered to the surface and the moisture has evaporated. 

How many coats of chalk paint are needed?

Ideally, you need two coats of chalk paint to achieve your desired color. However, painting a light color such as white or off-white over dark surfaces may ask for a third coat of paint.

Do you need to seal after chalk paint?

Yes! It would be best to seal the chalk paint, so it is not exposed to the natural distressing and regular wear and tear. Chalk paints are vulnerable and require a seal, usually a protective top coat of wax, to make them last a while.

Final Words

Irrespective of the paint you use to give your house a personal artistic touch, patience serves as the most important key. Especially when it comes to chalk paints, waiting the entire day is worth it. Do not repeat the mistakes I made. Make sure you know how long chalk paint takes to dry between coats and how long chalk paint should dry before applying wax.

If you’re a beginner looking for a guide to painting, check out my blog on if chalk paint be used on outside furniture or the best temperature and humidity for painting your interior and the best time of the year to paint. Happy painting!

is chalk paint waterproof

Is Chalk Paint Waterproof- 5 Affordable Ways To Make It Last

Chalk paint is a favorite among DIYers thanks to its thick consistency that covers surface imperfections like a dream. Another significant benefit of chalk paint is that it can be applied to any surface without multi-step preparations.

While it is perfect for the quick transformation of household objects, a question that troubles many homeowners is whether chalk paint is waterproof.

The short answer is No! Chalk paint is water-resistant but not waterproof. For this reason, the paint finish is not recommended for outdoor projects that must endure plenty of rain and snow. However, there are ways to seal chalk paint for maximum durability.

I love chalk paint because it can be painted over most clean and dry surfaces without prep work. Since the formula is water-based, it’s easy to clean paint brushes and equipment once I am finished. 

But I also want my hard work to last, so I always go the extra mile to make the chalk paint finish waterproof. You can also use any of the methods mentioned below to increase the durability of your paint job.

Is Chalk Paint Waterproof?

Chalk paint isn’t waterproof, but that doesn’t mean it will simply wash off whenever it comes into contact with water.

You see, there’s a difference between water-resistant and waterproof. That’s why your laptop keeps working if you accidentally splash water on it but shuts down entirely after being immersed in the same water for a long time.

In the same way, when you apply chalk paint to a surface, it doesn’t come off with occasional water spills and splashes. But, if the object is submerged in water, the moisture seeps into the paint’s texture and forces it to chip and peel.

Hence, chalk paint is water-resistant on its own but not waterproof.

Luckily, various sealants are available in the market that help in waterproofing your chalk paint.

How do you make chalk paint waterproof?

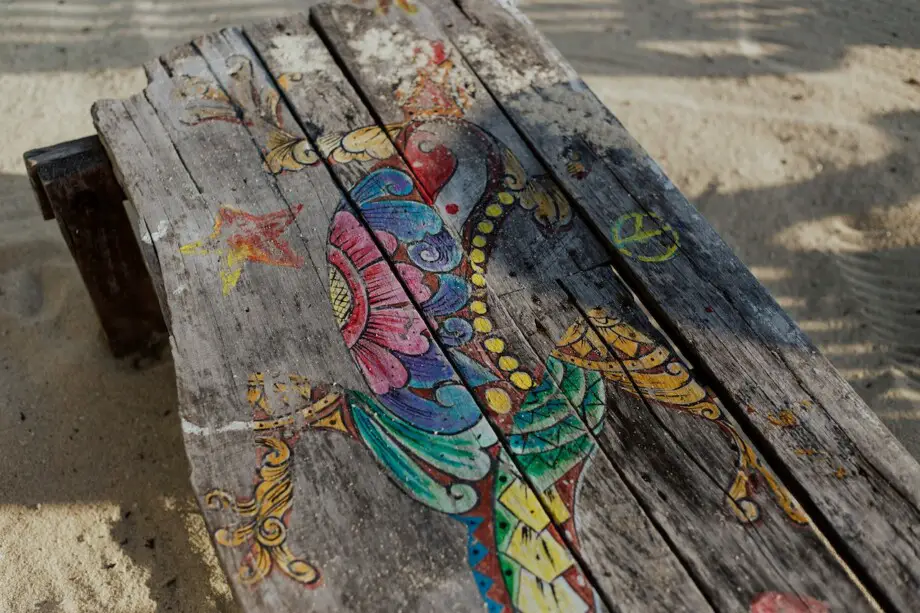
Chalk paint is an excellent option if you prefer a matte look on different surfaces. 

Originally, chalk paint was used to color furniture, but now people use it on various surfaces, including walls, doors, fences, etc. The only downside is that the paint could be more durable when it comes to resisting water.

Fortunately, different sealers can make your chalk paint finish waterproof when used as a top coat. Here are my top picks:

1. Acrylic Paint Coating

When using chalk paint outdoors, it’s necessary to protect it from moisture and other environmental stressors. Acrylic paint is one of the best coatings you can apply to your chalk paint finish.

The highlight of applying an acrylic top coat is that it can be used on various surfaces, such as concrete, leather, wood, metal, fabric, and canvas. If you are interested in learning more about painting fabrics, you can check my blog for some insights.

A transparent acrylic coat keeps water away from the chalk paint finish, making it more durable than when it’s on its own. This way, you can give your outdoor furniture a new matte look without compromising its life span.

The Aleene’s Spray Acrylic Sealer is a perfect option if you want to apply an acrylic top coat. It is available in three finishes: Gloss, matte, and pearlescent, so you are free to choose whichever suits your taste best.

It is a spray-on formula; therefore, it is effortless to use and perfect for covering large surfaces. Once it dries down, the acrylic sealer provides a clear protective finish that is waterproof, precisely what you want for your outdoor furniture.

2. Lacquer Paint Coating

Applying a lacquer coat on top of your chalk paint surfaces is another effective method for making it more resistant to water damage.

Some people believe that lacquer and acrylic coating is the same, but the two vary significantly in composition. Lacquer paints are solvent-based, while acrylic paints are water-based.

Since pigments are carried in a solvent base, lacquer paints are more toxic than acrylic paints. However, if you plan on using the top coat on outdoor furniture, its toxicity should not be a problem.

Regardless, you should remember that lacquer is water-resistant, not waterproof. So, if you immerse the painted object in water, it may not hold up.

A good option is the Krylon Lacquer Spray, a fast-drying formula that protects surfaces from moisture. The lacquer dries down to an ultra-hard finish, which helps improve the paint job’s longevity.

The Krylon Lacquer spray delivers a factory-like high-gloss finish, but if you prefer something more matte, you can check out the Minwax Lacquer Spray. This one has a satin finish that doesn’t require sanding between coats. The Minwax lacquer is ideal for interior wood surfaces but can also waterproof outdoor surfaces.

Expert Advice: The inventor of chalk paint, Annie Sloan, also recommends covering painted surfaces with a lacquer coating, primarily when used outdoors.

3. Wax Coating

Wax coating is another quick way of making your chalk paint surfaces waterproof. Most chalk paint manufacturers, including Annie Sloan, produce wax that can seal the chalk finish for improved durability.

The wax coating works similarly to acrylic or lacquer coating, creating a film over the chalk paint that prevents water from passing through it.

However, the wax coating doesn’t deliver the same strength as the previous two since its formula isn’t designed to withstand extreme temperatures and rain.

Wax coating is best suited to indoor furniture that requires an extra layer of protection from accidental or constant water exposure. For example, dining tables and kitchen stools.

Pro Tip: If you cover outdoor painted surfaces with wax, be prepared to watch it melt off in excessive heat.

4. Varnish Coating

Varnish is generally used on wood surfaces to protect them from moisture. In the same way, it can be used on objects colored with chalk paint. 

Varnish effectively makes any surface waterproof and extends the object’s life by 3 to 5 years. Since varnish dries slowly, using it may seem intimidating to some. However, if you clean up the surrounding areas thoroughly before starting, there will be fewer chances of dust and lose debris sticking to the surface.

Pro Tip: You should use varnish on outdoor horizontal objects where you suspect water to sit on the surface.

5. Polyurethane

Polyurethane sealant is also used to protect chalk-painted surfaces from water. However, this method isn’t as effective as the others, so I have placed it at the end.

Although several people have reported that polyurethane coatings make their painted surfaces more resistant to environmental stressors. Since chalk paints already have water-resistant properties, there isn’t enough evidence to support whether the polyurethane sealant offers waterproof protection.

If you decide to go down this road, the Rust-Oleum Specialty Polyurethane Spray is a quick way to seal and protect interior surfaces. The spray can be used on painted surfaces, wood, and metal but is only suitable for indoor use. Thus, use an acrylic coating if you want better protection for your outdoor surfaces.

Will Chalk Paint Wash Off in the Rain?

Chalk paint is water-resistant, so it will not wash off in the rain. However, if the rainwater stays on top of the painted surface long enough, it may seep into the paint finish and cause damage.

Owing to chalk paint’s water-resistant qualities, you don’t require a sealer for vertical surfaces. That is because when you color vertical surfaces with chalk paint, water will not be able to sink into the paint finish and simply slide off.

Hence, the painted finish will not be affected by water.

On the flip side, painting horizontal surfaces with chalk paint increase the likelihood of water sinking into the finish. Therefore, it is recommended to apply a top coat to seal the paint and increase its life.

If you plan on using chalk paint for outdoor furniture or other surfaces, use an acrylic sealer or similar coating to protect it from environmental stressors.

You can learn more about which paint types are waterproof in this blog to decide the best one for outdoor use.

Will Chalk Paint Last Outdoors?

The question, ‘Is chalk paint durable enough to be used outdoors? is one I have been asked many times.

The short answer is yes, but the weather conditions where you live make a significant difference in the durability of your paint job.

If you live somewhere, that stays dry for the most part of the year with occasional showers, your chalk-painted furniture will last a long time. But if you experience heavy rain and snow in your area, the painted surfaces may show signs of wear and tear much earlier.

Make sure to check out the detailed blog on “Can chalk paint be used on outside furniture?”

Is Chalk Paint Washable?

Chalk paint isn’t washable. Here’s why:

As a rule of thumb, paints with a glossier finish can be cleaned more easily than matte finishes. And chalk paint is classified as a matte finish since it has almost no sheen in its formula. In fact, its chalky appearance actually makes it popular among homeowners.

However, chalk-painted surfaces can be cleaned gently from time to time. But if you overdo the washing part, you will notice signs of degradation, such as the paint fading and peeling quickly.

Fortunately, a way to make your chalk-painted surfaces washable is to coat them with wax!

If the paint’s washability is vital for your project’s success, read this blog to find out which paint finish is easily washable.

How to Determine If Chalk Paint is Waterproof?

Chalk paint isn’t waterproof on its own, but adding a sealer can significantly improve its water resistance. If you want to assess the strength of your paint’s finish against moisture, you can conduct this simple test.

  • Pour a small amount of water on the chalk-painted surface (with or without sealer).
  • Wait for a few minutes.
  • The finish isn’t waterproof if you observe the water sinking into the top coat.
  • The finish is waterproof if the water stays on top of the surface without changing its color or penetrating the finish.

FAQs

Is chalk paint permanent?

Chalk paint is permanent and can easily last on a surface for several years. However, you can increase its durability by adding a sealer on top of the finish for extra protection. 

Is chalk paint toxic?

Chalk paint is not toxic and doesn’t emit any harmful fumes. For this reason, you can use it on both indoor and outdoor objects without worrying about the paint’s adverse effects on your family’s health.

Does chalk paint come off with water?

Chalk paint doesn’t come off with flowing water. However, if the water remains on the surface for too long, it will eventually sink into the paint finish and cause it to chip and peel. The best way to avoid this situation is to cover the chalk paint finish with a top coat such as acrylic sealer or varnish.

Is Rustoleum chalk paint waterproof?

Rust-Oleum chalk paint is water-resistant but not waterproof like most chalk paints from leading manufacturers. Regardless, you can improve the durability of your paint finish by sealing it with a waterproof top coat like Rust-Oleum LeakSeal Flexible Rubber Coating Spray or the Rust-Oleum Universal All Surface Clear Topcoat Spray.

How many coats of wax do you need on top of chalk paint?

You must apply two to three layers of wax on top of chalk paint for maximum protection. Layering an inadequate amount of wax will result in a thin top layer that cannot completely resist water damage.

Conclusion

Chalk paint delivers a clean and soft look to any surface it’s applied to. Because the paint finish differs from its traditional counterparts, many DIYers prefer chalk paint for indoor and outdoor projects.

The only downside is that the paint isn’t waterproof and can lose its color when exposed to excessive rain. However, different sealers can help make chalk paint waterproof and protect it from water, moisture, scratches, and other damage.

Hence, if you want to use chalk paint on outdoor surfaces, applying a waterproof top coat is best to improve its durability.

outdoor furniture

Can Chalk Paint Be Used On Outside Furniture – Will It Last?

Outdoor furniture gets to witness its fair share of wear and tear thanks to the relentlessly bright sun in the summer, and icy cold gushes in the winter. And when you add heavy rainfall to this equation, you are left with furniture pieces that look a far cry from when they were freshly painted.

Fortunately, DIYers have several paint options to renew shabby-looking furniture, and chalk paint is a popular choice among them. It doesn’t require prep work and can be applied directly to any surface, making many wonder, ‘Can chalk paint be used on outside furniture?’

The answer is: Yes! Chalk paint is suitable for outdoor furniture, whether wood, plastic, or metal. You only need to remember to add a sealer on top of the final paint layer to make it weather-resistant and durable.

Chalk paint delivers a unique texture that’s aesthetically pleasing, but if it’s not applied and sealed correctly, the paint finish can deteriorate quickly over time. I will discuss how you can achieve lasting results with chalk paint and make your outdoor furniture as good as new.

Can You Use Chalk Paint On Outdoor Furniture?

Chalk paint is an excellent choice for painting furniture because of the clean and modern finish it delivers. But the paint is water-resistant and not waterproof; therefore, you must be careful about where and how to use it.

Generally, indoor furniture is exposed to occasional spills and water splashes from time to time. For this reason, waterproof paint isn’t really a priority when selecting a suitable paint for the job.

However, it’s not the same with furniture pieces that remain outdoors. Here you need a paint formula that dries to a waterproof finish and keeps your outdoor furniture safe from rain, snow, wind, and the sun.

Chalk paint has water-resistant qualities, so it will not wash off when it comes into contact with water. But if you want to use it on outdoor furniture, applying a sealer on top is a must. You can read more about ‘Is chalk paint waterproof’ to figure out where to use it outdoors.

Expert Advice: Chalk paint is best suited to small furniture pieces, so avoid using it on large surfaces like the outdoor patio or gazebo.

How To Apply Chalk Paint To Outdoor Furniture

Chalk paint is a favorite among DIYers because it requires practically no prep work or primer. Since it can be applied directly to the object you want to paint, that significantly reduces the time it takes to complete the paint job.

That being said, I prefer to do some prep work before applying chalk paint to my furniture. That is because a little TLC makes the final result look crisp and smooth and makes the color vibrancy last longer.

Here is my take on using chalk paint on outdoor surfaces.

Step 1- Clean the Surface

It’s crucial to start your paint application with a clean surface. This helps ensure the paint goes on smoothly, without any dust or debris getting stuck underneath its layer. Also, I prefer to remove the previous color from the furniture to avoid problems of flaking paint.

For this step, the pressure washer can be your ultimate friend. It not only removes the dust off the furniture quickly and thoroughly but also partially removes the previous color stain.

After cleaning with a pressure cleaner, you can finish with a professional heavy-duty cleaner used prior to painting any surface.

Don’t try to save time on this step because any grime or dirt left behind is sure to find its way back up, resulting in peeling paint on those spots.

Step 2- Apply the Chalk Paint

Make sure to give your paint a good shake before you begin in case you’re using a spray can. Apply one thin layer of chalk paint to the object and wait for it to dry.

As the paint dries down, you will notice cracks and other imperfections in the surface becoming more pronounced. Now is a good time to repair and fill these gaps with a wood filler.

Allow the filler some time to dry before sanding the surface for a smooth finish. Now, apply two more thin layers of chalk paint to complete this step. Remember to give each coat ample time to dry.

Step 3- Seal the Deal with a Top Coat

This is crucial, especially when getting your furniture ready for outdoor use.

After your final chalk paint layer has dried, apply one to two layers of top coat to protect and seal it. This will help make the surface waterproof and withstand rain, snow, and other environmental pressures.

Also make sure that you check out our blog on “Is chalk paint waterproof?” to get a clear answer to this question that might have popped up in your mind.

Best Chalk Paint for Outdoor Furniture

Everyone loves the farmhouse-chic appeal of chalk paint, and when you combine that with quick-drying properties, we have a winner! However several chalk paint options are available in the market, but only some deliver good results.

To save you the trouble of searching for the best chalk paint for outdoor furniture, here are my top picks for the job:

Rust-Oleum Ultra Matte Chalked Paint

71VyDC+4lpL. AC SY300 SX300 Can Chalk Paint Be Used On Outside Furniture - Will It Last?

The Rust-Oleum chalk paint is a highly versatile option that covers various surfaces like wood, metal, canvas, ceramic, etc. It is perfect for a quick touch-up since it dries in just 30 minutes, but if you want a more professional finish, I’d recommend you wait up to 2 hours before applying another coat.

The paint is effortless to apply and dries down to a contemporary, ultra-matte finish with rustic aesthetics. Another thing I love about the Rust-Oleum Chalk Paint is the exciting variety of colors available, for example, blush pink, coastal blue, serenity blue, etc.

It also comes as a matte clear top coat which is ideal for waterproofing your outdoor furniture.

KILZ Chalk Style Paint

Can Chalk Paint Be Used On Outside Furniture - Will It Last?

Here is another great option for chalk paint. The KILZ Chalk Paint is perfect for renovating and upcycling your outdoor furniture. It can be used on different surfaces like wood, cast stone, glass, wicker, metal, concrete, etc. Because of its versatility, you can use it on different objects to create a customized look.

The KILZ Chalky Paint is available in 13 colors, so you have plenty of options. Whether you’re looking for a subtle and neutral shade or a bright, eccentric hue, you’re sure to find something that tickles your fancy.

Krylon Chalky Finish Spray Paint

51GkTbWT5 L. AC SX300 SY300 QL70 FMwebp Can Chalk Paint Be Used On Outside Furniture - Will It Last?

Krylon is a name you can trust when it comes to excellent color payoff and durability. The Krylon chalk paint is flexible enough to be used on wicker, plastic, vinyl, metal, and other surfaces. Since it is available in aerosol form, it can be sprayed onto furniture quickly and with minimum fuss.

Apart from several practical colors, it is also available in ‘Wax coating,’ which can be used to seal the chalk paint and increase its life.

Chalk paint is a popular choice among homeowners but whether or not it’s an ideal choice for outdoor furniture is debatable.

Here is a breakdown of the advantages and disadvantages of using chalk paint outdoors.

ProsCons
No preparation requiredPricier than other paint finishes
No primer neededToo many visible brush strokes
Less time consumingUsing a sealer on top is necessary
Easy to clean up
Quick drying

Advantages of Applying Chalk Paint

1.      No prep work Required

In most cases, prepping your surface is necessary for a good finish. From cleaning the furniture to removing the old paint, sanding, and repairing gaps, you need to spend considerable time getting your surface ready for paint.

However, chalk paint is more forgiving when it comes to application. This is the reason why you can skip the prep work but still achieve a decent finish.

2.      No need for a primer.

While topping off the chalk paint finish with a clear coat is essential, there’s no need to apply primer to the surface before you begin. This helps cut down your painting time that would otherwise be spent on primer application. Another benefit of skipping primer is that your paint job’s total budget decreases as you no longer need to purchase the primer.

3.      Perfect for quick paint jobs

Since there’s no prep work required for chalk paint application, you can start and complete a project on short notice without compromising on its quality. Whether you have to repaint your outdoor furniture on short notice or need just a few quick touch-ups, chalk paint is an excellent option that delivers quick results.

Another perk of chalk paint is its quick drying time compared to other paint finishes. Although the actual drying time can vary based on humidity, the application process, etc., most people vouch that chalk paint doesn’t take too long to dry.

4.      Easy Clean-up

If you’re new to painting furniture, chalk paint is perfect because it is extremely easy to clean. From accidental spills to washing paint brushes, the clean-up is quick and effortless. Also, as a beginner, you have a high chance of getting paint on your hair and clothes, but not to worry because we have you covered! Here is a useful article about removing paint from skin and hair.

Disadvantages of Applying Chalk Paint

1.      More Expensive

Chalk paints are comparatively more expensive than latex paints. This can be a problem if you’re on a tight budget or have several pieces of furniture to color simultaneously.

2.      Too many brush marks

A common problem that many DIYers have observed is that it’s not easy to get a smooth finish with chalk paint. Since the paint dries to an ultra-matte finish, brush marks appear more prominent than in other paint finishes.

A quick way to tackle this issue is using a sprayer or aerosol chalk paint.

3.      You Cannot Skip the Sealer

Sealing the deal is a crucial step that decides the success of your paint job. When you’re painting furniture for outdoors, you cannot skip the sealer application, or else the paint will weather away quickly. This added cost can be avoided if you use a two-in-one paint.

How to Seal Chalk Paint for Outdoor Use?

Sealing the chalk paint finish is necessary if you want to protect it from moisture. Although the paint’s formula has water-resistant properties, it’s not enough for the exposure it will get outdoors. This is why it’s best to apply a sealer after the final layer of chalk paint has dried down completely.

Depending on the surface you’re applying the sealer to, here are a few solid options you can try:

  • Wax
  • Lacquer
  • Polyurethane
  • Varnish
  • Wood glaze

Remember that the final chalk paint layer should be fully cured before you apply the sealer. If you seal the paint too quickly and the solvent hasn’t fully evaporated from the surface, it will get trapped between the two layers.

The solvent will prevent both finishes from drying, leaving behind a sticky paint film.

FAQs

Can I use chalk paint on exterior door?

Yes, you can color your exterior door with chalk paint as long as you apply a layer of sealer on top to protect it from rain.

Can Rust-Oleum chalk paint be used outside?

Rust-Oleum chalk paint can be used outdoors on surfaces such as wood, ceramic, wicker, metal, etc. The paint’s formula has water-resistant properties, which makes it a good choice for furniture. However, it’s best to add another protective layer of sealer to make the finish waterproof for the outdoors.

Can chalk paint be used on metal?

Chalk paint has a highly versatile formula that can be applied to various surfaces, including metal. Remember to clean any rust from the metal before you layer on the paint for the best results.

Is chalk paint permanent?

Chalk paint is permanent on any surface, from wood and metal to wicker. So, if you get any paint on your rugs or floor by accident, you should try to clean it with soap and water while it is still wet.

Conclusion

Chalk paint is an exciting alternative to regular semi-gloss paint that’s usually used to color furniture. It has an aesthetically pleasing texture that instantly gives your home a modern look. But if you’re concerned about the durability of chalk paint, you can expect it to last for 3 to 5 years when sealed correctly.

So the next time you want to color your outdoor furniture, don’t hesitate to reach out for chalk paint in the paint store.

pexels kindel media 8325716 Thinner Vs. Turpentine - Knowledge of the Basic Differences

Thinner Vs. Turpentine – Knowledge of the Basic Differences

Have you believed that thinner and turpentine are the same for all these years of your life? Well, the same was the case with me until I started painting. I felt like a kindergarten kid finding out that thinner and turpentine are similar but not the same. 

The main difference between thinner and turpentine is that thinner, as the name suggests, is a thinning agent for oil-based liquids. Moreover, it can also be used as a cleaning agent over paint. At the same time, turpentine is an essential oil extracted from pine wood that acts as a solvent for paints and a thinning agent for dyes.

Before you begin painting, you must know your liquids and solvents. Sometimes, deciding what to mix with paint becomes the hardest decision of your life. Therefore, to avoid confusion when you’re all set to begin painting, find the differences between thinner and turpentine and their advantages and disadvantages with me.

Difference between Thinner and Turpentine

ThinnerTurpentine
Used as a thinning agent for liquidsUsed as a solvent for oil-based paints
Made from petroleumMade from pine trees
Synthetic productNatural Product
No significant effect on paint drying timeHelps paints dry quicker
Bearable odorVery strong smell
Has higher toxic compoundsEco-friendly additives
Comparatively cheaperHeavy on the pocket

Thinner and turpentine are widely used for mixing with paints before application on the walls. However, each of them has its advantages and disadvantages. Let’s dig deeper into how suitable thinner and turpentine are and what are the limitations of their usage.

THINNER – advantages and disadvantages

Advantages
Readily available, anyone can purchase
It is a highly volatile and potent compound  
A fair evaporation rate
It works great on wooden, metallic, and concrete surfaces
Mainly, it is used as a cleaning agent
It dissolves well in oil-based paints and eases its application
It also helps remove paint stains
Disadvantages
Synthetic additive
More expensive than other artificial thinning solutions like mineral spirits
Be careful when using it, as thinner is a highly addictive and toxic compound
People misuse it as many feel relaxed when they inhale the vapor of thinner
Inhaling can cause severe damage to the central nervous system
It doesn’t work on rubber and plastic surfaces and can make it rough and lose its shine

Turpentine – Advantages and disadvantages

Advantages
A natural pine resin derivative and a safe compound to use
An excellent solvent for paints
Exceptional cleaner of all types of paints
Often used in the cosmetics industry
It improves paint consistency to make it more spreadable
Its high evaporation rate allows the paint to dry faster, speeding up the painting process
Cleans fresh paint stains and also the old and hardened stains
It can be effectively used as furniture polish
An eco-friendly compound that is less toxic and is free from petroleum distillates which cause pollution
Disadvantages
It has a very strong smell that causes headaches, dizziness, nausea, and vomiting
Avoid getting eye-contact with turpentine as it can causes severe irritation, medical assistance maybe required
If swallowed, immediately get medical help as it can lead to kidney infections and adversely affect the bladder
It is a poisonous compound and can higher concentrations can lead to death
One should handle it with proper safety measures and SOPs and avoid inhaling, ingesting or injecting it

Thinner or Turpentine – Which one is better? 

Turpentine is derived from a natural source that is the pine trees. This makes turpentine less toxic than thinner. In addition, it improves the spreading ability of paint. Thus, paint mixed with turpentine gives a classic finish. Moreover, turpentine has proven to be more effective in cleaning and removing tough stains. Finally, turpentine is cheaper than thinner, making it easy for your pocket. 

However, turpentine has a powerful smell that few people can bear. If that sits well with your nose, using turpentine as a paint-thinning agent is a great decision.

Alternatives to Thinner and Turpentine

Both turpentine and thinner are available at any departmental store. However, for various reasons, some people may prefer using something other than these agents to mix with their paints. For example, some may not be comfortable with the prices or would strictly want to avoid these chemicals’ toxicity. In that case, some alternatives for turpentine are linseed oil, gamsol oil, samsodor, lavender spike oil, safflower oil, stand oil, poppy seed oil, and walnut oil.

Frequently Asked Questions 

What is turpentine commonly known as in America? 

In America, Turpentine is commonly known as turps. Other names for turpentine are oil of turps, gum thus, gum spirits, gum turpentine, wood turpentine, rectified turpentine oil, sulfate wood turpentine, and sulfate turpentine.

Can you use Kerosene instead of turpentine? 

Kerosene can be an alternative to Turpentine as Kerosene and Turpentine have similar properties, and both can thin out oil-based paints. However, since turpentine originated from pine tree oil and Kerosene is petroleum that comes from crude oil, there will be a difference in their smells. 

Can I use Acetone instead of Turpentine? 

Yes! Acetone can be used instead of turpentine as a solvent for oil-based paints and as a thinner and a cleaning and stain removal agent too.

Can I use turpentine for latex-based paints? 

Latex paints are water-based paints. This is because oil doesn’t mix with water. Since turpentine is oil from pine trees, it can only work as a solvent or thinner for oil-based paints. Thus turpentine cannot be used for latex-based paints. For latex-based paints, you should only use water.

How much thinner should you use with paint?

You can mix thinner with the paint, keeping the paint to a thinner ratio of 4:1 or 3:1. You can always add a smaller quantity of thinner, check the consistency, and then decide whether you need more. However, while mixing thinner with paint, ensure that the paint quantity is always higher. 

Final Thoughts

Turpentine and thinner are both used to regulate the consistency of paint. Neither of them should be used with latex-based or water-based paints. Since turpentine is a more natural compound and low in toxicity, it is mainly preferred over a thinner one. However, turpentine is costly. If you can afford the price and bear the power smell it gives off, turpentine should be your mixing agent. However, thinner does its job effectively too.

If you are interested in which one to use for getting rid of paint from your hands, nails and face, you can read a detailed blog on our website.