Meet Raheela, your friendly neighborhood content wizard, armed with over four years of experience in the realm of writing. An enthusiast of all things tech, lifestyle, chemistry, dyes, paints, spray paints, interior design, and exterior design, Raheela crafts articles that are both informative and engaging. Dive into the world of knowledge and creativity with Raheela's articles, where every piece is thoughtfully curated to bring you insights and a dash of inspiration.
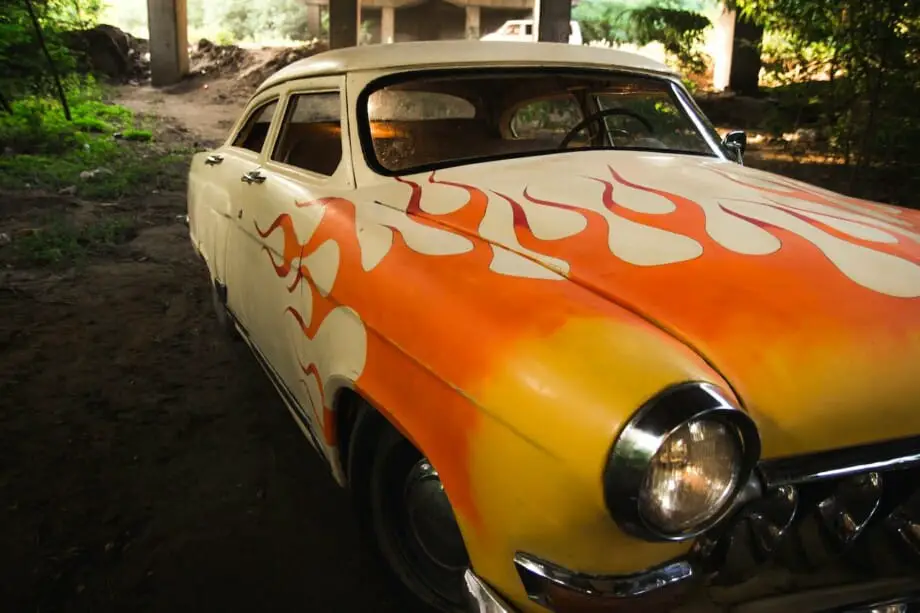
Whether your car shows too many signs of wear and tear or you want to change its look with a brand new color, spray painting your car is the perfect way to upgrade your vehicle. However, without proper planning and prep work, you can end up with a DIY disaster.
You can spray paint your car and get good results if you follow the correct process. Start by washing your car and sanding the surface to achieve a smooth base for your car paint. Next, cover the areas you don’t want to paint with painter’s tape and apply a primer. Finally, use the color coat to complete the look.
A good paint job can add a new lease on your car’s life. Just be sure to prepare your base properly for maximum paint adhesion and a flawless finish.
Can You Paint Over Existing Paint?
Yes, you can paint over existing paint, but the results will not be as good as expected. Suppose your car’s existing color is red, and you want to paint it steel gray. If you don’t sand the existing paint properly before spraying on the new color, chances are that some of the red color will peek through.
However, if you sand and prime the car’s surface correctly before spraying a new color, you will get an even coverage. This is especially helpful when changing the color from a darker to a lighter hue.
How To Paint a Car From Start To Finish
Painting a car from scratch can seem daunting, but if you know all the steps in the process, you should be able to get the job done nicely.
Step 1- Wash your Car
Starting with a clean surface always makes sense. You can wash the car by hand or take it to the car wash to make it squeaky clean.
Step 2- Dismantle Components
It would save you a lot of work if you dismantled the components you don’t want to paint. Remove parts like the lamp, antenna, washing nozzle, hubcap, side rod, wiper, door handle, etc. Another benefit of doing this is that you can identify any defective components and change them after you’ve painted the car.
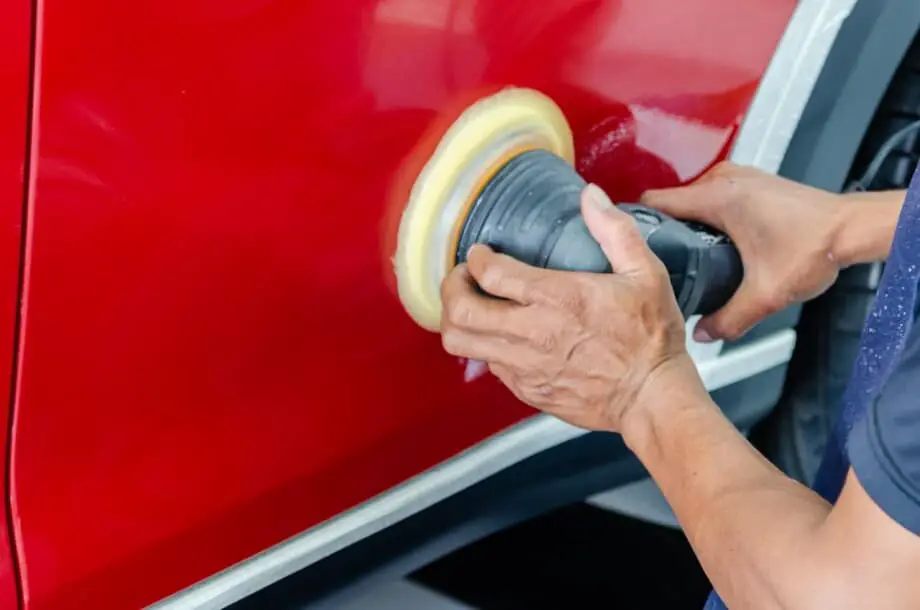
Step 3- Start Sanding
Use 600-grit sandpaper to sand away the metal surface of your car. Rub the sandpaper thoroughly over all the areas to remove the existing paint coat. When you notice that most of the paint has come off, switch to 1500-grit sandpaper and keep the momentum going. Make sure you remove any rust on the car to create a smooth and clean base for your color coat.
Step 4- Repair Holes and Dents
You may notice holes in the metal from places where you’ve removed rust. Use a putty specifically designed for metal to fill in those holes. You should also fill up any scratches on the car at this point with the putty.
Squeeze the putty directly onto the areas you want to fill. Once the hole is completely covered, smooth the surface with a putty knife and remove any excess.
Allow the filling to dry for at least an hour before sanding again with 1200- grit sandpaper.
Use a rag, mineral spirits, or denatured alcohol to meticulously wipe your car’s surface. It will help clean any oil residue, wax, or sanding dust and prepare the surface for the next step.
Make sure you’re working in a well-ventilated area, as the fumes from the cleaner can be toxic.
Step 6- Cover the Areas with Painters Tape
Start covering any areas you don’t want to paint accidentally with painter’s tape and paper. This step will not take too long if you’ve dismantled most components. However, if most parts are still attached to the car, carefully tape pieces of paper to cover them completely.
Step 7- Spray On the Primer
Now that you’re working with aerosols protect yourself from the paint fumes and wear proper safety gear to avoid a mishap.
Select a primer designed for automotive purposes, like the Rust-Oleum Stops Rust Automotive Primer. The primer will ensure a long-lasting and durable coating while offering a flat finish that allows the top coat to adhere to the surface.
Hold the primer can 25 centimeters away from the car’s surface and start spraying the entire area using back-and-forth strokes. Keep your hand moving steadily to achieve an even coat. Once the first layer of primer is on, wait for 15 minutes so it can dry down before applying the next one. Apply at least 3 coats of primer for a solid foundation.
After the third layer of primer has been applied, leave the vehicle for 24 hours so it can dry completely.
Step 8- Sand the Surface Again
Use 1200-grit sandpaper to rub the surface in a back-and-forth motion. The purpose of this step is to smoothen the primer and make it as even as possible. Remember to clean the surface with a cloth after sanding the area. You can even use warm, soapy water at this point to clean the car.
As you can see, prepping the surface thoroughly is key to a good DIY paint job.
Step 9- It’s Time to Paint!
Finally, it’s time to start painting. Make sure you’ve selected a paint suitable for metal surfaces and perfect for automotive use. The Dupli-Color Black Perfect Match Automotive Paint is a good choice for this task because it seamlessly duplicates the original factory colors.
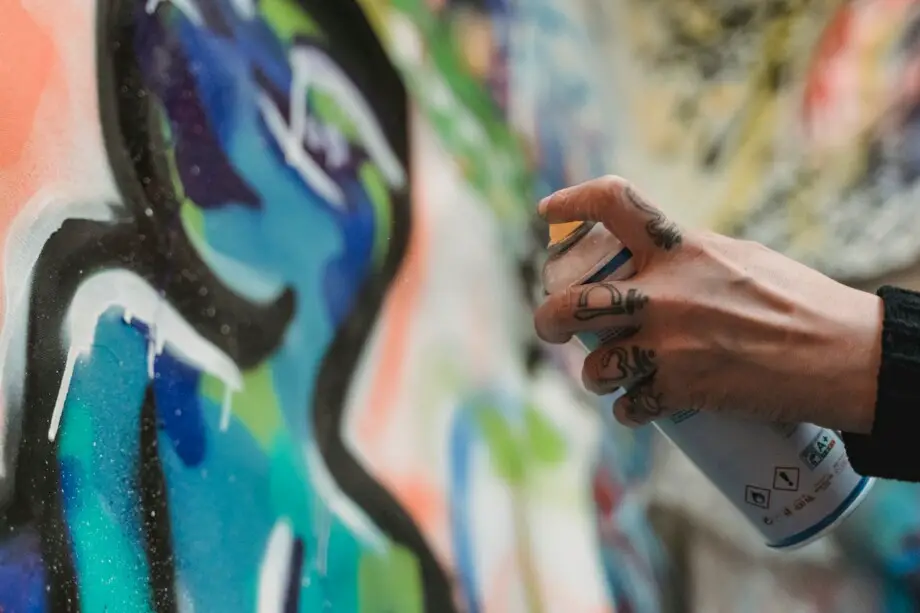
Shake the can for a good 5 minutes before you begin. This will help re-combine the pigments in the paint that separate over time. Position the can parallel to the surface and start spraying using horizontal strokes. Keep your hand moving to avoid thick layers, and spray the paint in thin overlapping coats.
Wait for 10 minutes to allow the coat to dry completely before spraying the second one. You may need multiple layers to achieve full coverage.
Allow the final layer to dry for at least 30 minutes before moving on to the next step.
Step 10- Apply Clear Coat
It’s time to seal the deal with a coat of clear paint. You can either choose a matte-finish variant like the Dupli-Color Acrylic Enamel ClearCoat or opt for a high-shine finish.
Use the same technique to apply clear paint as you did with the color coat. Allow your vehicle to dry for 24 hours before you start using it.
After the top coat has cured entirely, remove the painter’s tape from the areas, you had sectioned off previously. Also, reassemble any components that you had removed in the beginning.
Now, take a step back and appreciate the beauty in front of you!
Best Spray Paints for Cars- Urethane or Acrylic?
When choosing spray paint for your car, you will come across two popular options: urethane car paint and acrylic car paint. You should remember that there are other factors to consider other than the aesthetic appeal of the paint when making the final selection.
Durability
Urethane paints are the industry’s standard for automotive paints and are preferred by automakers around the world. It is hailed as the most durable auto paint that is also chip-resistant. Many car restorers argue that urethane paints outlast most acrylic paints if maintained properly.
Toxicity
Urethane paints are solvent-based, while acrylic paints are water-based. So, if you compare the health hazard of the two, acrylic will emerge as the winner because it’s far less toxic than urethane.
Drying Time
The paint application process also varies between the two. Acrylic paints need more time to dry (around 24 to 48 hours) before the second coat can be applied. On the other hand, urethane paint dries much faster and allows you to finish the project quickly.
Budget Friendly
Another factor you will need to consider is the cost of the paints. If you’re working on a budget, acrylic enamel auto paint is more affordable than urethane or acrylic lacquer. But if you want a professional-like finish, the urethane will offer better results.
Ultimately, the best spray paint for your car depends on your desired finish and the budget you’ve set aside for the job.
FAQs
What happens if you don’t sand your car before painting?
Failing to sand your car before the paint job will result in an uneven finish, making the paint vulnerable to chipping and peeling in the long run.
How many spray paint cans are required to paint the car exterior?
You will need around 20 aerosol cans of spray paint to cover the entire surface of your car. You may need more if you’re painting a larger vehicle like an SUV, truck, etc.
Is spray painting your car a good idea?
Spray painting your car is an excellent idea if you don’t want to spend too much money on a professional paint job. However, you should begin with realistic expectations because no matter how well you spray paint, it can’t match the perfection of a professional paint gun.
How long will spray paint on a car last?
Acrylic lacquer or acrylic enamel paint should last 5-10 years, depending on the severity of the environmental elements it’s exposed to.
Final Verdict
You can definitely spray paint your car to revamp its look but always maintain reasonable expectations from the project as it can’t compete with a professional paint job. However, if you decide to paint the car yourself, make sure to follow the process mentioned above for a solid finish.
Being a mother of two young girls is one of the most beautiful things you’d experience unless they tell you they need to wear painted jeans to school for tomorrow. For the love of my daughters, I started looking in the garage to find some paint I could use on denim. All I could find was a couple of spray paints. It did wonders on jeans.
You can spray paint jeans to bring life to an old pair of jeans. Or upgrade your wardrobe with trendy bottoms. Even though regular spray paint works on denim, fabric spray paints are long-lasting. They come in plain, glitter, and glow in the dark.
My daughters came back with smiling faces, and that made my day. Listed below are all the dos and don’ts of spray painting jeans. Learn from my experience to get a solid outcome on your first attempt.
DIY spray paint your jeans- Steps to follow
In my first attempt, I, too, was confused about how to go about it. Here’s what I followed. I hope it helps you out! Each step is essential since it serves a specific purpose.
Step 1: Wash the jeans
The first thing that you need to do is wash your jeans. Washing the jeans beforehand ensures that no dirt particles are left behind. Spray paint adheres better on clean surfaces than dirty ones.
Step 2: Prepare the work surface
Lay down a tarp or an old cloth piece before you paint your jeans. Spraying can leave paint marks on surfaces around it, so it is better to take this precaution.
Step 3: Choose the colors
Next, choose which spray paint you are going to use. Fabric spray paints are the best for painting jeans and other clothing items.
Decide on the colors you want to paint and gather all material in front of you before you begin to paint.
Step 4: Use your denim canvas
Once you have gathered all your supplies, you can start spray painting. If you need to use any stencils, place them carefully on the jeans. Cover other exposed parts to prevent the paint from spreading in unwanted places.
Step 5: Leave it to dry
Lastly, let the paint dry for about 48 hours. Spray paint usually dries in about a day but leaving it for 2 days ensures no paint comes off when you wear it.
Things to keep in mind:
Make sure the jeans are completely dry before you start painting them.
Do not use spray paint other than the fabric paint on your jeans.
Always use spray paint in a well-ventilated area.
Hold the can 6-8 inches away from your jeans.
Spray short, even strokes.
Paint light colors first and then move on to dark colors.
Fit cardboard strips inside the jeans to prevent paint from seeping to the other side.
Wait for at least 30 minutes before applying a second layer.
Pros and cons of using spray paint
Spray can be a cheap alternative to getting a new pair of fancy pants, but it also comes with its cons. Let’s have a look at both sides.
PROS
CONS
Spray painting offers more coverage than brush strokes
Spray paints contain toxins
They are more durable than water-based paints
Strenuous work (fingers can cramp)
Creates less mess than oil or water paints
Spray paint is cheaper than other kinds of paints
Pros and Cons of Spray Painting Jeans
Best spray paints for jeans
If you’re a first-timer, having numerous questions in your mind is justified. The most common question I get is; what spray paint should I use?” Here are some top picks on which almost all fabric spray painters agree. They are easy to use, readily available in stores and online, and last permanently.
The Dupli-Color Vinyl and Fabric spray does not chip or peel easily. Available in 13 colors, you can use it on multiple surfaces, including fabrics and vinyl automobile interiors. There is no need for a primer as the paint adheres well enough.
One disadvantage is that the paint is highly flammable and should only be used between 70 and 90 degrees Fahrenheit.
The Krylon spray paints are ideal to use on a variety of fabrics and has shown great results on jeans and demin outfits. Krylon COLORmaxx provides full coverage and is fast drying and durable.
Along with this, It also protects the surface as it is infused with a primer. It is also available is many different colors that would be just perfect for showing off your creative side.
The fabric spray paint from Tulip Permanent is non-toxic and environmentally friendly. It comes in 7 brightly colored spray bottles and can be used on any fabric.
The nozzle provides precision in strokes, making it ideal for customizing jeans and other clothing items.
This Glow in the Dark Spray Paint will make your jeans stand out everywhere. It gives off a bright neon glow in the dark. Moreover, the high-quality pigments are visible during the day as well.
Neon Nights Glow in the Dark Paint can be used on any shirt, pants, canvas, or shoe. Also,it is resistant to washing and does not peel off too soon.
Last on our list is the Montana Cans Hologram Glitter Effect Spray. Its holographic particles glitter under the sun giving off different rainbow colors at different angles. It is an excellent choice for customizing party-wear clothes. You can use it both as a base coat and a top coat.
The paint does not contain any CFCs and is 100% lead-free.
What to do if spray painting goes wrong?
Since this could be your first time using fabric spray paints, there is a high chance that the results of your painting are not what you expected. No need to panic as I’ve worked my way around a fix to that too. You can clean your jeans and redo them the way you like.
Spray paints are wash-resistant, but here are a few ways to remove the color marks altogether.
Using alcohol swabs
Alcohol swabs are found in first aid boxes at home easily. If you mess up your paint or a few strokes, go in another direction to what you intended them to be on. You can easily remove them by using an alcohol swab. Make sure to rub over the desired area gently until it has faded enough to be repainted.
Hair spray
Hair sprays contain solvents like ethanol that work great in dissolving oil-based paints. Since spray paints are oil-based paints, hairspray can help you fix what went wrong. We’re sure you have a spray paint can lying on your dressing table. It’s time to make use of it more than just hair.
Nail paint remover
To remove spray paint from jeans, another household item you could bring to use is a nail paint remover. Nail Paint contains acetone that effectively works on oil-based spray paints. Dab a cotton swab dipped in nail paint remover over the pants. We suggest you stay patient as the process takes time.
Turpentine
Turpentine makes stronger bonds with oil than paint pigment. This way, dubbing turpentine will help remove the paint from your jeans. However, Ensure that the space you are working in is well-ventilated. You must be wearing gloves. Ensure to rinse the pants multiple times before working on them.
Dishwashing liquid
Dishwashing liquid can do wonders on jeans. Even when detergents give up on removing the permanent spray paint, a teaspoon of dishwashing liquid goes a long way. Pour it on the affected area, add a couple of drops of water and rub in circular motions. Rinse the pants with water, let them dry, and you can begin painting.
Industrial spray paint remover
Going to a hardware store and asking for an industrial spray paint remover is what most people would do. Industrial spray paint remover has been designed to remove spray paint from jeans and other surfaces so you can clean the canvas again.
If you do not want to go through the hassle of removing the spray paint, you can get your jeans dyed to their original color. You also have a choice to use any other fabric dye and customize the jeans to the color of your choice. You can spray paint on it again or wear it just like that.
Frequently asked questions
What kind of paint can I use on the jeans?
Both acrylic paint and fabric spray paint can be used on jeans. But the best kind of paint is fabric spray paint. It is explicitly designed for clothes because it adheres well to the fabric without causing any damage.
How can I permanently paint my jeans?
After completely drying the paint on your jeans, use an iron to heat the painted area. Heat therapy locks in the spray paint in the denim fabric, letting you paint your jeans permanently. The paint will now stay on the jeans longer without fading.
How do you spray paint jeans?
Spray painting jeans is quite simple. All you need to do is place your stencil on the jeans, cover any exposed parts, and start painting. Make sure your jeans completely dry after being washed, and you’re painting in a well-ventilated area.
How to bleach paint jeans?
Take water and liquid bleach in equal parts. Mix them. Now fill it up in a spray bottle if you want to bleach-paint your jeans in a freestyle pattern. You can even splash the water and bleach mixture. Submerge the jeans in a tub of water containing equal parts of water and bleach; if you would like to bleach-paint it all.
Considering All Of The Above – Never Be Afraid To Be Creative!
Customizing jeans using spray paints is a great DIY way to upgrade your denim wardrobe. It is cheaper and more durable than regular water-based paint. However, you must be careful while using spray paints as they contain toxins that can harm your health.
Painting can be incredibly fun and rewarding, unless it comes to metal furniture or equipment. Coating a metallic object might not sound very arduous if the piece is new and has never been layered before. However, in the case of an old one, you either need to adopt the DIY technique or look for an excellent product that peels off the existing layer without damaging the metal furnishing.
Scrapping paint from metal surfaces can be daunting, as the materials are often hardy and resistant to most removers. However, certain products like spray paint removers have proven successful in removing even stubborn layers of paint.
So, how can you choose the best spray paint remover out of the many available options? To simplify the process, here is a rundown of the top 10 spray paint removers, outlining each one’s benefits and drawbacks to let you determine which one perfectly meets your requirements.
We evaluated 50 spray paint removers and rated the top ten based on the criteria listed below:
1. Price
Price is the biggest concern of any customer while buying a product. Nobody would like to spend a few hundred bucks to remodel a window or a door. So, select products that are the most valuable to money and efficient per gallon application.
2. Least Toxic
Most paint removers in the market contain methylene chloride (NMP) or some other form of harsh chemicals. When the remover is applied to the surface, they react with the surface and, as a result, emits harmful fumes.
Because caustic fumes are detrimental to the environment, we searched for the least noxious substances that are biodegradable and ecologically benign.
3. Convenience
Nobody wants a product that makes a mess and requires much time to clean. So we shortlisted the easily applicable products that need minimum effort to peel off the stripped coatings. Further, these products are also convenient to use due to the absence of strong odors.
Best Spray Paint Removers for Metals
Metal items are often cherished for their unique design and craftsmanship. However, over time it is not uncommon for them to become covered in paint. This can be a huge eyesore and take away from the piece’s beauty.
To restore your metal item to its former glory, you need to use a quality spray paint remover. Without further delay, let’s move to the list of the best spray paint removers for saving your treasured metal items!
This Smart and Easy Porouse Surface Graffiti remover is ahead of its competition in the industry because of its professional grad formula, which makes it perfect for metal surfaces. A few coats (usually less than 3) are enough to peel off all the paint and expose the bare metal.
Another great advantage this product has is its non-corrosive solid formula, which contains harmless chemicals that don’t react with metal surfaces. By acquiring this paint remover, your equipment will be effectively restored to its original form.
What needs to be improved?
A minor inconvenience some people face is that it can be a little harsh on drywall. Plus, premium pricing is also a downside for some buyers.
Pros
Only require a couple of coats
Dries up quickly, especially during hot weather
Able to remove powder coating
Works well on wood and other non-metal surfaces as well
If you are looking for a jack of all trades, put your hands down on Citristrip Stripping Gel. It can remove almost all types of paints and varnishes on most surfaces, including wood, metal, and even masonry.
The most significant advantage of this gel is its versatility which comes in handy. So, no matter whatever surface you are coating, it’s always helpful to have this paint stripper throughout the process because you never know when you might need.
What needs to be improved?
Some consumers have complained about a residual film of gel on woodwork. But it is not much of an issue as paint thinner can easily remove the film.
Pros
Removes multiple layers at a time
Works on a variety of surfaces
Does not have any harsh chemical odor
Easy to apply
Readily available in most stores
Cons
Takes up too long to dry
It can leave a sticky film behind on wooden surfaces
Removing leftover residue within a few seconds gives this product an edge over other alternatives. It won’t take any longer than 2 minutes to scrape the paint off, and during our testing, this product was effective enough to remove not only to strip the top layer but also some of the stains underneath.
Moreover, its fast-removing capabilities are not restricted to just metals. With horizontal surfaces like glass windows, we obtained the same results as well. So if you are looking for a paint stripper with a less messy formula, Sunnyside Corporation Advance Paint Removing Gel is for you.
What needs to be improved?
Some consumers have complained that the new formula is relatively weaker than the previous one.
This is the ultimate DIY product for any homeowner due to its diverse functionality. It can work on almost any surface and does not take much effort to remove all the paint in 1 coat.
If you have a metallic piece coated with lead-based paint, Smart’s Strip Advanced Paint Remover is what you require. Its unique formula is specifically manufactured to dissolve lead-based dyes, which makes it one of the best spray paint removers for metals.
What needs to be improved?
Some consumers complain that the remover evaporates quickly without working if left uncovered in hot weather.
Pros
Can remove many layers at a time
Works on diverse surfaces
Specializes in intricate carved and lead-based paint removal
This is a dream product for any car enthusiast. If you are trying to find the best metal spray paint remover for your car, you don’t have to look any further. It is a universal product that works both on your interior and exterior (including the dash) without doing any damage to the car’s original finish.
Its compact size makes it convenient to store in a car trunk and pull out whenever necessary.
What needs to be improved?
Contains relatively less amount per unit, but its portability makes up for this shortcoming.
Pros
Removes all types of sticky residuals from your car
Ability to remove tar and decal stains on the wheels
Stuck with the hard-core metallic painted surface? We have a Premium Spray Paint Stripper in our bucket.
Due to its foaming capabilities, it can strip off even the most stubborn paint from metal objects. As soon as you spray the product on your equipment, the foam immediately gets to work and starts dissolving the paint coating.
So, all you have to do is to apply the stripper and, wait for 15 minutes, leave the rest of the job to this incredible paint removal solution.
What needs to be improved?
Some consumers have complained about the strong fumes evaporating from the product. But it can be easily evaded by working outside or near a window.
Even the best metal spray paint removers can fail when faced with a shiny vertical surface. That’s where Sunnyside Advanced Solution comes along. It was designed with the intent to function on the vertical surface, which makes it slightly thick and adhesive.
This adhesiveness further contributes to stick to slippery surfaces like shiny metal windows, marble, and veneers, along with wood and other glass surfaces.
What needs to be improved?
It can leave uneven patches due to its high viscosity. But they can be easily cleaned with a few strokes of sanding paper.
Looking for some stuff to tackle with the acrylic paint or to rid of corrosive miniatures on metallic objects? Smart ‘n Easy Citrus Paint & Varnish Remover Gel is what you should consider.
It has the ability to remove multiple layers of different paint colors upon a single application. This removing gel also has a lovely citrus scent which made our experience quite pleasant.
Furthermore, the process of application is uncomplicated and user-friendly: just apply the solution, let it set for the allotted time, and then power wash it to avoid any residue.
What needs to be improved?
Like other removers, this one also lacks the ability to remove decade-old paint coatings. This happens mostly on wooden surfaces which only have a single paint color.
Worried about the latex paint stains on your metal surfaces? We have got you covered. This product tends to work with all types of llatex paint sprays (fresh or dry) and makes them vanish in a few minutes. Its low VOC formula is also convenient to use inside closed spaces.
From a portability standpoint, it is ahead of the game since its form is similar to that of a spray bottle. Further, it’s essential to wipe out sprayed drops with a paper towel, otherwise, you will end up damaging your precious furniture.
What needs to be improved?
Sometimes you might need a few extra sprays to get the job done. This is because of the remover’s low VOC formula, which makes it less toxic and easy to apply.
Pros
Requires only a few minutes to work
Perfect for interior work due to low VOC
Works on interior surfaces like carpet, laminate, and vinyl
Dried paint stains on metal surfaces like garage doors or railings are very common. These stains are not washable and very irritating to look at. If you have been entangled in a similar situation where dried paint is giving you a tough time, go for Goof Off Splatter Hardwoods to automate your procedure.
This dried paint remover has a potent formula that reacts as soon as it comes into contact with the surface. Within no time, the reaction will cause the paint to start peeling off.
What needs to be improved?
Leaving this remover on for too long might leave a wet stain on your floor.
Pros
Extremely strong
Works very fast
The paint peels right off without much effort
Works on all types of flooring
Comes in strong packing
Cons
Strong chemical fumes
Leaves a stain if left on for too long
How to Purchase the Best Paint Remover for Metals?
Metal surfaces are hard to paint because most of them are covered in a protective layer like lacquer and shellac, which makes it hard for a regular remover to penetrate and dissolve the paint.
So they require specialized removers which can break through thick layers of coating and dissolve the paint without reacting with the metal surface. But acquiring the desired item is quite challenging as the market is flooded with various products that claim to stand excellent even if the reality is the opposite.
To make your purchase hassle-free, here we are providing a list of a few factors that you should keep in mind while selecting spray paint remover for metals.
Types of Paint Remover
Not all metal paint removers are built equally. The truth is they are countless types of metal spray paint removers depending upon their formula. But we can categorize them according to the type of paint they remove. Understanding the difference between each type is crucial to ending with the right purchase.
Primarily, there are four types of paint strippers available:
1. Solvents: The most effective type of paint remover we ever have. They are induced with the potent chemicals that disrupt paint’s adhesion to the surface. Further, solvents are efficient in wiping paint, epoxy, and polyurethane from wood, masonry, and metal objects and surfaces.
2. Caustic Paint Stripper: It comes in contact with the paint to turn the coating into a soapy substance in order to break down the bond between the paint and the surface on which the solution was applied. However, they don’t operate with epoxy or polyurethane.
3. Biochemical Paint Strippers: These strippers are produced by incorporating plant-based solvents and an organic substance called N-methyl-2-pyrrolidone (NMP) to make them less abrasive. Just like caustic paint strippers, they are incapable of working on epoxy or polyurethane.
4. Low- Or Zero-VOC Paint Strippers: If you are concerned about the environment, low- or zero-VOC paint strippers are what you should add to your cupboard. They are induced with natural solvents such as benzyl alcohol instead of NMP or methylene chloride, which are highly corrosive.
Safety
Safety should always be your first priority. As you can see throughout the list, many products can be too toxic to be used on interior surfaces like metal doors or inside windows. Some fumes are so strong that even a well-ventilated room will not be of much help.
That is why choosing a metal paint remover that you can safely handle is very important. If you have a family with young children, it is better to go with the least toxic and odorless metal paint removers.
Having a caustic metal paint remover might take a little longer, but your safety levels will significantly increase. Finally, staying away from substantial toxic formulas is better, especially if you are a newbie.
Application Process
Every paint remover is unique in its formula and functionality. Metal surfaces are very vulnerable to chemical reactions. For example, if you use a spray paint remover with a strong formula and leave it for too long on the surface, it might eat away the metal itself.
In other cases, the product may react with the metal and form poisonous fumes that are absolutely detrimental to health. So, it’s always advised to read the application process given in the manual before experiencing the product in real time.
Further, paying attention to procedures will help you understand the application process and decide which product you should buy and which you shouldn’t.
Point to Ponder: Going through the manual and guidelines will not only save your precious time but also aid in achieving the best possible outcomes.
Refund and Exchange Policies
First-time buyers with little knowledge of metal spray paint removers are more susceptible to making an ineffective purchase. If you are working on a huge project and have purchased the metal remover in bulk, a small unfortunate mistake might significantly impact your budget.
Even if you aim to deal with household items, paying an extra buck for paint remover is pretty bothersome. To avoid facing any of these issues, make sure to go through the return and exchange policy of the product in the beginning.
These policies differ from product to product and company to company, giving them a thorough read is essential. In case the product doesn’t function as intended, you can claim a refund or benefit with an exchange policy.
Alternatives: Readily Available Substitutes
Let’s suppose you have some guests coming over, and you don’t have to go and get a commercial remover. Or, you just don’t want to spend money to get a few stains out. In that scenario, you can go for substitutes readily available in every home kitchen.
Vinegar
Vinegar is one of the most widely available kitchen ingredients, which also works perfectly as a DIY paint remover. All you have to do is heat up the vinegar in your microwave (do not boil it). Take a sponge, soak it in the warm vinegar, and rub it over the paint stains; they will vanish.
Baking Soda
Baking soda, also known as sodium bicarbonate, is an excellent substitute for paint removers if you are dealing with minor paint stains. Initiate by boiling water in a pot (don’t use the pot you use for cooking), then add a quarter cup of baking soda to it without stirring. After a few minutes, use the mixture to clean the stained surface; this DIY works best on metal surfaces.
Liquid Detergents
The whole purpose of a detergent is to remove leftovers. A detergent solution works best to scrap off paint strains from metal tools. Because they contain chemicals that loosen the bond between the paint and the target surface, a detergent will work better on fresher blemishes instead of old harder ones.
Nail Polish Remover
And finally, we move on to the ultimate DIYer, the nail polish removers. They are basically paint removers in smaller packaging sizes but serve the same purpose. So if you have a stain on a wall or any other surface, a nail polish remover will work as well as any other commercial paint stripper in the market.
Conclusion
Scrapping paint from metal can be challenging, but the finest spray paint removers can help.
We have compiled a list of the best spray paint strippers to help you out with the excellent possible purchase. The list is by no means exhaustive, but with our rigorous selection criteria and an extensive assortment of items, you are likely to discover one that corresponds to your requirements.
In case you are hesitant to shell out more cash just to fix a few patches, you can opt for one of the substitutes mentioned above and say goodbye to those bothersome and irritating stains forever.
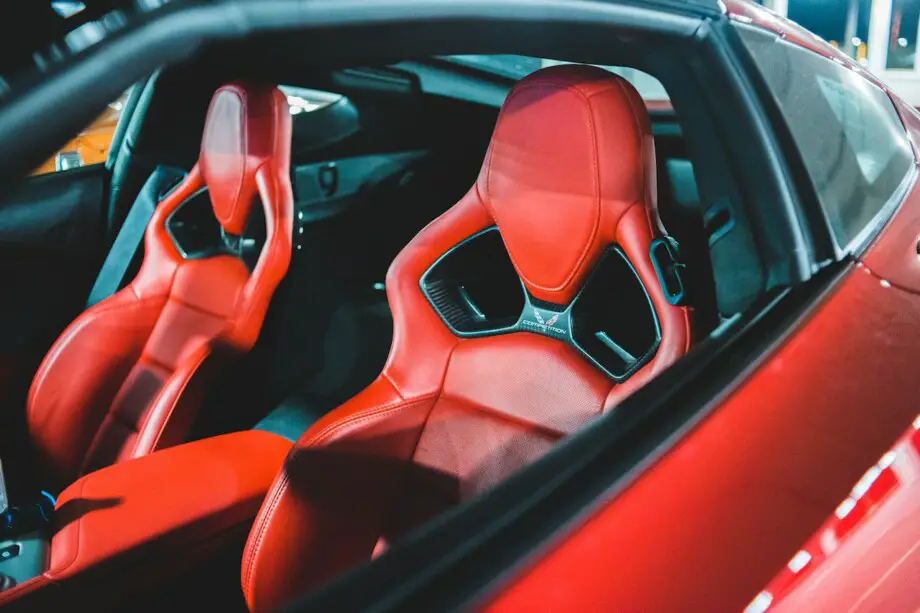
Leather car seats are the most durable in terms of appearance and sturdiness. The only downside is that regular wear and tear can make it look faded and old. Fortunately, you can spray paint on your leather car seats to refresh their aesthetics. You can even change its color entirely to match your mood without overspending your budget.
Yes, you can spray paint leather car seats. You must start by cleaning the surface and wiping away any oils with an alcohol cleaner. Prep the surface by filling in cracks and creating a smooth base. Apply a primer, ensuring all the seat seams are adequately covered, and finish with a color coat.
Painting your car seat should be easy if you have the right leather spray paint and a set of tools. But you must make sure that the surface is thoroughly prepped before you start painting, or else the results might be disappointing.
Which paint can you use on leather car seats?
To achieve the best results, it’s important to use paint that’s designed especially for flexible surfaces like leather car seats. Choosing the correct paint variant ensures that the color doesn’t slide off, crack, or peel once it has dried. It also helps make sure that the final result is durable and lasting.
If you opt for a leather coloring kit, you will get leather prep, a palette knife, an abrasive pad, finishing sprays, a spray unit, gloves, and sponge applicators. These kits are available in multiple colors, so check them beforehand to confirm it has the color you want.
Which spray paint is ideal for leather seats?
You can choose from several quality spray paint brands in the market, like SEM, ColorBond, and Rust-Oleum.
If you plan on using a spray gun or an airbrush for paint application, you can even go forAngelus Acrylic Leather Paint. The best thing about Angelus paints is the wide variety of colors you can find to work with.
In case you decide to buy an individual spray paint, you will need a primer like theSEM Clear Plastic Prep Aerosol to create a clean and smooth base to work on.
Once you have created a solid foundation for spray paint, you can choose between different brands and colors to find the one that meets your needs.
How to paint your car seat with a leather coloring kit?
Here is a step-by-step guide on ‘how to paint leather car seats’ with a leather coloring kit.
Make sure to buy a kit that is nonflammable and non-toxic. Also, ensure that you’re working in a well-ventilated area, as leather paints contain fumes that are hazardous to health.
Step 1- Remove the Car Seats
Remove your car seats and set them up in a well-ventilated area. Before you start, disconnect your car’s battery and any electrical wires attached to it.
If you’re unsure about taking out your front and back seats, refer to the car’s manual for instructions. Take off any plastic components attached to the seats or cover them with masking tape.
Step 2- Clean the Leather
Before you start the prepping process, you should clean away any dust or debris on the seats. Brush each portion of the seat with a soft-bristled brush to remove food crumbs, dirt, or dust.
Next, vacuum your seats with a hose attachment to clean them thoroughly.
Step 3- Prepare the Leather
Use the abrasive pad provided in the kit to remove the transparent manufactured finish from the leather. As you scrub the top layer, some color will also come off, which is how it works.
When you see the old color removed from an area, take it as a sign that you have successfully cleared the transparent finish, and you should move on to the next spot.
As your top layer disappears, so does the shine, which is an indicator that your leather is prepped correctly.
The reason your leather seats look old most of the time is because of the cracks that develop on their surface. It is actually the paint that cracks and not the leather itself. So, when the painted layer is taken off, most of the cracks are removed in the process.
Step 4- Wipe with Alcohol Cleaner
Use an Alcohol Cleaner to wipe away any waxes, oils, or silicones that may be on the leather. This helps prepare a base for good paint adhesion.
Step 5- Fill in the Cracks
At this stage, inspect your leather seats closely and identify any small cracks on the surface. Fill in the gaps with a palette knife and Flexifil. You should apply the filler in thin layers, allowing 5- 10 minutes for each coat to dry.
Keep filling the cracks until they align with the leather’s surface.
Step 5- Sand the Surface
Take 1200-grit sandpaper to the leather and make the surface smooth for paint application. Remove the sanding debris with a clean cloth.
Step 6- Sponge on the First Layer Of Color
Apply the first layer of your car leather seat paint with a sponge. This will help you cover hard-to-reach areas and also reduce later spray applications.
Don’t apply too much pressure, and gently wipe the colorant onto the leather using a sponge. Allow the first coat to dry for 5 minutes before moving to the next step.
Step 7- Spray On The Colorant
Use the kit’s airbrush to spray the Leather Colorant onto the seats. Start from around the edges of the piping towards the center, covering the hard-to-reach areas first.
Spray on the colorant in thin layers and allow the previous coat to dry before spraying more on top.
Apply the Leather Finish at the end to seal in the color. Once your paint job is complete, wait for a day before installing and using your leather seats.
How to Paint Leather Car Seat with Spray Paint?
While it’s easier to paint with a leather kit, there’s no reason why you can’t work just as well with individual spray paint. Here is an easy guide to help you achieve even paint coverage on your leather car seats.
Step 1- Remove the car seat
Removing the car seat ensures that you don’t miss any narrow spots and also protects your car’s interior from accidental splashes. You can check your car’s manual for instructions on unscrewing the seats.
Step 2- Clean the Seats
Clean the car seats with a stiff brush, making sure all the dust and food particles are adequately removed. You can even attach a thin nozzle to your vacuum cleaner to reach between the seams and other narrow areas.
Step 3- Wipe with Alcohol Cleaner
Clean any oils, waxes, or grime from the leather seats using an alcohol cleaner.
Step 4- Fill in the Cracks
Fill in any cracks on the leather using Flexifil and a palette knife. Prepping is key to achieving an even and lasting finish, so take your time and follow the process.
Step 5- Sand the Surface
Use sandpaper to slough away the top coat of the leather. Only apply a little pressure, or you may end up damaging the surface. Wipe the seats clean once you are done sanding with a clean microfiber cloth.
Step 6- Apply Primer
Spray on the leather primer in thin, even, and overlapping coats. Make sure to give each coat ample time to dry before moving on to the next one. You may need more coats of primer (5-6x) if the old color is dark or bright. Keep spraying layers until you have achieved a solid base to work on.
The primer enhances the adhesive effect and makes it easier for color to stick to the surface. It also prevents the leather from absorbing the pigment color, which can eventually make it hard and plastic-like.
Step 7- Start spraying the Color
Start with a thin coat of paint and slowly build the pigment with additional layers. Pay attention to the seams and other areas that might get ignored during the painting process. Wait 15-20 minutes between each coat, allowing it enough time to dry.
You may need to apply 3 to 5 layers of paint to achieve an even and pigmented coverage.
FAQs
Does spray paint stick to leather?
Spray paints designed for flexible surfaces adhere properly to leather and vinyl. You can amplify the results by prepping and priming your leather surfaces adequately.
Which spray paint is best for leather seats?
The best leather paint for car seats is acrylic paint. It is water-based and can adhere to leather without cracking over time. As they respond well to changes in temperature, acrylic paints are perfect for use on your car’s interior.
Is it better to dye or paint leather?
Dyes are usually less pigmented than spray paints; therefore, they can’t be used to lighten the color of dark leather. On the other hand, spray paints are more pigmented and versatile and can be used to change the color of leather from dark to light and vice versa.
Can I lighten the color of my leather seats?
You can easily lighten the color of your seats by using a leather primer and full-coverage leather spray paint. Just make sure to apply adequate coats to achieve a good result.
Final Word
Changing the color of your leather seats is a quick way to refresh your car’s interior and breathe new life into it. The right spray paint and technique can give you excellent results and a durable finish.
If you are interested in spray painting your car’s exterior, check out our blog on how to spray paint your car, and you can go through all the steps in detail. Let us know what you think.
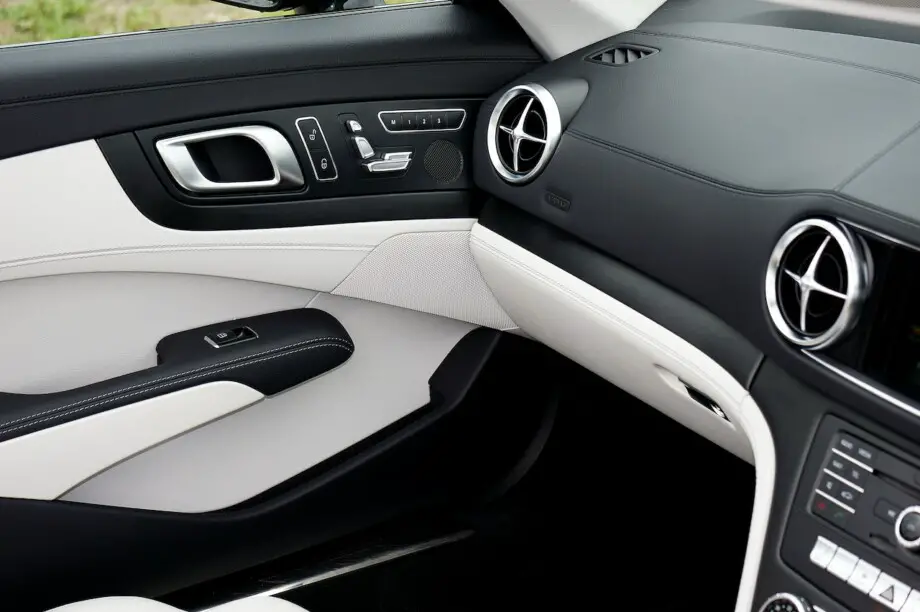
Many people prefer customizing their car’s interior as it adds a personal touch to the vehicle. Some opt for aftermarket interior modification parts which can be expensive, while others search for DIYs that fit perfectly into their budget. Lucky for car owners, spray paint is an easy and effective way to spruce up their dashboards.
Before you start painting your dashboard, you should remove or cover any parts that you don’t want to paint. Clean the surface with soapy water and some rubbing alcohol, followed by sandpaper to achieve a smooth base. Apply thin layers of primer and color coat, sealing the paint with a lacquer finish at the end.
Whether you want to improve the aesthetics of your car’s interior or repair signs of wear and tear in the dash, painting your car’s dashboard is a great idea. Make sure to use the right equipment and follow the correct procedure to get near-professional results in no time.
The Materials You Need To Paint Your Dashboard
If you want your car’s interior to look as good as new but are still wondering, ‘can you paint a dashboard?’ the answer is yes, you can! All you need is a few materials mentioned below, and you’re ready to start your paint project.
Unlike other surfaces, a dashboard is surrounded by several parts, most of which you don’t want to paint. Therefore, you are left with two options: you can either remove those parts or cover them thoroughly to prevent the paint from spraying on them accidentally.
How To Remove Dashboard Parts
If you are going to paint smaller trim pieces, such as the ones around the air vents and stereo, it would be best if you removed them from the dashboard and painted them out in the open. Removing them is still advisable if it’s the other way around and you want to paint the dashboard but not the trims.
You can follow these steps to remove any dashboard parts safely.
Ensure the car’s ignition is off, and then disconnect the car battery before removing any parts.
Refer to the car’s manual for guidance on how to remove trim pieces. While you may be tempted to take the screwdriver and start disassembling the parts on your own, it’s better to consult the manual to ensure you’re removing the parts correctly.
Take out snap-in dashboard parts with a screwdriver or trim removal tools.
You can unscrew other pieces that are fixed on the dashboard.
Disconnect any wiring behind the parts you remove.
Store the parts safely.
Save the screws for re-installation after the paint has dried.
Step-by-Step Guide for Painting Your Dashboard
Painting your car’s dash is a straightforward process, and if you follow all the steps outlined below, you can achieve a finish you will be proud of.
Step 1- Clean the Surface
Before you start painting, you want to make sure the surface is free from dirt and grime, and the best way to do that is by cleaning it with soapy water. You can use any tack cloth dampened with soapy water to wipe all the dashboard components. Allow the surface to air dry.
Step 2- Wipe with Rubbing Alcohol
After all the components you have washed with water and soap have dried completely, take a microfiber cloth and wipe the dashboard with isopropyl or rubbing alcohol. This helps you get rid of oily residues left behind by fingerprints.
Step 3- Sand the Surface
Take a scouring pad or 1500-grit sandpaper to scrub the surface of the dashboard. Be careful to apply only a little pressure and sand in a circular motion. Roughening up the surface will help the primer adhere to it better.
Once you are done, wipe away any sanding dust with a clean microfiber cloth.
Step 4- Cover Surrounding Areas with Tape
Cover any areas or parts you don’t want to paint using painter’s tape. You might need to use multiple strips to cover the area completely. You can also protect the steering wheel by placing a plastic bag over it and securing the ends around the base of the steering column with tape.
Since many parts surround your dashboard, take your time making sure all the areas around the dashboard are shielded with plastic, tape, or paper. This includes the car’s vents, knobs, windshield, front seats, floorboards, and so on.
Step 5- Put on your Vapor Mask and Gloves
Auto spray paints contain potentially hazardous fumes, so you should always work in a well-ventilated area. Put on a vapor or respirator mask and wear proper eye protection gear to protect yourself.
You can paint outdoors as long as it’s not too hot or humid and the temperature is between 65 to 85°F. It’s better to avoid painting under direct sunlight as it may hamper the drying process.
If you’re working in the garage, make sure to keep the main door and windows open. Setting up box fans also helps to exhaust air and fumes out of the area.
Plastic parts absorb skin oils very easily, which means your fingerprints can cause spots or fisheye. Wearing powderless latex or vinyl gloves when handling the components can help avoid these marks.
Step 6- Apply Primer
When painting your car’s dashboard, your best bet is a plastic primer like the Rust-Oleum Automotive Universal Bonding Primer Spray. It helps adhere the top coat on automotive surfaces and creates an ideal surface for the next step.
Shake the can well for about a minute and start spraying the dashboard while maintaining a distance of 6-8 inches. Keep the can moving in a steady back-and-forth motion to avoid thick layers. Apply 2 to 4 layers of primer to achieve an even and durable finish. You should wait at least 5 minutes before the second layer, but if you can wait for 10 to 15 minutes, that would be even better.
Step 7- Spray Paint the Dashboard
You should chose a paint designed for automotive plastic parts for this project. The SEM Paints Color Coat Aerosol is a good dashboard spray paint as it offers Elastometric Coating that doesn’t crack. You can also use any other quality vinyl dashboard paint for the job.
Shake the can thoroughly and spray the color coat in thin, even layers. Spray in quick bursts and keep a steady hand. You should apply 3 layers of paint at the least, but it is recommended to spray 5-8 layers for more durability. Wait for 5 minutes between coats to avoid saturating wet paint.
Step 8- Finish with Lacquer
Applying lacquer is an optional step, so you can skip it if you want. However, a top coat greatly improves the durability of your paint job.
You can choose between a glossy or matte finish for the lacquer, and it should be applied the same way as the primer and color coat.
Step 9- Re-install removed parts
You should give your paint job more than 4 hours to dry completely before you touch the surface. Let it cure for 24 hours if you can. Once the paint feels dry to the touch, peel away the painter’s tape from all areas you have covered and re-install any trims and panels you removed.
What is the Best Paint for a Car Dashboard?
Using the correct paint for your dashboard can significantly impact its finish and resilience. Here are my top picks for achieving excellent results:
This paint is perfect for vinyl and fabric coating; whether you want to restore your interior vinyl seats or customize dashboards, consoles, and door panels. As it’s formulated with a maximum adhesion promoter, you can skip the primer and still achieve a smooth finish.
The spray paint is a multi-surface car interior paint that provides a urethane solvent-based coating. It offers a brilliant and lasting finish that doesn’t flake, peel, or crack.
This paint provides excellent adhesion without rubbing off, cracking, or peeling. It is fitted with a comfort tip that allows you to spray at any angle and cover any hard-to-reach areas.
FAQs
Can you paint a dashboard with a brush?
Yes, you can paint your dashboard with a brush. However, you should keep in mind that using a brush to paint small surfaces leaves brushstrokes that might not look as appealing as the even finish you can get with spray paint.
Can you spray paint a car dashboard without removing its components?
You can definitely paint a dashboard without removing its components, but you need to make sure all the surfaces, trims, and fixtures you don’t want to paint are adequately covered with painter’s tape, plastic, or craft paper.
How to recolor a dashboard?
If your car’s dashboard requires paint repair, you can easily cover any scratches and recolor them using a combination of plastic primer, color coat, and lacquer.
How do you paint plastic dash panels?
You can quickly paint plastic dash panels with automotive plastic spray paint. You can achieve lasting results with quality paint if you prepare and prime your surface correctly.
Conclusion
Spray paint allows you to repair and refresh the appearance of a worn-out and dull dashboard. You can even get creative and try different colors or masking patterns to customize your car’s interior. As long as you follow the process outlined above and use a suitable primer and paint coat, you should be able to get the job done perfectly.
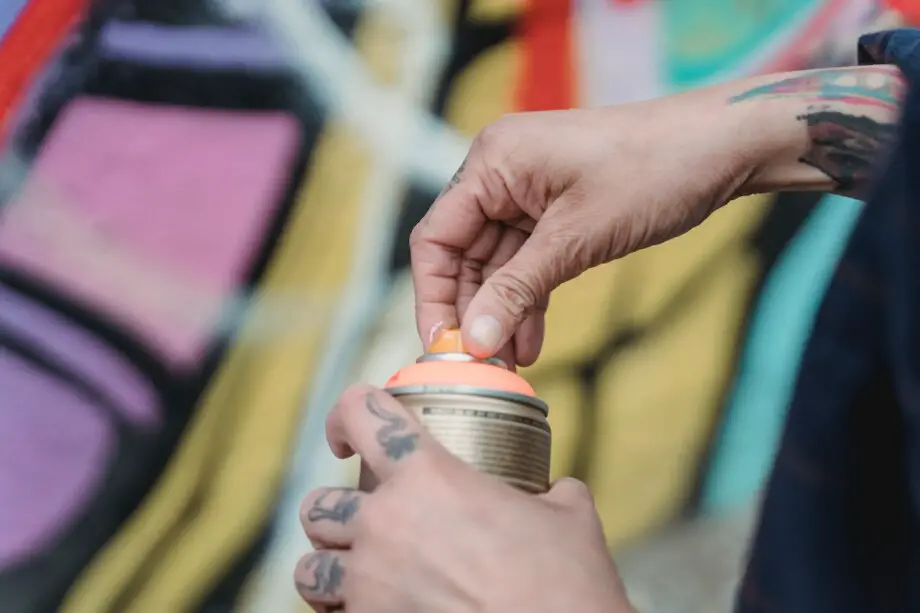
You feel excited and pumped up when you start a new painting project. Unfortunately, this excitement quickly fizzes out when you find that your spray paints won’t work because of blocked nozzles. But there are different ways to keep your spray paint nozzles clean, so whenever you pick up a can, it’s ready to paint.
To avoid your spray paint cans from clogging, clean the nozzle after each use. You can achieve this by spraying the paint can upside down for a while before storing it in a warm place. Apart from the nozzle, keeping the tube inside the can clean also helps your nozzle from getting blocked.
Here are a few tips to keep the spray paint nozzle from clogging.
Tip 1- Spray the can upside down
Once you’ve completed painting a surface and it’s time to put the spray paint can away, turn the can upside down and spray until the paint stops coming out. This way, you can be sure that all the leftover paint in the tube and the valve system of your can has emptied.
When the tube inside the can is clean, the chances of paint drying inside it or on the nozzle are minimal.
Tip 2- Clean the nozzle after each use
After you have sprayed the paint can upside down, you might notice traces of paint on the nozzle’s exterior. Don’t leave any paint marks on the nozzle because once it hardens fully, it will end up blocking it.
You should allow any leftover paint on the nozzle to dry slightly and simply pick it off with your fingernail or a sharp tool before you store the can away. The paint should come off quickly without much hassle.
Tip 3- Store your paint cans upside down
Have you noticed the goopy texture of spray paint when you start painting? That’s because when you leave paint sitting for too long, the pigment separates from the liquid agent and sinks to the bottom. So when you start using a paint can, the collected pigment enters the tube first and may end up clogging the nozzle.
However, if you store your paint cans upside down, the tube inside will not pick up the thick pigment first. So, give the can a good shake whenever you want to use it and spray away.
Tip 4- Use a large nozzle to get the paint can started
If you are using a spray paint can after some time, check the nozzle size before you begin painting. If the nozzle is too narrow, the initial pressure inside the can may be too much to handle. You may end up clogging the nozzle in the process.
Instead, use a large nozzle in the beginning so it can increase the pressure within. Once your spray paint can is running smoothly, switch the nozzle back to the narrow one and start creating your masterpiece.
Tip 5- Store your paint cans in a warm place
Storing your paint cans in a warm spot can make all the difference in maintaining their formula, finish, and spray mechanism. If you allow your paints to sit in the cold for long, they will freeze. While they will eventually thaw, the nozzles might not be as forgiving as the paint’s formula.
Therefore, store your spray paints in a warm area to keep the nozzle from clogging up. Trust me you will never get yourself into a ‘my spray paint can won’t spray’ situation.
How To Unclog A Blocked Nozzle?
Aerosols are brilliant when they work, but once the spray paint stops spraying, it can get more and more frustrating by the minute. The tricks mentioned above will help you keep your spray paint nozzle from getting blocked. However, other elements, such as storage temperature, and paint type, can also affect the spray paint’s usability.
If you encounter a blocked paint nozzle, the first thing you should try is shaking it vigorously. This should jump-start your nozzle in the following cases:
The paint is too thick, and the pigment has separated from the liquid part
The spray paint was stored in a cold area which affected its consistency
The can hasn’t been used for a while
Shake the can for a good 2 to 5 minutes to mix its contents with the propellant and try spraying. If it still doesn’t spray, you can take a look at how to unclog a spray paint nozzle and let us know if that works for you.
Keep Spare Nozzles Handy
While it is deeply satisfying to unclog a nozzle and watch it spring back to action, sometimes, you are pressed for time and want a quick solution. It always helps to keep extra spray paint nozzles handy if the need arises.
You can either buy spare nozzles of different sizes and add them to your paint DIY arsenal or save the nozzle of empty spray paint cans.
If you plan to reuse a nozzle, remember to clean it thoroughly before storing it away because the last thing you want when looking for a replacement is another clogged nozzle.
FAQs
Should you store spray paint upside down?
Always store your spray paints upside down. It helps clear the can’s tube and prevents the nozzles from clogging up.
Why is spray paint clumping?
Spray paints have propellants that need to be mixed properly before you spray. If they are not evenly distributed, the color can come out in varied proportions causing your paint to clump.
How to fix chunky spray paint?
Sometimes, paint can get clogged in the nozzle causing your spray to spit out the paint in chunks. You can avoid this by cleaning your blocked nozzle or replacing it with a spare one that works.
Should you warm up the paint can before painting?
Ideally, your spray paint should always feel warm to the touch. You can warm up the can by placing it in warm water or heating it with a hair dryer.
Conclusion
A blocked spray paint nozzle can be a bummer when artistic inspiration strikes. The best way to avoid running into one is by storing your paint cans properly and cleaning the nozzle after each use.
I love spray paint DIYs because they are easy, fun, and provide excellent results. So, it’s no wonder I have many different spray paints stored away in my garage. However, I realized that most of my cans wouldn’t spray when I tried to use them for a recent project, and the culprit was: a blocked nozzle.
You can unclog a spray paint nozzle by soaking it in warm water, vinegar, alcohol, or paint thinner. Giving it heat with a hairdryer can also do the trick, but you must be careful not to melt the plastic. If nothing else works, you could also use a needle or an aerosol lubricant to clean the nozzle.
I knew I had to unclog the nozzle of my spray paint cans to make them usable again, so I searched for different ways to clean them. Let me share with you what I found and how I unclogged my spray paint nozzles.
What Causes Spray Paint Nozzle to Clog?
The main reason spray paint can nozzles become clogged is due to dry paint. The nozzle can get clogged if it isn’t properly cleaned after a paint job, and the excess paint dries up inside it. As the build-up hardens, it blocks the passageway of the paint, and it can get difficult to spray.
Sometimes, the nozzle can get blocked while you’re spraying. This usually happens when the paint has not been mixed properly, or when they are new. Thicker substances get stuck in the nozzle as you start spraying. The best way to avoid a blocked nozzle is to shake your spray paint can thoroughly for 5 to 10 minutes before you start.
How To Unclog A Spray Paint Nozzle – 8 Simple Ways
When I was unclogging my spray paint nozzles, I discovered 8 simple tricks that got the job done. They are very easy to implement and give quick and effective results. Here are my picks:
1. Give It Heat With A Hairdryer
An efficient way to soften the paint on your nozzle is to apply some heat to it with a hairdryer. Place the can on a newspaper or cardboard to avoid unnecessary mess inside the house, or take it out in the open. Next, position the nozzle over the exhaust and turn on the hairdryer. If the dried paint isn’t too much, it should quickly melt off.
In case the hairdryer doesn’t clear out the nozzle completely, you can take the nozzle off the spray paint can and blow hot air into it from the rear end. Whichever method you use, make sure the nozzle and the valve don’t touch any hot object directly. Also, keep changing its position as the plastic material can melt due to prolonged heat exposure.
2. Use A Needle
When people realize their can of spray paint is clogged, the first thing they reach out for is a needle. That’s because a needle, safety pin, or wire hanger is readily available in every household.
You can use a needle to gently scrape off dried paint that you can visibly see on the outside of the nozzle. If that effectively removes the blockage, your can is ready to spray paint, but if it doesn’t work, you will have to insert the needle into both ends to dislodge the dried paint.
You must proceed cautiously at this stage because the needle’s sharp edge can damage the nozzle. If you’re not careful, you could end up ruining the nozzle entirely.
Although this method works to unclog spray paint nozzles, it is not recommended every time as it may cause more harm than good.
Another trick that works most of the time for cleaning clogged nozzles is using paint thinner. All you have to do is separate the nozzle from the spray paint can and place it inside a bowl filled with paint thinner.
Make sure the nozzle is completely immersed in the thinner solution, so you don’t miss a spot. Allow it to soak for 2 hours to let the dry paint melt away. Don’t keep it dipped in the paint thinner for too long, though, since the nozzle can get damaged.
Once the paint thinner has worked its magic on the nozzle and softened all the paint, use a needle to remove any residue. Don’t use a lot of pressure when using the needle, as it could ruin the nozzle’s mechanism.
4. Dip It In Warm Water
Warm water is one of the easiest ways of unclogging a nozzle. Take a bowl of warm water and soak the nozzle in it until the water loses heat. You can also take a rag soaked in warm water and wrap it tightly around the nozzle.
The heat from the water will help soften the dried paint and make it easier to clean the nozzle with a needle. However, there is a downside to this method– it doesn’t always work on the first go, so you might have to repeat the process until you get the desired results.
If you’re wondering ‘how to clean spray paint nozzle,’ another trick that worked for me was soaking it in vinegar.
Fill a bowl with vinegar and allow the nozzle to soak for 24 hours. Once you remove it from the vinegar solution, clean it with warm water and then try spraying again.
While vinegar is an effective way to dislodge any dried paint, repeated contact with the solution can cause damage to its plastic exterior. It can cause your nozzle to become brittle over time and break apart. Therefore, use vinegar sparingly for nozzle clean-ups.
If you’re facing trouble with your spray paint not spraying, you can clean its nozzle with running alcohol and try again. The cleaning method is similar to vinegar; you must soak the clogged nozzle for a couple of hours in a bowl of rubbing alcohol.
Rinse the nozzle with warm water and return it to the spray paint can. If it still doesn’t start spraying, repeat the steps until all the dried paint is removed.
Rubbing alcohol can denature any type of paint, so you should be careful when you attach the nozzle back to the spray can. Let it air dry completely, or use a hairdryer to speed up the process.
An aerosol lubricant is a valuable addition to your spray paint arsenal as it’s a great tool to unclog nozzles.
You will need to replace the nozzle on an aerosol lubricant can with the blocked one from the spray paint. Press the nozzle to force the lubricant through it. You can try this a few times until the clog is completely gone.
If that doesn’t work, you can try another method. Remove the nozzle from the can and spray the lubricant directly into the nozzle. Make sure to cover both ends of the nozzle openings. Once the nozzle is entirely lubricated, place it again on the aerosol lubricant can and press it a few times. This should help clean up any blockage.
An aerosol lubricant is usually very oily and greasy; therefore, wear gloves to avoid staining your clothes or other fabrics.
If none of the methods work, the final solution to ‘how do I unclog a spray nozzle’ is to replace the nozzle of your spray paint can with a new one. If you have an empty can lying around in your garage, you can simply remove its nozzle and place it on the other can. It always helps to have a few spares if a situation arises.
When replacing the nozzle, you should make sure that you pick one from a similar brand and type of paint because different paints have varying viscosities.
FAQs
Why does my spray paint keep clogging?
The nozzle can keep clogging up when you don’t shake your spray paint can thoroughly before you start spraying. It can also be the result of a spray paint nozzle block.
Is it okay to store spray paint in the garage?
It is okay to store your spray paint cans in the garage as long as the temperature is between 55 and 80°F. Higher or lower temperatures can affect the formulation of the paint and deteriorate its quality.
How do you store spray paint after use?
If you haven’t finished all the paint in a spray, you can store it in a flammable safety cabinet in your garage. Make sure the spot you choose is not too hot or cold.
Final Word
It can be frustrating to find your spray paint nozzle clogged when you want to start a new project. But with some patience, you can easily unclog it with the methods mentioned above.
Would you like to hear from someone who has spent his fair share of Sunday afternoons painting the exterior of his house? In other words, for exterior painting, I can guide you on which items are worthwhile to purchase and which aren’t. To make a conclusive decision stay tuned!
In most cases, yes, you need a primer for your exterior surfaces. Exterior surfaces are mostly made out of concrete or wood, which are uneven and porous. Primer is crucial for a flawless and long-lasting exterior finish. It makes the surface smooth and fills the holes for an easier coat of paint.
While the above statement may have addressed your concern, it does not provide a comprehensive view. Exterior house painting is an expensive and time-consuming job. You must know which primers to use and which to avoid so that you can focus on other facets of house improvement.
What Is a Primer?
To have a concise answer to “do I need to prime before painting?” We must first know what it is. A primer is a resin material that provides adhesion on the paint surface and makes it smoother for the paint coat itself. It is an undercoat that serves as the “middle man” between the surface and the final coat of the paint.
A primer also reduces the number of coats you need to apply on a surface by reducing the project’s overall price. So when it comes to primer vs. paint, which one provides a better middle layer? A primer is mostly an on-go choice.
Many different types of primers are commercially being used to paint the exteriors of buildings, but all of them fall under these three basic types:
Oil-based primer
Latex-based primers
Pigmented primers
When Do You Need a Primer?
Many individuals erroneously use primers when they don’t need to, and the opposite is also true. Here is a list of some of the most common situations where you should always use a primer.
Whenever you are covering unfinished wood
While changing the color of your exterior
While painting high glossy surfaces
When painting brick walls, chimneys, or other types of masonry surfaces
To cover your overt wall stains
If you have water bleeding through your walls
When your current plaster begins to flake
Categories of Primers Best Suits to Your Exterior
All primers are not built and do not serve the same purpose. To save time and effort, you must consciously choose the primer best suits your painting surface. So if you are wondering, do you need a special primer for exterior paint? We have got you covered.
Have a look at a compiled list of the most common primers that may go well for your home exterior.
1.Wood Primer
You need a primer for wooden surfaces. Your walls, doors, and furniture items require a primer before they are painted. My friends and family, who know me well, always ask about priming their exterior doors, wood walls, and outdoor furniture, and I highly recommend using a good old-fashioned oil-based wood primer for all wooden surfaces.
Bare wood has the roughest and most porous surface, which causes it to absorb the paint like a sponge. Without a primer, it would take you several coats to paint the whole thing, and even that would not be enough to cover the uneven surface completely. A single layer can fill out the holes and smooth the surface.
A minor downside is oil based primers usually take very long (around 24 hours) to dry, so if you are in a hurry, you can move to a quick-drying latex-based primer which will serve your purpose and consume less time.
2.Drywall Primer
Drywalls may have a smoother texture than bare wood, but their porous surfaces are just as tough as painting wood. It will absorb paint more in some places than others, leading to an even coat that will cause flashing.
Flashing happens when there are visible differences in the final sheen of your paint. A latex primer will fill up pores on the surface and make it smooth. Moreover, the primer is much cheaper per gallon as compared to multiple coats of paint, but if you are wondering, do you have to paint over the exterior primer? Well, in the case of drywall, absolutely; otherwise, you will have a bland exterior.
3.Masonry Primer
When we move towards the relatively warmer regions, we will see most exteriors will have masonry built. A masonry surface generally refers to surfaces made of solid materials like concrete, cement, or sandstone.
In most cases, masonry surfaces have high pH, which reduces their adhesion and makes it difficult for the paint to stick on top. Manufacturers developed a specialized masonry problem that works like a charm on any masonry surface to cope with this issue.
Sometimes white crystalline deposits can develop on a masonry surface called efflorescence. If you are facing this issue, make sure to look for a masonry primer that is efflorescence resistant as well so your walls can have a long-lasting coat.
4.Bonding Primer
Glossy surfaces pose a major difficulty to even the best of primers. They are quite slick, which makes it hard for paint to stick on them without running off. These surfaces might include metal surfaces, ceramic tiles, and plastic or vinyl shutters.
Using an oil-based primer on metal doors or surfaces might get you good results, but in the case of ceramic tiles or plastic/vinyl surfaces, an oil-based primer would be a waste of money. So if you want to paint any of these exteriors, we recommend using a bonding primer to provide extra adhesion to your paint.
5. Stain Blocking Primer
A stain on your exterior wall is not only irritating to the eye, but in some scenarios, it can completely ruin your exterior design, so a primer is needed while painting your exterior.
Water and smoke stains bleeding through your wall are also quite a headache. They are especially bothersome for people living in coastal areas. The producers addressed this consumer pain point through stain-blocking primers.
To combat stains like ink, markers, or grease on your exterior, these stain-blocking primers, in conjunction with a few coats of paint, will make your exterior as good as new.
6.Tinted Primers
Made up your mind to change the color of your exterior? A primer is an essential ingredient to add on. It will not only reduce your paint coats but will also secure them, providing a long-lasting effect.
If you are painting a lighter color over a dark one, tint your primer in that specific color to reduce your time and effort.
You can tint your primer by one of two ways, either ask the retailer to tint it for you or do it yourself in order to save few extra bucks. Just simply mix some of your paint in the primer and you will be good to go.
A Few Tips to Apply Primers
The list mentioned above is by no means exhaustive, and there could be other types of primers specifically made to serve your purpose. Search and pick as per your requirement.
Here we will provide you with some tips to avoid rookie mistakes and choose the right product.
Read and Follow the Instructions Carefully
Always use the recommended amount and give it ample time to dry up; otherwise, you will not have the same results.
Quick-Drying Primers are Also a Good Option
Find the specific primer that works best for your project and meets your criteria. If you are short on time and cannot wait for the primer to dry for a day, you can always move to quick-drying primers.
Do not use Interior Primers for Exterior Walls
Exterior primers have much higher VOC levels than interior primers, which makes them resistant to harsh climates and UV rays. In comparison, interior primers have a lower level of VOCs, which gives off much fewer fumes, making them relatively safer for the household.
Now let’s move on to the situations where a primer might not be necessary.
1.Reapplying The Same Color
As mentioned before, a new color-tinted primer is a must ingredient if you are re-painting. But if you are redoing the same shade just to give it a fresh look, a primer is unnecessary. But keep in mind you can only skip the primer if the previous layer is not peeling off.
2.2-in-1 Combo
Applying the primer and then painting subsequently is a two-step process that can be quite long because you have to wait for the former to dry out.
To address this issue, many manufacturers have developed primers infused paints. These paints have negated the use of primers altogether as they are infused with them. But not all products are equal, so make sure you get your 2-in-1 combo from a trusted brand.
3.Matte Surfaces
Finally, we move to matte surfaces. Most matte exteriors are already coated with a protective layer which increases their lifetime. These protective layers are provided with matte/vinyl or paint protection films (PPF). These films play the role of a built-in primer, so if you are painting on a surface that is not glossy and relatively smooth, you can totally skip the priming process.
Frequently Asked Questions
What happens if you don’t use a primer before painting the exterior?
Skipping the priming process while painting your exterior will develop flashing effects, leading to uneven paint patches. Your paint coat will have a shorter lifespan, and you will also run the risk of peeling, especially in humid conditions.
Can regular paint be used as a primer?
Using regular paint as a primer is no different than using multiple paint coats to cover a surface. It is extremely time-consuming, and the results are not as promising as using a primer. Multiple coats will also lead to a higher per-gallon price.
Do you need to prime already painted exterior wood?
The exterior, either finished or already painted, does not need a primer coat. The previous paint has already filled the pores and made the surface even, so using a primer is unnecessary.
What is the best time to paint the house exterior?
The drying process requires moderate temperatures. The best time to paint your house exterior is either spring or fall. You should never paint your exterior in snowfall or rainy seasons.
Finally-do you need a primer to paint your exterior? The answer is yes in most cases, priming reduces your cost, gives a better finish, and makes your coating resistant to climate and UV rays for an extended time. But now that you are well informed about all the categories of exterior primers and how they are used, you can make an informed decision for your specific exterior and rest easy for a long time.
Galvanized metal is a highly durable material, making it an ideal choice for several objects such as car bodies, bicycles, piping, playground equipment, etc. The only downside is that it doesn’t look aesthetically pleasing, but luckily, you can spray paint it to make it more attractive.
You can spray paint galvanized metal to increase its lifespan and improve its aesthetic appeal. However, spray painting directly on a galvanized surface will cause it to peel, so you should treat and prime the surface thoroughly before you start painting.
Spray painting on galvanized metal isn’t that simple, but if you follow the correct procedure, you can get flawless coverage without professional help at home. Let me share with you what I have learned through my experience of painting on galvanized metal.
What Are The Challenges Of Painting Galvanized Metal?
A question I get a lot is, ‘Can you spray paint zinc-plated steel?’ The reason many people feel don’t feel confident spray painting galvanized metal is that it doesn’t stick to the surface, and they end up wasting their time and energy.
Metal surfaces are coated with a thin layer of zinc to prevent rusting. That is why when you try painting zinc-plated steel directly, it reacts with the paint’s binding agents and causes the paint’s layer to crack and peel.
When you paint on a galvanized metal surface that has not been adequately prepped, the paint will have trouble adhering. Therefore, cleaning the surface and preparing it following the correct process will help you achieve lasting coverage.
Why Do You Need to Paint Galvanized Metal?
We know that galvanized metal surfaces are well-protected from short-term and long-term corrosion. This brings us to the question, ‘why do we need to paint a galvanized surface in the first place?’
The reason is that even though the material is highly durable, it is still vulnerable to environmental elements such as acidic rain, sulfur dioxide, and other reactive substances. Also, if the surface comes in regular contact with salty water, its corrosion rate would increase, reducing the lifespan of the metal.
Painting galvanized metal increases the surface’s longevity and enables it to withstand environmental stressors. In addition to providing supplementary protection, the paint helps the object look more aesthetically pleasing.
Which Paint Should You Use to Paint Galvanized Steel?
While preparing the surface properly is crucial, choosing the right spray paint that sticks to galvanized surfaces without cracking or peeling is equally important.
Alkyd or oil-based primers and paints aren’t a good fit because their chemical composition creates an unfavorable reaction with the zinc coating, resulting in the formation of a film on the surface.
This film prevents the paint from adhering to the metal as the paint dries, often leading to problems like chipping, flaking, bubbling, and peeling. Instead, you can buy oil-based and alkyd paints and primers specially designed for galvanized metal to avoid the mentioned issues.
A better option is to choose water-based primers or paints created for metals specifically. Water-based paint versions don’t react with the zinc coating or form a film on the surface, which means there will be no adhesion issues as you paint.
If you’re wondering, ‘will Rustoleum paint stick to galvanized metal?’ The answer is yes! The Rust-Oleum Galvanizing Compound is a great option for painting on galvanized surfaces. Apart from adhering well to galvanized surfaces, the paint dries to the touch within 20 minutes.
Equipment You Will Need To Paint Galvanized Metal
Here are a few supplies you will need to start your metal painting project:
Chemical degreaser
Vinegar/ Ammonia solution
240- grit sandpaper
Primer for zinc-coated metal
Spray paint for galvanized metal
Lint-free tack cloths
How To Spray Paint On Galvanized Metal Surfaces
Painting on galvanized metal objects is a multi-step process, and if you follow every step carefully, you can get excellent coverage that lasts. So, if you want to know how to paint over zinc plating, here is a step-by-step guide to help you through the process.
Step 1- Clean and Degrease The Surface
Before you start cleaning, remember that our purpose is to clean the zinc coating thoroughly, not remove it.
A simple clean-up with hot soapy water will suffice if you work on a newly galvanized surface. You will follow a similar cleaning method if the surface is fully weathered. However, if the galvanized metal is partially weathered, you must remove the surface oxide, hydroxide film, and debris.
The best way to clean a galvanized surface is to use a chemical degreaser. The degreaser helps eliminate grease, grime, and other debris without affecting the zinc coating. Simply spray the solution over the surface and use a lint-free cloth to scrub it clean.
Step 2- Wipe With Vinegar
Galvanized metal isn’t an ideal surface for painting because it is difficult to make the paint stick. However, you can improve its adhesion by wiping it with a white vinegar solution. The acid in the vinegar reacts with the metal surface and provides a more agreeable surface to paint on.
You can also use an ammonia solution instead to prep the surface but only in well-ventilated areas. So, if you’re working on a project outdoors, an ammonia solution can work well to prep the surface for spray painting.
Step 3- Allow The Metal To Dry Completely
After wiping the surface with vinegar or ammonia solution, give it enough time to dry out completely. If you’re working on a roof, it might take a few hours, depending on the weather, but an indoor project would take less time.
Step 4- Begin Sanding
Take your 240-grit sandpaper and put it to good use by sanding the metal surface thoroughly. 240-grit sandpaper is ideal for galvanized metal because it can prepare the surface well without gouging the zinc coating.
You must be careful about how much pressure you apply while sanding. Keep a steady hand and try not to overdo it.
You can remove any attachments, like bolts, etc., at this stage so you can sand the entire surface properly. After you’re satisfied with the sanding results, wipe away any debris created during the process with a clean, dry cloth.
Step 5- Apply Primer
As discussed earlier, avoid using oil-based primers when painting galvanized metal. Instead, use one designed especially for painting on zinc-coated surfaces like the Rust-Oleum Flat Primer.
You should use a primer with a water-based formula that provides a solid base for excellent paint adhesion. If you are painting a surface for outdoor use, invest in a multi-purpose primer designed for outdoor use.
Allow your primer to dry completely before you move on to the next step. If the primed surface feels tacky to the touch, let it dry for longer because painting over wet primer is not recommended.
Step 6- Start Painting
The paint application of galvanized metal is pretty straightforward. Make sure to use spray paint that’s ideal for galvanized surfaces, and apply the paint in thin layers, allowing plenty of time between coats for the paint to dry.
Spray paint usually takes 10 to 20 minutes to become touch dry on galvanized surfaces, but it can take up to 24 hours to fully cure. Refer to the paint’s label to check the recommended time so you know how long you should wait between coats.
It is possible to paint rusted galvanized metal, but it requires more prep work. If you don’t clean all the rust before painting, it will eventually spread and ruin the surface. Therefore, scrub off any rust with a wire brush or sandpaper first and then apply the primer.
Some spray paints are designed to stop rust from spreading and turn any existing rust into a non-rusting surface. However, you should sand the surface thoroughly, so you have a smooth base to paint on, regardless of the type of paint you use.
FAQs
Will paint stick to zinc-plated metal?
Paint doesn’t stick to the zinc-plated metal if the surface hasn’t been prepped properly. Using a primer before you paint also helps the paint adhere to the metal.
Can stainless steel be zinc plated?
Stainless steel can be zinc plated, offering excellent corrosion protection and a smooth, clean finish.
What spray paint can I use on galvanized metal?
Cold-galvanizing spray paints work well on galvanized surfaces. You can also use acrylic latex paint or water-based paints formulated for zinc-coated metal.
Can you spray paint over rust on metal surfaces?
No, you cannot. If you want the spray paint to apply evenly and stick to the surface, you must clean the rust and sand the object before painting.
Conclusion
Hopefully, you now know the answer to ‘can you spray paint galvanized steel.’ If you use the correct primer and paint while following all the steps outlined above, you shouldn’t have any trouble painting on a galvanized metal surface.
I finished painting the outer walls of my house, and now it was time to begin redoing the interior paint. Even though I had ordered a stock of interior paint, I did not want the leftover paint to go to waste. I decided to utilize that before I opened the new paint cans. I encountered a severe allergic reaction.
This was when I realized that you could not use exterior paint inside due to its harmful volatile compounds. These additives in the paint make it resilient to the outdoor environment and protect it from chipping off too quickly. The chemical compounds present in exterior paints release fumes that harm the human body. Exposure to such chemicals can lead to allergies and various respiratory disorders.
I don’t want any enthusiastic painters to undergo what I experienced. Thus, you should know why you can not use exterior paint inside and what will happen if you accidentally use exterior paint inside.
What happens if you use exterior paint inside?
Just as using interior paint outside has its drawbacks, using exterior paint inside comes with disadvantages too. Therefore, exterior paints are used strictly on exterior surfaces only. While they are long-lasting and using them indoors might be tempting, the health hazards they pose might make you reconsider. Exterior paints contain additives such as fungicides, mildewcides, and UV blockers, making them unfit to be used inside the house.
The VOCs (Volatile Organic Compounds) used in exterior paints are also considerably higher than in interior paints. The fumes from these chemicals are dangerous and can cause serious health issues.
When exterior paint is used outside, the volatile compounds evaporate quickly and do not cause any harm. The inside of the house does not provide adequate ventilation for this kind of paint, and if these fumes are inhaled, they can irritate the skin and respiratory system and trigger allergies.
Behr is one of the most affordable yet premium-quality paint brands. They manufacture and sell interior and exterior paints following the standard VOC limitations.
Most of their exterior paints have primer mixed in paint color, making it easier for you to paint the exterior of your house yourself. The consistency of the paint is thick enough to provide full coverage in a single coat.
Using Behr exterior paint inside is not a great idea; thus, we recommend you stick to using this paint only for exterior surfaces.
Valspar is known to manufacture excellent quality masonry paints. It has an excellent elastic formula to provide coverage on the roughest surfaces.
Valspar promises that the paints are UV resistant and do not bleach out even under harsh sun rays for years. The paint also contains active ingredients preventing mold and algae build-up.
Additionally, the brand provides a 15-year warranty for peeling, cracking, and flaking.
Many people wonder; can you use Valspar masonry paint indoors? The simple answer is no; you cannot use Valspar exterior paint indoors as it is not specialized to give the interior the finish it requires. It instead works best on coarse surfaces generally found outdoors.
Guaranteeing a tough and durable, chip-free, and bleach-free coating for up to 15 years, Perma-White exterior paint is an excellent choice to revamp the exterior of your house. The brand manufactures paints in 1500+ color variants, so you have a never-ending list of shades to choose from.
The paints are weatherproof, quick drying, and have antifungal properties to prevent paint degradation. The best part is that they are self-priming, cutting down on cost and painting time.
However, these exterior paints must be used on the exterior walls only. As per the company, inhaling fumes can injure the health and cause multiple respiratory illnesses.
If you haven’t heard of Prestige paints, you are missing out on premium quality exterior paints available in the market. Gaining immense popularity over the past few years, prestige has proven to be one of the most environment-friendly paints manufactured in America.
They have a vast variety of exterior paints most of them coming with a primer in paint bucket making it easier for nonprofessionals to paint their house.
Unlike other paint companies, they offer many shades of exterior paint so that you can choose one depending on your taste. Flat paints, Satin paints, and semi-gloss paints are available as exterior paints, each of which is weather and bleach resistant for up to 15 years.
Since their interior paints are sold separately, prestige does not recommend their exterior paints be used inside the house. Despite having low VOCs, they can still cause respiratory tract illnesses.
I have seen multiple people recommending Diamond Brite exterior paints to those who wish to paint their house themselves.
The brand manufactures a variety of oil-based, latex-based, and special-purpose paints and gives you a long list to choose from. Their customer support will also assist you with the paint type and color selection.
Even though they may cost you slightly higher than other kinds of paints, their ease of application and longevity covers the cost. Diamond Brite manufactures paints that can be used indoors and outdoors, so you can use most of their paints anywhere you wish.
Frequently Asked Questions
Can you use exterior paint inside a kitchen?
Exterior paints are strictly not to be used in confined places due to the toxic fumes that is released from them. Therefore, you cannot use it to paint kitchen walls. It will affect your health and may cause respiratory problems especially when the environment is all heated up.
Can I use exterior paint on the inside of my front door?
Exterior paints have toxic chemicals that are dangerous to health. In many states, exterior paints have now been illegalized for indoor use. This eliminates any possibility that you may consider using leftover exterior paints for the interior.
However, the front door is considered an exterior surface widely exposed to environmental and climate factors daily; you can use exterior paint inside your front door.
Can I use exterior paint inside my bathroom?
It is not advisable to use exterior paints in bathroom, infact it is strictly discouraged.
Bathrooms are high-humidity areas, and therefore you might consider applying a coat of exterior paint for extra protection. However, its chemical formula and the VOC components make it unfit for using on bathroom walls.
Can you use exterior paint inside a garage?
Even though it is not recommended, exterior paint can be used on garage walls only if they are adequately ventilated and detached from the house.
Apart from this, exterior paint is not suited for garages as they are challenging to clean. Exterior paints may be weather resistant but not to stains and scratches.
Conclusion
Exterior paints are specialized to be used on outdoor surfaces. Unlike interior paints, they can withstand direct sunlight and changing weather conditions. Nonetheless you can also know if you can use interior paint outside in this article from our website.
Outdoor paints are specifically designed to have additional chemicals that give them high durability and longevity. However, these chemicals produce toxic fumes which are harmful to health and that’s why can’t you use exterior paint inside.
I hope you found this article helpful and if you want to know more, please comment below.