Meet Raheela, your friendly neighborhood content wizard, armed with over four years of experience in the realm of writing. An enthusiast of all things tech, lifestyle, chemistry, dyes, paints, spray paints, interior design, and exterior design, Raheela crafts articles that are both informative and engaging. Dive into the world of knowledge and creativity with Raheela's articles, where every piece is thoughtfully curated to bring you insights and a dash of inspiration.
Nothing beats the look of a clean, shiny car but rusty door handles can quickly spoil the aesthetic appeal of your ride. There are two ways to fix this problem: repaint or replace them.
Replacing car door handles can be expensive, but fortunately, repainting them delivers comparable results that last a long time.
Yes, you can spray paint car door handles. Start by cleaning the handles with soap and water, followed by light sanding. Apply a suitable primer to allow the paint to stick to the surface, and finish it off with a top coat.
Spray painting car door handles at home is easy, but the results might be disappointing if you don’t use an effective technique. I will share practical tips that work and keep your handles looking new and shiny for longer.
Can You Paint Car Door Handles?
Yes, you can!
Car door handles are either made of metal or plastic; therefore, it’s important to know the material of your handles before starting the DIY project. Once you know the surface you’re dealing with, you can choose the primer and paint most suitable for it.
Does Spray Painting Car Door Handles Last?
If you need a car door handle paint repair, opting for the DIY route is a great idea. However, repainting your door handles at home also comes at a cost, meaning the results should be lasting enough to justify the money and effort spent on it.
The good news is, spray paint on car door handles does last as long as you prepare the surface correctly and use a suitable primer and paint.
You should remember that car door handles experience a lot of wear and tear and are used constantly. For this reason, you must ensure the paint application is fool-proof and delivers durable results.
If you want to give your car a complete makeover, learn how to spray paint your car dashboard to refresh your ride’s interior and exterior.
A Step-By-Step Guide For Painting Car Door Handles
If you’re wondering how to paint car door handles, this guide will give you the confidence to paint them like a pro! So, let’s get started.
Step 1: Clean The Surface
Starting with a clean surface is crucial because you don’t want dirt on your freshly painted car door handles.
Grab some soap and water and scrub the handles with a washcloth. Remove all dirt and grime so your primer has a clean foundation.
Pro Tip: Use a degreaser to cut your cleaning time and eliminate grime completely.
Step 2: Sand The Handles
Some tend to skip this step, thinking it’s unimportant, but sanding gives your primer a fair chance to stick to the surface. It promotes adhesion and ensures lasting results.
Take fine 120-grit sandpaper and sand the handles lightly. Don’t apply too much pressure, or you might scratch the surface. Next, wipe the handles with a tack cloth to remove sanding debris.
You can skip this step if you’re working with metal handles.
Step 3: Secure The Surrounding Areas With Tape
Now that your handles are ready for priming use painter’s tape to cover the areas you don’t want to paint.
Carefully tape off the car’s door and the lower side of the windows, only keeping the handles visible. This will help ensure the overspray doesn’t ruin your car’s exterior.
Pro Tip: Stick to painter’s tape since it’s great for this purpose and comes off easily without messing the paint beneath it.
Step 4: Apply Primer
Primer helps create a suitable base that paint can stick to. Although it’s tempting to skip it, this step is the difference between a botched-up paint job and one that stays looking as good as new for long.
Choose a primer according to your surface; if you’re painting plastic handles, select a primer that sticks to the material, and if your handles are made of metal, any automotive primer will work.
Shake the can for a minute or two and spray a light layer of primer on the car handles. Allow the first coat to dry before spraying on another.
Following the instructions given on the primer can let the handles dry before moving on to the next step.
Pro Tip: Some paints deliver the benefits of primer and paint in a single can; you can choose a similar formula to skip this step.
Step 5: Paint Away!
Just like the primer, make sure you’ve selected a spray paint that’s best suited for the surface you’re working on.
Shake the can well and spray an even layer of paint on the handles. Be careful not to spray too much paint at once, as it may cause drips and uneven finished results.
Wait 15 minutes before applying the second coat of paint, or check the paint label for drying instructions.
Some paints don’t require you to apply a top coat as the formula is durable on its own. However, spraying a final layer of top coat seals the paint and protects it from chipping and peeling.
What Is The Best Spray Paint For Door Handles?
Here are my top picks for spray paints on car door handles.
The Dupli-Color perfect match is an automotive spray paint specially formulated to match the exact color of your car’s original factory-applied coating. The formulation works well on metal and plastic door handles and can be used for later touch-ups.
The Dupli-Color Perfect Match is easy to use and delivers high-quality, fast-drying acrylic lacquer that lasts.
The Rust-Oleum enamel spray is another great option that works on metal, and plastic car door handles. The paint’s formula is UV and weather-resistant and delivers vibrant results that last. Rust-Oleum paint dries to the touch in just 15 minutes so that you can finish your paint job quickly.
Rust-Oleum Painter’s Touch is a popular choice because of its versatility. It has a chip-resistant, low-odor formula that works on plastic, metal, and other interior/exterior surfaces. The oil-based paint provides excellent coverage and an even finish, making it ideal for any DIY paint job.
The Krylon spray paint includes primer in its formulation, so you don’t need to worry about applying it separately. The Krylon paint is suitable for metal and plastic surfaces and delivers superior color that’s durable.
FAQs
How To Paint Interior Car Door Handles?
You can renew your interior car door handles easily with spray paint. Start by washing the car door panel with soap using a sponge. Next, use sandpaper to roughen the hard vinyl and prepare it for better paint adhesion. Mask off all the areas you don’t want to color, apply primer, and finish with two coats of paint.
Is It Worth Spray Painting Door knobs?
It is worth spray painting door knobs and car handles as it quickly refreshes its appearance and saves you money that you’d otherwise have to spend on replacements.
Is Spraying Better Than Painting Car Door Handles?
Spray painting delivers even coverage compared to painting with a brush. The application is quick and mess-free, making it a popular choice for DIY enthusiasts.
Conclusion
Spray painting car door handles is a quick way to spruce up your ride’s exterior. You can even find out how to paint car rims to upgrade your car. Just follow the easy steps above to achieve professional results your friends will envy.
Sage green resonates with feelings of tranquility, renewal, and progress. It makes you feel closer to nature and creates a sense of balance whether it’s used on a painter’s canvas or added to your home’s décor.
The only problem is that it isn’t a regular color you can find in your painting arsenal, and more than often, it needs to be created from scratch. So, how to make sage green color?
There are different ways to make sage green; the easiest one is mixing a dash of grey color with green.However, you will need to experiment with other color combinations, such as yellow/ blue and yellow/ blue/ red, to achieve a full array of sage hues.
Mixing colors in the right ratio is key to achieving the perfect shade of sage. I will tell you how to create a customized sage green color palette using your existing paints. So buckle up because I have several tricks up my sleeve that you’ll love.
Let’s begin with the basics!
What Is Sage Color Like?
Sage green color sits comfortably on the color wheel nestled between yellow and green, but it is predominantly a shade of green. Looking at it, you will find that sage is a gray-green hue that resembles dried sage leaves.
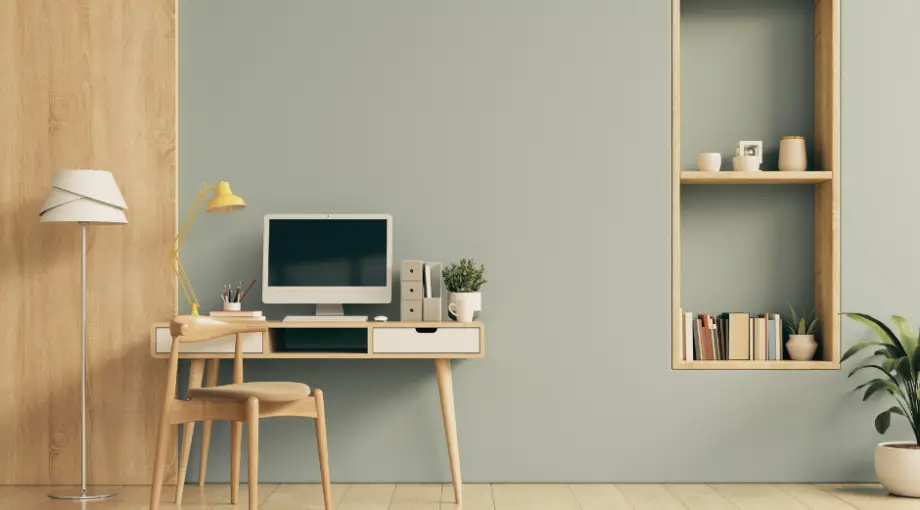
Since the color is connected to green, it symbolizes purity, calmness, freshness, and prosperity. It’s no wonder sage green has been hailed as a favorite in the home décor industry.
The calming visual properties of sage green combined with its timeless appeal means it can be incorporated creatively in traditional as well as contemporary spaces. So, if you want to spruce up your home or workplace interior, sage green is an excellent option to consider.
What colors make sage green?
If you’re wondering what two colors make sage green, the simple answer is green and grey. However, you should keep in mind that sage green has several shades that can be achieved by mixing other color combinations.
As sage is primarily green, you can also create it by mixing yellow and blue and tweaking the ratios to get the perfect sage color. If you’re satisfied with the initial dark sage green, you’re ready to start painting, but if you need to adjust its brightness, white paint is your best bet.
Mixing red with blue and yellow is another way to get sage color. But you should be careful adding red to the mix as it can quickly overpower the color.
Pro Tip: There are more than one ways to make sage green color, so don’t give up until you’ve given each of them a fair chance.
3 Ways To Make Sage Green Paint
If you want to create a customized sage green color palette, all you need are a few paints, a palette, and a mixing knife. Here, I will discuss three ways you can achieve the beautiful sage hue using the existing paints in your arsenal.
It’s time to mix things up!
Method 1
For this method, you’ll need four colors: blue, yellow, white, and black.
Mix one part blue with two parts yellow to make the color green.
Make a dark grey color with one part white and ½ part black. Remember that you can darken the color with just a dash of black but lightening it will require a lot of white paint, so add the black gradually.
Add a little grey color that you’ve made to some of the green on the palette.
Slowly mix the two colors to achieve the perfect hue and intensity.
Pro Tip: Work with primary colors to make the green shade, as it will allow you more control over the final result.
Method 2
This method only requires two colors: blue and yellow.
Mix one blue and two yellow parts to create the base for your sage green color.
Add more yellow to the mix to brighten up the color.
You can play around with different quantities of green and yellow to get the perfect shade of sage green you’re looking for.
Pro Tip: You can add white color to the paint mix if the color isn’t light enough for your preference.
Method 3
For this method, you need red, yellow, and blue.
Take two parts of yellow and mix it with one part of blue for a basic green color.
Separate a small amount of the green color you created on a clear side of the palette.
Add one part of red to the separated green color and mix until you get brownish-red paint.
Now, gradually add the brownish-red paint to the green color for the perfect shade of sage green.
Pro Tip: Do not add red directly to the green color, as too much of it can overpower the color mix leaving you no choice but to start over.
How do you darken sage green?
If you’re not happy with the sage green color and wish it was a little darker or more neutral-toned, don’t fret because the solution is pretty simple.
All you need to do is add some grey color to the sage green, and the shade will instantly darken and look more subdued. Just make sure to introduce grey gradually so it doesn’t ruin the color you’ve already created.
Pro Tip: Adding grey will darken sage green but dull its brightness and intensity.
How to make light sage green paint?
You can lighten sage green paint by adding white to the mix. However, it will also make the color appear more subtle and muted.
If you don’t want to compromise the color’s brightness, you can add a lighter shade of green to reduce the color’s intensity but still maintain its freshness.
How To Create Sage Green Digitally?
If you want to nail the exact sage green color in your digital designs, it’s important to know its color code and identification across various systems.
The Hex code of sage green is #B2AC88, and if you’re working in an RGB colorspace, the percentage representation of the color is 70% red, 67% green, and 53% blue.
For a print project, you will need percentages for CMYK colorspace- 0% cyan, 3% magenta, 24% yellow, and 30% black.
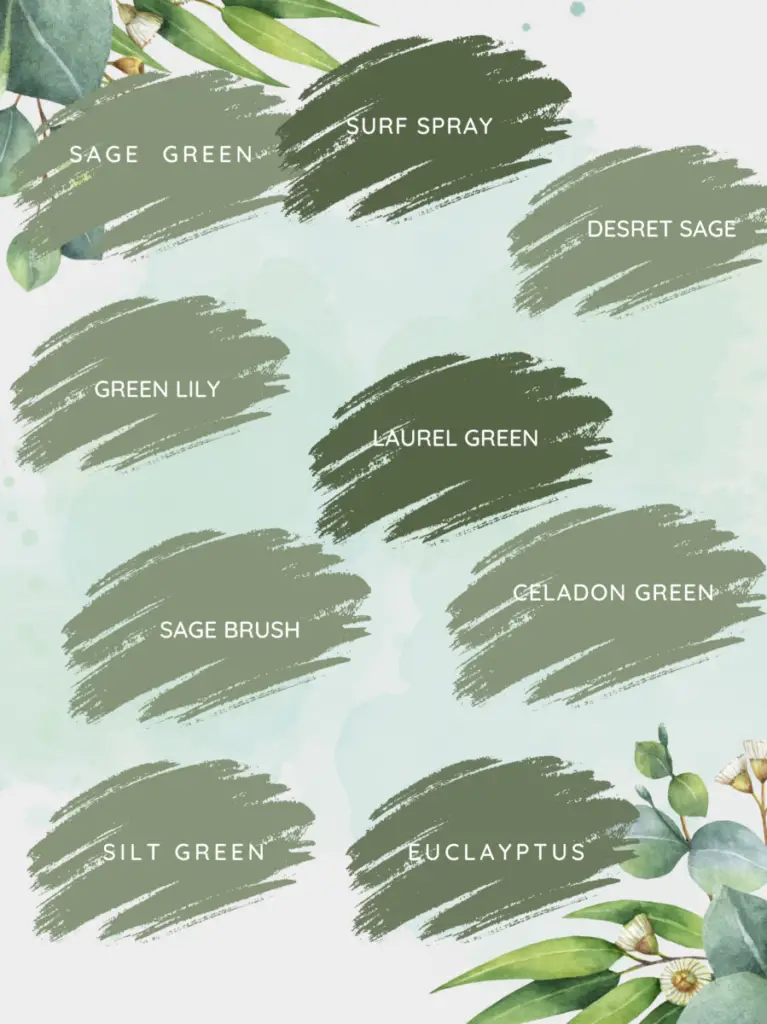
Here are a few popular shades of sage green that you can explore in your digital creations.
Shade Name
Hex code
RGB
CMYK Color Code
Sage green
#b2ac88
178, 172, 136
0, 30, 24, 30
Surf spray
#aabfb8
170, 191, 184
11, 0, 4, 25
Desert sage
#aaae9f
170, 174, 159
2, 0, 9, 32
Green lily
#b5c6b4
181, 198, 180
9, 0, 9, 22
Laurel Green
#acbaa1
172, 186, 161
8, 0, 13, 27
Sagebrush
#517470
81, 116, 112
30, 0, 3, 55
Celadon Green
#b2c1a2
178, 193, 162
8, 0, 16, 24
Silt Green
#adc3b7
173, 195, 183
11, 0, 6, 24
Eucalyptus
#9cab9e
156, 171, 158
9, 0, 8, 33
What is the best color combination for sage green?
The on-trend shade of sage green is having its moment in the spotlight as more and more homeowners are incorporating it into their living spaces. This muted color can transform your home into a peaceful haven for relaxation and attune your workplace to nature and equilibrium.
Since the color is inspired by nature, it works beautifully with natural and earthy materials and textures. It can be paired with different types of wood furniture and various materials like rattan and jute.
Here are my top 5 sage green color combinations.
Sage Green With Earthy Browns
There is something about earthy browns that instantly soothes your nerves and makes you feel grounded, but when you combine its properties with sage green, all its effects are amplified.
This color combination is perfect for homes in bustling cities as it provides a grounding connection to nature.
You could pair a sage green throw with an earthy brown or light ash neutral-toned bedspread to invite warmth into your bedroom. You could also add sage green accents to a kitchen with earthy brown cabinets.
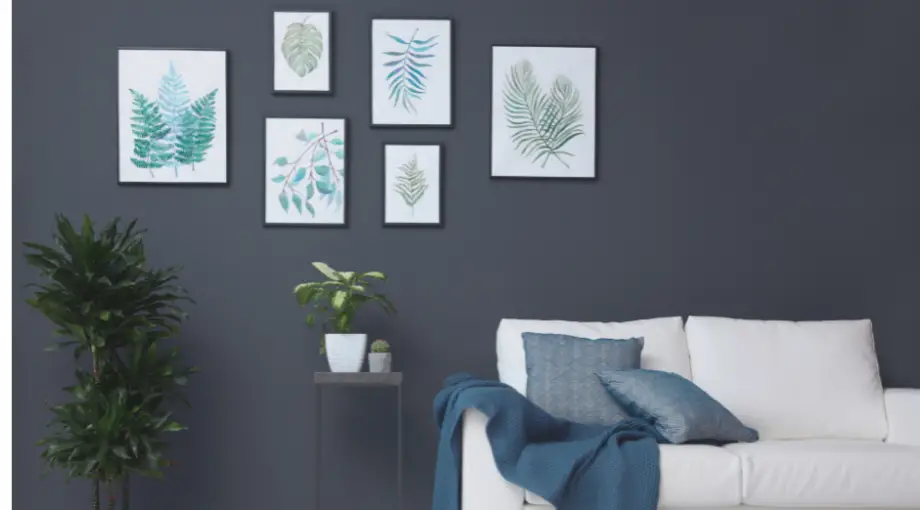
Sage Green With Black
Here’s a color combination that demands attention for all the right reasons!
Black is a neutral color that highlights any color you pair it with, and sage green and black make for a dynamic space. This powerful color combination looks indulgent, modern, and chic and can add personality to any room.
There are several ways to use sage green with black. You could design your study or workstation in the color combination to invite positive energy. Or design your living room using the two colors for a modern and fresh appeal.
Sage Green With White
Not a fan of black for home interiors, but still want sage green to shine against a neutral backdrop? White walls are the answer you’re looking for!
White compliments sage green exceptionally and creates a fresh and calm ambiance in living spaces.
Whether you place sage green accent furniture against white walls or redo your kitchen with sage cabinets and white marble tops, the result will make you feel alive and happy!
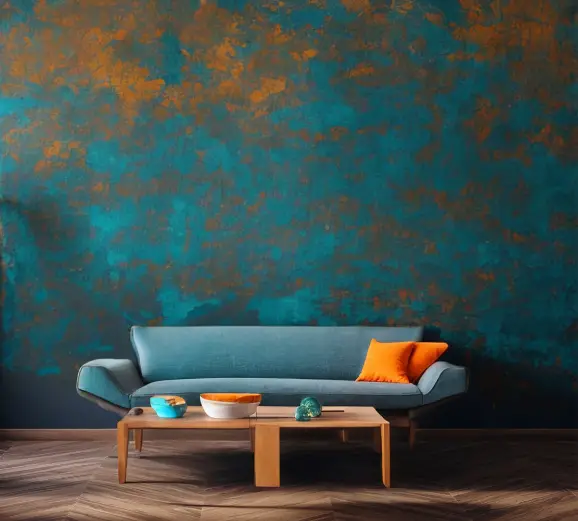
Sage Green With Muted Orange
Sometimes, all you need is a pop of color to brighten up your space, and what better color to liven things up than warm shades of orange?
Muted orange compliments sage green very well and can be used to create some drama in an otherwise boring room. However, you shouldn’t go overboard with orange, or the sage green will lose its soothing effect in the chaos.
Instead, use warm shades of orange sparingly across the room. For example, you could add orange floor cushions against a sage green wall or place a tangerine throw on your sage green sofa.
Just remember, less is more when mixing up these two colors.
Sage Green With Dark Stone
Sage green fits right in with natural materials like hardwood floors, stone tile, butcher-block countertops, and other natural finishes.
Dark stone compliments the sage color and provides a feeling of freshness and groundedness. This color combination looks exceptional in kitchens, where dark stone can be used on counters, islands, and cabinetry, and sage green can be used on walls.
What I love about these two colors is that they can be used to create various kitchen styles, from rustic to more contemporary.
What acrylic colors make sage green?
If you need sage green acrylic paint for a project, mixing up different hues should be fun, allowing you to add depth and dimension to your painting.
Start by using sap green as the base and add zinc white, raw sienna, and ultramarine blue to the base color for sage green.
Initially, sap green was derived from buckthorn berries; since the color was organic, it wasn’t permanent enough. However, you don’t need to worry about that anymore, as sap green is now made using modern pigments that deliver lasting results.
Quick Guide For Making Sage Green With Acrylic Paint
Place pea-sized amount of sap green, zinc white, raw sienna, and ultramarine blue on your palette.
Using a palette knife, place half of the zinc white on a separate end of the palette.
Mix a quarter of the sap green into the separated zinc white.
Carefully add just a dash of raw sienna to this mix and combine the three colors until you achieve a uniform shade.
Match the sage green to the color of your preference and make small adjustments until you’re happy with the results.
If you want to intensify the hue, add a little more saps green.
If you want to subdue the sage green and make it more earthy, add another dash of raw sienna.
Suppose the color is too dark; you can lighten it up with some zinc white.
If you prefer a cooler shade of sage green, add a little aquamarine blue to change the tone of the color.
Pro Tip: It can be tricky to add very small quantities of paint, so the best way to get the littlest possible amount is to dip your palette knife in a blob of paint and pull it out upright. The color you have sticking to your palette knife should be enough to do the trick.
FAQS
How do you make sage green food coloring?
Suppose you want sage green frosting for your forest-themed cake; you can make the color easily with food coloring. Add 6 drops of yellow and 2 drops of blue food coloring to the frosting to make a base color. Then add one small drop of brown to achieve the perfect shade of sage green.
How to mix sage green oil paint?
Mixing colors with oil paints is easier since it remains wet for longer. Simply mix two parts of yellow oil paint with one part of blue to get a base color. You can then experiment with red, yellow, and grey colors to get your preferred sage green shade.
How to make green with paint?
Green can be made using the primary colors yellow and blue, and you can tweak the amount of the two in your mix to achieve different shades of green.
Conclusion
Sage green is a unique color that symbolizes years of wisdom and the Universe’s truth. Using it for your home’s interior can evoke feelings of satisfaction and balance, something we all need at the end of a busy day.
Sage green also enhances the aesthetic appeal of your artwork when used creatively, so don’t be shy to grab some colors and start mixing them up to create a personalized sage green palette.
Most painting kits contain skin-colored paints that are too peachy or brown shades that are too unnatural to be used for painting the color of skin. So, what’s the solution? You can either search the art supplies store for the perfect shade of tan or create one with the colors you already have at home.
Believe it or not, making your own shades of tan is highly satisfying because you can see the actual color on the palette and adjust it according to your needs.
The quickest way to make tan paint is to add some white to your brown color; however, the shade will lack depth and intensity. Instead, you should blend blue, red, yellow, and white in varying quantities to get the perfect hue of tan.
Several shades of tan can be used to elevate your masterpieces, and in this guide, I will tell you how you can play around with the right colors to explore its shade range.
What Colors Make Tan Paint?
At first glance, tan looks like light brown, and you will be tempted to add some white paint to brown and create the color. But you will quickly notice that the color lacks the complexities and depth of a true tan.
In the same way, if you add white to beige, you will end up with a tan color with a pinkish hue. If that’s what you’re looking for, you have found the answer to what two colors make tan, but if you desire a deeper and more intense tint, a combination of beige and white isn’t the solution.
The reason is that skin contains other pigments that define its undertones. Some people have pink, peach, or red undertones, while others can have yellow, olive, and orange undertones.
Therefore, to achieve a tan color that stands out from quicker alternatives, you must first mix blue, red, and yellow to make a rich tone of brown with prominent undertones and then add white to subdue its darkness.
How Do You Make Tan Skin Paint? A Step-by-Step Guide
Tan invokes feelings of security and warmth, like most shades from the brown family. The earthy and neutral hue of tan provides a sense of stability wherever it is used.
Now that you know what colors are needed to make tan paint, let’s discuss the simple steps you must follow to make it.
Step 1: Squeeze Out White Paint
Since tan is primarily a light, neutral color, you will need more white paint on your palette. Also, it’s always better to start with a light color and build the intensity as you go.
So, generously squeeze out some white paint on your palette before adding any other colors.
Step 2: Make A Custom Brown Color
Next, take out some red, blue, and yellow paint on the palette to make a brown color. You should keep in mind that blue paint gives brown its darkness and intensity, so start with a small quantity and add more only if needed.
At this point, you can experiment with varying quantities of yellow and red to see which blend looks closest to the tan color you’re looking for.
Pro Tip: Remember to clean your brush after dipping it in color. You don’t want your mix to look more yellow, red, or blue just because you forgot to wipe the brush after adding that color to your mixing palette.
Step 3: Mix All The Colors
Once you have all your colors on the palette, it’s time to mix them thoroughly to achieve an even color. If you’re not careful at this step, you can end up with streaks of individual colors in your tan shade.
How To Make Tan For Digital Art
If you need to create a digital version of your painting, you must know the CMKY% and RGB% of the tan color to get the exact shade you want.
To make tan, you need C 0%, M 14%, Y 33%, and K 18%. This will give you a basic tan shade, but you can always tweak the percentages to lighten or intensify the color. For example, if you want a darker tan, you can increase the percentage of K. Similarly, for a brighter tan, you can decrease the level of K.
The RGB code of tan is #D2B48C, but if you prefer a darker hue, you can increase the value of red and blue to check if the color matches your preference. In the same way, you can decrease the value of red and blue to make your tan color lighter or add a higher percentage of white to it.
How To Make Different Shades Of Tan
Like other colors, tan also comes in various shades that you can mix at home simply by adjusting the values of the colors needed to make tan. Since tan is mostly used to paint skin tones in paintings, having expertise in different hues of tan can be very helpful in representing people of multiple backgrounds and ethnicities.
How do you make brown tan?
Brown tan, also called tan brown, has the HEX code #AB7E4C. It is a warm color that primarily belongs to the yellow color family. Brown tan has darker yellow tones that give it its distinct color.
How to make brandy color?
Brandy is a popular shade of tan as it’s lighter and brighter than traditional tan. The HEX code of brandy is DABC94, and it can be achieved by increasing the quantity of white in your color mix.
Windsor tan has the HEX code A75502, a warm color that leans towards orange. You can get this color by adding a dash of orange or red to your tan mix.
How to make Tuscan tan?
Tuscan tan is a rich tan color with earthy brown tones. The HEX code of Tuscan tan is #A67B5B. Tuscan tan is a slightly darker hue that can be achieved by reducing the quantity of white in the mix.
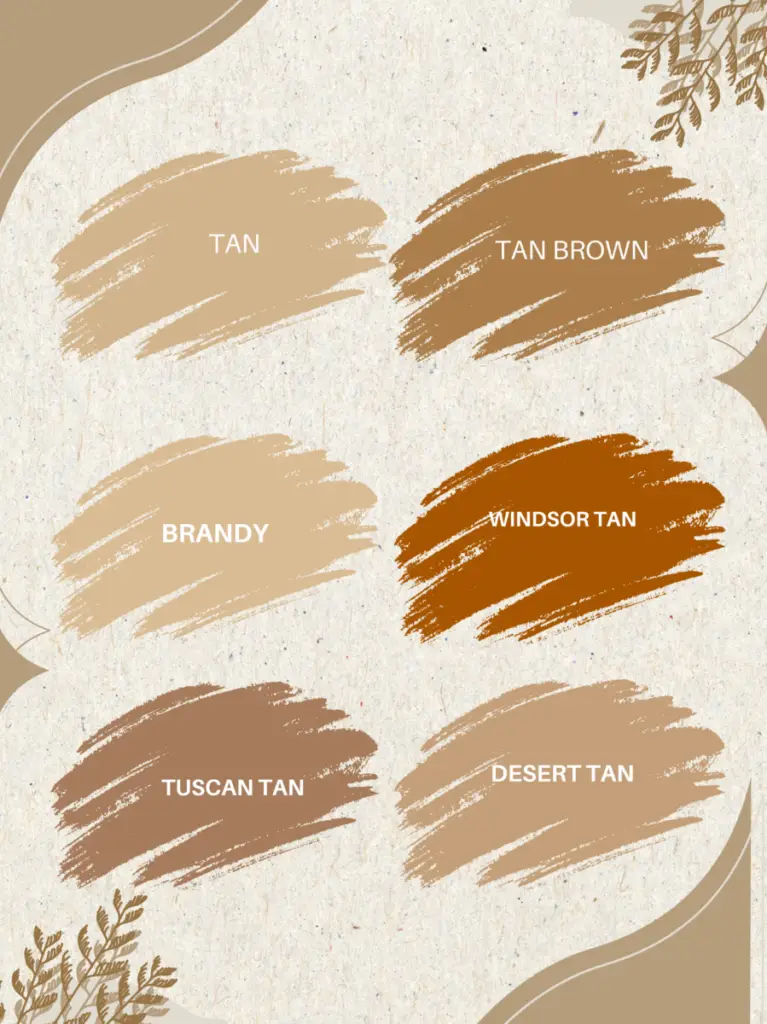
Desert tan has the HEX code C49E78, a muted, earthy color that captures the sunbaked warmth of the Sahara Desert. It comprises 76.9% red, 62% green, and 47.1% blue in RGB format.
Shade Name
HEX Code
RGB
CMYK
Tan
D2B48C
R: 210 G:180 B:140
C: 0% M: 4%, Y: 33% K:18%
Tan Brown
AB7E4C
R: 171 G: 126 B: 76
C: 0% M: 26% Y: 56% K: 33%
Brandy
DABC94
R: 218, G: 188, B: 148
C: 0%, M: 14%, Y: 32%, K: 15%
Windsor Tan
A75502
R: 167 G: 85 B: 2
C: 0% M: 49% Y: 99% K: 35%
Tuscan Tan
A67B5B
R: 166 G: 123 B: 91
C: 0% M: 26% Y: 45% K: 35%
Desert Tan
C49E78
R: 196 G: 158 B: 120
C: 0% M: 19% Y: 39% K: 23%
Different Shades of Tan – HEX, RGB and CMYK
How To Adjust Tan Color Brightness And Warmth?
A custom color palette allows you the freedom to create shades and tones that perfectly match the shade you have in mind, with just the right brightness and warmth. Here is a quick guide that will help you adjust your tan shade.
How To Make Tan Darker?
There are a couple of ways to make your tan color darker. The first one is to add a dash of black to your mix but remember to keep a very light hand because it can quickly overpower the color.
If you don’t feel confident adding black to the mix, add some red or brown paint to your tan to make it darker. However, adding too much can make the mix look muddy and less vibrant, so be careful to introduce a small amount.
How To Make Tan Lighter?
Suppose your mixed color is too dark; adding white paint is the best way to lighten it. You can also add a bit of yellow or green to counter the darkness but make sure to add just a little since it can alter the tone of your tan color and turn it into beige.
How To Make A Warmer Tan?
Although tan is primarily a neutral color, you can always make it warmer to achieve the skin color you’re looking for. Yellow is an excellent addition to warm your tan, but bright yellows can produce a very neon shade that might not work well for certain skin tones. Therefore, stick to medium hues of yellow.
You can also use orange to change the tone of your tan and make it warmer, but if you want an even richer hue, try adding red to the mix.
How To Make A Cooler Tan?
Adding more blue is the quickest way to neutralize your warm tan paint mixture. Another trick is to use cool-toned brown, yellow, or red to make the tan mix. This will help you achieve a cool tan without compromising its hue or depth.
Are Beige and Tan The Same?
Beige is a lighter version of tan, so some people might think the two can be used interchangeably.
If you’re wondering, ‘What colors make beige?’ the answer is white and yellow, unlike tan, which needs white, blue, red, and yellow. It’s obvious from their color composition that tan has more depth and complexity than beige.
To find out how to make beige, you must take white paint and add a drop of yellow to the mix. The yellowish hue that is produced turns a white base into a beige or cream color.
Complimentary Colors That Make Tan Pop!
Are you wondering what colors look the best paired with tan? I have some exciting combinations based on color theory for you to try.
Tan With White
Since tan is a neutral color, it compliments various shades and tones across the color wheel. If you like the ‘clean space’ vibes, tan and white can be an excellent combination for your interior walls. It creates the illusion of a wider space and looks modern and chic.
Tan paired with a soft pink like Resounding Rose (#D1918C) creates a fresh and soothing ambiance. You can even add some green to your interior palette, like the Sherwin Williams Dancing Green (#CBD18C), to make your room more interesting.
Here’s a combination you will find in many acrylic masterpieces. You can pair tan with monochromatic colors such as Brandy (DABC94), Gold (E8CAA2), Calico (E2C49C), and Peach Yellow (FDDB5) to portray different shades of desert sand, mountains, and skin tints.
What Interior Colors Go With Tan?
Do you love the earthy and warm feeling of tan but are not sure how to make it work inside your home? Don’t worry because I have the answers you’re looking for.
First things first, tan being a neutral color, looks great paired with a variety of hues and works seamlessly with a range of aesthetics. However, some colors can elevate tan shades and transform your living spaces.
Here are my top picks:
1. Tan and Purple
Since tan is a light, neutral color, it looks outstanding with contrasting colors from the purple family. Depending on how low or high you want the contrast, you can experiment with a range of shades, from pale purple (#FAE6FA) to Eminence (#6C3082), for the perfect combination.
Tan and purple can be used together for decorating your bedroom, living room, and even the kids’ nursery. Combining the two creates a warm and welcoming ambiance where each perfectly compliments the other.
If you’re unsure about the high contrast, make small additions in purple before a big commitment. For example, add cushion covers in English Violet (#563C5C) to your tan leather sofa for a luxe and majestic feel.
2. Tan And Blue
Nothing compares to the serenity and calmness of a blue interior, and what better color to pair it with than tan?
You can use blue accents on tan walls to infuse a sense of relaxation in any living space. This color combination also looks amazing in bathrooms and bedrooms, whether you want to unwind in the bathtub after a long day or get a good night’s sleep.
There are several blue shades that you can pair with a tan interior. For example, you can decorate your living room with tan furniture, Prussian blue (#003151) curtains, or a rug. Don’t be afraid to add some white to the mix, as it adds a touch of freshness to the earthy undertones of the room.
3. Tan And Yellow
Yellow is often overlooked as an interior color because of its brightness, but using it sparingly can give any room a unique and modern look.
If you find yellow’s vibrancy too much for your tan walls, you can opt for warm golden yellow (#EEC61F) against tan walls with white and dark wood accents.
Since the combination of yellow and tan isn’t high in contrast, it balances the earthy tones of tan with the vibrancy of the sun. The room looks alive, and you feel energized, but remember to add small splashes of yellow color, or it will overpower the tan interior.
4. Tan And Teal
Now, here’s a color combination that homeowners love!
Teal (#008080) paired with tan creates an accentuating impression in home decor that can elevate any living space. The color teal itself is a soothing and rich hue that screams attention, and when you combine it with tan walls or furniture, the result is striking yet relaxing. In short, a match made in heaven!
The contrasting colors can be used for the bedroom, living room, or dining area. Whether you place a tan sofa against a teal-colored wall or a teal sofa against a tan-colored wall, they will complement each other seamlessly.
FAQs
How to make orange?
To make the color orange, you need red and green colors. Start by mixing red and green to get the color yellow. Next, add more red to get the desired shade of orange.
How to make brown paint?
If you want to find out how to make brown, just mix the colors red, blue, and yellow, and you will get a basic shade of brown.
How to make grey?
The two colors that make grey are white and black, and you simply need to mix equal parts of both to get a neutral shade of grey.
What colors make a tan with food coloring?
Add 1 drop of red food coloring to 10 drops of yellow to make tan, but if the color looks grey or black, add another drop of red to the mixture.
Conclusion
Mixing up colors is fun, especially if it perfectly compliments your artwork. Follow the tips in this article to customize your shade of tan, and also check out how to make teal paint for a tan combination that truly pops!
Spray painting is a popular method for applying coatings and finishes to various surfaces. However, it is essential to recognize that spray painting activities are subject to specific laws and regulations, particularly in the state of Florida. These laws serve several crucial purposes, including maintaining public safety, safeguarding the environment, and ensuring aesthetic harmony within communities.
In Florida, spray painting laws play a significant role in controlling air pollution and preserving air quality. The state has established stringent standards and guidelines to minimize the release of harmful volatile organic compounds (VOCs) and other pollutants into the atmosphere. These regulations aim to protect the health and well-being of both individuals and the environment.
Some of the basic laws governing spray painting in Florida include obtaining the necessary permits for spray painting activities, ensuring compliance with air quality standards, proper management of hazardous materials, adherence to waste disposal regulations, and the use of appropriate safety precautions and personal protective equipment (PPE).
By adhering to these laws, spray painters in Florida can contribute to the overall well-being of their communities while enjoying a safe and sustainable work environment. Understanding and complying with spray painting laws is not just a legal obligation but also a responsible commitment to creating a cleaner, healthier, and more aesthetically pleasing Florida.
Understanding the Importance of Spray Painting Laws in Florida
Spray painting laws play a vital role in maintaining environmental and public health standards.
They ensure the safety of workers
These laws also preserve the aesthetic appeal of communities
The spray painting laws are designed to regulate the use of spray paint, control emissions, and minimize the negative impacts associated with spray painting activities.
Understanding the importance of spray painting laws is crucial for both individuals and businesses engaged in these activities.
The Purpose and Significance of Spray Painting Laws
The purpose of spray painting laws is multifaceted.
Controlling VOC Emissions
These laws aim to protect the environment by controlling the release of harmful substances into the air. Spray paint contains volatile organic compounds (VOCs) that can contribute to air pollution and have adverse effects on air quality. By imposing limits on VOC emissions and promoting the use of low-VOC paints, spray painting laws help reduce air pollution and safeguard the environment.
Preventing and Avoiding Health Hazards
Spray painting laws are significant in ensuring the health and safety of workers and the general public. Exposure to the fumes and chemicals present in spray paint can pose serious health risks, such as respiratory problems and allergic reactions. By establishing regulations and guidelines for proper ventilation, protective equipment, and safe work practices, these laws help minimize health hazards and protect individuals involved in spray painting activities.
Protecting Public and Private Property
Spray painting laws contribute to the aesthetic preservation of communities. Unregulated spray painting can lead to unsightly graffiti and vandalism, negatively impacting the visual appeal and property values of neighborhoods. By implementing restrictions on where and when spray painting is allowed, these laws help maintain clean and attractive public spaces.
By adhering to and understanding the importance of these laws, individuals and businesses can actively contribute to a cleaner, safer, and more aesthetically pleasing environment.
Key Regulations and Restrictions on Spray Painting in Florida
Environmental Protection Agency (EPA) Regulations
Spray painting activities in Florida are subject to various regulations set forth by the Environmental Protection Agency (EPA). The EPA plays a critical role in ensuring the protection of the environment and human health from the harmful effects of spray paint emissions. Understanding these regulations is essential for individuals and businesses engaged in spray painting to remain compliant and environmentally responsible.
One of the primary focuses of EPA regulations is the control of Volatile Organic Compounds (VOCs) emitted from spray paint. VOCs are chemicals that can evaporate into the air and contribute to air pollution. To limit the release of VOCs, the EPA has established strict guidelines regarding permissible VOC content in spray paint products. These limits vary depending on the type of paint and its intended use.
Compliance with EPA regulations typically involves using low-VOC or zero-VOC paints that meet the specified standards. These paints are formulated to have lower emissions and minimize the impact on air quality. By using environmentally friendly paint options, individuals and businesses can significantly reduce their carbon footprint and contribute to cleaner air.
In addition to VOC regulations, the EPA also requires businesses engaged in spray painting to comply with specific reporting and compliance obligations. This includes record-keeping requirements related to paint usage, emissions data, and waste management practices. It is crucial for businesses to maintain accurate records and submit necessary reports to demonstrate their adherence to EPA regulations.
Florida Department of Environmental Protection (FDEP) Guidelines
In Florida, the Florida Department of Environmental Protection (FDEP) also plays a significant role in regulating spray painting activities. The FDEP works in conjunction with the EPA to ensure environmental protection and compliance with state-specific guidelines.
The FDEP regulations encompass various aspects of spray painting, including permitting and licensing requirements. Businesses engaged in spray painting operations may need to obtain appropriate permits or licenses to operate legally. These permits help ensure that spray painting facilities meet certain standards and requirements related to emissions control, waste management, and facility design.
Furthermore, the FDEP provides guidelines and best practices for waste disposal and recycling associated with spray painting activities. Proper disposal of paint waste is essential to prevent contamination of soil and water bodies. The FDEP emphasizes the importance of using designated waste collection and disposal methods to minimize environmental impact.
To stay in compliance with FDEP regulations, individuals and businesses should familiarize themselves with the specific requirements applicable to their region and industry. It is advisable to consult the FDEP website or contact the department directly to obtain accurate and up-to-date information on permits, guidelines, and compliance procedures.
In addition to federal and state regulations, local city and county governments in Florida may also establish their own regulations governing spray painting activities. These local regulations are designed to address community-specific concerns and ensure the preservation of local aesthetics.
Local regulations often include restrictions on spray painting in residential areas to prevent unauthorized graffiti and vandalism. Zoning requirements may be in place to designate specific areas for commercial spray painting facilities. These regulations aim to strike a balance between allowing legitimate spray painting businesses to operate while mitigating the potential negative impact on residential neighborhoods.
Understanding and complying with local regulations is crucial to avoid penalties and maintain good relationships with local communities. It is recommended to consult with the respective city or county government offices to obtain information on any specific restrictions or permits required for spray painting activities within their jurisdiction.
By adhering to federal, state, and local regulations, individuals and businesses can ensure their spray painting activities are conducted in a responsible and compliant manner. Being proactive in understanding and implementing these regulations not only helps protect the environment and public health but also demonstrates a commitment to operating within the bounds of the law.
Penalties for Violating Spray Painting Laws in Florida
Civil and Criminal Penalties
Violating spray painting laws in Florida can result in both civil and criminal penalties, which serve as deterrents and consequences for non-compliance. Understanding the potential repercussions is essential for individuals and businesses engaged in spray painting activities.
Civil penalties may include fines, fees, and restitution for any damages caused by the violation. The specific amount of the fine can vary depending on the severity of the offense, the extent of the violation, and whether it is a first-time or repeated offense. These fines can range from hundreds to thousands of dollars, and they can accumulate quickly for repeated or persistent violations.
In addition to civil penalties, there may be criminal charges associated with severe or deliberate violations of spray painting laws.
Criminal penalties can lead to more significant consequences, including potential imprisonment, probation, or community service. The severity of the criminal charges depends on factors such as the extent of environmental damage, intentional vandalism, or willful disregard for public safety.
What are the penalties for graffiti in Florida?
The penalties for graffiti in Florida vary depending on the amount of damage caused.
If the damage is $200 or less, it is a misdemeanor of the second degree, punishable by up to 60 days in jail and a fine of up to $500.
If the damage is greater than $200 but less than $1,000, it is a misdemeanor of the first degree, punishable by up to one year in jail and a fine of up to $1,000.
If the damage is $1,000 or more, it is a felony of the third degree, punishable by up to five years in prison and a fine of up to $5,000.
It is important to note that penalties for violating spray painting laws can be enforced at both the state and local levels. Therefore, penalties may vary depending on the jurisdiction and the specific regulations in place. It is advisable to consult the relevant government agencies or legal professionals to understand the specific penalties applicable to your location and circumstances.
Compliance Tips and Best Practices
Ensuring Compliance with Spray Painting Laws
Complying with spray painting laws is not only a legal obligation but also an ethical responsibility towards the environment and the community. Implementing effective compliance measures can help individuals and businesses maintain a positive reputation, avoid penalties, and contribute to a sustainable future. Here are some essential compliance tips and best practices for spray painting activities in Florida:
Familiarize Yourself with Applicable Regulations: Stay updated on federal, state, and local regulations governing spray painting. Understand the specific requirements, permits, and restrictions that apply to your location and industry.
Use Environmentally Friendly Paints: Opt for low-VOC or zero-VOC paints that meet regulatory standards. These paints have reduced emissions and are less harmful to the environment and human health.
Proper Ventilation and Personal Protective Equipment (PPE): Ensure adequate ventilation in spray painting areas to minimize the exposure to hazardous fumes. Additionally, provide and use appropriate PPE, such as respirators, goggles, and gloves, to protect against inhalation and contact with paint chemicals.
Training and Certification: Provide comprehensive training to spray painting technicians on proper techniques, safety protocols, and environmental compliance. Encourage technicians to obtain relevant certifications to demonstrate their expertise and commitment to best practices.
Waste Management and Recycling: Establish proper waste management procedures, including the collection, storage, and disposal of paint waste. Implement recycling practices wherever possible to minimize environmental impact.
Record-Keeping and Documentation: Maintain accurate records of paint usage, emissions data, waste disposal, permits, and any other compliance-related documentation. These records will help demonstrate your commitment to compliance and simplify reporting requirements.
Regular Inspections and Maintenance: Conduct routine inspections of spray painting equipment and facilities to ensure they are in proper working condition. Promptly address any issues or malfunctions to prevent violations and potential harm.
Stay Informed and Engage with Authorities: Keep in touch with regulatory agencies, such as the EPA and local environmental departments, to stay informed about any updates or changes in regulations. Seek guidance and clarification when needed to ensure compliance.
To avoid penalties, it is crucial to stay informed about the relevant spray painting laws, regulations, and restrictions in Florida. By complying with these laws and taking necessary precautions, individuals and businesses can mitigate the risk of violations and ensure a safe and responsible approach to spray painting activities.
Legal Ways to Spray Paint in Florida
Public Art Projects
There are many public art projects in Florida that allow for the use of spray paint. These projects are typically organized by local governments or community organizations, and they provide a safe and legal space for artists to express themselves. Some examples of public art projects that allow for the use of spray paint include:
Mural festivals: Mural festivals are a great way to see a variety of different graffiti artists’ work in one place. These festivals typically take place over a weekend, and they feature live music, food, and other activities.
Legal graffiti walls: Legal graffiti walls are designated areas where artists can spray paint without fear of being arrested. These walls are often located in parks, community centers, or other public spaces.
Art contests: Some communities hold art contests that allow artists to submit their spray paint work. These contests can be a great way to get your work seen by a wider audience.
Legal graffiti walls
There are also a number of legal graffiti walls in Florida. These walls are typically located in public spaces, and they are designated for the use of graffiti artists. Some examples of legal graffiti walls in Florida include:
The Wynwood Walls: The Wynwood Walls is a popular tourist destination in Miami. It is a collection of outdoor murals that were created by some of the world’s most famous graffiti artists.
The Graffiti Bridge: The Graffiti Bridge is a bridge in Tampa, Florida. It is a popular spot for graffiti artists, and it is one of the most well-known legal graffiti walls in the United States.
The Graffiti Wall: The Graffiti Wall at the Jacksonville Zoo and Gardens is a legal graffiti wall in Orlando, Florida. It is a popular spot for local tourists and artists to get inspired.
Permission from the property owner
Finally, you can also spray paint legally in Florida if you have the permission of the property owner. This means that you can spray paint on your own property, or you can get permission from someone else to spray paint on their property. If you are planning to spray paint on someone else’s property, it is important to get their permission in writing.
PS: People convicted of graffiti in Florida may be required to remove the graffiti themselves or pay for its removal.
Tips for Safe and Legal Spray Painting
Choose the right spray paint
When choosing spray paint, it is important to choose a paint that is designed for the surface you are going to be painting on. For example, if you are going to be painting on metal, you will need to use a paint that is specifically designed for metal. You should also choose a paint that is non-toxic and has a low odor.
Not all spray paint is created equal. Some spray paints are more toxic than others, and some are not suitable for outdoor use. When choosing spray paint, it is important to read the label carefully and choose a paint that is safe for your intended use.
When spray painting, it is important to wear protective gear, such as a respirator, goggles, and gloves. This will help to protect you from the fumes and chemicals in the spray paint.
Get permission from the property owner
Before you start spray painting, it is important to get permission from the property owner. This is especially important if you are going to be spray painting on private property. If you do not have permission from the property owner, you could be charged with graffiti.
Follow the law
It is also important to follow the law when spray painting. In some jurisdictions, there are restrictions on where and when you can spray paint. For example, you may not be allowed to spray paint in certain areas, such as near schools or hospitals. You should also check with your local government to see if there are any other laws that you need to be aware of.
Tips that you should not miss:
Practice your technique in a safe area before you start spray painting on a permanent surface.
Use a tarp or drop cloth to protect the area around your work surface.
Clean up any spills or overspray immediately.
Dispose of empty spray paint cans properly.
By following these tips, you can help to ensure that your spray painting experience is safe and legal.
PS: If you are a victim of graffiti, you should document the damage as soon as possible. This includes taking pictures of the graffiti and getting the names and contact information of any witnesses.
The Future of Spray Painting in Florida
The rise of legal graffiti walls
There has been a growing trend in Florida of creating legal graffiti walls, where artists can legally spray paint their work. These walls provide a safe and legal outlet for graffiti artists, and they also help to beautify public spaces.
The growing popularity of street art
Street art is another form of spray painting that is becoming increasingly popular in Florida. Street art is often more colorful and eye-catching than traditional graffiti, and it can be used to communicate a variety of messages.
The potential for graffiti to reduce crime
Some studies have shown that graffiti can actually help to reduce crime. This is because graffiti can deter criminals, and it can also help to create a sense of community in an area.
The future of spray painting in Florida is looking bright. With the rise of legal graffiti walls and the growing popularity of street art, there is a growing appreciation for this art form. Graffiti can be a powerful tool for expression and creativity, and it has the potential to make our communities more beautiful and safer.
Here are some additional thoughts on the future of spray painting in Florida:
As the popularity of street art continues to grow, we may see more businesses and organizations commissioning graffiti artists to create murals.
Graffiti could be used to promote social change or to raise awareness of important issues.
Graffiti could be used to create more interactive and engaging public spaces.
The future of spray painting is full of possibilities. It will be interesting to see how this art form evolves in the years to come.
To Sum it up
Compliance with spray painting laws in Florida is crucial for individuals and businesses. Understanding regulations from the EPA, FDEP, and local governments is vital for environmental protection, public health, and aesthetic preservation. Adhering to these laws minimizes harmful emissions, ensures safety, and maintains attractive communities. Non-compliance may lead to civil and criminal penalties. To ensure compliance, familiarize yourself with regulations, use eco-friendly paints, implement proper ventilation and protective gear, and practice responsible waste management. Regular training, documentation, and engagement with authorities are key. By prioritizing compliance, individuals and businesses demonstrate their commitment to environmental responsibility, public safety, and ethical practices, contributing to a cleaner, safer, and sustainable spray painting industry in Florida.
In Florida, graffiti is defined as the willful and malicious placement of any inscription, mark, design, figure, or drawing on real or personal property belonging to another without the consent of the owner or person having lawful control of the property. This includes, but is not limited to, the following:
Tags
Throw-ups
Pieces
Stencils
Tags made with spray paint, markers, chalk, or other materials
Any other form of inscription, mark, design, figure, or drawing that is intended to deface or damage property
Who can be charged with graffiti in Florida?
Anyone who willfully and maliciously places graffiti on property belonging to another can be charged with graffiti in Florida. This includes adults and juveniles. If a juvenile is convicted of graffiti, they may be ordered to perform community service, pay restitution, or attend counseling.
How can I report graffiti in Florida?
If you see graffiti in Florida, you can report it to the police or to your local government. The police will investigate the graffiti and, if they can identify the person responsible, they will file charges. Your local government may also have a graffiti removal program that can help you get rid of the graffiti.
The color teal is loved by many for its calm and soothing vibes. It not only looks amazing on canvas but also helps create a modern and serene ambiance when used inside the house.
However, store-bought paints can be generic with a limited shade range. Fortunately, you can take your creative flair to new heights by creating a customized teal color palette yourself.
Teal is a combination of blue and green, but you can experiment with different shades of the same color to achieve a variety of teal hues. Other colors like white, yellow, and black can also be added to expand and enrich your teal palette.
Teal combines the cool calmness of blue with the balance and stimulation of green to deliver a beautiful and impactful color. I will help you create unique hues of teal that will make your work stand out from artists still relying on store-bought colors.
Let’s dive into the nitty gritty details of making teal blue!
What Colors Do You Mix To Make Teal?
If you’re wondering, ‘What two colors make teal?’ The answer is blue and green.
However, in the same way, that there are several shades of teal, there is a wide variety of blue and green shades too. Therefore, the shade of teal you’re looking for might need you to experiment with different colors of blue and green and achieve the desired result.
Remember that the exact hue of each color you choose will determine the final shade of teal, so be prepared to take a few wrong turns before you find the right one.
As a rule, you should pick a green and blue that leans towards each other. For example, a cool blue shade like phthalo blue combined with a cool, bluish shade of green, like phthalo green, is a great place to start.
However, only mixing blue and green will not give you the teal color of your dreams. Depending on the final effect you want, you might need to add white, yellow, red, or black to the mix, but we’ll discuss more of that later.
A Step-by-Step Guide To Make Teal
Most artists prefer to work with acrylic paints, which is why we have focused on them in this guide. But you should remember that the same shade of teal will look different on various mediums, so before you go all in, test the color on a small area of your preferred surface.
Start with a wide selection of blues
The base of the color teal is blue; therefore, the more variety of blue you have in your arsenal, the more shades of teal you can create.
Pick blues from across the spectrum, making sure to include light, bright, deep, and dark shades of blue.
Squeeze out each of the shades on a palette but don’t mix them.
Pick a medium shade of green
You don’t need as many shades of green; instead, you want to pick a medium hue that isn’t too dark or light. Emerald green or Kelly green is most commonly used for making the perfect shade of teal.
If you want more control over the final shade, you can mix your green color from scratch using the primary colors yellow and blue. Once you have your desired shade of green, you can later add blue to eventually end up with teal.
Select a few shades of yellow
Yellow is an excellent addition to this mix and can help you create unique shades of teal. So grab a few colors of yellow, from pale to bright, and squeeze them out on the palette.
Keep white on hand
You may need to add white to adjust the intensity and tone of the mixed color. So, keep a plain shade of white handy to make any necessary adjustments to the color’s intensity.
Time to mix the colors!
For a basic teal shade, mix blue and green in a 1:1 ratio using a palette knife. You can tweak this ratio depending on the color you want. For example, you can add more blue paint for a teal blue shade or increase the quantity of green for a hue closer to aquamarine.
If the shade looks too dark or overpowering, you can add a little bit of white to tone down the color. However, you should know that white can dull the brightness of your shade a little.
Yellow, on the other hand, has the opposite effect on teal. It doesn’t dull the shade’s brightness but changes its tone, making it lean more toward green.
Pro Tip: At this point, you can play around with different hues of yellow to achieve the color you’re looking for.
Tips For Creating Hues Of Teal With Acrylic Paint
Now that you know how to make the color teal with acrylic paint, the following tricks of the trade will help you get better results every time!
Acrylic paints become darker as they dry, so it’s better to mix a slightly light teal color to achieve the desired color on canvas. You can learn more about whether paints dry darker or lighter to know exactly how your color will look on the final surface.
You can add metallic acrylic paints to the mix for a more lustrous shade of teal.
While black can add depth and intensity to your teal color, it can be disastrous to fix if you add too much. You can use burnt amber or gray instead of black or simply use darker hues of the colors you’re already mixing.
Use a palette knife to blend instead of a brush since it helps mix different colors evenly.
I recommend using the mixed teal paint immediately, but if you must store it, an airtight container is your best bet.
How To Create Teal Digitally?
Not every artist works with paints and canvases, and your approach to making teal will be different when working with digital colors.
Teal is a combination of red, green, and blue (RGB), while in printing, it involves a mixture of cyan, magenta, yellow, and black (CMYK).
For digital design and printing, the code for a basic teal is #008080, but you can tweak it according to your preference.
Similarly, the basic code for CMKY teal is:
C: 100%
M: 0%
Y: 0%
K: 50%
However, you can experiment with the percentages to increase the depth or change the tone of the shade.
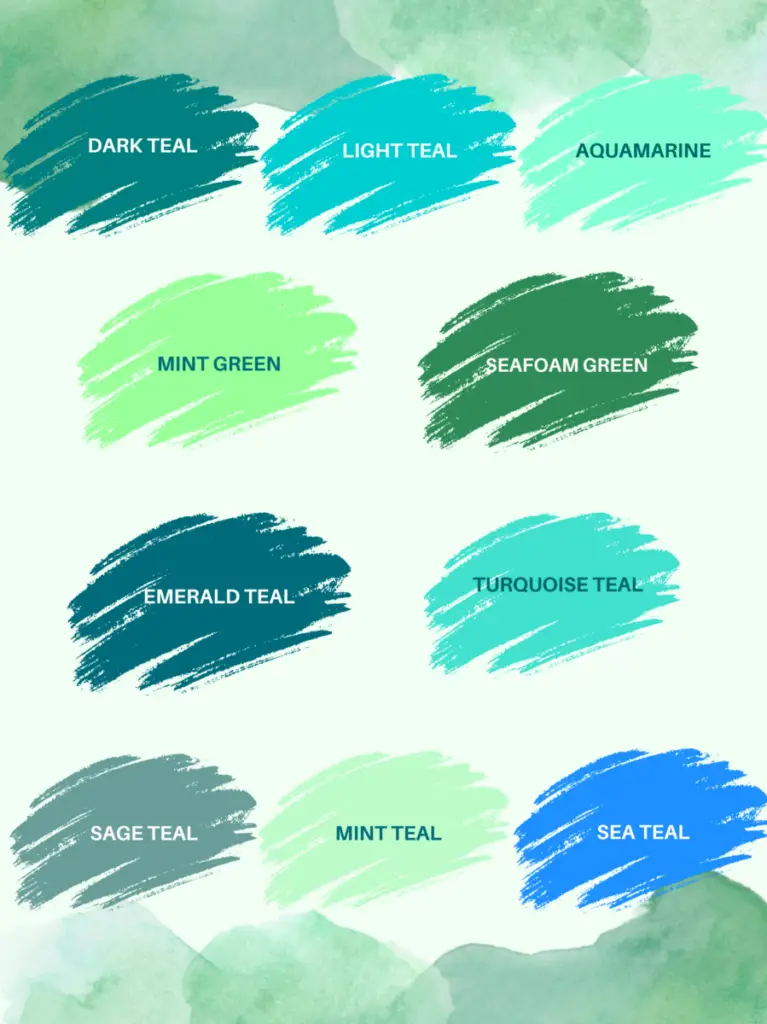
The following table mentions a few popular shades of teal with their hex codes and percentages of color to make your job easier.
Color
HEX
RGB %
CMYK %
Dark Teal
#008080
R: 0%, G: 50.2%, B: 50.2%
C: 100%, M: 0%, Y: 0%, K: 50%
Light Teal
#00CED1
R: 0%, G: 80.8%, B: 82.0%
C: 100%, M: 1%, Y: 0%, K: 18%
Aquamarine
#7FFFD4
R: 49.8%, G: 100%, B: 83.1%
C: 50%, M: 0%, Y: 16%, K: 0%
Mint Green
#98FF98
R: 59.6%, G: 100%, B: 59.6%
C: 41%, M: 0%, Y: 41%, K: 0%
Seafoam Green
#2E8B57
R: 18.8%, G: 54.5%, B: 34.9%
C: 66%, M: 0%, Y: 36%, K: 57%
Emerald Teal
#00C957
R: 0%, G: 78.4%, B: 34.7%
C: 100%, M: 0%, Y: 56%, K: 25%
Turquoise Teal
#40E0D0
R: 25.1%, G: 87.8%, B: 81.5%
C: 71%, M: 0%, Y: 7%, K: 14%
Sage Teal
#689D99
R: 40.4%, G: 61.2%, B: 60.4%
C: 34%, M: 0%, Y: 1%, K: 61%
Mint Teal
#BDFCC9
R: 74.5%, G: 98.0%, B: 78.4%
C: 24%, M: 0%, Y: 20%, K: 2%
Sea Teal
#1E90FF
R: 11.4%, G: 56.1%, B: 100%
C: 89%, M: 44%, Y: 0%, K: 0%
Different Shades of Teal
Exploring Different Hues Of Teal
Teal is a highly versatile color that can be used for different projects, and as with most colors, there’s a wide variety of shades you can create yourself.
You can opt for a deep and muted shade of teal for an accent wall in your home or a bright, preppy hue of teal for furniture in the children’s nursery. Whichever shade of teal you select, it will completely transform the mood and feel of that room.
In this guide for how to make teal paint, you can tweak the quantities of blue, green, white, and yellow to get the following standout tints.
Pale Teal (HEX# 82cbb2)
This shade sits on the light teal color spectrum, giving off a fresh green hue. You can make pale teal by adding a fair amount of yellow to your blue and green paint mix.
Dull Teal (HEX# 5f9e8f)
Dull teal is a muted color perfect for painting contemporary accent walls. You can make dull teal by adding a little dark yellow to your teal paint mix.
Bright Teal (HEX# 01f9c6)
Here’s a bright and energetic color everyone loves! This vibrant color contains a lot of yellow with just a hint of black, but if you don’t want to use it in its very vibrant state, you can tone it down with some white paint.
Aquamarine Light Teal (HEX# 6EC6BA)
This shade is considered the perfect light teal color by most artists. You can make aquamarine light teal by adding a light and bright shade of green instead of medium green and a good amount of white paint.
This shade is an excellent choice for painting stucco houses in 2023, but this blog is full of great options if you want more exterior color ideas.
Tropical Teal (HEX# 008794)
Tropical teal is a cool green-toned teal that reminds you of sandy beaches lined with palm trees. The shade contains a little more magenta than common teal.
Teal Blue (HEX# 01889f)
Here is a rich blue-toned shade of teal that invokes feelings of tranquility and contentment. You can make teal blue by adding black to the blue and green paint mix.
Deep Teal (HEX#00555a)
Deep teal is a rich hue similar to dark teal. However, the two differ because of more magenta content in deep teal that helps create a slightly warmer tone.
How To Create Shades of Teal
The easiest way to create teal is by mixing blue and green, but now you understand that it’s more complex than that. After all, if you want to create a unique teal color palette, you must experiment with different colors and think outside the box.
How To Make Muted Teal Paint
As a rule, the quickest way to mute a shade is to add a color from the opposite end of the color wheel. Since teal is the product of blue and green, both cool colors, adding a bit of warmth can do the trick.
If you want muted teal, a hint of red and orange can help you achieve the desired hue. However, if you don’t want to compromise the brightness of the color, some warm yellow, like cadmium yellow, can deliver a more subtle muting effect.
How To Make Light Teal Color
If you want your teal shade to look a little lighter, you can add some white paint to get the desired effect. However, keep in mind that white can make teal less bright and softer. So, if you want to lighten the color without losing its vibrancy, add some lime yellow to the mix.
Pro Tip: Don’t add too much yellow, or the teal shade’s tone will alter significantly.
How To Make Dark Teal Color
There are two ways to make dark teal color. The first one is to use deeper hues of blue and green to get a darker and more intense teal. Another way to achieve the color is to add black to the mix of blue and green but remember that this trick can sometimes dull the final shade.
Dark teal is a popular choice for accent walls, but before you mix large quantities of green and blue paint, read up on how much interior paint you need to paint your wall.
Pro Tip: Add black in very small quantities to the mix since it can quickly overpower any color.
How To Make Bright Teal Paint
The best way to give your teal color a ‘pick-me-up’ is to add some yellow to the paint. Since there are different shades of yellow to choose from, try a few to find the perfect shade.
What Colors Go With Teal Interior?
Since teal has the characteristics of both blue and green, it invokes a sense of tranquility and comfort. Although the color is very popular for home interiors, people often shy away from going all in with teal. The good news is, there are endless colors that work perfectly with teal; you just have to take care to pair it right.
If you’re looking for some inspiration to work teal into your home, here are 5 colors that pair well with it and create a rich and bold palette for any room.
1. Teal And Tan
Did you think creating a neutral space was impossible with teal? Think again.
Teal can be paired with any neutral hue like tan, beige, and grey for a classic look that still looks lively and fresh. If you’re worried teal may overpower your neutral interior, add the color sparingly for just the right amount of zing.
For example, you could introduce teal pillows to your tan bedroom or living room. Better yet, you could opt for bold teal prints for an extra punch of exuberance.
If you’re interested in creating a custom tan palette, this guide has everything you need to get the perfect hue of tan for your next project.
2. Teal And Tangerine
Teal is a happy color that makes you feel warm and comforted but when you pair it with a fun color like tangerine, it creates a whole different vibe!
If you think teal and tangerine might make a garish or harsh contrast, the placement of the two on the color wheel will convince you otherwise. Both colors are fairly close to each other, which makes the combination super fun and not overwhelming.
Consider pairing teal and tangerine with white to create an open and lively space. Also, introduce tangerine tastefully to ensure the room has just the right amount of popping color.
3. Teal And Wood
Here’s a color combination that is rustic and country chic.
Wood has a timeless appeal that adds warmth to any room. However, having too many wood tones in a space can seem daunting and dull. That’s where teal comes to the rescue!
Teal looks majestic paired with wood tones, and the variety of teal shades makes it effortless to add a splash of color that grounds the space and balances out the different shades of wood.
4. Teal And Grey
Many homeowners hesitate to add teal accents to grey interiors thinking that the combination might take away from the neutral vibe of the room. But the fact is, teal is the perfect color to bring out cool tones of grey and also add some personality and energy to the space.
The introduction can be as subtle as a teal-colored knitted throw on a grey sofa or as obvious as teal-colored curtains against a grey wall. Don’t be afraid to experiment with a few shades before settling for one.
5. Teal And Gold
Teal is a color that inspires regality, and when coupled with gold, it exudes an aura of opulence and grace.
At first glance, gold accents may come off as tacky, but when used sparingly and in combination with teal, they can truly elevate the mood of your home.
Just remember to use this color combination in small locations such as the bathroom, kitchen sink, or table decor so it doesn’t look too overpowering.
turquoise vs. teal
Most people confuse teal with turquoise and vice versa. That’s because both colors are the product of blue and green. However, a few differences can help you tell them apart.
Turquoise is lighter, brighter, and more vibrant than teal.
Teal is a darker color with low saturation.
Teal leans toward blue, while turquoise has more green in it.
Turquoise has a higher saturation than teal.
FAQs
How to make blue?
You can make a range of blue shades with magenta and cyan. But this blog can be very helpful if you want a step-by-step guide for making blue paint.
Does blue and green make teal?
Blue and green can be mixed together to get a basic teal color. However, you can also add white, yellow, and black to alter the shade’s brightness, depth, and tone.
Does yellow and blue make teal?
Yellow and blue are the two colors you need to make teal, but since it’s a tertiary color, you first need to mix yellow and blue to get green (a secondary color) and then add some more blue (a primary color) to the mix for a shade of teal.
Conclusion
Creating your own shades is fun and rewarding since you get to experiment with combinations that aren’t common. Imagine painting your masterpiece with a customized teal palette and making others wonder which store you brought the shades from.
Imagine you want to touch up a chair you just painted last season, but as you grab the leftover paint from your garage, you find it completely frozen! While your initial reaction may be that of surprise, it can quickly turn into panic as you remember all the cans of stored paint sitting in your garage.
Don’t worry because it’s normal for water-based paint to freeze when temperatures drop below 32 degrees Fahrenheit, but that doesn’t mean it becomes useless. So, what to do when paint freezes?
Frozen paint can be restored and made reusable. All you need to do is place the paint can at room temperature and allow it to thaw naturally. Once the paint has defrosted, stir it vigorously to remove any lumps and carry out a small patch test before applying it to your project.
However, if your paint has frozen and thawed a couple of times, the formulation may be ruined for good. But before you toss away your paint cans, try my tips and tricks to revive your frozen paint and save yourself some bucks.
Is Acrylic Paint Ruined If It Freezes?
The question, ‘Is paint still good if it freezes?’ is common, especially if you live in an area that experiences sub-zero temperatures.
The answer is yes, but there are limitations to the finish you can achieve with restored paint.
To be clear, you’re not supposed to let your paint freeze. This is why manufacturers mention the ideal temperature for paint storage on the label.
However, it will undoubtedly freeze if you don’t store the paint correctly and leave it in your garage or shed during harsh winters. So, now comes the real question: Can you use the frozen paint for your next DIY project?
While the simple answer is yes, it isn’t generally recommended.
The best way to determine ‘Is house paint ruined if it freezes?’ is by checking its consistency and quality after it has thawed.
What Happens To Latex Paint When It Freezes?
When latex paint freezes, its formulation is irrevocably altered, affecting the paint’s hue, color, texture, and finish. Sometimes, freezing paint can result in water being separated from the solvent, which changes the consistency of the formula completely. The separation of the chemical compounds can result in the creation of lumps that often render the paint useless.
But you should know that paint that has only just begun to freeze or was frozen for a short period can be salvaged easily compared to paint that has been frozen solid all winter.
Pro Tip: Latex paint can withstand a few freeze/thaw cycles, so don’t be quick to dispose of your frozen paint cans before checking their usability.
Will Wall Paint Freeze In Garage?
Once you’ve wrapped up a DIY painting project, the next thing you do is store any leftover paint in your garage and forget all about it. The only time you reach out for it again is when you need to paint something else.
But what happens if paint freezes during the time it is stashed away in the garage?
Whether or not your wall paint will freeze depends on the type of paint, where you’re storing it, and the temperature. Let’s have a closer look at each of these factors.
The Type Of Paint
There are two main types of paints: water-based and oil-based. Since the former consists of water, it freezes at the same temperature as its base, 32 degrees Fahrenheit or 0 degrees Celsius.
In contrast, oil-based paints are more resistant to freezing since their formula generally comprises linseed oil- a substance that begins to freeze at -4 Fahrenheit or -20 Celsius.
So, if you’ve stored oil-based paint in your garage, you probably might not need to worry about it freezing unless your area experiences extremely low temperatures in the winter.
However, your water-based paints will freeze in your garage as soon as the temperature drops below 32 Fahrenheit.
Where You Store The Paint
The more exposed your paint cans are to external elements, the more it will affect their formulation.
For example, your paint cans are more likely to freeze if left on the garage floor. But if you store them higher up where the temperatures are slightly warmer, you can save them from frost.
Paint only freezes when the temperature around the can drops below freezing point. So, if your garage is heated, your paint will be ready to use any time you pick it up. However, you will be left with freezing paint if your garage has no heat.
The Temperature
Water-based paints freeze faster than oil-based paints, but it’s always best to double-check the freezing point of the specific paint you’re planning to store. The reason is that various paint formulations contain different ingredients that can change their ideal storage temperature.
Water-based paints will begin to freeze at 32 degrees Fahrenheit, and as the temperature drops further, the rate of freezing will intensify.
Other factors affect the temperature around your paint can, such as:
Is the paint can sealed?
Is there any insulation around the can?
Is it close to your home?
How To Restore Frozen Paint
If you’re wondering, ‘Can you unfreeze acrylic paint?’ the short answer is yes!
But the real question is, ‘If latex paint freezes, is it ruined?’ Well, that would depend on the condition of the paint once it melts.
So, before you hastily toss away frozen paint cans, allow them to thaw gradually and then check if the paint is still good after freezing.
Here is a quick guide you can refer to if your paint is frozen.
Place your frozen paint can at room temperature and let it thaw naturally.
This process will take a few hours, but it’s important not to try to speed it up with a hairdryer or heater.
Spread an old towel and some sheets under the can to protect the surface.
When you’re certain the paint has thawed, open the lid and stir the contents around to restore its original consistency.
How To Check If Paint Is Still Good After Freezing
Deciding whether the thawed paint is any good for a beginner who has never had to deal with frozen paint may be challenging. So, how can you tell if the paint has gone bad?
First, you must remember that all paints have an expiry date, so no matter how much you try to revive it past that date, you will only be wasting your time and efforts. This guide about spray paint expiration will help you decide if your stored paint is worth checking or saving.
Now if your paint hasn’t expired but simply froze due to extreme temperature, there’s still hope!
The first trick is to stir the paint after it has defrosted to combine all the chemical compounds that may have separated during the freezing/thawing process. Once everything looks nice and even, check its consistency for any lumps or grains.
If the paint has gone bad, you will notice large clumps, almost like cottage cheese or a stringy texture. That’s a sign your paint is beyond repair and must be discarded.
But if the paint has slight graininess, grab a paintbrush and test it on a scrap of wood or paper. If the finish looks normal, your paint is probably good to use.
Another trick is to compare the paint with another can of paint in the same color. If you see a difference in hue between the two, chances are the paint you just warmed up will not deliver the same color payoff.
Pro Tip: You can take the thawed can of paint to a paint store and have it professionally shaken for the best results.
How To Dispose Of Frozen Paint?
Now that we’ve discussed how to check if your paint is still usable after thawing let’s move on to what you need to do if it is indeed ruined.
It’s important to mention that oil-based paints contain hazardous chemicals that can contaminate soil and water. This is why throwing it as is in the trash is illegal in most states. On the other hand, disposing of latex paint is easier as long as you follow a few guidelines.
It’d be best to acquaint yourself with Universal Waste Laws relating to non-empty aerosol cans before you dispose of the ruined paint.
Here are a few quick steps to safely dispose of your paint.
Latex Paint
Remove the lid and pour the paint on a newspaper to let it dry.
Place the empty can and lid in the recycling bin.
Once the paint has dried completely, toss the newspaper in your trash can.
Pro Tip: Mix cat litter in the paint to speed up its drying process.
Oil-Based Paints
Take the can of paint to your county’s hazardous waste facility.
You can also check Paint Care to find take-back programs near you. (This recycling program is currently available in ten states and the District of Columbia.)
You should learn more about recycling spray paint cans if you are a DIY enthusiast who loves playing with paints and creating masterpieces.
How Do You Store Paint To Keep It From Freezing?
As I said before, you shouldn’t let your paint cans freeze because that can significantly alter their formulation and affect the performance and finish of the paint.
While the best option is to store all your paint inside the house where it’s nice and cozy, not everyone has much room to spare to stack paint cans. Therefore, most used and unused paint containers inadvertently end up in the garage. Now the real question is, ‘how to keep paint from freezing in garage?’
The solution isn’t as hard as you think!
Check out these ideas to find one best suited to your situation.
1. Utilize Paint Before Winter Season
Using up all your old paint before winter strikes sounds like common sense, but we, as lazy couch potatoes, tend to delay projects.
Now that you know how frost can ruin your stored paints, use it as motivation to finish painting projects around your home during summer.
This approach has two undeniable benefits. First, you get the best finish from the paint you bought since the formulation is perfect when used fresh from the can.
The other highlight of using your paints before winter is that you don’t need to worry about creating the ideal storage conditions for your paint cans.
2. Store Paint At Room Temperature
As room temperature is ideal for paint storage, the most effective way to prolong the life of unused paint is to place it in a heated room away from freezing temperatures.
If you plan to store the cans in your garage, ensure it’s heated, and the temperature is regularly monitored.
However, not everyone is willing to spend extra bucks on utility costs just to keep their paint cans warm in the garage. The next tip will maintain your paint’s consistency and help cut back avoidable utility expenses.
3. Build A Heated Paint Box
A heated paint box isn’t as complicated as it may sound and can be made in very little time.
All you need to build one is:
Heat tape/ heat light
Foam insulation
Use the foam insulation to build a small box around your paint cans but remember to leave enough space to hang your heat lamp/ light. You can also use heat tape to achieve the same effect.
This heated box will maintain an ideal temperature inside to keep your paint cans warm despite freezing temperatures outside.
Oil-based paints generally comprise linseed oil with a freezing point of -4 Fahrenheit or -20 degrees Celcius. So unless your area experiences extremely cold winters, your stored oil-based paints may never freeze.
Can paint freeze overnight?
Latex paint starts freezing when the temperature drops below 0 degrees Celcius. This means if you experience freezing temperatures during the night, your water-based paint can freeze overnight.
Is spray paint ruined if it freezes?
Spray paints can withstand a few freeze/thaw cycles; therefore, always unfreeze your paint cans and check their performance before using them on a project or tossing them for disposal.
Conclusion
Let’s wrap this up with a simple advice that couldn’t be more obvious: Do not let your paint freeze!
But if your stored paint gives you ‘the cold shoulder’ after winter, you can follow my tips and tricks and restore it to its original glory.
Adding a burst of color and showcasing my unique talent, I take pride in my property when I see it appealing to every passerby. Not only does it seem rewarding but satisfying when the tired and weathered exterior comes to life with a new coat of paint. One thing I have realized over time is that the exterior paint is not merely about the aesthetics but the maintenance and protection of your property.
There is no definite rule on how often you should paint the exterior of your house, but anywhere between five to ten years is a healthy time. This varies depending on the location of your house, the weather conditions, the material that the exterior walls are built up, and the quality of the paint previously used.
I wish I had known the things I learned through years of painting experience sooner. Since painting costs quite a penny, you surely don’t want to miss out on this information.
Location of the house
How long the paint stays fresh on the walls varies greatly based on the location of your house. Areas with extreme temperature fluctuations, high humidity, or intense sunlight can cause paint to degrade faster compared to regions with milder climates.
Similarly, high rainfall or excessive moisture, such as coastal areas or places with heavy seasonal rains, are more prone to moisture-related issues. It causes paint to blister, peel, or develop mold and mildew, leading to premature paint failure.
Houses near the coast also experience adverse effects of the salt in the air that accelerate paint deterioration. The salt particles can corrode metal surfaces and break down the protective paint layer, leading to more frequent repainting needs.
Is your house located near an industrial area? Not only does the pollution affect your well-being, but your paint’s wellbeing too. Chemical exposure degrades paint faster, causing it to fade, discolor, or deteriorate more quickly, asking for repainting in a shorter span than expected.
Direction the walls face
Did you know that the southern side of the house is more exposed to the sunlight than the northern side? UV radiations from the sun (a major factor contributing to house wear and tear) fall more on the southern walls and may rip apart the paint sooner than from other parts of your house.
You might want to check those walls specifically and repaint them more often than the rest of the exterior.
Color Choice
Dark colors need to be repainted more often than light colors. When UV rays hit the surface of a dark-colored paint, the energy can break down the pigments, causing them to lose their vibrancy and fade over time. On the other hand, lighter colors reflect more light and heat, reducing the absorption of UV radiation and minimizing fading.
Material of the Exterior
Different materials have different adhesive properties and can increase or decrease the time your exteriors ask for a repaint. Paints on aluminum/vinyl slidings typically last longer than wood slidings. Similarly, paints on metal stay fresh for longer durations than stucco or cement.
Material
Repainting Durations
Wood Siding
Every 3 – 7 years, every 4 years if stained
Aluminum Siding
Every 5 – 7 years
Stucco
Every 5 – 6 years
Cement Fibreboard
Every 10 – 15 years
Brick
Every 15 – 20 years, needs minimal cleaning
Metal
Every 5 – 15 years, depending on corrosion
Concrete
Every 5 – 10 years
Quality of the Exterior Paints
Besides the material of your exterior, the quality of the paint itself is the most obvious factor determining how often you would be required to paint over it. Not sure which paint to invest in? Here’s a list to the rescue.
Resists cracking, blistering, peeling, and dirt Easy application, suitable for self-painters Simple cleaning with soap and water Infused color-lock technology for maximum longevity Unmatched adhesion to all surfaces Easy on the pocket Limited color options
Provides maximum coverage Classic matte and satin finish Lasts more than 7 years Suitable for aluminum/vinyl sliding unlike most exterior paints Can be painted in temperatures as low as 35F Says self-priming but a primer is needed Above average pricing
Flat matte finish Easy application with a brush or roller; doesn’t leave paint lines behind Self-cleaning technology Heat resistant Lasts long – up to 25 years Not the most affordable option in the market
Rain-resistant acrylic paint Prevents mildew buildup Paint and primer in one, so it saves overall application time and efforts Covers a generous area Easy application – suitable for self painters Not low is VOCs More than average pricing – buy good value for money
Wide variety of colors to choose from 20-years color guarantee Suitable for all exterior surfaces Comes with a satin finish and matte finish option to choose from Falls in a budget Coverage up to 400 square feet Doesn’t paint below 50F Long drying hours
Pro tip: Always buy paints that come with a claimable warranty to save costs and ensure optimal quality.
5 Signs Your House Is Screaming For A Repaint
Peeling or Cracking
Remember when your house’s paint was smooth and flawless? That was a sight, wasn’t it? If you notice peeling or cracking paint, it’s a surefire sign that your house is begging for a fresh coat. Those unsightly flakes and fissures not only compromise your home’s curb appeal but also leave it vulnerable to moisture damage. It’s time to rescue your house from this paint predicament, even though the paint has lived 5 years’ worth of life.
Paint Faded Colors
Over time, exposure to sunlight can cause paint to lose its original vibrancy, making your house appear tired and worn out. Don’t let your home fade into the background; it’s time you give it a splash of vibrancy and a colorful makeover that will turn heads!
Chalky Appearance
Another clear indication that it is time for you to paint the house’s exterior is the mysterious appearance of a chalky residue called efflorescence. This SOS signal from your house tells you it’s time to wipe away the old and embrace a new, durable paint job. Say goodbye to the chalky mystery and hello to a fresh-looking facade!
Cracks in Caulk
Take a closer look at the areas where different materials meet, such as windows, doors, and trim. Are you noticing cracks in the caulk? If yes, you know the drill. The paint has lived its life, and now is the time for a rebirth. By addressing the caulk cracks and applying a fresh coat of paint, you can seal the deal on a beautiful, well-maintained home exterior.
It’s been more than 10 years
How old is your current paint job? If it’s been over a decade, your house is probably shouting for a well-deserved makeover. Like all things, paint ages, and its protective properties diminish over time. Show your home some love and appreciation by providing it with a fresh coat of paint that will not only enhance its appearance but also shield it from the elements for years to come.
Pro tip: Proper cleaning, inspections, and touch ups can decrease the frequency that your house exterior requires a fresh coat.
Frequently Asked Questions
Why is it important to repaint your house?
It is crucial to paint your house to protect the integrity of your house. Since a paint coat acts as a protective layer, unprotected houses are prone to severe damage from sun and rain, to the extent that they might need replacement. Painting your house also prevents you from expensive replacement and maintenance costs.
Can I go without painting my house for 20 years?
The lifespan of exterior paint varies but typically ranges from 5 to 15 years. Factors like paint quality, climate, and maintenance affect its durability. While existing paint in good condition may last longer, signs of deterioration should be monitored. Personal preferences and aesthetics may also prompt repainting before the 20-year mark.
Will I attract more buyers if I paint my house?
Yes, painting your house can enhance curb appeal and create a positive first impression, potentially attracting more buyers when selling. A fresh coat of paint can make your home appear well-maintained and visually appealing. However, other factors like overall condition, location, and pricing also influence buyer interest.
Summing it up
Painting the exterior is not a one-time job. Like any other thing you own, it needs maintenance every 5 to 10 years. The exterior paint can last longer if you’re located at a stress-free, ideal location. However, a humid and polluted region can ask you to paint every 4 to 5 years.
Remember, it is not only about house aesthetics but the safeguarding and protection of the walls too. Make wise choices by investing in good-quality paint. You can take inspiration and consider our top picks for exterior paints to save yourself the hassle of a decade.
Imagine transforming a plain, ordinary item into a work of art with just a few bursts of color (impressive, isn’t it?). Spray paint has long been a favorite tool of artists, DIY enthusiasts, and those looking to add a pop of personality to their stuff.
But have you ever wondered if spray paint is safe for use on items that come in contact with food?
So, is spray paint food safe? No, not every spray paint is food-safe. Only the spray paint canisters with a food-safe or nontoxic label are food safe and can be used to color your kitchenware or even let your kids play with them (even better, ain’t it?).
Understanding the safety considerations surrounding spray paint’s use on food-contact items is crucial. After all, artistic expression shouldn’t come at the cost of your health and well-being.
The below blog further discusses everything you must know about food-grade spray paint, what they are, what types of kitchenware can be painted, what brands you can trust, the safety regulations, and more.
Keep scrolling!
Is There a Paint that is Food Safe?
Have you ever noticed restaurants serving Japanese cuisine in sleek black or dark gray plates? That’s because the contrast between the vibrant colors of fresh fish, white rice, and wasabi against the dark background creates an eye-catching display.
Similarly, Indian cuisine perfectly complements the earthy tones like deep orange, red, or brown, while the Mediterranean ingredients take center stage with a white backdrop.
So, if you’re wondering, is there a food-safe spray paint? The above examples are a testament that food-safe paints have long been used in the kitchen and greatly impact how appetizing our food appears.
Food-safe or food-grade spray paints are non-toxic and free from harmful/toxic chemicals. They are specifically formulated to be safe for surfaces that come into contact with food. They strictly comply with the safety regulations, so next time you are in the mood to show some harmony between food and art, you don’t have to think twice about safety!
Non-Food-Grade Spray Paint
Many people may wonder if they can use non-food-grade spray paints for general kitchen furniture. While non-food-grade spray paints can be used on furniture surfaces that do not come into direct contact with food, it is important to consider the potential for indirect contact or transfer.
Non-food-grade spray paint is not specifically formulated or certified for use on surfaces that come into contact with food. These paints are designed for general-purpose use on various surfaces but may contain ingredients not intended for food contact or meet food safety regulations.
Kitchen furniture, such as cabinets, tables or countertops, can come into contact with food through spills, utensils, or food preparation. It is advisable to use paints specifically labeled as food-safe or food-grade for kitchen furniture to minimize the risk of contamination or chemical leaching.
Parameter
Food-Grade Spray Paint
Non-Food Grade Spray Paint
Safety
Formulated with nontoxic ingredients
May contain toxic substances
Food Contact
Safe for surfaces that contact food
Not recommended for food contact surfaces
Regulations
Complies with food safety standards
Does not adhere to food safety standards
Ingredients
Free from harmful chemicals
May contain toxic heavy metals and VOCs
Cleaning
Withstands regular cleaning
May require more delicate cleaning
Heat Resistance
Varies depending on the paint
Varies depending on the paint
Application
Suitable for food-related projects
General-purpose paint for various projects (usually outdoors)
Aesthetics
Available in various colors and finishes
Available in various colors and finishes
Intended Use
Specifically designed for food contact surfaces
General use on non-food surfaces
Safety Standards
Compliant with food safety regulations
Follows general safety regulations
A COMPARISON TABLE FOR FOOD-GRADE VS. NON-FOOD-GRADE SPRAY PAINTS
5 Key Considerations When Choosing Food-Safe Spray Paint
If you’re looking to paint surfaces that may come in contact with food, there are several key considerations to keep in mind.
Read product labels: Pay attention to product labels and look for indications that the spray paint is explicitly labeled as non-toxic, food safe, or suitable for food-contact surfaces.
Check for certifications: Certifications such as FDA compliance or NSF International certification for food equipment coatings. These certifications ensure that the product has undergone testing and meets safety standards.
Consider the intended surface: Different food-contact surfaces may have specific requirements. For example, if you’re painting a plastic item, ensure the spray paint is formulated to adhere to plastic surfaces effectively.
Research reputable brands: Choose spray paints from reputable brands known for their commitment to quality and safety. Look for brands with a good track record and positive customer reviews.
Cleaning and Maintenance: Check if the food-safe spray paint is easy to clean and maintain. It should withstand common cleaning methods without chipping or flaking off. Reviewing peer reviews is also a great way to know you’re investing in the safest option.
Important Note: Remember, it’s always recommended to carefully read the product labels, instructions, and any safety information provided by the manufacturer. If you have specific concerns or questions about a particular food-safe spray paint, reach out to the manufacturer for further clarification.
Food-Grade Paints for Different Surfaces
When it comes to food-safe paints, selecting the appropriate paint for different surfaces is crucial to ensure both the safety and visual appeal of your culinary creations. Understanding the compatibility between surfaces and paint types can help you make informed decisions. Let’s explore some common surfaces and their recommended food-safe paint options:
Glass and Ceramics
Glass and ceramic surfaces offer a sleek and elegant canvas for food presentation. To embellish these surfaces, look for food-safe paints specifically designed for glass or ceramics. These paints are formulated to adhere well and withstand high temperatures, ensuring longevity and durability. Consider paints labeled as “glass enamel” or “ceramic paint” that can be cured through baking or air drying. Krylon Fusion All-In-One Spray Paint for Indoor/Outdoor Use is an all-purpose paint used to paint various materials without chipping or fading off. It comes in a variety of colors and finishes, so you can get your favorite look with just a few bursts of paint!
Metal
Metal surfaces, such as stainless steel or aluminum, often grace our kitchens as pots, pans, and utensils. To add a touch of color to these surfaces, seek food-safe paints suitable for metal applications. Look for paints that are heat-resistant, durable, and able to adhere to metal surfaces effectively. “Heat-resistant enamel” or “metal paint” are commonly used to describe paints suitable for metal surfaces. Often, metal utensils or kitchen equipment are subject to extremely high heat, which makes them susceptible to leaching paint, and that’s when Rust-Oleum 7751830 High Heat Spray Paint comes to the rescue. It’s a food-grade spray paint for metal with retaining properties that can withstand up to 1000°F. And yes, you need not worry about the finish, too; it remains intact even after repeated heating.
Wood
Wooden surfaces like cutting boards, utensils, or serving platters can benefit from wooden butter or conditioner made from edible wax to increase their vibrancy. Our favorite pick is the Macy’s Place Food Grade Protective Mineral Oil and Beeswax for Wooden Cutting Boards, Surfaces, and Tools. To paint your kitchen wooden furniture, food-safe paints not only add vibrancy but also protect the wood from moisture and staining.
Select food-safe paints designed for wood applications, ensuring they are free from harmful substances. Water-based acrylic paints or stains labeled as “food-safe” are often suitable choices for wooden surfaces. Pintyplus Water-Based Spray Paint is a low-odor and non-yellowing formula that offers adhesion and is suitable for various materials.
Fabric
Though less common, some culinary creations may involve fabric elements, such as custom table linens or decorative cloth napkins. For such applications, search for fabric paints that are labeled as “food-safe” or “non-toxic.” These paints are designed to provide vibrant colors on fabric surfaces while remaining safe from contact with food. Tulip ColorShot Instant Fabric Spray won’t disappoint you the next time you’re looking to decorate your napkin.
Best Practices for Food-Safe Spray Painting
Following steps will help you to safely use spray paint on food-contact items:
Prepare the surface: Clean the item thoroughly with mild soap and water, ensuring it is free from dirt, grease, and previous coatings. Allow the surface to dry completely.
Choose a well-ventilated area: Work outdoors or in a well-ventilated room with windows open and fans running to ensure proper air circulation. Spray paint can cause health hazards if you’re working in a poorly-ventilated space. Here are effective tips can help you clear your lungs of spray paint.
Protect the surrounding area: Cover nearby surfaces or objects with plastic sheets or newspapers to prevent overspray from settling on them.
Shake the can: Shake the spray paint vigorously per the manufacturer’s instructions. This ensures proper mixing of the paint components.
Test spray: Before applying the paint to the food-contact item, perform a test spray on a scrap surface or piece of cardboard to check the paint’s consistency and spray pattern.
Apply thin, even coats: Hold the can approximately 6-8 inches away from the item and apply thin, even coats of paint. Use sweeping motions, moving across the surface consistently to achieve an even finish. Avoid excessive layering, as it can lead to dripping or uneven drying.
Allow proper drying time: Follow the manufacturer’s instructions regarding drying time. Allow the paint to dry thoroughly between coats and before handling the item. This ensures proper adhesion and prevents smudging or damage to the paint.
Glaze the surface: Glazing the surface is usually not needed. Spray paint sealers provide a protective layer to increase durability. However, you may use an additional layer of food-safe spray glaze to enhance visual appeal like Rust-Oleum Specialty Clear Triple Thick Spray.
If the cup is spray painted with food-safe spray painted and allowed to dry completely, it is absolutely safe to drink out of it.
Is Rustoleum spray paint food safe?
Rustoleum is a reputed name in the industry of painting. The company formulates various kinds of spray paints for different uses. While not all are nontoxic, you can always check rustoleum food-safe spray paint with a non-toxic and indoor-use label.
Is Krylon spray paint food safe?
Krylon is another well-reputed name in the paint manufacturing industry. Their spray paints are intended for both indoor and outdoor use. Check the ones that comply with food safety regulations.
Is acrylic paint food safe?
Acrylic paint may and may not be food-safe. Make sure you read the can or ask your local store manager before purchasing the paint.
Is enamel spray paint food safe?
Enamel paint is inherently not food safe. However, there are food-safe options in enamel paint that you can go for. Ensure to thoroughly read the label before use.
Is it safe to spray paint food containers?
Yes, if you are using food-safe or food-grade spray paint, it is totally safe to spray paint food containers.
How to make spray paint food safe?
You should never try to make your regular spray paint food-safe on your own. It is rather advisable to purchase a nontoxic spray paint intended for the purpose.
Here’s a Recap!
To sum up, it’s essential to prioritize the safety of your food and yourself when it comes to whether spray paint is food safe. While spray paint can be a convenient and versatile option for various projects, not all spray paints are suitable for surfaces that come into contact with food. Using non-food-grade spray paint on items like plates, utensils, food containers, or even kitchen furniture can pose potential health risks due to chemical leaching or contamination. Opt for paints specifically labeled as food-safe or food-grade to ensure food safety.
Choose wisely, and let your creativity shine while keeping your kitchen and dining experiences truly enjoyable and safe.
If you have any questions or comments, leave them in the comment section below. Maybe we all learn a thing or two! 🙂
Nothing beats the look of a clean and sparkling kitchen, but worn-out kitchen cabinets can overshadow the most gleaming countertops. The solution? Spray painting kitchen cabinets to transform your culinary haven into an aesthetically pleasing cookhouse.
However, painting kitchen cabinets isn’t a one-day job but requires you to set aside at least a week to complete the project perfectly. So be prepared to eat lots of take-out food.
Start by covering your workspace because spray painting your kitchen cabinets can get messy. Clean all the surfaces with a degreaser and sand the cabinets to create a good base for the primer. Apply a thin layer of a suitable primer followed by 2-3 coats of color.
There are several guides for spray painting kitchen cabinets across the internet, but do they actually work? I will discuss painting steps and pro tips and tricks to help you achieve results your neighbors will envy.
Can You Spray Paint Old Kitchen Cabinets?
If your kitchen cabinets are old and screaming for a makeover, spray painting is the best option. Especially if you are not in the mood for overspending your monthly budget on costly replacements.
The highlight of a DIY painting project is that you can immediately create a noticeable change without investing too much money and time. In addition, opting for a completely new color or high-contrast combination greatly impacts how your kitchen looks and feels.
While the short answer to: Can you spray paint wood kitchen cabinets is yes, you must remember that not all kitchen cabinets are worth your time and effort. So, before you break out the roller, check the condition of your cabinets to be sure they can be saved with just paint.
A few small chips or cracks here and there can be easily fixed with wood filler, but if the woodwork is warped or the veneer is peeling, you might be better off replacing the beat-up drawer fronts and doors with new ones.
Pro Tip: Oak cabinets and other coarse-grain wood species cannot be spray painted smoothly. To get an even base, you must fill the grain on the door panels, cabinet frames, and sides with spackling compound.
Can You Use Canned Spray Paint for Kitchen Cabinets?
Canned spray paints are efficient and provide the cleanest and smoothest finish, making them an excellent candidate for kitchen cabinets. However, spray painting kitchen cabinets with cans means you will need a lot of them to cover all surfaces, which is not exactly budget-friendly.
There are other applicator options like rollers and paint brushes, but they either consume too much paint or offer a streaky finish in the hands of an amateur. The best way to paint your kitchen cabinets is with a professional-level sprayer like the Home Right Finish Max Paint Sprayer.
I understand these sprayers are on the pricier end, but if you are a DIY paint enthusiast, they might turn out to be the best investment you can make. However, if you want to renovate your kitchen on a budget, you can always get a sprayer on rent from a hardware store and get the job done.
If you’re still confused between using a paintbrush, roller, and sprayer, this battle of the applicators should definitely help!
Pro Tip: Buy a respirator mask for protection if you plan to use a professional paint sprayer.
What Type Of Paint Is Ideal For Kitchen Cabinets?
The best spray paint for kitchen cupboards would depend on the surface you’re working with.
As each type of paint is formulated differently, what works on one surface may offer different results on another. As a rule, you should avoid acrylic and oil-based paints when painting kitchen cabinets made of vinyl, acrylic, or plastic.
Alternatively, solvent-based paints adhere perfectly to timber, plastic, and vinyl cabinets.
Both latex and oil-based paints offer a great finish; however, the improvement in latex paint formulations over the years has made many professionals ditch the traditional oil-based paints for their water-based counterparts.
Latex paints have quick drying times, are easier to clean up, and are much more forgiving than oil paints in terms of paint application. But no one can argue with the increased durability of oil paints.
While oil-based paints are more expensive and less user-friendly, they do a much better job hiding any imperfections in your cabinets. Moreover, they don’t shrink as much as they dry, which means what the paint looks like wet is what it will look like dry.
Now that we’ve discussed the paint formulation and applicator best suited for your kitchen cabinets let’s move on to the application process.
Step 1: Inspect Your Kitchen Cabinets
While it’s easy to get carried away with the excitement of a DIY project, slow down to check the condition of your kitchen cabinets.
You should look for any chips or cracks that need to be repaired with wood filler, as that will be the deciding factor between a patched-up job and a flawless one.
Step 2: Prepare Your Workspace
If you plan to use a professional paint sprayer for your cabinets, be warned that the paint will get everywhere, and I mean everywhere! So unless you want your countertops, roof, and side walls to get an unexpected paint job of their own, prep the surface thoroughly.
Here’s a quick checklist you can follow:
Empty the cabinets
Clear the counters
Move any furniture that is in the way
Clean the room thoroughly to ensure dust particles or pollen don’t stick to the wet surfaces.
Cover the counters, backsplash, and floor with plastic sheets and secure with painter’s tape.
Step 3: Remove The Doors and Hardware
Did you think covering your workspace was enough? There’s plenty of prep work to be done, so stay with me.
Remove the cabinet doors using a drill or manual screwdriver, and get rid of all cabinet hinges, drawers, and hardware while you’re at it. Although you may feel like going rogue on this step, it will allow you to access all parts of the cabinet and achieve a professional finish without cutting corners.
Pro Tip: Number each cabinet door as you take them off and place its hardware in a small bag with the same label. You will thank me for this tip once you start reassembling your kitchen cabinets.
Step 4: It’s Time To Sand!
Typically I would ask you to clean, strip, and sand the surface until your back starts hurting, but there are quicker ways to get the same results, thanks to advancements in the home improvement industry.
Simply go over all the surfaces you want to paint with liquid sandpaper and create a good base for the primer to bond. You can also use the M-1 Pre-Paint Cleaner and Gloss Remover to rid the surfaces of dirt, grime, and oily residue.
You should patch up any holes and cracks with wood putty by this time and sand them once dry so the repair doesn’t show through the paint.
Pro Tip: Avoid using TSP or silicone-based cleaners because they can create fisheye on the cabinets, which is a nightmare to paint.
Step 5: Apply Primer
Kitchen cabinets experience a lot of wear and tear and must be cleaned every few days. This is why ensuring your paint job resists all the culinary and cleaning stress is exceedingly important.
Select a primer according to the material of your cabinets and apply a thin layer with a brush, roller, or sprayer. Don’t be alarmed if the results look like the work of an 8-year-old; the coverage does get better with each coat of paint.
You should match the primer’s hue with the paint coat’s color for best results. So, if you plan to paint the cabinets white or any other light color, go for a white primer, but if you intend to use deeper colors, you’ll be better off with a darker primer.
Pro Tip: Most latex primers and paints must be thinned down for an HVLP sprayer. You should follow the sprayer manufacturer’s instructions to get the right consistency.
Step 6: Let’s Paint
Once the primer is dry, which generally takes around 40 minutes, start applying the paint in thin layers keeping a steady hand.
If you’re using a brush, avoid too many brush strokes, or you may create air bubbles that dry down to nasty bumps. If rollers are your preferred tool, start from the inside edges of the face frames to the outer cabinets and fronts. This will give you enough time to roll on larger flat surfaces while they’re wet.
If you’re using a paint sprayer, make sure your cabinets are placed in a well-ventilated area. You can even turn on the fan to diffuse the fumes as you spray, and don’t forget to wear your respirator mask! In case you do end up accidentally inhaling the fumes, make sure to clear your lungs of spray paint.
One step that most DIYers tend to skip is sanding between paint coats. Once your first coat of paint is dry, lightly sand all surfaces with soft sandpaper and clean the sanding residue with a tack cloth. Then spray your second coat and repeat the process with each layer.
Pro Tip: Two coats of paint are enough to get decent coverage, but you can always apply a third layer to make the finish more durable.
Step 7: Put Everything Back In Place
If you’re tempted to check whether the paint has dried, try to resist the urge unless you want fingerprints on your finished project.
Allow the paint to cure for at least 48 hours before reassembling the kitchen cabinets.
You can even accessorize your newly painted cabinets with contemporary hardware to elevate their look. The basic idea should be to create contrast. For example, you can pick darker hardware in bronze or black for lighter cabinets and brass or nickel for deeper cabinet hues.
How Much Does Spray Painting Kitchen Cabinets Cost?
The cost of spray painting your cabinets depends on labor and materials.
If you decide to tackle the painting project yourself, you can save the labor costs altogether but remember that you’ll need 20 or more hours to paint an average-sized kitchen.
On the flip side, getting services from ‘professional spray painting kitchen cabinets near me’ save you from paying for other materials like a paint sprayer, roller, drop cloths, tools, etc.
The average cost to paint kitchen cabinets is $775, but it can go up to $2,500 for a large, luxurious kitchen. Subsequently, homeowners can paint their kitchen cabinets themselves, spending as little as $200 on paint and supplies for a small kitchen.
Whether you opt for the DIY option or professional services, repainting your kitchen cabinets will cost less than replacing them, as new cabinets range between $3,000 and $25,000.
Can You Spray Paint Laminate Kitchen Cabinets?
Yes, absolutely!
Spray paints deliver excellent results on laminate, wood laminate, wood, veneer, fiberboard, and even metal. But if you’re dealing with plastic laminate and thermofoil cabinets, you may need specialized paints and techniques to ensure the paint sticks to the surface.
Since it can be confusing for beginners to determine the material of their cabinets, I would advise you to remove a door or drawer and bring it into a paint store for inspection. But if you don’t want to go the extra mile, paint a small area of the cabinet, preferably one not in plain sight, to check if it adheres to the surface.
Can you spray paint melamine kitchen cabinets?
Melamine has a smooth, shiny surface, meaning the paint can have difficulty adhering to it. However, that can be easily fixed with a primer designed for melamine surfaces and 120-grit sandpaper.
Start by sanding the surface to roughen up the top layer but don’t go overboard because you don’t want to remove the material entirely. Rough things enough so that melamine has something to adhere to, and clean the residue with a tack cloth.
Remember to apply a generous layer of primer to give the melamine cabinets a fair chance to bond with the paint. Sand the surface once the primer is dry because bonding primers tend to leave a rough surface.
Pro Tip: Melamine takes longer to dry because it doesn’t absorb any moisture. So, allow your primer extra time to dry before applying the paint coat.
FAQs
Can you spray paint gloss kitchen cabinets?
Yes, you can spray paint glossy kitchen cabinets, but you must prepare the surface by filling in any cracks and holes with a wood filler, followed by a primer like the ZINSSER Primer & Sealer that creates a durable foundation for the paint coat.
Can you spray paint MDF kitchen cabinets?
You can spray paint MDF kitchen cabinets, but the results can be patchy if you don’t prepare the surface well. MDF tends to soak up paint, which means you spend more money but still get a blotchy finish. The best way to avoid this is to use a shellac primer like the ZINSSER Bulls Eye Shellac so the paint doesn’t sink into the surface and delivers an even, smooth finish.
Can you spray paint vinyl kitchen cabinets?
Yes, you can quickly spruce up the appearance of your vinyl kitchen cabinets with a fresh and contemporary paint color. But you must use an adhesion-promoting primer, sand between each primer, and paint coat for long-lasting results.
Can you use Rustoleum spray paint for kitchen cabinets?
Rust-Oleum spray paint is a reliable choice for painting kitchen cabinets, but it’s best for small repairs and touch-ups since one can only covers about 20 square feet.
Conclusion
Nothing beats the look of fresh paint, whether you color the interior walls of your home or revamp your kitchen cabinets. DIY painting jobs are rewarding because you can save some major bucks and also feel super proud of the results. So, take the leap, follow my instructions, and paint your kitchen cabinets like a boss.
Do you want to add a spark of fun and excitement to your future endeavor or event? Enhance the ambiance of your surroundings by using glow-in-the-dark paint. Discover the enchanting effect of glow-in-the-dark paint! Its remarkable ability to emit light in low-light situations makes it the perfect choice for creating a truly unique and mesmerizing effect that is sure to leave a lasting impression.
With an abundance of options at your disposal, selecting the ideal glow-in-the-dark paint can be an intimidating task. Let us take the lead from here. Discover the top glow-in-the-dark paints available today in this comprehensive article. From high-intensity formulations that deliver a brilliant and long-lasting glow to easy-to-apply paints that create a smooth and uniform finish, we’ve got you covered.
Don’t wait any longer, act now! Discover the limitless possibilities of glow-in-the-dark paints and unlock their incredible potential!
We hope our rating criteria assist you in making an informed selection when purchasing glow-in-the-dark paint. Now that we have the criteria out of the way let’s move on to the list of the 7 best Glow in the Dark paints that will make your events much more fun and enjoyable.
With so many options on the market, it can be challenging to choose the best one for your project. In this guide, we’ll take a look at some of the top glow in the dark paints available, including their features, benefits, and drawbacks, to help you make an informed decision.
Finding a glow-in-the-dark paint that is not hard to apply and provides a long-lasting glowing effect is quite challenging. Some are easy to apply and long-lasting, but Art’ N Glow’s glow-in-the-dark paint is the jack of all trades.
This glow-in-the-dark paint has an acrylic-based formula, making it durable and long lasting, especially for fabric painting. The product’s Glow comes from the strontium aluminate glow powder, providing a premium finish.
Another advantage of using this product is despite all its upsides, the product has a nontoxic formula. It is derived from naturally occurring elements which makes it non-radioactive and relatively safer for the environment.
What needs to be improved?
The only downside of this product is its container size which is quite small which is around 1 fluid Oz or 28 millilitres. Bigger container sizes can be quite useful for large scaled projects.
Budget is a major concern in any kind of painting project. Glow-in-the-dark products are usually more expensive than regular paints, but if you are concerned about it, don’t worry. We have got you covered. This FolkArt acrylic paint provides the best bang for the buck due to its high paint volume and reasonable price.
The product is universal in its application; it can be applied on most surfaces, including wood, fabric and even glass. It works best on interior surfaces and provides them with the smoothest finish. Moreover, it is very easy to clean up afterwards, which is very unusual in these products.
Finally, this glow-in-the-dark paint has a nontoxic formula, so it is not harmful to the environment and is also children-friendly.
What needs to be improved?
The paint, despite its high quality, requires multiple coats to fully get its Glow, which can be quite bothersome. But the price and end result justifies the effort you put in while using this product.
Pros
Relatively affordable price
High paint volume
Best for interior surfaces
Provides a smooth surface
Does not contain harmful substances
Cons
Require multiple coats
Does not work on exterior surfaces
Note: If you want paint that works on exterior surfaces, go right to the last product on our list.
There are not many brands in the industry which can match Rust-Oleum in terms of durability. They are one of the oldest and most reliable brands in the market due to their consistently high quality and durable products, and the Rust-Oleum 278733 is no exception.
This glow-in-the-dark spray paint has a strong oil-based formula which is the reason behind its high durability. This formula also makes it applicable on exterior surfaces, including ceramic wooden, and even plastic surfaces. Its strong adhesion prevents it from dripping, which also reduces mess and improves cleanup.
The product requires optimal light exposure and can glow for hours like none other. One can also reapply a new coat without any prior prep work to increase the glow.
What needs to be improved?
The drying time for this product is a whole day which makes it vulnerable time taking. But when you factor in the end result, this one day does not seem like a big ask.
Pros
Highly durable finish
Strong adhesion
It can be applied to both interior and exterior
It can be reapplied without any prep work
Does not drip or run off
Cons
Takes too long to dry up
Harsh fumes can cause problems in interior painting
Note: If you want paint that dries up quickly and does not produce harsh fumes, the next product is your perfect ask.
If there is any brand one can trust for coming up with quick-drying paint without compromising on durability, it is Rust-oleum. This time their Rust-Oleum 267026 made our list due to its ability to dry to the touch in 15 minutes and completely dry off in less than 2 hours which is very rare in these glow-in-the-dark products.
This is an aerosol product which makes it easy to use, and it covers around 8 to 10 sq ft surface area, which is quite high for these products. The reason behind the paint’s quick drying time is its latex-based formula which also allows it to stick to plastic and vinyl surfaces without putting in much effort.
Finally, the product provides a satin-type finish which is suitable for both interior and exterior surfaces.
What needs to be improved?
The glow of this product is inferior to others mentioned in our list. But its easy-to-use ability and quick application make it perfect for room or kitchen decorations.
Fabric painting is the new hobby in town, and what is better than giving it a twist by applying paint that glows in the dark? This question was answered by Tulip when they came up with their Tulip 17581, which is a specialized product for fabric painting that allows the finished product to glow in the dark.
This product mostly comes in a pack of 6; each bottle has a different colour which allows you to be creative with your painting. The paint type of this product is metallic, which also makes it washable, so the paint does not chip after washing.
Finally, each bottle is equipped with a precision tip for writing purposes so you can write any catchphrase or emotional message on your t-shirts which glow in the dark and look aesthetic in the pictures.
What needs to be improved?
The product is sticky in the beginning, which can cause an issue. But the stickiness goes away with time, and you are left with a great glowing fabric.
Body paints are becoming more and more common nowadays due to their use in themed parties and clubbing. But most people have doubts about them due to the potential harm these paints can cause to one’s skin or health. This is where Garyob enters the conversation.
Their glow-in-the-dark body paints have a nontoxic formula which makes them non-flammable non-volatile, and completely harmless to the skin. In addition, these paints are easy to apply and dry up quickly, which makes them very convenient. This product shines brightly under UV light, which makes it suitable for both day and night functions.
Finally, these paints are very easy to remove; you just have to rinse them with water the paint will come right off of you without leaving any marks.
What needs to be improved?
The biggest complaint consumers have about this product is its paint volume, which is very low per product (10 ml). This issue needs to be addressed as soon as possible; otherwise, any competitor can come in and steal their market with larger volumes.
Pros
Comes in a pack of 6
Non-toxic and environmental friendly
Glows very bright
Dries up quickly
Easy to remove from the body
Cons
Very small paint volumes
Highly-priced
Note: if you desire low-priced, high-volume glow-in-the-dark paint, go for our best-budgeted product.
Exterior painting is always more challenging than interior due to tough surfaces and harsh weather conditions. Most glow-in-the-dark paints will vanish in a matter of hours, but not the Neon Nights glow-in-the-dark paint products.
These acrylic-type paints are tailored and made for outdoor painting, which includes masonry and wooden surfaces. This product comes in a pack of 8 different vibrant colours, which makes it perfect for party raves and outdoor music festivals. These paints are self-luminous and shine bright under broad daylight as well.
The product is universal in its usage and is applicable on almost all types of surfaces, which makes it very versatile and user-friendly.
What needs to be improved?
The paint volume is relatively lower for exterior application, which has a large surface area. But 8 different colours are enough for a project. You just have to be smart with its application.
Pros
Comes in 8 vibrant colors
Very versatile in its use
Glows bright even at day time
Universally applicable
Highly user-friendly
Cons
Relatively lower volume
It can dry up if not kept covered after use
Buying Guide for Best Glow In The Dark Paints
Now that we have provided you with the list of the 7 best glow in dark paints, it is up to you to decide which one serves you the best. Each of the paint has its own pros and cons, and even our best option might not fit your project criteria. But if you are a beginner and cannot decide how to make a choice, don’t worry. We have got you covered here as well. We are going to provide you with an expert buying guide that will help you determine the best paint for your specific project.
1. Paint Type
The requirements of the task will dictate the kind of paint you employ. Acrylic paints are perfect for painting on fabric since they are water-based and dry quickly. Additionally, they are durable and tough, both of which are essential if you want your project to survive for a long time. On the other hand, thanks to their resilience to the elements, oil-based paints are more suited for outdoor surfaces. So be careful while choosing your paint type otherwise you might ruin the whole project.
2. Glow Time
When choosing a glow-in-the-dark paint, the length of the glowing effect is an important feature to consider. Some paint light for only a few minutes, while others might shine for several hours. The Art’ N Glow – Glow In the Dark Paint is a fantastic choice since it lasts a long time and has a high-quality finish.
3. Surface Compatibility
Make sure the paint you choose is suitable for the surface you plan to put it on. Some paints may not cling well to specific surfaces or create a smooth finish. FolkArt acrylic paint is versatile and may be used on a variety of media, including wood, cloth, and glass.
4. Non-toxic recipe
If you have children or pets or are worried about the environment, choosing paint with a nontoxic recipe is essential. The nontoxic nontoxic, and harmless nature of the Neon Nights Glow-in-the-Dark Paint makes it suitable for both children and adults.
5. Budget
Your budget will also influence your choice of glow-in-the-dark paint. While some paints are more expensive than others, they may provide superior quality or last longer. The FolkArt acrylic paint offers the best value for money owing to its high volume and affordable price, but the Neon Nights Glow-in-the-Dark Paint is more expensive but specialized for outdoor painting.
By taking these elements into account, you may choose the ideal glow-in-the-dark paint to fit your individual demands and preferences.
Conclusion
Finally, choosing the best glow-in-the-dark paint for your next project might be a difficult challenge. It might be tough to know where to begin with so many alternatives on the market. However, by taking into account the three variables we’ve described – glow intensity, simplicity of application, and durability – you may limit your selections and choose a solution that matches your individual requirements.
Whether you want to make a one-of-a-kind work of art or add some fun and excitement to your next party or event, top-quality glow-in-the-dark paint may help you achieve your goal. There are several alternatives available to meet your demands, ranging from high-intensity formulations that create a bright and colourful glow to easy-to-apply paints that provide a smooth and uniform finish.