
How to Cut in Without Painter’s Tape: Putty Knife Method
This post contains affiliate links. As an Amazon Associate, we earn from qualifying purchases.
To cut in without painter’s tape, hold a 6-inch putty knife in your non-dominant hand and drag it down the joint at the same pace as a 2.5-inch angled sash brush loaded with no more than 1.5 inches of paint. The knife guards the line; the brush follows it.
The blade is doing the work a steady hand is supposed to do. Held by the blade with your thumb on one side and your fingers on the other, it gives you a hard edge to slide along the corner instead of an imaginary line to aim at, which is how to cut in without painter’s tape. That turns the job from aiming into following.
What follows is the full sequence, the brush specs that actually matter, and the three places where the sources flatly disagree about loading and taping. You’ll also see which walls should get tape anyway, and why.
Key Takeaways
- A 6-inch putty knife held by the blade is what keeps the line straight; the brush travels down the joint at the same pace, never ahead of or behind it.
- Dip no more than 1.5 inches into the paint, per This Old House, and load enough for at least a foot of painting.
- Purdy, This Old House, and wallfixguide give three different loading depths, and the shallowest is the safest place to start.
- Tape still wins on delicate abutting material and edges too thin for tape to grip, per This Old House, while Purdy and carnivalpaintingaustin favor freehand.
- Cut in about 3 to 4 inches wide, or twice your brush width, per Behr, then roll while the edge is still wet.
Why the Putty Knife Does What a Steady Hand Can’t
Mauro Henrique, the painter This Old House sends out to demonstrate this, holds the putty knife by the blade rather than the handle. Thumb on one side, fingers on the other. That grip is the part that matters.
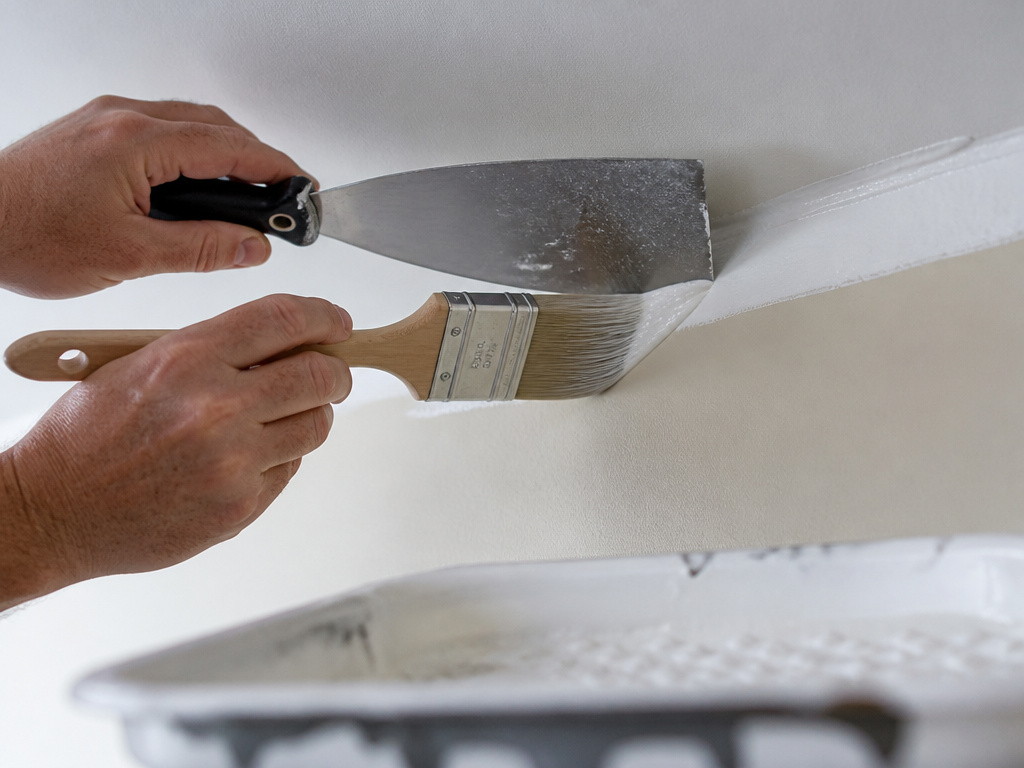
A 6-inch putty knife is seated blade-first into the corner, with the thumb on one side of the blade and the fingers on the other. The brush touches the surface level with the blade, and both hands travel down the joint at an identical pace so the bristles never lead or lag the knife.
A knife held this way stops being a scraping tool and becomes a fence. The blade sits in the corner, your hand slides it down the joint, and the brush travels at the same pace, never ahead of or behind it. Your wrist stops making decisions.
The best tools for cutting in paint are a 2.5-inch angled sash brush and a 6-inch putty knife. Nothing here requires a specialty store.
- A 6-inch putty knife. The blade is the fence.
- A 2.5-inch angled sash brush with medium-stiff polyester and nylon bristles, which is what This Old House Magazine specifies. The slanted tip lets you see the line rather than having the brush block your view of it.
- A paper towel, for wiping the blade when paint piles up on the steel.
- A small bucket with a handle. carnivalpaintingaustin makes the case that it’s easier to manage than a full-sized tray.
The knife is there because your hand alone can’t reliably paint a straight line at arm’s length, though Purdy describes how to cut in without painter’s tape using only the brush and no aid. Over a long run, small errors compound and the edge wanders.
You’ll feel the blade go heavy before you see anything. That weight is paint stacking up on the steel, and it’s your signal to stop and wipe.
The 6-Step Freehand Cut-In, Start to Finish
Six steps, and the pace matters more than the pressure.
Before you start: Clean surfaces to remove dust and grime, and protect floors and adjacent areas with drop cloths before cutting in.
- Clean the surface and lay drop cloths. Dust and grime keep paint from gripping, and a skipped drop cloth means you’re scraping dried latex off the floor with the same putty knife next week.
- Load the brush. Dip no more than 1.5 inches, roughly the width of two fingers, and stop when you have enough for at least a foot of painting. Overload it and the first stretch of your line runs.
- Seat the putty knife in the corner, holding it by the blade. Grip the handle instead and the blade rocks, which opens a gap the paint walks straight through.
- Touch the bristles to the wall level with the blade and start moving. Both hands travel at the same pace. Let the bristles get ahead of the knife and paint crosses the line.
- Stop when the blade loads up. Hold it in place, lift it slightly toward the painted side, and wipe it with the paper towel. Skip this and the excess gets pushed onto the trim.
- Stop when too much paint accumulates on the putty knife, lift the blade toward the paint side, and wipe it clean with a paper towel before continuing.
The ceiling edge is a joint where you’re working overhead and can’t see the line from directly below. Keep the brush and knife at the same pace there and let the knife carry the line.
How Much Paint Should Be on the Brush? Three Sources, Three Answers
Ask three sources how deep to dip the brush and you get three different numbers.
| Source | Loading guidance | Type of source |
|---|---|---|
| Purdy | Fully loaded brush | Brush manufacturer |
| This Old House | No more than 1.5 inches deep | Trade demonstration |
| wallfixguide | About one-third of bristle length | Independent guide |
Read them together and a workable rule appears. Load enough for at least a foot of painting, as This Old House puts it, but keep the dip shallow enough that the heel of the brush stays dry.
Purdy’s “fully loaded” describes a brush that’s saturated and tapped off, not dunked to the ferrule. The one-third-of-bristle figure from wallfixguide sits at the conservative end when you compare a how to cut in without painter’s tape. For a first wall, start shallow and add paint rather than starting heavy and wiping.
Where this goes sideways: Dipping deep enough to bury the heel of the bristles. Paint creeps into the base, dries hard at the ferrule, and the brush splays so it stops holding a point.
A cut in brush with a slanted tip earns its price here. The slanted tips let you see the line and the long point lays the edge.
Tape or No Tape: Where the Advice Actually Splits
Behr’s own cut-in page tells you to tape the trim, the ceiling, and the electrical sockets before you pick up a brush. Purdy defines cutting in as drawing a line with only the brush, no masking tape or other aid. Both are manufacturers. They disagree.
This Old House’s painter generally doesn’t waste time taping, and the same page says there’s no shame in it. Meanwhile a contractor blog points out that painter’s tape can peel fresh paint, leave residue, or bleed if it isn’t applied correctly, and it takes time to put up and take down.
So the sources split, and the split is about the wall in front of you rather than about skill.
Reach for tape when:
- The abutting material is delicate enough that tape would lift its finish.
- The edge is too thin for tape to sit flat.
- You’re sealing off sockets, trim, or a ceiling line and want the protection, which is Behr’s default approach.
- The run is long enough that you can’t reach it in one pass.
I keep tape in the bucket for the awkward edges. The long runs are where freehand gets faster, and the awkward ones are where tape can fail quietly, under the paint, where you won’t see it until the light changes.
When tape wins anyway
Behr’s method is worth following if you tape at all: press the tape down firmly with a putty knife to stop paint seeping behind it.
If you do tape, ScotchBlue’s guidance relayed by wallfixguide is to pull it while the paint is dry to the touch, typically within about an hour, and lift it back on itself at roughly a 45-degree angle rather than straight up. That’s ScotchBlue’s own guidance, relayed by wallfixguide. Wait past that window and the dried film tears where the tape crosses it, taking a hairline of paint with it.
Where Freehand Fails: Texture, Bare Compound, and Tight Corners
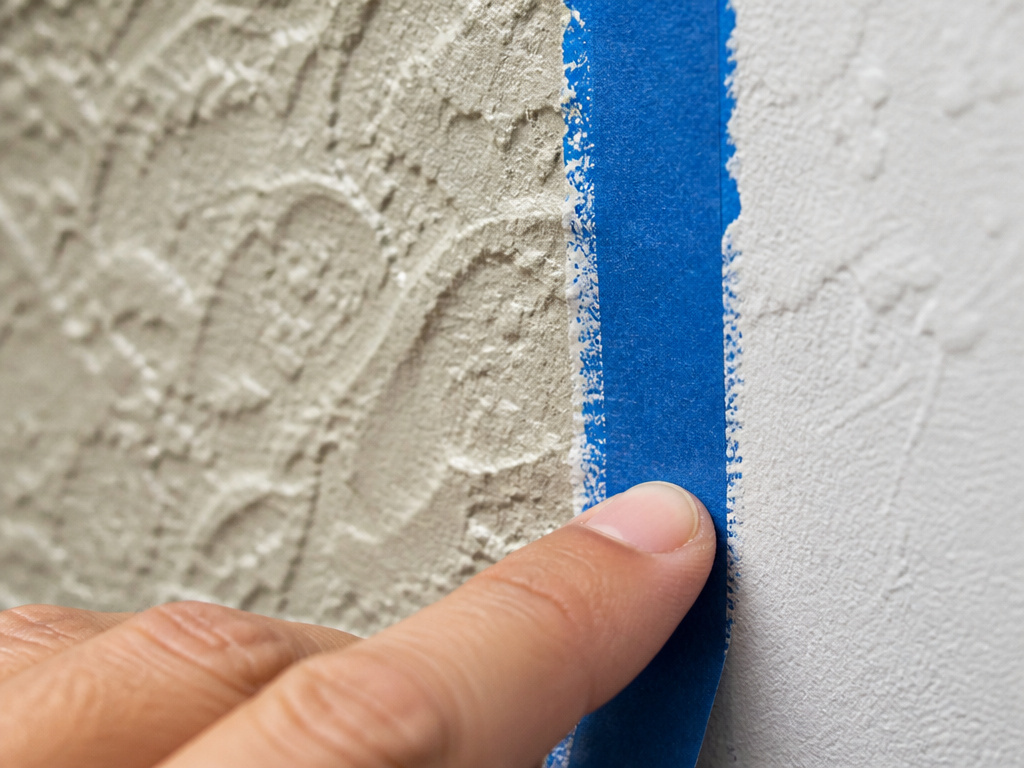
Run your palm along a knockdown wall. You feel hills, and between them shallow valleys you can’t see from standing height.
| What you see | Why it happens | What to do instead |
|---|---|---|
| Paint bleeding under the tape | Tape contacts only the hills; valleys stay open and paint wicks by capillary action | Cut in freehand on orange peel, knockdown, skip-trowel |
| A soft, feathered edge | Same texture gap; pressing harder doesn’t fix bleed on texture | Stop pressing harder and change method |
| Ragged edge over a patch | Bare, unprimed compound pulls paint in unevenly at the edge | Prime the patch before you cut in |
| A faint ridge along the line | Paint pools a fraction thicker against the tape | Freehand the line, or accept it under flat light |
Textured walls: why pressing harder doesn’t help
Pressing the tape down harder doesn’t fix bleed on texture. The tape is bridging the valleys instead of sitting in them, so the paint finds the gap by capillary action and dries as a soft, feathered edge rather than the crisp line the tape promised.
Bare compound and the feathered edge
Bare, unprimed drywall compound pulls paint in unevenly right at the edge you’re trying to keep clean. Prime the patch and the edge behaves like the rest of the wall.
Under raking light, a taped edge can show as a faint ridge where the paint pooled a fraction thicker.
How Far Should You Cut In Before Rolling?
Behr puts the cut-in width at 3 to 4 inches, or twice the width of your brush. That’s the number to work to before you touch a roller.
Most of the speed comes from treating cutting in and rolling as one continuous pass instead of two separate days.
A wet edge is a deadline, not a suggestion. The moment the cut line stops being wet, you’ve lost the chance to blend it, and the roller can leave a seam.
Purdy’s rolling guidance fits the same logic. Keep a wet edge but don’t let it drip, never run the roller cover dry, and roll an N in a three-foot square, working from the unpainted surface into the painted one. An extension pole helps reduce lap marks.
Longer strokes vs. Short ones
Purdy is specific about stroke length. Longer, full strokes give smoother coverage with fewer brush marks and fewer breaks in the cut line. Shorter strokes are for bathrooms, six-panel doors, and closets, where a long stroke isn’t an option.
Easy to miss: The tray. Purdy caps it at one-third full, and an overfilled tray is what turns a controlled brush into a dripping one.
If you’d rather use a paint edger than a knife, it’s a different motion with its own learning curve.
For most rooms, the setup is a 2.5-inch angled sash brush and a 6-inch putty knife. A 2.5-inch angled sash brush is the one I’d hand a beginner, and a 2-inch angled sash brush is the same idea for tighter work. Both are cheap enough that buying one to learn on isn’t a decision.
Frequently Asked Questions
Do I really need a putty knife to cut in without tape?
It’s the tool that makes the method repeatable. This Old House’s demonstration uses a 6-inch putty knife as a physical guide, with the brush traveling at the same pace as the blade, never ahead of or behind it. You can cut in with a brush alone, which is how Purdy describes the technique, but the knife removes the aiming problem on long runs.
What size brush should I use for cutting in?
This Old House Magazine specifies a 2.5-inch angled sash brush with medium-stiff polyester and nylon bristles. Wallfixguide puts the standard range at 2 to 2.5 inches. The angled tip is the part that matters, since it lets you see the line you’re cutting to.
Can I cut in without tape on textured walls?
That’s exactly where freehand beats tape. On orange peel, knockdown, and skip-trowel finishes, tape only contacts the hills and paint wicks underneath by capillary action. Pressing harder doesn’t help, because the tape can’t reach the valleys in the first place.
How long can I leave painter’s tape on before pulling it?
ScotchBlue’s guidance, as relayed by wallfixguide, is to pull the tape once the paint is dry to the touch, typically within about an hour, lifting it back on itself at roughly a 45-degree angle. Past that window the dried film tears where the tape crosses it.
How wide should the cut-in strip be?
Behr recommends about 3 to 4 inches, or twice the width of your brush. That’s wide enough to roll into without touching the edge, and narrow enough that the paint stays wet long enough to blend.
The Bottom Line
The trigger for switching methods is the wall, not your confidence. If the surface is textured, the abutting material is delicate, or the edge is too thin for tape to grip, go freehand. Tape fails on those edges in a way you won’t see until the light changes.
Start with one doorway this week. Load a 2.5-inch angled sash brush to 1.5 inches, seat a 6-inch putty knife in the corner, and drag both hands down the joint at the same pace. The first pass will be ugly. Then your hands sync up and the knife does the work.
None of this rescues bad prep. Dust, bare compound, and an overloaded brush will wreck a perfect line, and no brush angle fixes any of the three.
And if you want to cut in without painter’s tape on a smooth wall, carnivalpaintingaustin says freehand is often faster and produces cleaner results than tape, while Behr’s tape-first procedure is the other approach. On a bad wall, tape is the wrong tool entirely. The wall decides.
