Spray Paints

guillermo latorre Y44x1mQB2Xc unsplash Can You Spray Paint Concrete - 6 Speedy Steps

Can You Spray Paint Concrete – 6 Speedy Steps

Concrete is a durable building material, but too much of its gray color can be a bit boring. Luckily, I can help you cover imperfections and spruce up the look of any concrete object, from walls to basements and driveways, with a coat of spray paint. With my tips, you can spray paint concrete walls and achieve a smooth finish that doesn’t chip or feather away.

Yes, you can easily spray paint on concrete surfaces with the correct technique. Start by cleaning the surface you want to paint and follow it up with a thorough sanding to achieve a smooth base. Apply a coat of primer to build a strong foundation, and finally, spray the paint in multiple thin layers for an even finish.

Painting on concrete can be tricky, and it’s easy to mess up the paint job if you don’t follow the right process. Here is everything you need to know about painting concrete surfaces like a pro while making sure it stands the test of time.

What Kind Of Spray Paint To Use On Concrete?

A spray paint DIY is the easiest way to bring life to old and dull concrete surfaces. It not only enhances the appearance of concrete objects but also protects surfaces from stains.

While the thought of clean and freshly-painted concrete is appealing, choosing the right type of paint is critical to give your masonry surface a new look. There are two types of concrete paints:

  • Acrylic latex paint
  • Epoxy paint

Each type of concrete paint has pros and cons. Familiarize yourself with the two, so you know which kind of paint is better suited to your project.

Acrylic Latex Paint

Acrylic latex paint is water-based and makes paint application on concrete seem like a breeze. The paint mixes and spreads quickly on masonry surfaces without special tools such as brushes or rollers. It is a budget-friendly option that can be used to paint walls, floors, steps, etc.

The downside of acrylic latex paint is that it’s not as durable as epoxy paint. As easy as it is to apply it, the paint comes off rather quickly and requires a fresh coat every 2-3 years.

Epoxy Paint

Epoxy paint is available in different variants, such as two-part solids-based, water-based, or solvent-based. It is an acrylic latex product that contains a small amount of epoxy in the mix. The addition of epoxy provides a tough and durable protective coating that is easy to maintain.

The main difference between epoxy and ordinary paint is that epoxy ensures that the paint adheres to the concrete surface better, whereas standard acrylic paint will eventually flake and peel.

Epoxy kits contain two liquids that must be mixed before application: an epoxy resin and a hardener. This type of paint is difficult to spread and is more labor-intensive. Apart from the additional paint application hours needed for epoxy paint, it is more expensive than acrylic paint. However, the results of epoxy paint application are amazing and worth the cost.

Additional Considerations For Paint Selection

If you plan to spray paint concrete, the type of paint you select isn’t limited to the latex vs. epoxy debate. There are other important considerations that you should keep in mind before starting your project.

  • Where is the object that you want to paint? Floor paints and epoxies are heavy, so they don’t work well on vertical surfaces. So, it’s better to buy concrete wall paint or concrete brick paint.
  • If you want to use the paint outdoors, make sure the paint is exterior-grade and weather-resistant. Exterior-grade paint and epoxies hold up well under harsh weather conditions and require fewer repairs and touch-ups.
  • Decide on the paint finish you want. A glossy surface is smooth, easy to clean, and overall more durable. But a matte finish would be more suitable if you want your masonry to blend into the background.

Materials You Will Need To spray Paint Concrete

Painting concrete is not as easy as painting a regular wall, but if you do it correctly, it can make your home look modern and neat. Here are the equipment and materials you will need for spray painting concrete.

  • A stiff bristle brush
  • A putty knife
  • A pole sander
  • A paintbrush, roller, or spray paint
  • Protective gear mask, gloves, eye googles and apron
  • A vinyl concrete patching compound
  • Sandpaper
  • Concrete sealing primer
  • Non-skid concrete paint
  • Painters tape

6 Steps To Apply Spray Paint To Concrete

Now, let’s get down to the real task. Please remember to wear protective gear so the paint doesn’t come in direct contact with your skin, eyes, or clothes, as it can be hazardous to health. Also, if the object you’re painting is brand new, wait for at least a month before painting it; otherwise, the paint will not adhere to the surface properly.

You can follow this step-by-step guide for painting on concrete.

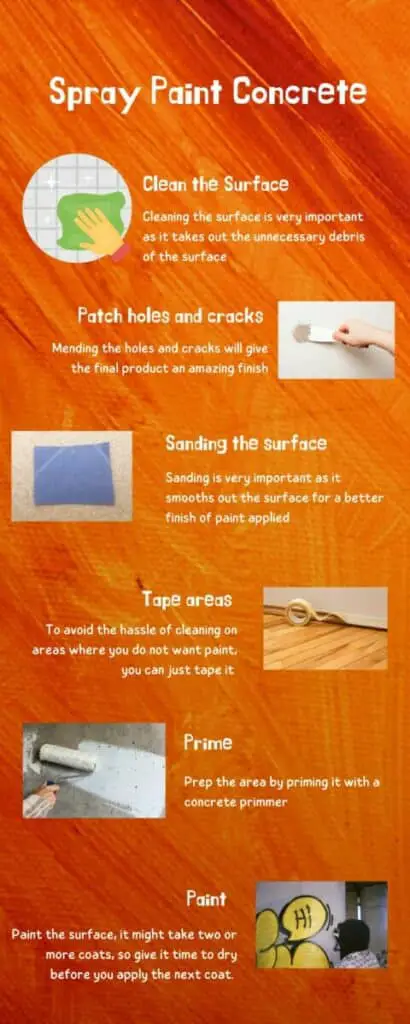
Step 1: Clean the Concrete Surface

You can achieve good paint results only if you start with a clean surface. Therefore, you must thoroughly clean the concrete surface with a stiff-bristle brush and remove loose concrete and debris. If you are working outdoors, remove any weeds or moss growing out of the area you want to paint.

You can use warm soapy water to get rid of any grime or dirt. If you have a power washer, take it for a spin and cut your cleaning time, but let the concrete dry completely before moving on to the next step.

Step 2: Patch Holes and Cracks

Concrete has small holes and cracks that can result in a patchy paint application. You can smooth out the texture by filling in the holes with a putty knife and concrete compound.

Step 3: Sanding

Use sandpaper to sand off any rough bumps or spots. If you are painting a large surface such as the basement floor or a wall, you can attach the sandpaper to a pole sander to cover more area quickly. After sanding, make sure to clean up any residue.

Step 4: Tape off areas you want to keep paint-free

It is a good idea to tape off any nearby areas where you don’t want to paint accidentally. For example, if you’re painting up to the edge of a wall, you can apply tape on the base to keep paint off of it.

Step 5: Prime the concrete

Concrete is a highly porous surface, so if you skip the priming step, the paint will not stick to it. Apply primer evenly over the surface with a roller or brush and wait for at least 30 minutes before you start painting. Some paints already have a primer in the formula; in that case, you can skip this step.

Step 6: Apply Paint

Now start applying paint to the prepped and primed concrete. You can use a brush, roller, or spray to cover the surface completely. Some masonry paints are thicker in texture and might clog air sprayers. So, if you plan to spray paint, buy a product that works well in a sprayer.

A single coat might not be enough, so apply paint in 2 to 3 layers for a rich and even finish. It would be best to let the area dry for at least a day before you go in with the next coat. If you are painting outdoors, scan the weather forecast before starting the project to avoid any surprise rainfall.

Steps for Spray Painting on Concrete
6 Easy Steps: Spray Paint Concrete

FAQs

Does painting concrete last?

Spray paint lasts on concrete for 3-5 years, depending on the type of paint you use and the elements the area is exposed to.

Is it better to roll or spray paint concrete?

Spray painting concrete is better than rolling because you can achieve an even finish even on rough and porous surfaces. However, it needs more number of coats as the paint goes on thinly with each coat.

Does painting concrete make it slippery?

Freshly-painted concrete surfaces tend to be slippery, but you can reverse that effect by using non-skid concrete floor paint.

Can you spray sealer on concrete?

Yes, you can apply a penetrating concrete sealer with a spray. If you are working with decorative acrylic sealer or epoxy floor coating, it is better to use a roller.

Can you spray paint concrete statues?

Yes you can most definitely spray paint concrete statues. You can use one basic color for whole statue or just a few different colors to create depth and make them life like. In any case, it is always better to prep the surface before spray painting them.

Can you spray paint concrete-Conclusion

Spray painting on concrete is not as difficult as it may look at first. Especially when you picture a perfectly-painted surface, all the effort seems worth it. With the correct tools and technique, you can easily paint any concrete surface regardless of size and condition.

Do check out our blog how to apply waterproof spray paint which might help you further increase your knowledge.

giorgio trovato 2KD6Z SmTQE unsplash How To Remove Spray Paint From Rims - 6 Easy Steps

How To Remove Spray Paint From Rims – 6 Easy Steps

It is tiring to look for the spray paint removal solvents available in the market when you do not know which wheel paint remover is the best for ‘your car wheels’. Saving you this trouble, I have everything you need to know about how to remove spray paint from rims.

You can easily remove spray paint from rims by using a spray paint remover. Start by soaking the paint stain with the remover of your choice for around 15 minutes and scrub it away with a soft brush or scraper. You can finish it off by rinsing with water or a pressure washer.

Whether changing the rims’ color or just bringing out the shine of the original material, you will need to remove the previous coat of spray paint, and here is how you can do that without causing damage to the wheels and tires.

Things To Consider

DIYs are fun,  but it is important to prepare for the process beforehand. From gathering the right tools to necessary precautionary measures, here is everything you need to know before you start working on the rims. 

What is the material of the rim?

All metal components are not created equal, and the technique that works on one type of rim might not work the same on the other. So, before collecting supplies for cleaning the wheels, check the type of rims on your tires.

You may have one of the following:

  • Steel rims
  • Aluminum rims
  • Magnesium Alloy rims
  • Chrome rims

Once you have identified the correct type, you can move on to the cleaning agents that are most suitable for removing spray paint from the rims.

How much paint needs to be removed?

Do you want to remove a few spots of spray paint that got splashed accidentally on the rims, or is the entire paint on the rim? This critical question will help you decide the tools and time needed to clean it up. 

If the whole rim needs paint removal, more liquid will be required to get it off; a small splash can be taken care of with a washcloth and just a dash of the solvent. 

Take Necessary Precautions

Some spray paint chemicals can be extremely hazardous to health. Strong volatile chemicals can affect your eyes and skin if necessary precaution isn’t taken. 

We recommend that you choose a well-ventilated area to do this process of spray paint removal and use a pair of goggles, a mask, gloves, and an apron to protect your eyes, hands, and clothes. Your health should be your first priority; even tiny drops of some of these can cause irreversible damage you would not want. 

The Supplies You Will Need To Remove Spray Paint

Here are a few essential tools and supplies you will need to get started.

  • A lug wrench and jack: You will need these tools to remove the wheels from the car. Most vehicles have a set in the trunk for emergencies.
  • A cloth. You need a rag or towel to clean the spray paint after exposing it to the cleaning agent. Make sure to use a disposable cloth, as you won’t be able to reuse it once the job is complete. 
  • Paint removing compound. Several cleaning agents on the market can help you clean spray paint from the rims. You can choose between Goo Gone, Goof off, Acetone, Paint thinner, Smart Strip, and other products to remove the stain. 
  • A brush. Some corners will be hard to reach and  will require scrubbing after you apply the paint remover. A small brush or a toothbrush should do the trick. 
  • A scraper. In some cases, the paint can be too tough to clean with just a cloth or brush. That is where a plastic scraper or sandpaper can make your job easier. Be careful with these abrasive tools, not to ruin the rims with too much pressure. 
  • A buffing tool. Sum it up with a buffing tool on top of a drill to clean tough paint spots. This is a softer alternative to abrasive tools such as sandpaper.

Pressure washer (optional). A pressure washer can help you clean up the rims quickly and thoroughly. Keep settings on moderate to low levels to avoid damaging the wheels.

How To Remove Spray Paint From Rims: 6 Steps

We have outlined the steps to remove the paint from rims but before you start the process, make sure you have the safety gear on and are working with proper ventilation. 

1. Remove the tires

Remove the tires from the car to make this job easier. You can remove the rims from tires but most paints do not affect the rubber material of tires. If you follow the time guidelines mentioned on the spray paint remover, you are good to go. To be safer, cover the sides with tape on the edges near the rim to protect the tire from any damage at all.

2. Wash the rims thoroughly

Wash out the dirt and debris from the car wheels before you apply any liquid to clean the paint off. Dirt removal is necessary from all corners and crevices for the chemical to work in a non-contaminated environment. Use any garden hose available and brush to do a proper cleaning.

3. Apply the spray paint remover

Apply the paint remover with a brush or spray it on the rims, be generous here, especially in the center where the spray paints are mostly concentrated. Leave the solvent on the surface to work. Make sure you do not leave for more than 15 minutes or the time recommended by the manufacturer. If you see a reaction happening, wait a while and smile because it’s working.

4. Clean off the paint

Bubbles will start forming minutes after you apply the paint but wait for 10 to 15 minutes.

One option could be to use a pressure washer to wash off the spray paint. It might take 2 or 3 cycles of applying paint remover and pressure washing it off, but the result is totally worth it.

The second option is to use a cloth, preferably a microfiber cloth, to rub out the paint on the rims. Use a small brush to reach hard-to-reach places.

Use sandpaper and a plastic scraper if the paint doesn’t come off easily with the cloth and toothbrush. While it’s tempting to finish the job quickly, applying too much pressure with harsh tools can damage the metallic finish on your rims. Be gentle and just use the force that is required.

5. Rinse the rims with water

Congratulations, you are in the final stretch now. Rinse the rims to ensure all the paint and paint remover are completely gone. The paint stripper can stick to the surface and cause damage to the rims in the long run. A pressure washer works best in these situations; however, thorough washing with tap water will also do the job just as well.

6. Use the buffer drill to polish the rim

After rinsing the spray paint remover, the surface of your rims might look a little rough. Once it is dry, use a buffer on a drill to clean up the rims for a more polished look.  

Congratulations! now you know how to successfully remove spray paint from rims without damaging it.

Six steps on how to remove spray paint from the rims - explained.
Steps to remove paint from rims

FAQs

Will Acetone remove paint from rims?

Acetone works amazingly to remove paint from rims. It is also harmless to the metal beneath and works best for the patches that the spray paint remover could not reach. It is expensive and can smell strong as it is very volatile. 

Does WD-40 remove spray paint?

WD-40 will remove small accidental spills of spray paint from the floor, on your car or wheels. However, for a more significant project, like removing spray paint completely from rims, you should go for the proper chemicals available in the market. 

Does vinegar remove spray paint?

Vinegar can remove the paint when mixed with baking soda. If heat is used, the job becomes easier. However, we can not guarantee how this mixture will affect the surface beneath. Corrosion can occur. Therefore it is always better to use the spray paint removers fit to do this job.

Final Piece of Advice

DIYs can be exciting but also a lot of work. So, if you don’t have the time or inclination to put in the required effort, you can always take professional assistance. Now you know how to remove spray paint from rims. Removing spray paint from rims is a time-consuming process, but if you have the right tools, supplies, and solvents on hand, you can cut down the cost and time and get the job done quickly. 

If you would like to know in detail about our preferences for spray paint strippers then check out our blog on 10 best spray paint strippers for metals and know which one is the best fit for you. You can also check out the best spray paints that we have selected for metals to repaint your rims.