
How to Glaze Walls for Depth: A 7-Step Sequence
This post contains affiliate links. As an Amazon Associate, we earn from qualifying purchases.
To glaze walls for depth, thin the glaze and build it in several translucent passes instead of one heavy coat. Golden Paintworks puts working time at 15 to 45 minutes, so you work one section at a time, keep a wet edge, and let each layer dry before the next.
Working time is the number that decides everything else here, and the how to glaze walls for depth question starts with it. A 15-minute window means working in small sections, and the glaze you mixed at nine in the morning may be a different material well before the working time is up.
What follows: the mix ratios, the wet-film versus dry-film argument between two published specs, the temperature floor nobody agrees on, and the test board step that saves the wall.
Key Takeaways
- Thin beats thick. A glaze built in three passes reads as depth; a heavy single coat reads as dried gravy.
- Working time runs 15 to 45 minutes per Golden Paintworks, so plan sections rather than whole walls.
- Golden’s glazing medium is interior only. The Charleston silicate system is the exterior option, and the two are not interchangeable.
- Two published specs disagree on whether 3 mils means wet or dry film. Know which one you’re following before you buy.
- Wait before you fix a blotch. Wet glaze looks worse than it settles, and most “fixes” make it worse.
What Glaze-to-Paint Ratio Actually Builds Depth?
Start at 3% colorant and work up, not the other way around. Golden Paintworks recommends tinting their Glazing Medium with waterborne dispersion colorants at up to a 5:1 glaze-to-dispersion ratio, beginning at a 3% addition and testing before you commit to a wall.
Golden Paintworks Glazing Medium accepts acrylic paint in any amount, or waterborne dispersion colorant at up to a 5:1 glaze-to-dispersion ratio. Universal colorants are not recommended because of their high glycol content. Two mediums ship in the line: the standard, which thickens at rest, and Sheer, which stays thinner and more oil-like.
Before you start: UFGS 09 96 59 requires solvent-resistant PPE covering the whole body, an eyewash and water supply within reach of the work area, and good ventilation with no smoking. If you’re spraying polyurethane in a closed room, the same spec calls for local exhaust ventilation or an air respirator.
That spec was written for high-build coatings, which are heavier products than a decorative glaze. The PPE and ventilation rules still apply to anything solvent-borne, and they cost you nothing to follow.
My own mix is a thin, translucent blend rather than a measured manufacturer ratio. That’s not a manufacturer number. It’s the ratio that stopped my walls from going muddy, and the habit of building up matters more than the exact figure.
Mixing by Ratio, Then by Eye
A scale gets you close. Your eye finishes the job.
Hold the stir stick up to a light source. A glaze mixed at the right load looks like weak tea. One mixed too heavy looks like chocolate milk, and it dries the same way.
Golden’s Slow-Dry Fluid Acrylics can be mixed in any proportion with the glazing medium to adjust pigment load and transparency. Do not mix the medium with oil paint, per the same data sheet.
The logic you’d use when layering acrylic paint holds on a vertical surface too: thin, translucent, stacked.
Mix a quarter cup and brush it on a scrap. That’s the whole test.
Three Mils Is the Number, but Nobody Agrees Which Three Mils
Three mils is the film thickness both published specs land on, and they mean two different things. UFGS 09 96 59 sets a minimum dry film thickness of 0.075 mm (3 mils) per coat, applied in two coats. The City of Charleston’s silicate spec sets a minimum 3 mil wet coat.
| Specification | Film thickness basis | Coats |
|---|---|---|
| UFGS 09 96 59 | 0.075 mm (3 mils) dry film per coat | Two, sometimes three |
| Charleston 09 97 23 | 3 mils wet film per coat | Primer, base, top |
| Golden Paintworks | Not stated | Recoat after 4 hours minimum |
Wet film shrinks as the carrier evaporates. A 3 mil wet coat of a high-solids product and a 3 mil wet coat of a thin one can cure to very different thicknesses, which is why the two specs never reconcile.
The UFGS 09 96 59 glaze coatings document goes further than thickness. It requires a Tooke gage reading to verify the film, and it excludes the filler coat from that measurement.
Charleston’s Charleston-SC glaze specification runs the sequence differently: primer diluted 1:3 with water and cured 12 hours minimum, then base and top coats each diluted 1:1 with silicate dilution, with the base coat drying 24 hours minimum. Mixing runs at 600 to 800 RPM to keep color uniform, and the diluted material stays stirred during application.
Neither document is a decorative-paint tutorial. They’re construction specs, and that’s exactly why they’re useful. They put numbers on things hobby guides leave vague.
The faux finishes most people picture, whether that’s rag rolling or sponging or strie, all sit downstream of these same thickness questions. Get the film right and the pattern reads. Get it wrong and no technique saves it.
How to Glaze Walls for Depth in Thin Passes
Forty minutes into a hallway wall, the glaze starts to grab and the brush drags lines instead of blending them. That’s the moment the urge to load more on gets loud.
My first glazed wall looked like dried gravy. I’d loaded the glaze on like frosting, stepped back, and watched two hours of work turn heavy and blotchy in the time it took to rinse a brush.
Now I thin the glaze and build in thin passes. Same wall, three passes, none of them thick.
Here’s the mechanism. A translucent layer lets light pass through, bounce off the base coat, and return to your eye carrying the base color. Stack three of those and the surface reads as depth because light is genuinely traveling through different depths. A heavy coat blocks the light at the surface, and you get flat color with brush marks sitting in it.
That’s the same glazing technique oil painters have used for centuries, just applied to a vertical surface with a wider brush.
Two thin passes beat one thick pass every time. The second pass is where depth shows up, because it sits over a layer that’s already scattering light.
What the Second Pass Actually Does
The first pass tints the base. The second pass is the one that creates variation, because it sits over a surface that’s already slightly uneven in tone.
If you want a drier, broken texture instead of a smooth veil, that’s closer to scumbling, where the brush leaves a little glaze behind rather than laying it down.
Don’t glaze over a base coat that hasn’t cured. I tried it before the base had fully cured once, on a panel, and the whole thing lifted into brown soup.
Now I touch the surface with a knuckle before I mix anything. Cool and dry means go. Cool and slightly tacky means wait another day.
Color Washing Is the Sleeper, and It Hides More Than You Think
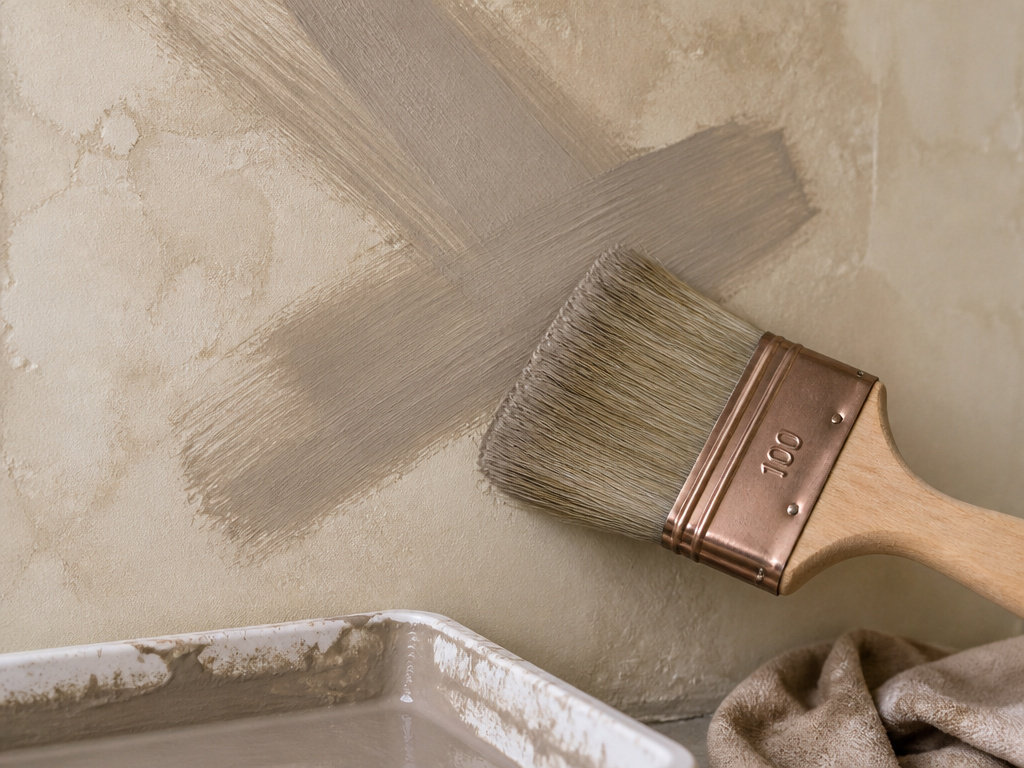
Color washing is the pick I keep coming back to.
I ran it over a wall full of old patch spots and sanding marks, and the soft cloudy layers swallowed almost all of them. Crisscross X-shaped strokes with a wide brush, nothing fancy.
The color washing approach works because you’re glazing a couple of shades off the base coat, not a dramatic contrast. Two similar tones, worked one section at a time, and it reads like aged plaster.
I won’t glaze a wall with a narrow brush. The X-strokes go choppy, the wet edge breaks, and you end up patching instead of blending. Learned that one the slow way on a stairwell.
If you want visible direction instead of clouds, strie is the same idea with a dragged brush. Same thin mix, different motion.
Where this goes sideways: Choosing a glaze four shades off the base. The contrast reads as stripes rather than depth, and it doesn’t settle into the wall with time. You’ll notice it every trip down that hallway.
What Temperature Can You Glaze At?
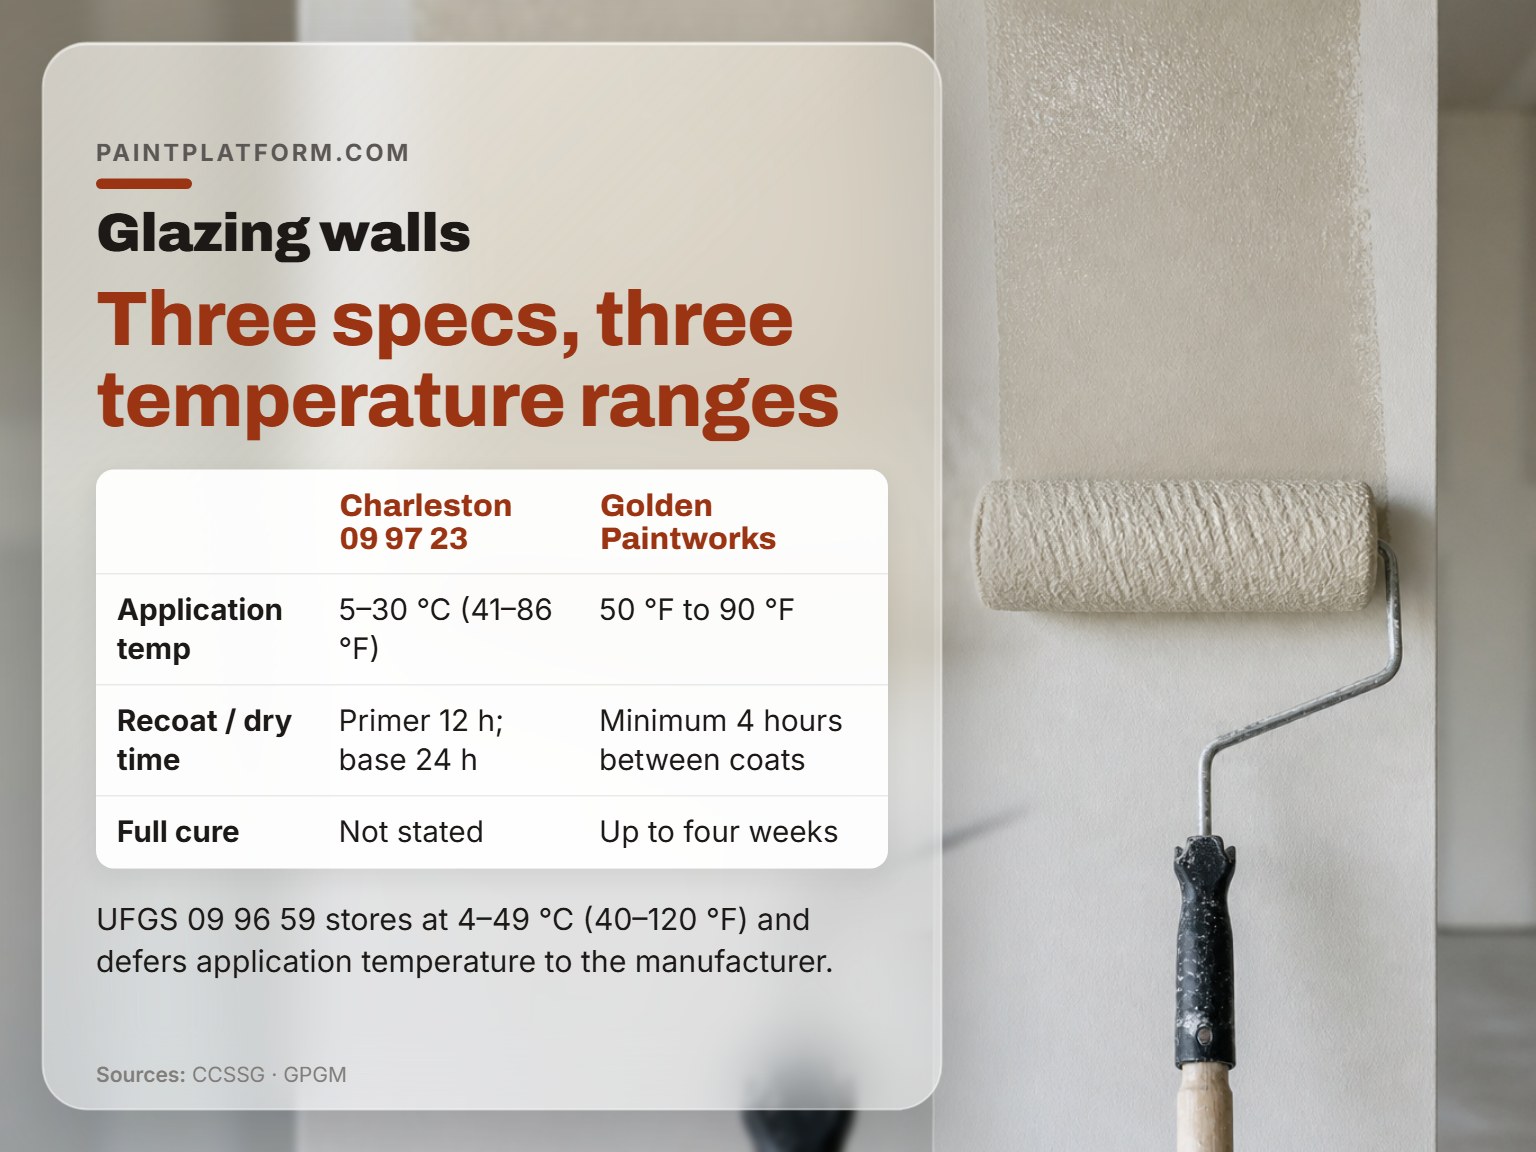
The three published numbers don’t match, and the gap matters in an unheated garage. UFGS 09 96 59 sets a storage range of 4 to 49 °C (40 to 120 °F) and hands application temperature to the manufacturer’s instructions. Charleston 09 97 23 requires ambient and substrate at 5 to 30 °C (41 to 86 °F). Golden Paintworks requires 50 °F to 90 °F.
That’s a meaningful spread at the cold end between Charleston and Golden. A glaze that cures fine at 45 °F under one spec violates the other outright.
The Golden Paintworks glazing medium technical data sheet is the one to follow if you’re using their product. It’s their chemistry, their numbers, their liability.
Reading the Recoat Window
Golden allows a minimum of 4 hours drying time between coats. Charleston wants 12 hours on the primer and 24 on the base.
Four hours and 24 hours are both “dry” in different senses. One means you can recoat without lifting. The other means the film has stopped moving.
A glaze that’s still curing carries a slight sheen when you look at it from an angle. Once it goes fully matte, you’re close.
Full water-resistant cure on the Golden product takes up to four weeks. Don’t hang anything on that wall or scrub it before then.
Glazing Medium and Silicate Glaze Are Different Chemistries
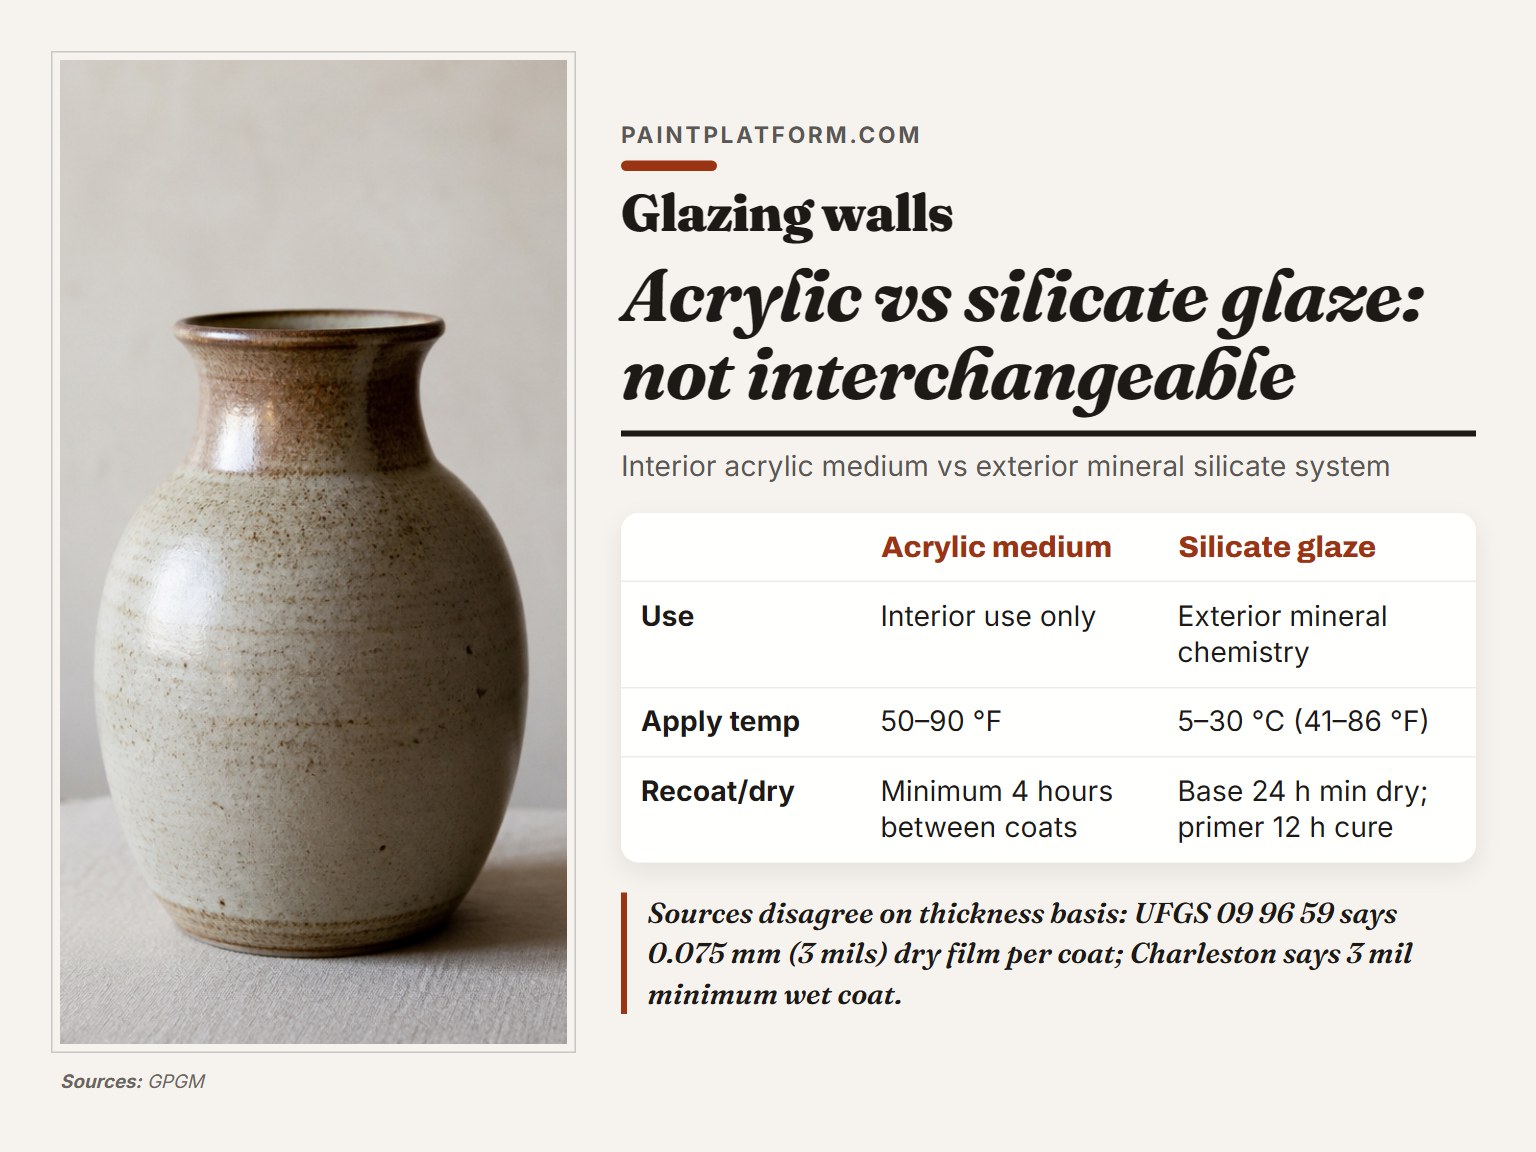
Golden Paintworks Glazing Medium is an interior acrylic product, full stop. The Charleston silicate system is exterior mineral chemistry, specified for the Old Exchange Building exterior restoration in Charleston, South Carolina.
The two are not interchangeable, and the reason is vapor. Silicate glaze bonds into mineral substrate and leaves the pore surfaces open to vapor diffusion. Acrylic glazing medium over a sealed base coat blocks that diffusion.
So for exterior restoration the Charleston spec answers with silicate, not acrylic, while Golden’s medium is specified for interior use only.
This is where a lot of decorative work goes wrong. The rag rolling and sponge painting finishes that look great in a living room are acrylic-medium techniques. They belong indoors.
Golden’s data sheet says interior use only in plain language. That’s not a suggestion.
Skip this if: You’re planning an acrylic glaze on an exterior wall. Golden’s medium is rated interior only, and one season of sun and rain will break down the film in a way no clear topcoat rescues.
Charleston’s spec also sets qualifications that surprise people. The manufacturer has to have fifteen years in silicate glaze production. The applicator needs three years of experience or one comparable project in the last 18 months, plus a manufacturer certification course.
The Test Board, Then the Wall: A 7-Step Sequence
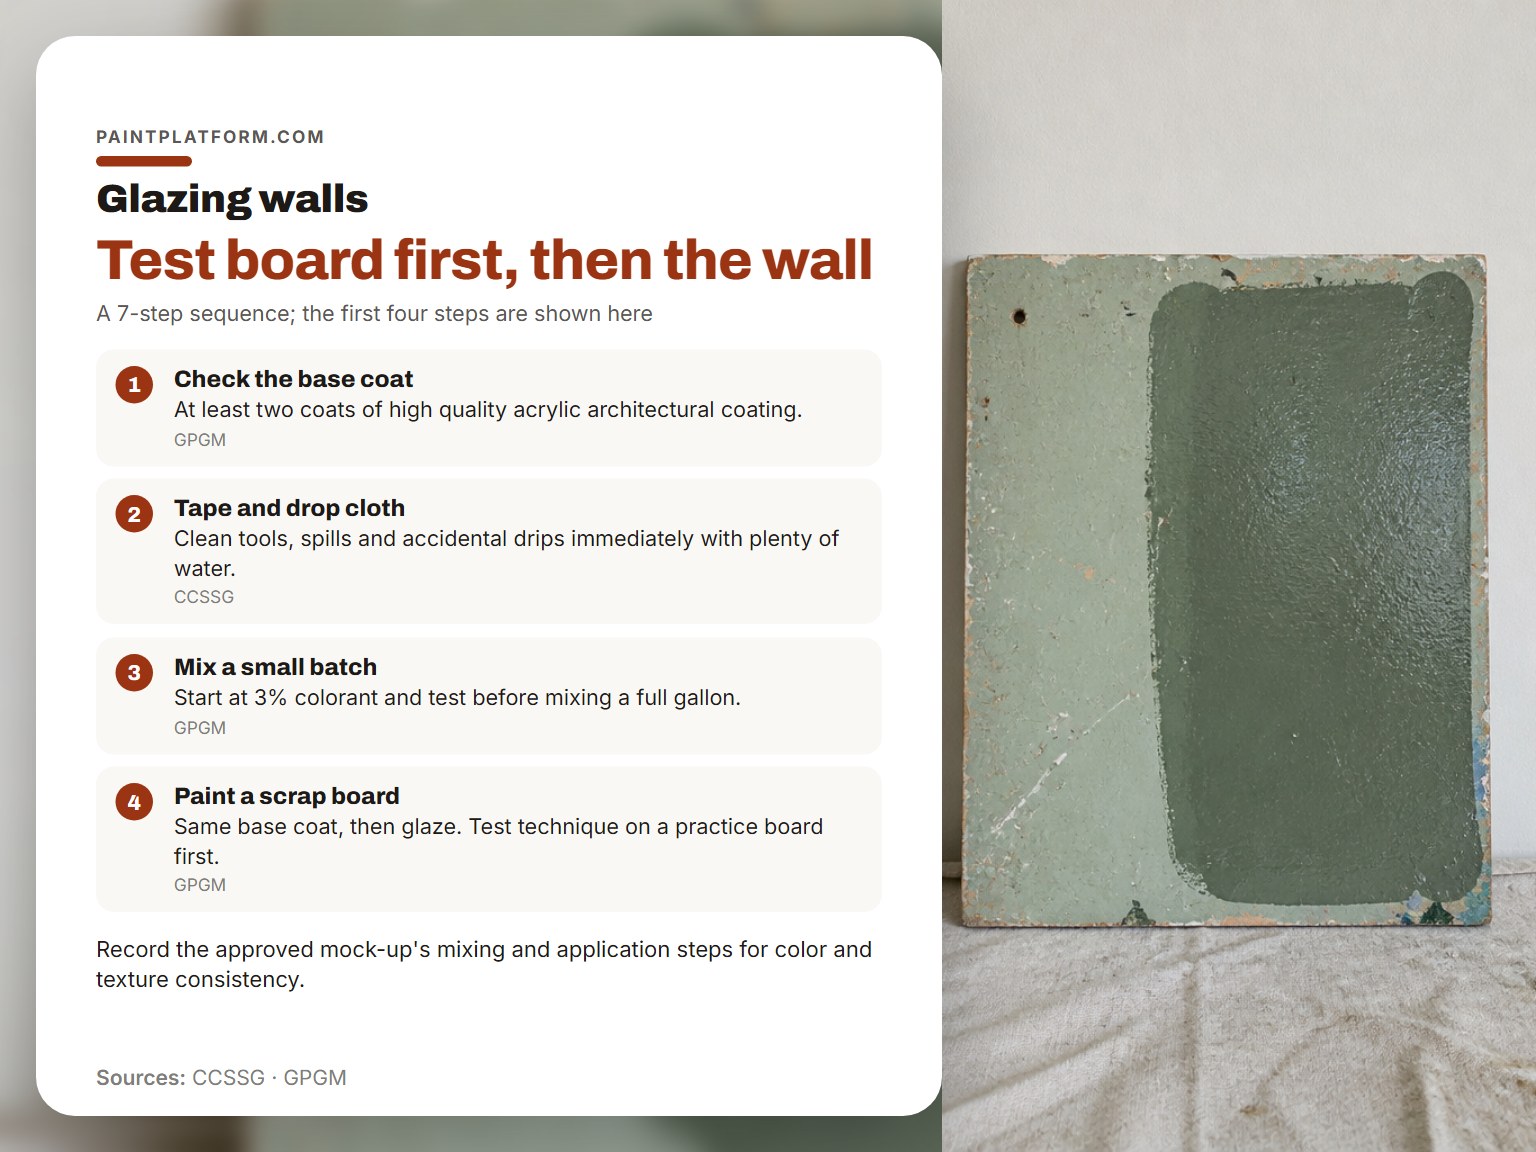
Charleston’s spec requires a mock-up for every finish type, accepted before the final unit of work begins, then kept undisturbed as the standard for judging the finished job. That’s a construction-grade version of a test board.
It also requires the applicator to record the mixing and application steps from the approved mock-up, so the final wall matches the sample on color and texture.
That recording habit is the part worth stealing. Write down your ratio. You will not remember it in three weeks.
- Check the base coat first. Two coats of acrylic, fully cured. If your knuckle reads tacky, stop and come back tomorrow. Glazing over a soft base lifts it into soup.
- Tape and drop cloth. Charleston’s spec calls for cleaning tools, spills, and drips immediately with plenty of water. Wet glaze wipes off. Dry glaze doesn’t.
- Mix a small batch. Start at 3% colorant and test. A full gallon of a wrong mix is an expensive lesson.
- Paint a scrap board with the same base coat, then glaze it. Golden’s data sheet recommends a practice board before walls, and they’re right.
- Work one small section at a time. Keep a wet edge. If the glaze starts dragging, you’ve waited too long.
- Walk away for 10 minutes before judging a blotch. Wet glaze always looks worse than it settles.
- Seal after full cure. Golden’s Clear Topcoats go on after the film has cured, not before.
When something does go wrong, the fix usually depends on which stage failed:
| Symptom | Likely cause | Fix |
|---|---|---|
| Blotchy while still wet | Uneven glaze load | Wait 10 minutes and re-check |
| Cloudy or foamy patches | Overbrushing one area | Stop, dry, recoat thin |
| Glaze lifts the base | Base coat not cured | Stop, wait a week, restart |
| Finish looks heavy and flat | Coat applied too thick | Sand lightly, redo thin |
| Color reads as stripes | Glaze too far off base tone | Remix closer to the base |
Frequently Asked Questions
How many coats of glaze do I need for depth?
Three thin passes is a working number for decorative depth. The published specs don’t agree on coat counts either: UFGS 09 96 59 specifies two coats at 3 mils dry film each, while Charleston 09 97 23 mandates three applications with distinct dilution ratios. Go thin and judge by eye.
Can I glaze over paint that’s only a day old?
No. Acrylic needs to stop moving before you trap it under a glaze. I tried it before the base had fully cured and the whole surface lifted. A knuckle test settles it: cool and dry is fine, cool and slightly tacky means wait.
Why does my glaze look blotchy while it’s still wet?
Because wet glaze is uneven by nature and you’re seeing it under raking light. Walk away for 10 minutes. Most blotches even out as the film levels, and the fixes people apply in a panic are what actually ruin the wall.
Is glazing medium the same as silicate glaze?
No, and the difference is chemistry, not branding. Golden Paintworks Glazing Medium is an interior acrylic product. Charleston’s silicate glaze is exterior mineral chemistry that bonds into masonry and stays open to vapor diffusion. Swapping them is a spec violation.
Can I use glaze on an exterior wall?
Only with an exterior-rated system like the Charleston silicate spec. Golden’s glazing medium is labeled interior use only. Applying it outdoors is a failure waiting on weather, and no topcoat fixes it.
How long until a glazed wall is fully cured?
Golden allows up to four weeks for a full water-resistant cure, with a 4-hour minimum between coats. Don’t scrub it or hang anything heavy before then. Charleston’s silicate sequence is faster between coats but still wants 24 hours of rain protection after application.
The Bottom Line
One number to carry with you: 50 °F for Golden’s medium, though Charleston’s silicate spec allows application down to 41 °F and UFGS defers to the manufacturer’s instructions.
Grab a scrap of drywall, paint it with the same base coat you’re using, and glaze it tonight. Tomorrow you’ll know more about how to glaze walls for depth than any guide can tell you, because you’ll have seen your own ratio under your own light.
Fair warning: this all assumes an interior wall. Outside, none of the acrylic advice applies and you’re in silicate territory with a completely different set of numbers and a 24-hour rain window.
Start small and stay curious. The scrap board is where the wall gets decided.
