
How to Repair Cracked Paint on Exterior Walls
This post contains affiliate links. As an Amazon Associate, we earn from qualifying purchases.
To repair cracked paint on exterior walls, find the moisture source first, then remove the loose material instead of painting over it. Test adhesion with tape in a 6 to 12 inch radius around the failure, spot-prime any bare wood, and topcoat only after the surface is fully dry.
Painting over a crack fails slowly. The new coat bridges the gap, the wood behind it keeps moving through every wet and dry cycle, and the film splits along the same line. The crack comes back wider, with more paint on either side of it. Knowing how to repair cracked paint on exterior walls means addressing the gap itself before repainting.
What follows is the order the sources agree on: diagnosis, adhesion testing, removal, priming, then a topcoat system. It also covers the four places those sources flatly contradict each other, because those are the decisions that actually trip people up.
Key Takeaways
- Moisture behind the film causes most failures, not sun or cheap paint. Fix the water path before you touch the coating.
- The tape test decides the job. Press tape over a clean section and pull. Flakes lifting means the paint has to come off.
- Film thickness over 1/16 inch changes the rules. NPS says spot-paint bare wood only and skip the feathering entirely.
- Sources disagree on repaint interval, from at least 4 years up to 10. The real number depends on wood species, exposure, and how many coats are on there.
- Never paint a damp surface. Rain, dew, or condensation on the wall is a listed cause of peeling, and it will undo the work.
Why Exterior Paint Cracks in the First Place
Purdue Extension names moisture as the most common cause of premature paint failure on wood, and the mechanism is simple. Water gets behind the film, the wood swells, and the coating loses its grip.
Paint fails at the interface between film and substrate. Moisture moving outward from the wall, or inward from a damp surface, swells the wood, and the film loses grip. Cracking concentrates at weatherboard edges, joints, mitres, and board ends, where the coating is thinner and water reaches end grain first.
NIST’s older circular makes the same point from a different angle: excessive moisture back of the film accounts for many of the blistering and peeling failures on exterior wood. Some of that moisture comes from inside the house. Purdue notes that moisture generated inside the house moves outward through the wall.
Exposure decides where it shows up first. Purdue puts the fastest deterioration on the south and west sides, the walls that catch the most sun and rain. BRANZ adds that cracking starts at board edges, joints, mitres, and end grain, because the coating is thinner there and water gets in faster.
This is the same mechanism behind peeling paint anywhere on the house. Cracking and peeling are usually the same failure wearing different clothes.
NIST also flags a case that catches people during renovations: paint applied to exterior siding before new interior plaster has dried may blister and peel. The wall is still pushing moisture outward for weeks.
How Do You Test Whether Cracked Paint Is Still Bonded?
Adhesive tape answers it in about ten seconds, and it costs less than the primer you would waste guessing.
BRANZ describes the method plainly. Press a strip of adhesive tape firmly over a clean section of paint and pull it away. If you want a harder test, score a cross-pattern over a small section with a sharp knife first, then tape over it and pull. Flakes coming off on the tape means the paint should be removed.
Sherwin-Williams adds a radius to it: test adhesion in a 6 to 12 inch radius around the peeled areas. That matters because failure spreads outward from the visible crack, and paint that looks sound at the edge of the damage often is not.
The Tape Test, Done Properly
Peel the tape back slowly and listen. Sound paint comes away with a clean rip and leaves a smooth, slightly glossy strip. Failing paint leaves pigment dust and chips stuck to the adhesive.
The same tape test works on cracked paint indoors, though interior failures usually trace back to a different source. Out here, the tape is telling you about water.
Telling Cracking Apart From Blistering, Chalking, and Mildew
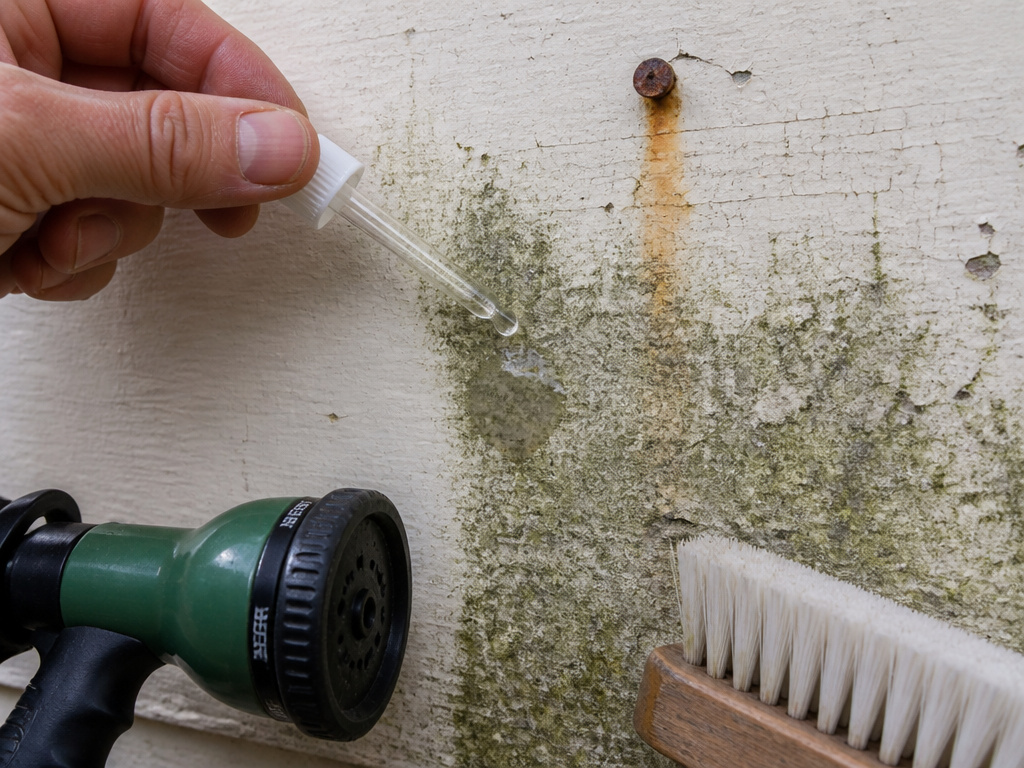
Cracking gets blamed for a lot of failures it did not cause, and each one needs a different response.
- Chalking. Rub a fingertip across the paint. A white smear on your skin means the resin is breaking down, and BRANZ lists it as the signal to repaint.
- Mildew. Green-gray film, usually on the shaded side, sometimes under eaves and around gutters.
- Blistering. Dome-shaped bumps where moisture pushed the film off the wood from behind.
- Cracking and alligatoring. The film itself splits, often in a pattern that looks like dried mud.
- Rust staining. Orange-brown streaks running down from nail heads or metal anchorage.
Getting the how to repair cracked paint on exterior walls diagnosis wrong wastes a whole weekend. Scrub mildew thinking it is dirt and it returns. Paint over blistering and the bumps telegraph straight through the new coat.
The Bleach Drop Test
NPS gives a test that settles the mildew question in seconds. Put a drop of household bleach on the suspected patch. Mildew turns white immediately. Dirt keeps looking like dirt.
Green-gray film on the north side is often surface mildew rather than water damaged paint, and the difference decides whether you scrub or replace boards.
For the wash itself, NPS specifies one cup of non-ammoniated detergent, one quart of household bleach, and one gallon of water. Stubborn spots take an extra quart of bleach. Scrub with a medium soft brush, rinse with a direct stream from a garden hose nozzle, and let it dry thoroughly before anything else happens. Repaint with a mildew-resistant primer and finish coats.
That word “non-ammoniated” is doing real work. Bleach plus ammonia releases a gas you do not want to be standing in.
NPS also points at the cause rather than the symptom: prune back the shrubs shading the wall, fix the drainage at the base, and the mildew has a harder time coming back.
Spot Repair or Full Repaint? Where the Sources Disagree
Four sources, four different scopes for the same defect, and the disagreement is worth understanding before you buy anything.
NPS Preservation Brief 10 is the most aggressive about restraint. A full paint job on isolated failures only adds film thickness, which accelerates the rate of peeling. Spot-paint bare wood only.
Sherwin-Williams will not let you paint over cracked or peeling paint at all, because it leaves unwanted texture and the cracking returns. BRANZ sits in the middle: if failure is in small areas only, clean and sand those areas, prime any raw surface you exposed, then repaint. Purdue endorses spot repair but wants a full primer plus topcoat system over the repaired area.
| Situation | What the sources say | Why |
|---|---|---|
| Isolated failure, sound film around it | Clean, sand, prime the raw spots, spot paint | BRANZ and Purdue both allow local repair |
| Film over 1/16 inch thick | Spot-paint bare wood only, skip feathering | Film thickness itself drives peeling (NPS) |
| Peeled with adjacent cracking and alligatoring | Remove the paint completely | NPS is explicit on this combination |
| Small areas of failure only | Clean and sand, prime exposed substrate, repaint | BRANZ |
| Whole wall failing | Full removal and repaint | Implied across all four sources |
The 1/16 inch threshold is the one people miss. NPS says that once the film exceeds 1/16 inch, you spot-paint bare wood only, and you do not feather or sand the edges, because the thickness of the film will cause it to peel regardless of how nicely you blend it.
That directly contradicts Purdue, which instructs you to sand and feather the edges of remaining paint smooth before repainting, and differs from BRANZ, which says to clean and sand the areas of failure before repainting. On a normal film, Purdue says to sand and feather the edges, while BRANZ says to clean and sand the areas of failure. On a thick legacy film, NPS says it is wasted effort.
Most of this comes down to preparing exterior walls properly before any coating goes on. The how to repair cracked paint on exterior walls prep is where the disagreement lives.
The Repair Sequence, Step by Step
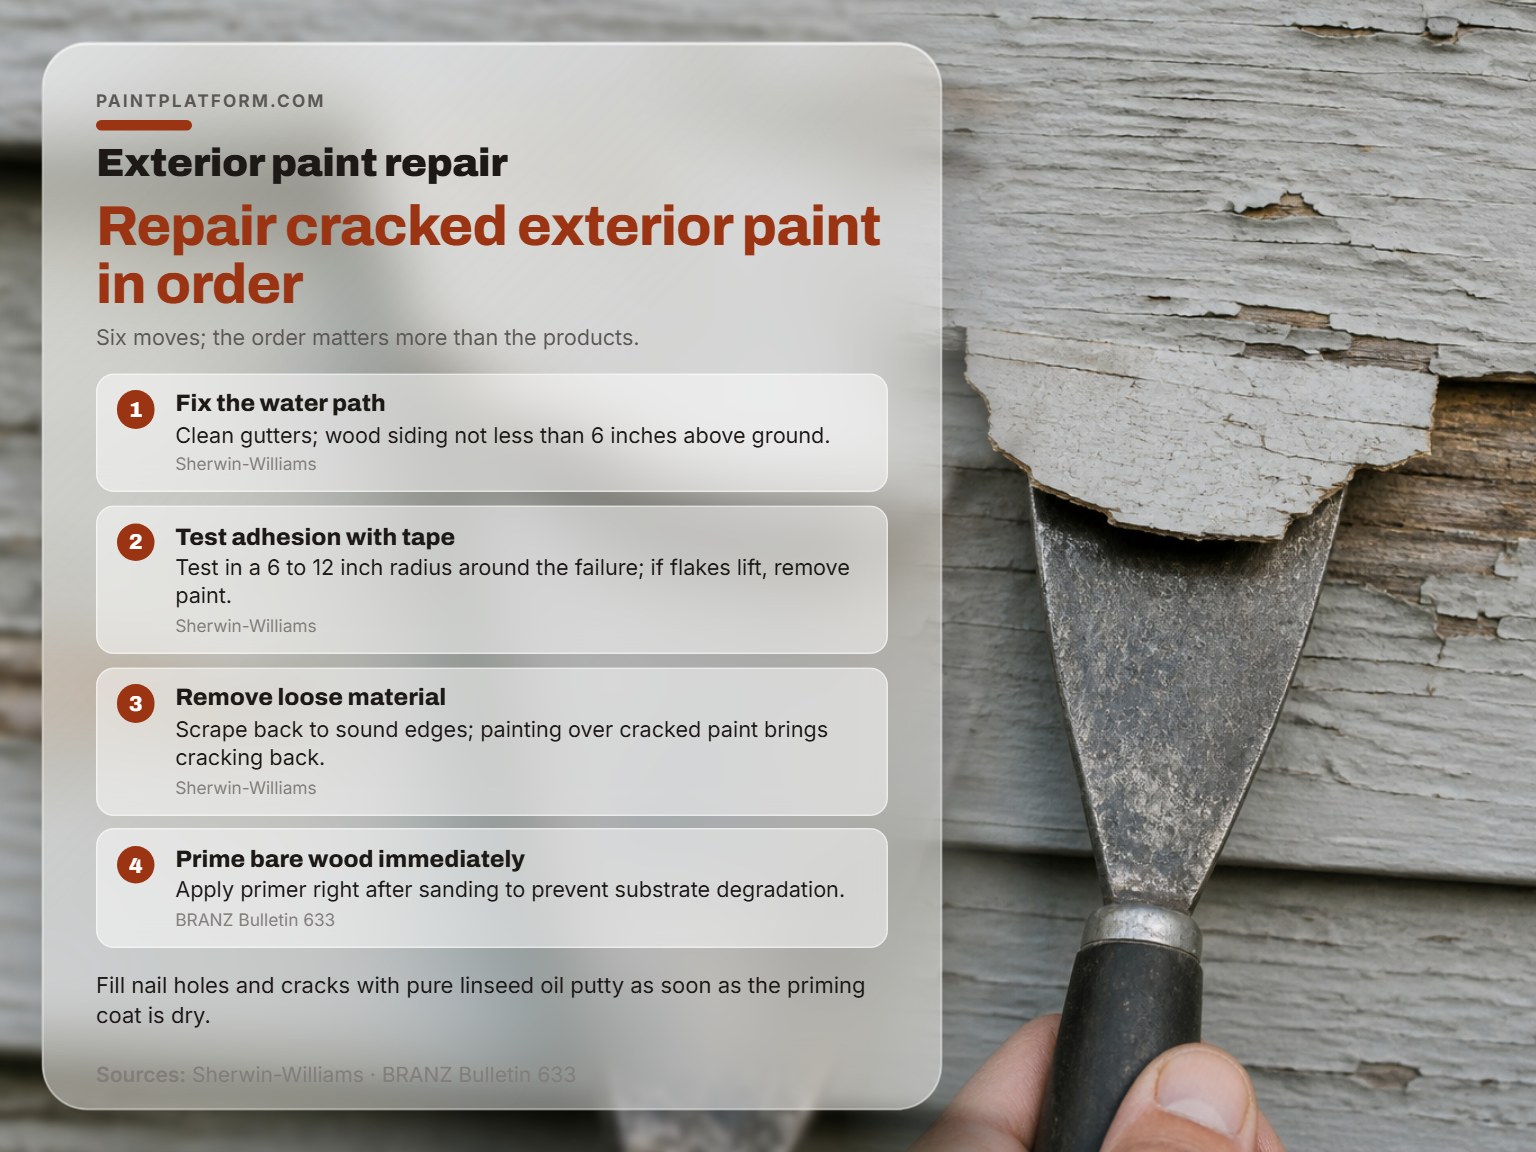
Six moves, in this order, and the order matters more than the products.
Before you start: Exterior paint work means ladders, scrapers, and bleach. Set the ladder on firm ground and keep your hips inside the rails, because a reach that feels fine at ground level puts you off balance three metres up. Wear eye protection when scraping overhead, since a chip coming down from a sill lands fast. Never mix the bleach wash with an ammonia-based cleaner, and if the house is old enough that the existing paint might contain lead, test it before you dry-sand anything.
- Find and fix the water path. Clean the gutters so they channel water away from the house, and check that wood siding sits not less than 6 inches above ground (Sherwin-Williams). Skip this and the repair fails on the same schedule as the original.
- Test adhesion with tape in a 6 to 12 inch radius around the failure. If flakes lift, the paint comes off rather than getting covered.
- Remove the loose material. Scrape back to sound edges. Sherwin-Williams is blunt that painting over cracked or peeling paint brings the cracking back.
- Clean and sand. BRANZ says brush and detergent where the paint is firmly attached, and a mildly abrasive cleaner on gloss finishes, then rinse before repainting.
- Prime bare wood immediately. BRANZ is explicit: primer goes on exposed wood right after sanding to prevent the substrate degrading. Leaving it bare overnight is a mistake.
- Fill and caulk. Remove loose or cracked caulking and replace it with a quality product (Sherwin-Williams). NIST says nail holes and cracks get filled with pure linseed oil putty as soon as the priming coat is dry, and after about a week of clear warm weather the putty should be hard enough for the second coat, while NPS prefers countersinking exposed nail heads, spot priming, then filling with a high quality wood filler. NPS prefers countersinking exposed nail heads, spot priming, then filling with a high quality wood filler.
- Topcoat only once the surface is fully dry.
Common mistake: Scraping a crack back to bare wood and leaving it until the weekend. BRANZ is explicit that primer goes on exposed wood immediately after sanding, because the substrate starts degrading the moment you open it up.
The Letter Circular 810 painting wood guidance is worth reading for the timing details alone. It also covers knots, which need spot-painting with orange shellac varnish or a good grade of aluminum paint a day or two before the regular paint. Applied too liberally, the shellac itself makes the paint peel later on.
The same sequence applies to chipped paint around trim and sills, where the failure is smaller but the prep is identical.
Which Primer and Topcoat System Should You Use?
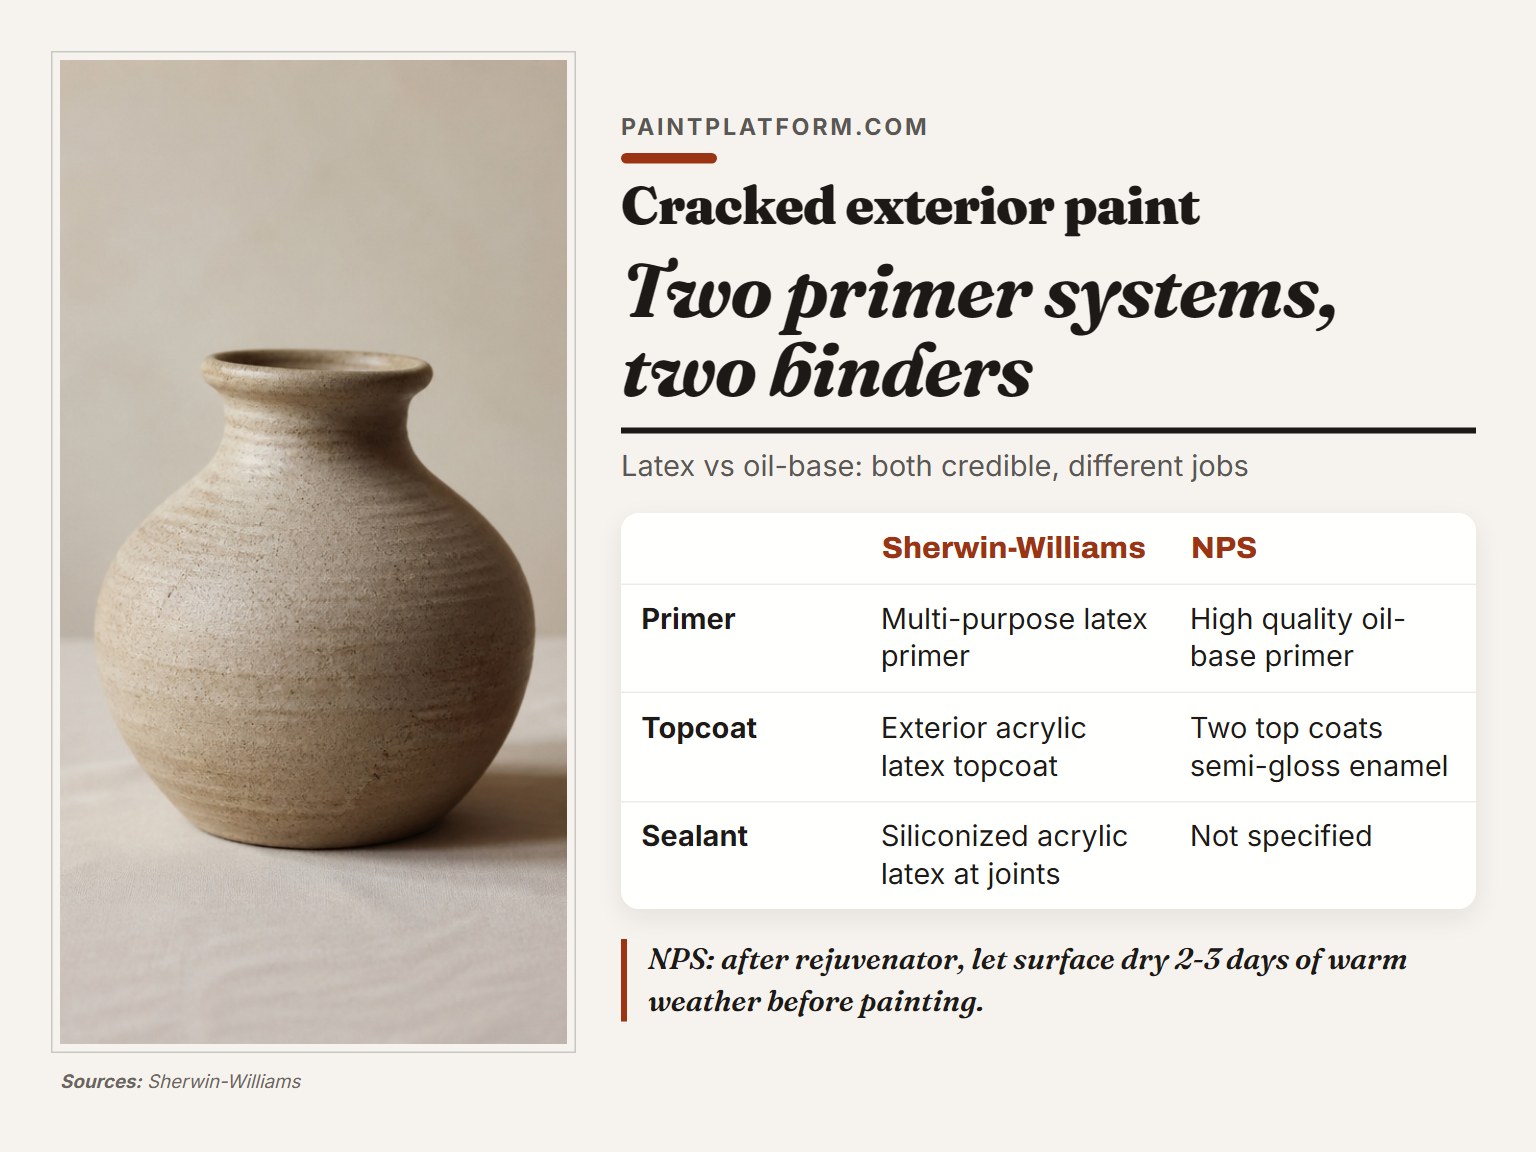
Two credible systems, and they disagree on the binder.
Sherwin-Williams specifies a multi-purpose latex primer, then an exterior acrylic latex topcoat, then a siliconized acrylic latex sealant at trim joints and edges once everything is dry. It is a modern acrylic system end to end.
NPS recommends a high quality oil-base primer followed by two top coats of a semi-gloss oil-enamel or latex-enamel paint. That is the older, heavier approach, and it makes sense on weathered bare wood that has just been treated with a rejuvenator.
Neither is wrong. The latex system is easier to work with and dries faster. The oil-base system is what NPS specifies for wood that has been stripped back and rejuvenated, where you want penetration into open grain.
I got lucky on a navy-to-cream repaint because the paint counter talked me into a gray-tinted primer. One primer coat plus two topcoats covered it. The same kind of colour change without tinting had taken me four coats of topcoat and a lot of grumbling.
NPS also gives the rejuvenator formula for weathered wood: 3 cups exterior varnish and 1 oz paraffin wax, brought to 1 gallon with mineral spirits, paint thinner, or turpentine. Brush it on liberally, then let the surface dry 2 to 3 days of warm weather before painting. Purdue’s number for a treated or water-repellent surface is at least two warm days, while NPS specifies 2 to 3 days of warm weather.
If you are still deciding what goes in the bucket, choosing exterior paint matters as much as the primer underneath.
How Often Does Exterior Paint Actually Need Redoing?
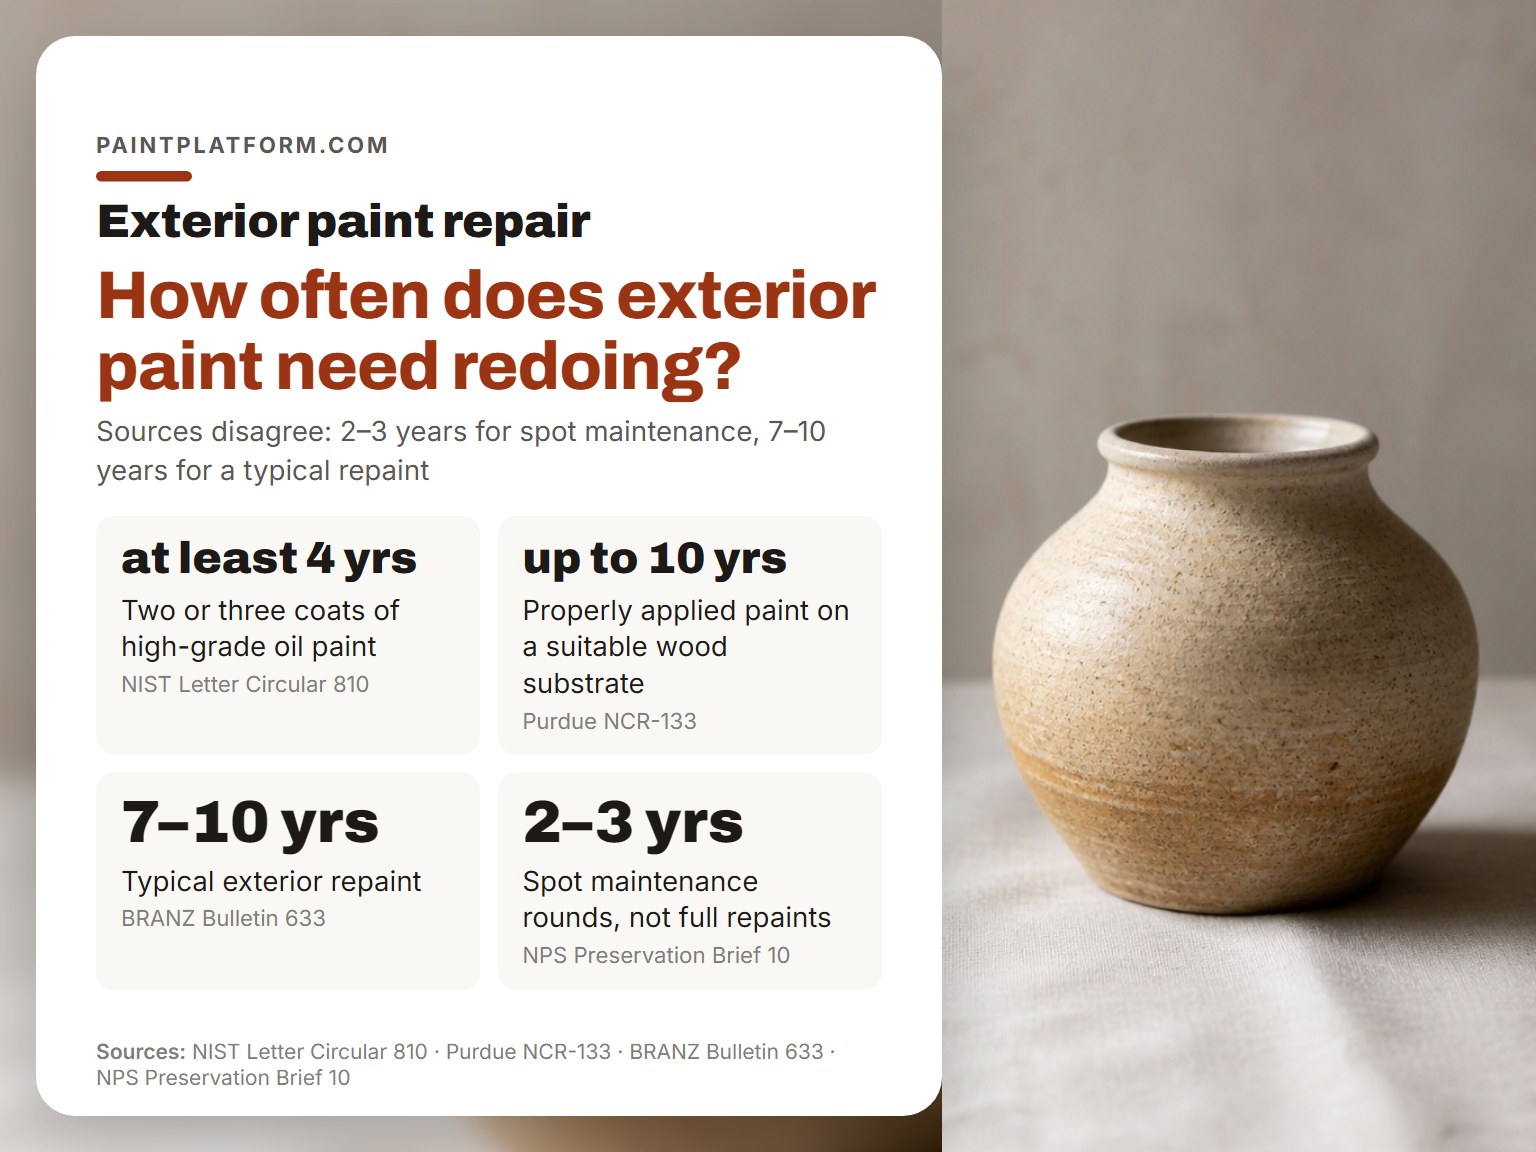
The honest answer is that the sources do not agree, and the spread is wide enough to plan around.
| Source | Stated interval | What it covers |
|---|---|---|
| NIST Letter Circular 810 | At least 4 years | Two or three coats of high-grade oil paint |
| Purdue NCR-133 | Up to 10 years | Properly applied paint on a suitable wood substrate |
| BRANZ Bulletin 633 | Every 7 to 10 years | Typical exterior repaint |
| NPS Preservation Brief 10 | Every 2 to 3 years | Spot maintenance rounds, not full repaints |
Those numbers are not really in conflict once you read the scope column. NIST is describing a floor, not a target. Purdue is describing the ceiling on good wood with good prep. BRANZ is describing the typical case. NPS is describing touch-up work, which is a different job from a repaint.
Wood species moves the number more than anything else. NIST ranks cedar, redwood, and cypress as the woods that hold paint longest. Douglas fir, western larch, and southern yellow pine sit at the bottom of that list.
BRANZ adds two more variables: annual washing to remove dirt, salt spray, moss, and mildew, and colour. Darker colours cause greater thermal movement of the substrate through heat absorption, though infrared reflective pigments reduce that effect.
The NPS Preservation Brief 10 is clear that this is maintenance, not immortality. Regular maintenance extends the life of an exterior paint finish but will not prevent long-term deterioration. Repaint before the paint starts to fail, particularly on timber.
Why the Patch Comes Back the Following Winter
You paint the patch in October. It looks clean through the first cold snap. Then in February there is a hairline shadow in exactly the same place.
Thick Legacy Films Over 1/16 Inch
If the wall has been painted five times without a strip, the film is thick enough that the rules change. NPS says spot-paint bare wood only and skip the feathering, because the film thickness will cause peeling regardless. On these walls, another full coat makes the problem worse rather than better.
End Grain, Mitres, and Board Ends
Run a hand along a board end and you can feel the grain standing up. That open end drinks water first, and the crack starts there and runs up the board. BRANZ names board ends, joints, and mitres as the initiation points for exactly this reason. Sealing those cut ends is not cosmetic work.
Stucco Cracks Behave Differently
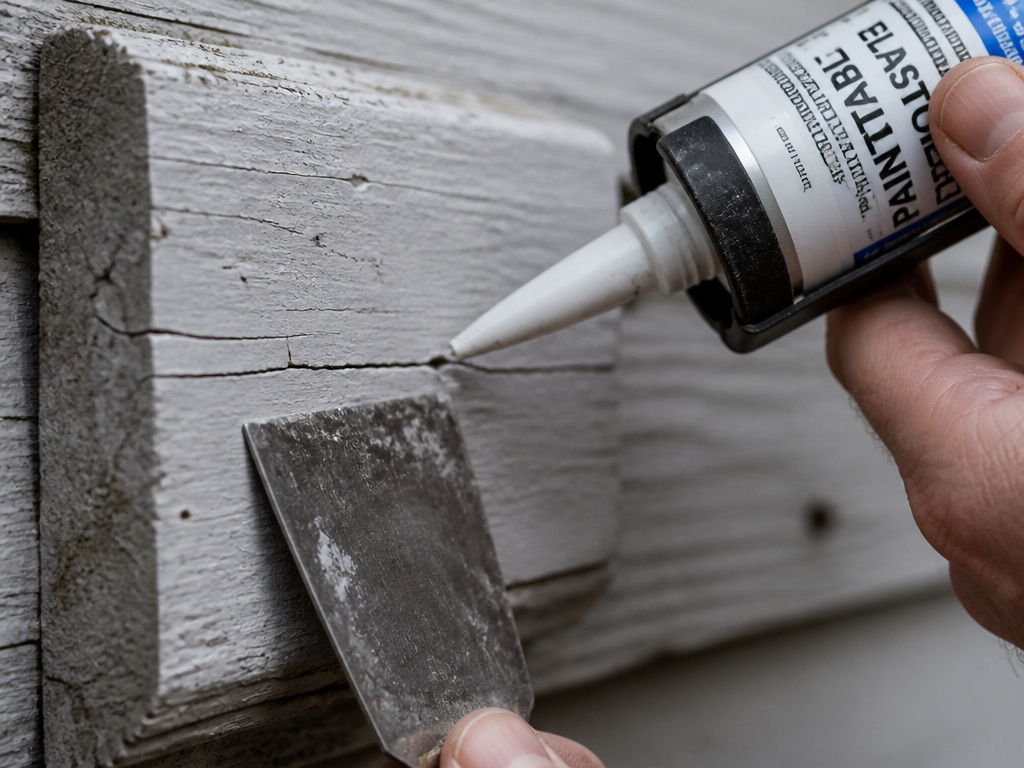
Wood siding and stucco crack for the same reason and need different repairs. Hairline cracks get stucco crack repair treatment with a paintable elastomeric caulk, then an elastomeric coat over the top. Wider ones need patch compound first.
Where this goes sideways: Painting straight over a hairline stucco crack without caulk. The crack reopens on the first hard temperature swing and takes a strip of fresh paint with it.
I learned that one the hard way. Skipping the caulk and just slapping paint on meant the cracks came back through in a single winter. The caulk is the repair. The paint is just the colour.
Matching the texture of a stucco patch is its own small art project. I tried a sponge, a stiff brush, and a crumpled paper bag. The sponge won and the paper bag was a mess I do not recommend repeating. A paintable elastomeric caulk is what I reach for now.
And painting stucco without an elastomeric topcoat is how the repair fails, even when the caulk was done right.
The Damp Substrate Problem
Sherwin-Williams lists painting a surface that is damp with rain, condensation, or dew as a direct cause of peeling. NPS puts it more bluntly: there is no sense in repainting before dealing with the moisture problems.
If you cannot answer where the water is coming from, stop. Painting is the last step, not the first.
When to Stop Patching
- Wood that gives under a screwdriver. Soft, crumbly timber is rot, and no coating fixes it.
- A crack that returns twice in the same place. The water path is still open somewhere above it.
- Film over 1/16 inch across the whole wall. Now you are stripping, not patching.
- Paint that lifts tape everywhere you test. The whole film is failing, not one section.
If a crack comes back in the same place twice, stop painting it. The second return means water is still getting in somewhere above or behind it, and another coat just adds film thickness to a problem that has not moved.
Frequently Asked Questions
How do I know if the crack is only in the paint or goes into the wood?
Press a thin blade or putty knife into the gap and probe sideways. If the metal stops at the wood surface and the gap is shallow, the split is in the film alone. If the blade sinks in or the wood feels soft and crumbly, rot or deep checking is present and the board may need replacement rather than a coating repair.
Can I just fill the crack with exterior caulk and paint over it?
Caulk is for joints between boards and around trim, not for splits in a flat painted face. Flexible sealant over a moving crack in wood will pull away or telegraph through the new coat within a season or two. The durable fix is to open the crack, remove failing paint nearby, and let the repair follow the wood rather than bridge it.
What is the minimum surface temperature for repainting after the repair?
Most exterior acrylics need the wall and air above roughly 50 F and rising, with no rain forecast for the drying window. Cold slows film formation, so a coat applied late in the day on a cooling wall may never cure properly. Check the label on your specific product, since some formulations allow lower temperatures.
Do I need to treat the whole wall or only the cracked area?
Spot repair is fine when the failure is isolated and the surrounding paint passes the tape test. If cracks are spread across a whole elevation, or the coating is thick and brittle everywhere, patching individual spots just postpones the next failure. In that case, removing the coating down to sound paint or bare wood across the full wall gives a longer-lasting result.
The Bottom Line
The threshold that decides most of these jobs is simple: if the tape lifts paint, the paint comes off. If it does not, you are patching rather than stripping, and the whole job gets smaller.
One concession worth stating plainly. Everything above assumes wood or masonry that is still structurally sound. If the siding is soft, or the crack is really a movement joint opening and closing, the repair changes completely and no amount of caulk and primer will hold it.
Start messy, refine later. Go outside with a roll of tape and a screwdriver before you buy a single can. Press the tape over the worst crack on the house, pull it slowly, and look at what came up. Then poke the wood underneath with the screwdriver. Those two answers decide the rest of the job, and they cost you nothing but ten minutes.
