
How to Make Milk Paint: Recipe, Ratios, and Fixes
This post contains affiliate links. As an Amazon Associate, we earn from qualifying purchases.
To make milk paint, curdle 1 gallon of fresh fat-free milk with 2 cups white vinegar, strain the curds, then stir in a paste of 112 g hydrated lime in 1.5 cups water and 200 g pigment. One batch yields about 1.75 quarts, covering 90 to 100 square feet.
That lime paste does more than thicken the bucket. The base opens the casein molecule and converts the milk protein into calcium caseinate, a glue that dissolves in water and then sets hard as the water leaves. The lime is also the ingredient the sources disagree about most, which is why the recipe below is written in grams and explains how to make milk paint.
What follows is the weighed method, the three places the makers contradict each other, and the fixes for beading, tannin bleed, and a batch that never thickens.
Key Takeaways
- Weigh the lime and pigment. Earth Pigments uses 112 g hydrated lime and 200 g pigment per gallon of milk, and cups drift too far to trust.
- Keep the milk under 115°F before you curdle it, because hotter milk damages the casein, though Porter’s Paints instead specifies a 10–30°C application window.
- Give the mix 20 to 60 minutes before brushing. The Endeavour Centre puts the casein-lime reaction at 20 to 60 minutes.
- Skip floors entirely. Porter’s Paints states milk paint is not suitable for floor surfaces, though other sources do not address floors.
- Test old finishes with a 3cm X-cut and a strip of tape before you commit a whole panel, as Porter’s Paints describes.
What Goes Into Milk Paint, and What to Leave Out
Casein, the protein in milk, is what holds pigment to wood. Everything else in the bucket exists to open it, color it, or add body.
Milk paint cures by protein coagulation rather than oxidation. Casein stays insoluble until a base raises the pH. Hydrated lime supplies that base and converts the protein into calcium caseinate, which binds pigment to a porous surface as the water leaves. Pigment supplies color, and powdered clay supplies body without adding binding strength.
The base is hydrated lime. Earth Pigments uses 112 g, about 3/4 cup, slaked in 1.5 cups of water for a full gallon batch. Porter’s Paints sells milk paint as a dry powder and its specification sheet doesn’t list lime at all, so the phrase “milk paint” covers more than one formula.
Pigment goes in at 200 g for that same batch. Soak it in an equal amount of water first and work it into a homogenous paste. Dry pigment dropped straight into the bucket leaves streaks you’ll still see on later coats.
Here’s what earns a place in the mix and what doesn’t:
- Kaolin clay works as a neutral extender, though it lightens the color and means you need less pigment overall.
- Whiting chalk is discouraged by Earth Pigments because it has no binding power and promotes separation.
- Linseed oil at 1/4 cup, emulsified into the quark after the lime has set and before the final water addition, adds a little sheen and flexibility.
- Nothing from the kitchen that isn’t milk or vinegar. Flour, glue, and cornstarch pastes stay tacky because nothing in them crosslinks.
Milk paint sits inside a wider family of natural paint recipes, and the protein chemistry here is the same one behind casein paint made for panels and sketchbook grounds.
The Recipe in Grams, Not Cups
Four ingredients, one thermometer, and two containers. That’s the whole how to make milk paint setup.
Before you start: Hydrated lime is mildly caustic to skin, so gloves and eye protection go on before the powder comes out of the bag. Dry milk paint powder carries silica dust, and a mask matters while it’s airborne. Milk above 115°F damages the casein, and a damaged batch never forms a proper curd.
- Warm the milk to no more than 115°F. Earth Pigments is explicit that the ceiling protects the integrity of the casein.
- Add 2 cups of white vinegar and stop stirring. Lemon juice works as a substitute. Agitation at this stage can break the curd into fines you’ll lose in the cloth.
- Leave it until the curds separate from the whey. You want the curds to separate from the whey.
- Strain through cheesecloth and break up any large curds. Big lumps can survive the next step and turn up as grit under the brush.
- Slake 112 g of hydrated lime in 1.5 cups of water, then stir that paste into the curds. The mixture turns creamy. If some curds resist, Earth Pigments says let it sit 15 to 30 minutes.
- Soak 200 g of pigment in an equal amount of water, work it to a paste, then stir it in. Add water sparingly from here.
- Strain the finished paint through cheesecloth or a nylon stocking. Aim for the consistency of light cream.
The full batch makes roughly 1.75 quarts and covers 90 to 100 square feet. On a very absorbent base, Earth Pigments allows the first coat to be diluted 20 to 50% with water as a priming coat.
Scaling Down and Swapping Lime Putty
Halve or quarter the recipe freely. Earth Pigments builds that into the method.
The trap is lime putty. If you substitute putty for powder, you need twice the weight, and that extra volume carries its own water. Recalculate the added water or the batch lands thin.
How Long Should Milk Paint Sit Before You Brush It On?
The sources split on how to make milk paint here, and the split matters.
Porter’s Paints says stir 3 to 4 minutes, stand 5 to 10 minutes, then strain. The Endeavour Centre milk paint entry puts the casein-lime reaction at 20 to 60 minutes and says the paint must sit at least 20 minutes before use. Earth Pigments gives no standing time at all, and mentions 15 to 30 minutes only for stubborn curds.
| Source | Stand time | Coats | Leftover paint |
|---|---|---|---|
| Earth Pigments | Not specified; 15 to 30 min for stubborn curds | Three coats shown on wood | Up to several days refrigerated, will separate |
| Porter’s Paints | Stir 3 to 4 min, stand 5 to 10 min, then strain | Two coats, 12 hours apart | Mix only what you need; use right away |
| Endeavour Centre | 20 to 60 min for the casein-lime reaction | Two or three coats | 7 to 10 days refrigerated |
If the paint still pours like milk instead of cream after straining, it hasn’t finished reacting. Give it more time and check the viscosity again before you touch a brush.
My own habit is to mix, strain, then go set up drop cloths. By the time the tape is down, the pot has had time to sit before the first coat goes on.
Why Does Milk Paint Bead, Peel, or Bleed Through?
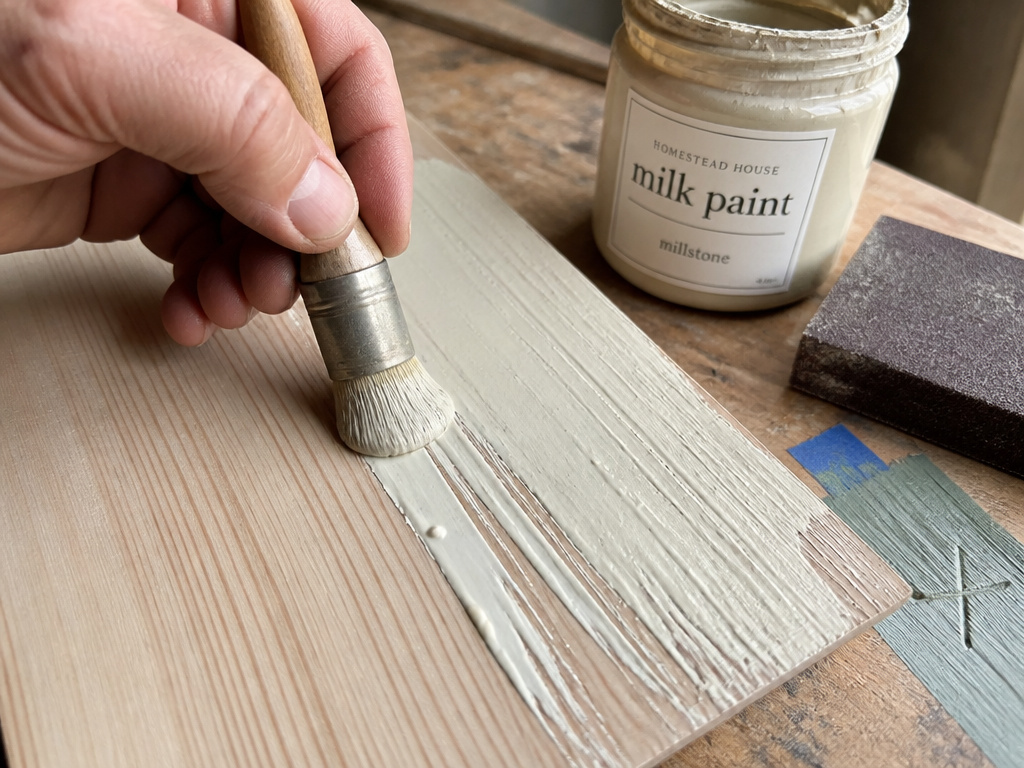
You lay down the first stroke and the paint pulls into islands, like water on a greasy skillet. That’s not a bad batch. That’s the substrate telling you something.
Porter’s Paints is blunt about the cause: if bare timber isn’t porous enough, milk paint beads and separates. Earth Pigments takes the harder line on old finishes, stating that milk paint will not adhere to latex or other paints and that surfaces must be absorbent and free of previous finishes.
| Symptom | Likely cause | Fix |
|---|---|---|
| Paint pulls into islands | Timber not porous enough | Sand back, or seal and undercoat first |
| Old finish lifts | Milk paint won’t bond to latex | Strip it, or run the tape test before painting |
| Brown stains reappear | Knots, resin, or tannin bleeding | One coat of Porter’s Limeproof Undercoat Sealer |
| Gritty, streaky film | Curds never broke down | Let it sit 15 to 30 minutes, then strain again |
| Chalky film rubs off | Paint is still curing | Wait the full 30 days before judging wear |
Where this goes sideways: Painting over multiple layers of old paint without testing. Porter’s notes that milk paint can pull at the layers underneath and peel them right off.
The test is quick. Cut an X about 3cm across the old finish with a sharp blade, press adhesive tape over it, rub firmly, and pull fast. If the old paint comes up with the tape, don’t paint over that surface.
Do You Need a Primer or a Topcoat Over Milk Paint?
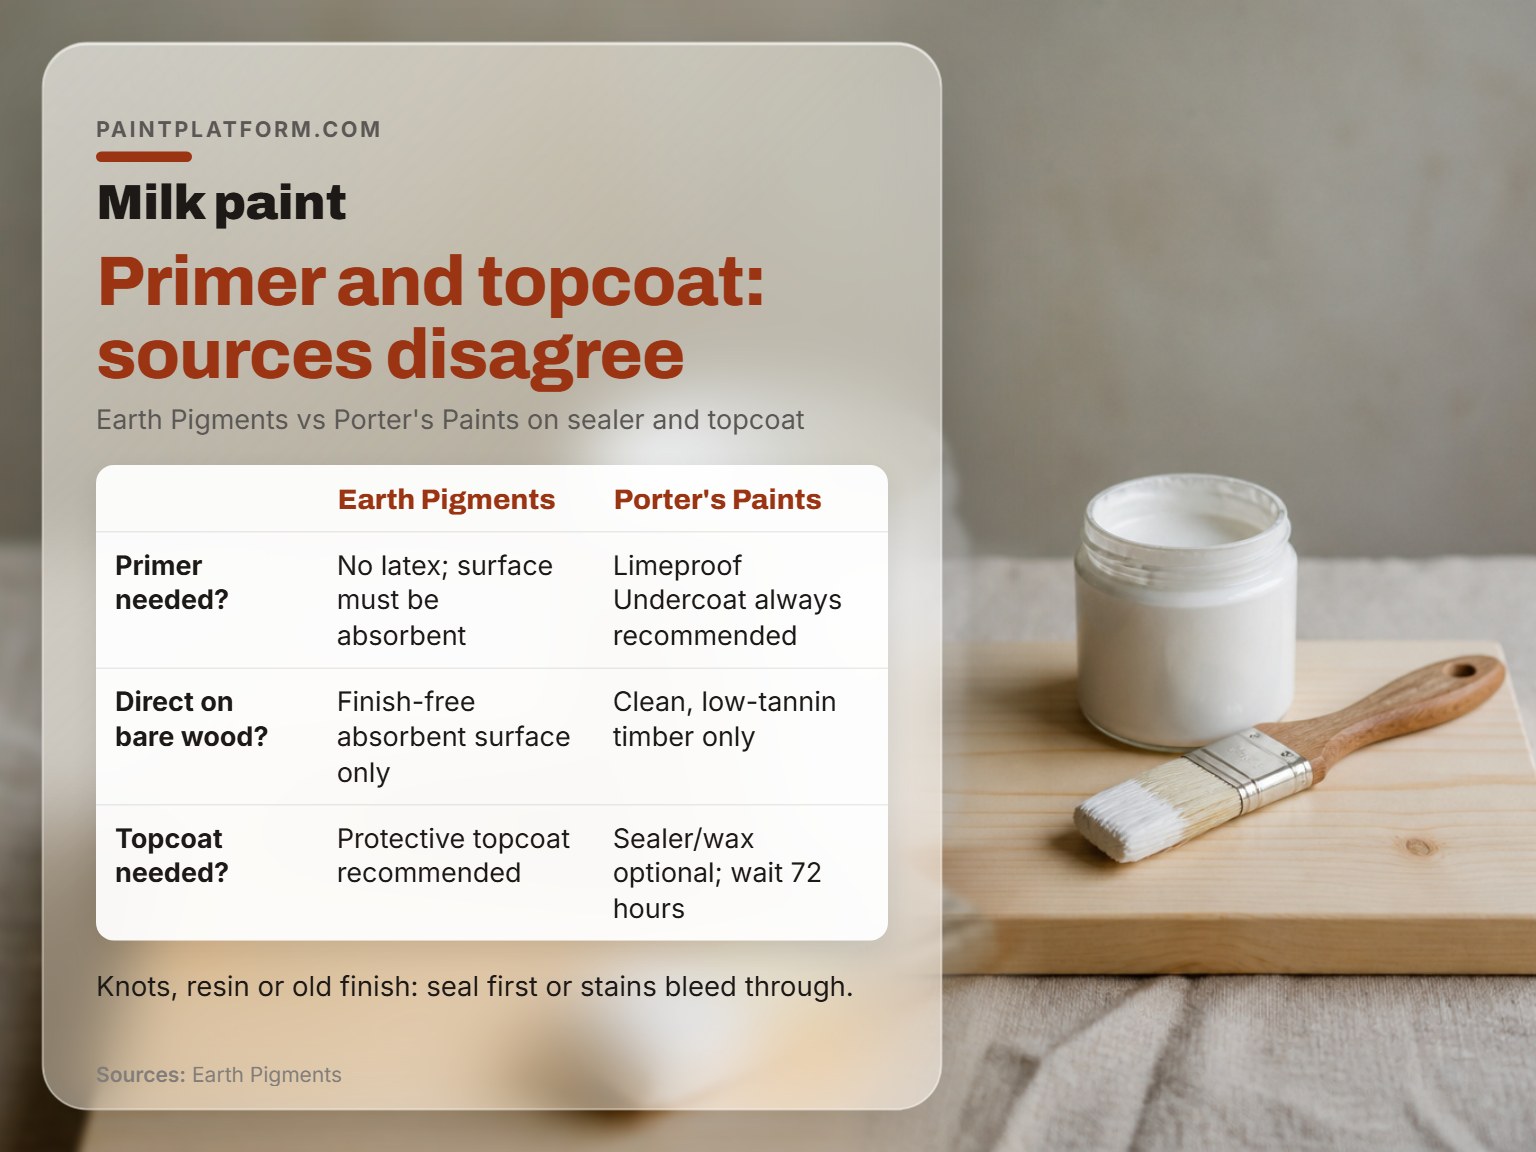
Primer is where the two manufacturers part company, and the answer depends on the timber in front of you.
The Primer Question
Earth Pigments requires an absorbent, finish-free surface and warns that milk paint will not adhere to latex. That rules out painting straight over a modern acrylic finish without stripping.
Porter’s recommends one coat of Limeproof Undercoat Sealer on everything, with a 2 hour touch-dry and 6 hour dry time, but concedes that milk paint may go on directly when the timber is clean, undamaged, and low in tannin; Earth Pigments instead requires an absorbent, finish-free surface. It also warns that knots, resinous ridges, and oil discolouration must be sealed or the stains bleed through and reappear.
So the practical rule: bare, clean, low-tannin pine can take paint directly. Anything with a knot, an old finish, or a history of stain gets the sealer.
The Topcoat Question
Earth Pigments recommends a protective topcoat to guard the matte, absorbent surface, while Porter’s treats sealer and wax as optional but says wait 72 hours before applying either, and the Endeavour Centre calls for an oil or wax finish only in high-wear or water-exposure areas.
If you’re going the wax route, the technique matters more than the product. Waxing milk paint in thin coats beats one heavy application every time. And if the piece will see real abuse, read up on how to seal painted furniture before you pick a product.
Where Milk Paint Belongs, and Where It Fails
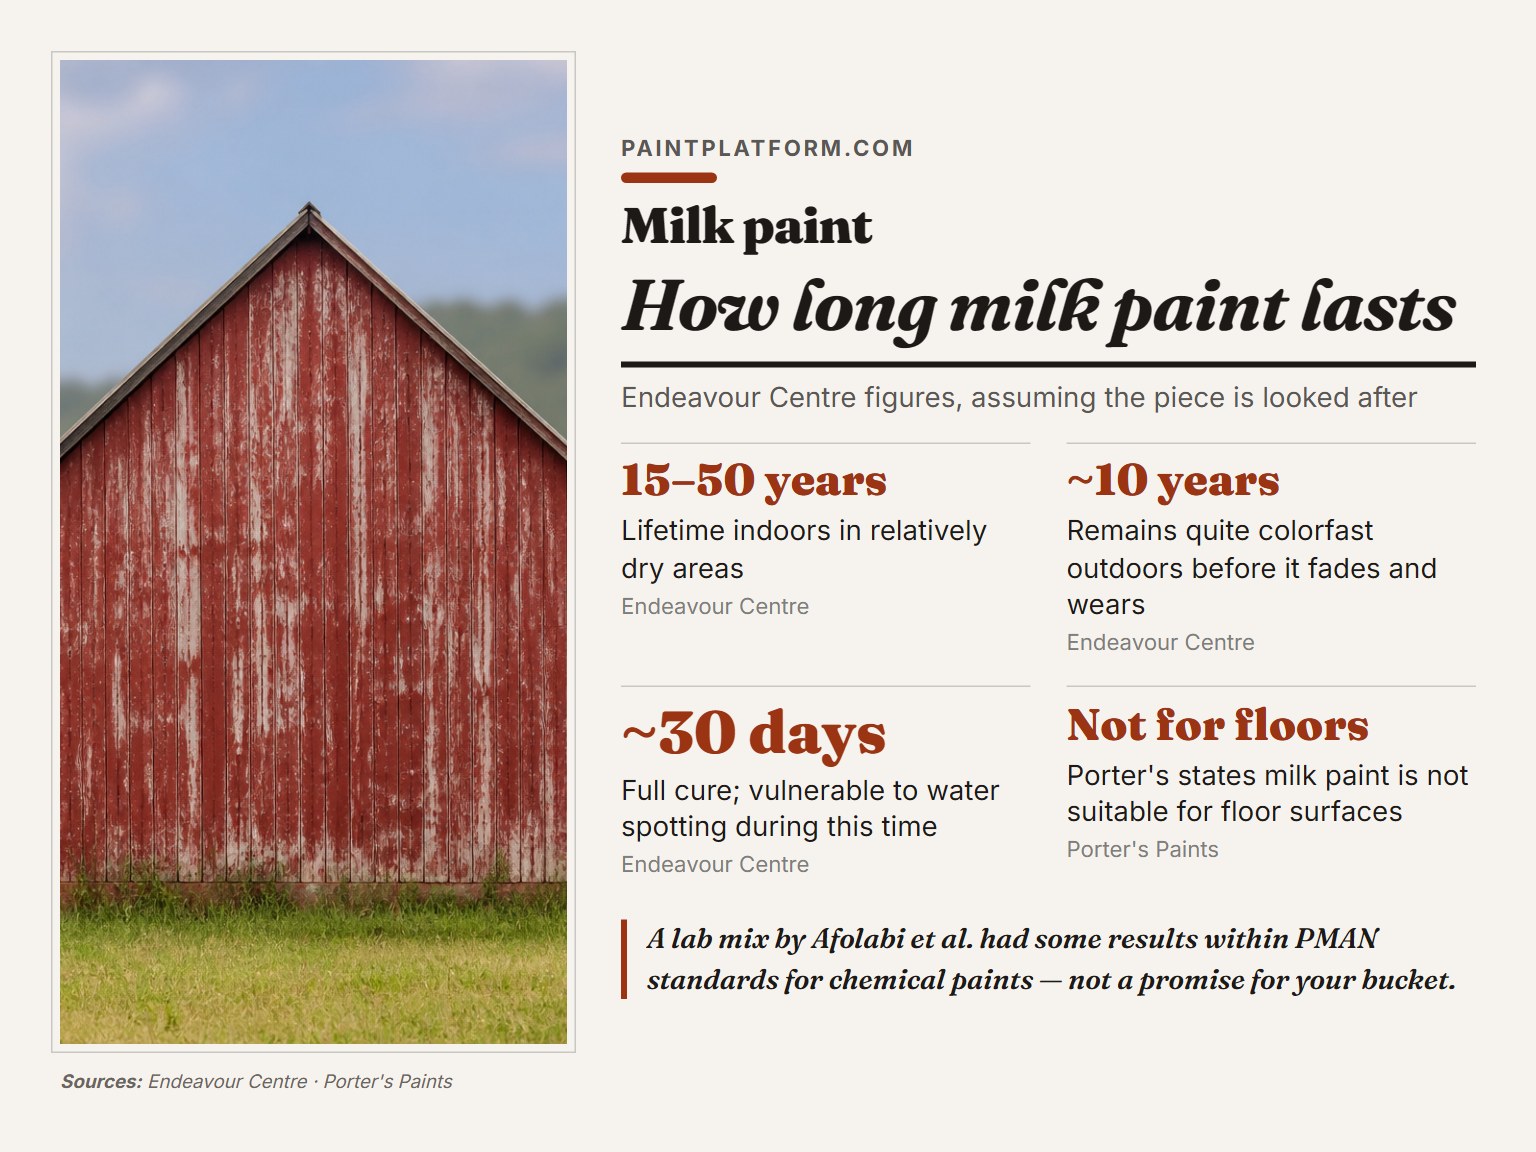
The Endeavour Centre gives fifteen to fifty years indoors and about ten years of colorfastness outdoors. Those are the Endeavour Centre’s figures, and they assume the piece is looked after.
Indoors in a dry room, milk paint holds up for decades and can take additional coats over time. Outdoors it stays quite colorfast for roughly a decade before it fades and wears, which is exactly what you see on old barn siding.
Two places it doesn’t belong. Porter’s states plainly that milk paint is not suitable for floor surfaces.
The cure window is the other thing nobody mentions. It won’t wash off once dry to the touch, but a splash can leave spotting during the cure period.
A peer-reviewed paint production research paper by Afolabi and colleagues tested milk-based and clay-based paints for adhesion, application, opacity, drying, viscosity, and pH, and found some results fell within PMAN standards for chemical paints. That’s a lab result on a lab mix, not a promise about your bucket, but it tells you the chemistry is sound.
For the fuller picture on wear and repairability, the milk paint pros and cons breakdown covers what the finish does after year five.
Start With a Test Batch, Not a Gallon
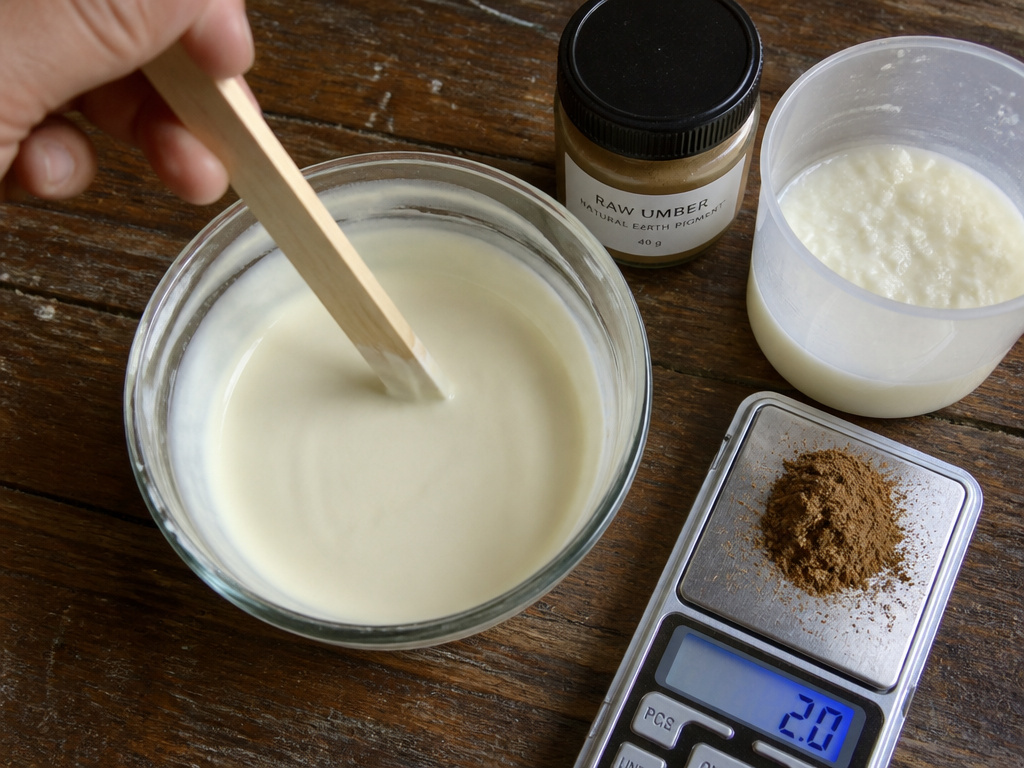
A quarter batch is plenty for a first attempt.
Here’s the honest version of what this is. Homemade milk paint is a wonderful experiment and a lousy substitute for a dependable tube. You’re making it to understand what a binder does, how pigment loads into it, and why the lime matters. That education is worth a Saturday.
What most people get wrong: Buying six pigments for a first batch. One ochre and one black will teach you more about loading and opacity than a rainbow will, and you’ll actually finish the pot.
I learned that one the slow way. I gave up on a giant set of paint colors because I kept reaching for the same handful, and a small palette made my mixing sharper and my choices faster. The same logic holds here. One pigment, weighed properly, beats a shelf of half-used bags.
If you’d rather skip the curdling, buy a powder. Porter’s Milk Paint is the reference formula if you’re working from a spec sheet. Earth Pigments publishes the gram weights this whole recipe rests on.
One more comparison worth making. If you’re weighing milk paint vs chalk paint, the difference comes down to the binder: protein here, calcium carbonate and a synthetic binder there. And a DIY chalk paint recipe built on plaster of Paris is the one I’d skip. It goes on soft and stays soft.
Frequently Asked Questions
Can I make milk paint with powdered milk?
It depends which source you follow. Earth Pigments specifies fresh, fat-free milk and says explicitly not powdered. The Endeavour Centre says skim milk powder can be used in place of casein powder. Porter’s sells its milk paint as a dry powder you mix with water. If you want the curdling method, use fresh milk.
How much area does one batch cover?
The Earth Pigments recipe yields about 1.75 quarts and covers roughly 90 to 100 square feet. Coverage shifts with how absorbent the surface is and how much you dilute the first coat.
Can I paint milk paint over old latex?
Earth Pigments states that milk paint will not adhere to latex or other paints. Strip or sand the old finish back, or seal it and undercoat before painting. Run the 3cm X-cut tape test first if you’re unsure.
How long before I can wax or seal it?
Porter’s Paints says wait 72 hours before applying sealer or wax. Give the film that window even if it feels dry sooner.
Does milk paint need a topcoat?
The sources differ. Earth Pigments recommends a protective topcoat for the matte surface. Porter’s treats sealer and wax as optional. The Endeavour Centre recommends oil or wax only in high-wear or water-exposure areas.
The Bottom Line
Mix a quarter batch this weekend and paint one scrap of pine. Not a cabinet, not a door. One scrap, so you can watch the color dry down and see how the film takes a second coat.
If the scrap goes well, scale up and keep the ratio. If it beads, you’ve learned something about the substrate for the cost of a cup of milk.
One concession worth stating plainly: if the surface is a floor, a wet kitchen counter, or anything that gets scrubbed, this isn’t your finish. Porter’s says so about floors, and the porous film makes the kitchen case obvious. Use milk paint where you want a matte, chalky, living surface that ages. Use something else where you want armor.
