
How to Touch up Car Paint: Step-by-Step
This post contains affiliate links. As an Amazon Associate, we earn from qualifying purchases.
To touch up car paint, match three things: an exact color code, a surface at least 15 C (59 F), and the damage depth. If you see metal, primer goes on first. If you see rust or bubbling, stop and get the panel repainted.
The 15 C number comes straight from Polestar’s 2026 owner’s manual, and it’s the one most DIY guides skip. Below that threshold, touch-up paint doesn’t flow or bond properly. The damage-depth rule is just as unforgiving: three different automakers draw the line in three different places, and knowing where each one draws it tells you whether you’re looking at a 15-minute fix or a body-shop job. Guides on how to touch up car paint often leave out these thresholds.
This guide walks the actual sequence, the temperature and surface rules, and the matte-versus-gloss split that decides which repair path you’re even allowed to take. It also flags the spots where the manufacturers disagree, because they do, and glossing over that leads to bad calls.
Key Takeaways
- 15 C (59 F) is the floor. Polestar’s manual sets this as the minimum surface temperature.
- Clearcoat dulling needs no repair. BMW’s service bulletin says minor abrasion that only dulls the clearcoat gets left alone.
- Primer visible means touch-up stick. Once the base color or primer shows through, BMW authorizes a matched touch-up stick.
- Rust or bubbling means full repaint. BMW escalates to whole-panel repaint at this stage.
- Matte finishes have no touch-up path for scratches. GM’s bulletin says any scratch that would need buffing means panel repaint, though GM allows a matte touch-up pen for minor chips.
What tools and materials do you actually need?
The list is shorter than the shelf at the auto parts store suggests. You need a matched touch-up product, something to clean the surface, and something to protect the surrounding paint while you work.
For the paint itself, start with an exact-match touch-up pen if your car’s color code is on the maker’s list. If it isn’t, a touch up kit from a dealer parts counter gets you the right code, and a touch up pen is easier to control than a brush for chips smaller than a pencil eraser. A dealer parts counter can supply a second option for older vehicles where an exact code match is harder to find.
For prep, a roll of masking tape does double duty when you learn how to touch up car paint. Polestar’s manual uses it twice: once to pull loose paint off the damaged area, and once to fence off a long scratch so you don’t smear paint onto good panels. I keep a roll in the drawer for exactly this reason. A bottle of isopropyl alcohol and a clean microfiber towel handle the degreasing step, and Tesla’s service manual specifically calls for an IPA wipe before any correction work.
The Polestar 4 owner’s manual specifies a minimum surface temperature of 15 C (59 F) for paint touch-up, requires a clean and dry surface, and directs owners to remove loose paint with a masking tape pull-off before applying any paint. The manual also warns that paintwork damage in front of a radar can affect radar detection.
The 3 things you should not skip
Skipping any of these is the most common reason a touch-up fails within a year:
- Degreasing. Wax and road film stop paint from bonding. Wipe with isopropyl alcohol and let it flash off.
- The masking tape pull-off. Loose flakes around the chip will lift under new paint and take the repair with them.
- Waiting for the right temperature. Below 15 C (59 F), the paint won’t cure properly.
That’s the whole list.
Try this: wipe a hidden panel with isopropyl alcohol and see what comes off the towel. That’s the layer sitting between your paint and the surface.
The 4-step touch-up sequence (and the step everyone skips)
Before you start: Isopropyl alcohol flashes off fast and the vapor is flammable, so work outside or with the garage door open. Masking tape pulls loose paint but can also lift a failing clearcoat, so test on a hidden spot first. If the panel is within a few inches of a radar, stop and call a service point.
Here’s the order that matches what Polestar’s manual actually says. Most YouTube videos show it differently.
- Clean and degrease. Wipe the chip and the surrounding border with isopropyl alcohol on a microfiber towel. Skip this and the paint may fish-eye or lift.
- Pull loose paint with masking tape. Press tape over the chip, peel it off, and repeat until no more flakes come up. Skip this and the new paint sits on a foundation that’s about to fail.
- Prime if you see metal, then base coat, then clear coat. Polestar’s manual is explicit: direct touch-up only if an undamaged paint layer remains. Bare metal gets primer first, applied with a fine brush or a matchstick and left to dry.
- Build thin layers, not one thick one. Thin coats beat one heavy coat every time. Patience matters.
If you’re spraying rather than brushing, blending the edges with a light pass keeps the repair from showing as a hard line. And the final coat is where clear coat matters most: a thin clear layer over the base coat is what protects the color from UV and gives the repair a fighting chance of matching the surrounding panel.
I won’t recommend a spray can for a first touch-up. A pen gives you more control, and a thin second coat is easier to add than overspray is to remove. Save the spray can for a bigger repair, and practice on a scrap panel first.
The patience part is where I’ve personally blown it. I once painted a second layer over a first one that was still tacky, thinking I could speed things up. The colors went muddy and I had to sand the whole thing back. That was on a canvas, not a car, but the chemistry doesn’t care what you’re painting on.
What surface temperature and conditions actually matter?
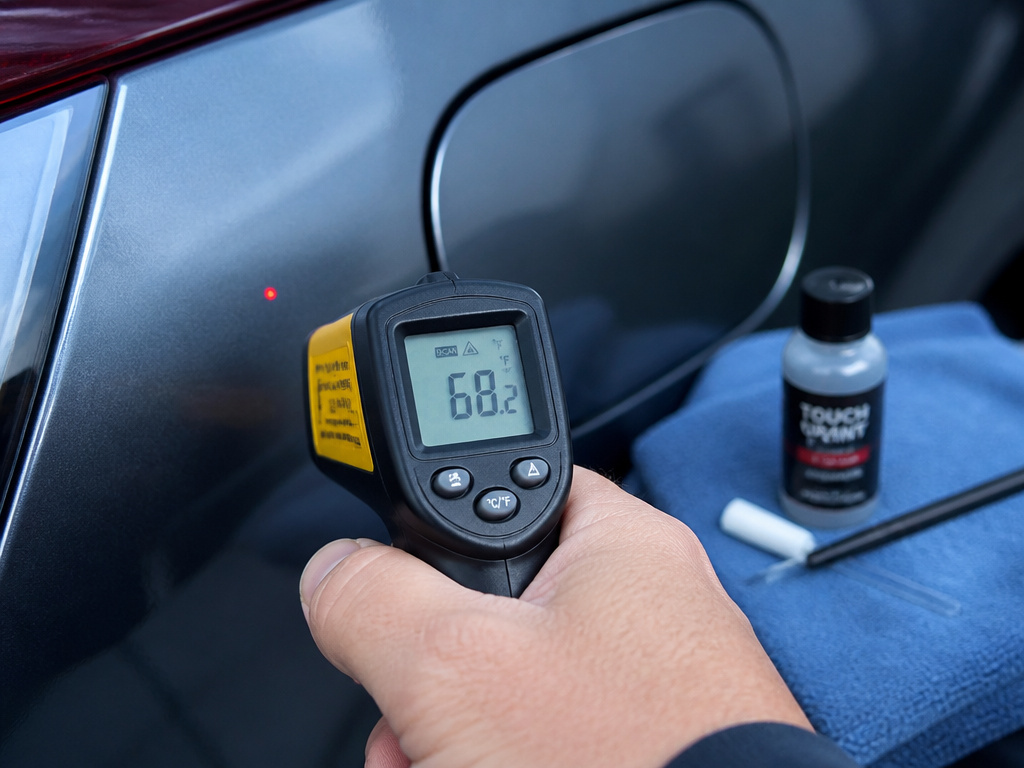
15 C (59 F) is the number to remember. Polestar’s manual sets it as the minimum surface temperature for touch-up, and it’s a hard floor.
Below that temperature, the solvents in touch-up paint don’t flash off at the right rate. The paint skins over before it bonds to the layer underneath, and the repair lifts at the first freeze-thaw cycle. A heated garage solves it in winter. So does waiting until mid-morning on a sunny day, when the panel has warmed up but hasn’t gotten so hot that the paint dries before it flows. I’ve learned to check the panel temperature with the back of my hand before I start. If it feels cool to the touch, check it against the 15 C (59 F) threshold.
A NHTSA technical service bulletin from BMW adds a second location rule that most owners miss. The critical inspection zone for paint abrasion at the inner taillamp is 5 mm inward from the top edge of the tailgate. If you’re checking for damage in that area, that’s where to look, and BMW specifies cleaning the area with R2 cleaner before inspecting.
| Condition | What it affects | Fix |
|---|---|---|
| Surface below 15 C (59 F) | Paint won’t flow or bond | Wait for warmer weather or use a heated garage |
| Radar-adjacent panel | Radar detection can degrade | Service point only, no DIY |
| Matte finish | Buffing kills the finish | Panel repaint, no touch-up path |
| Bare metal exposed | Rust risk | Primer first, then base and clear |
| Long scratch | Paint smears onto good panels | Masking tape border around the scratch |
For color, the code on the door jamb is your starting point, but Polestar’s manual warns that paint batches and brands can differ slightly in color even with the same code. That’s why the manual recommends contacting a service point for any paintwork damage. If you’re going the DIY route anyway, color matching is worth the extra step of testing on a hidden panel first.
Grab an infrared thermometer and check your garage floor on a cold morning. If it reads below 15 C (59 F), wait for a warmer day.
Why does damage depth decide the whole repair?
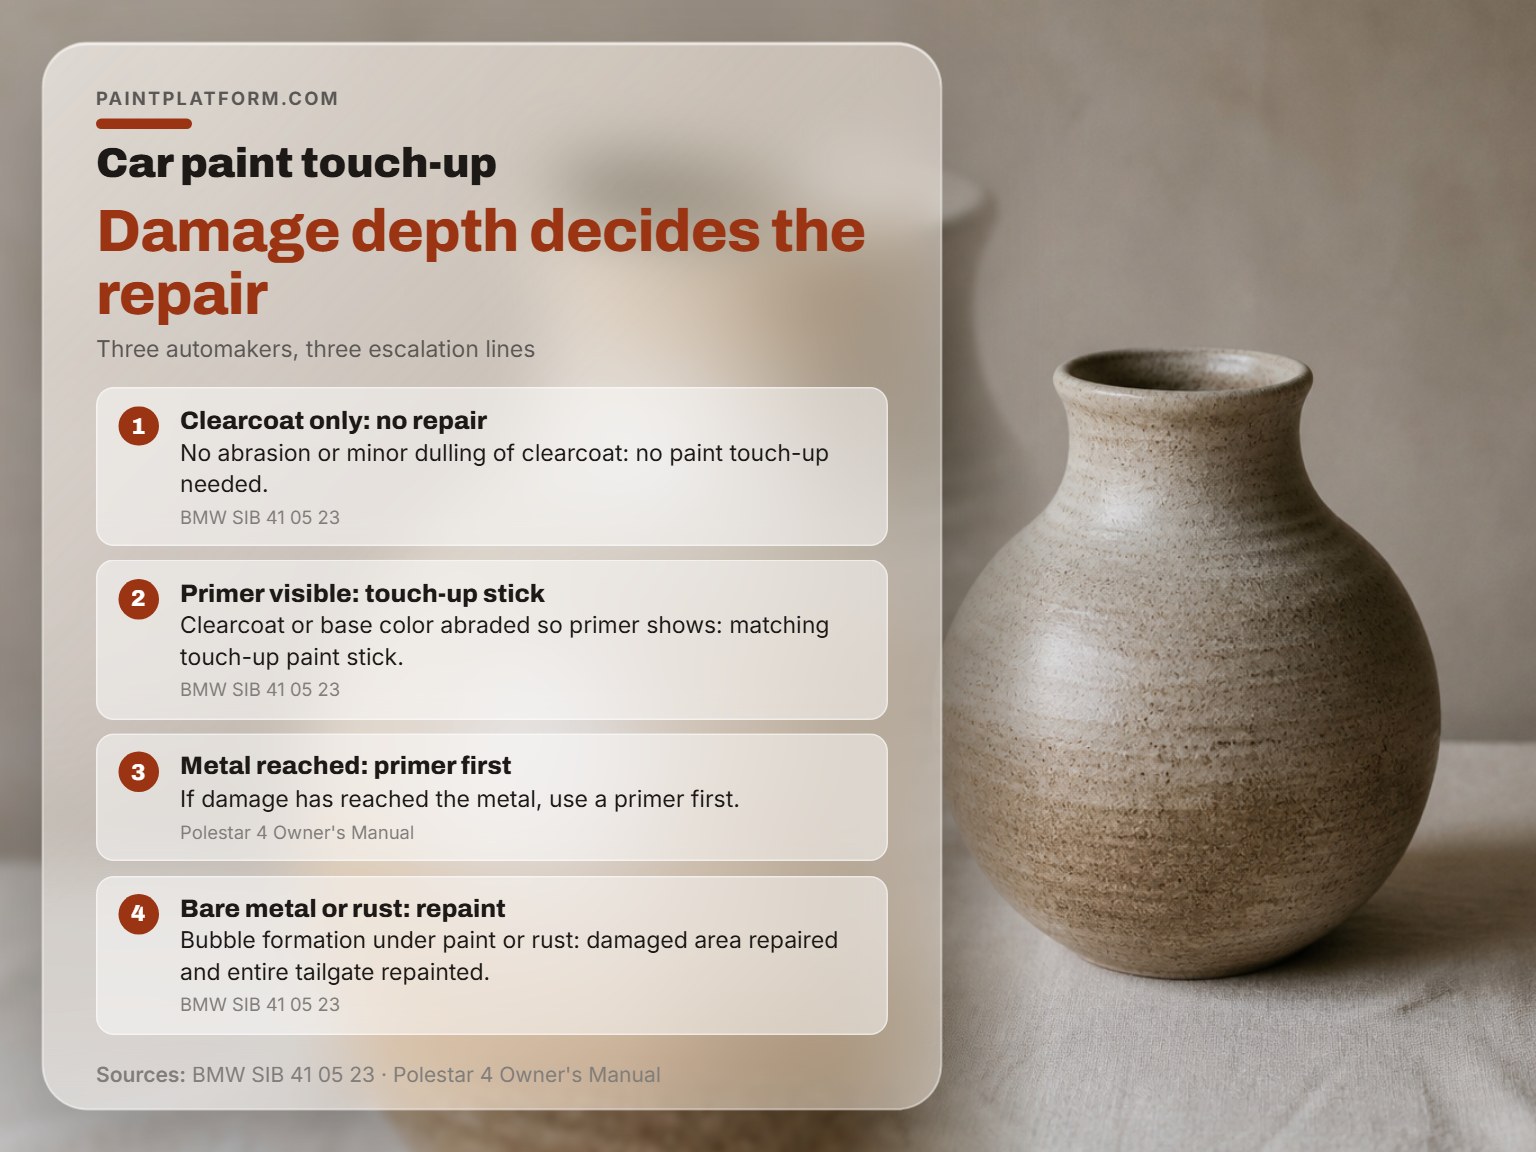
Three automakers, three different escalation lines.
Clearcoat only: no repair needed
BMW’s bulletin is unusually blunt here. If there’s no abrasion of the clearcoat or base color, or only minor abrasion that dulls the clearcoat, no paint touch-up is needed. That’s it. A dull spot that hasn’t broken through the clearcoat gets left alone, because paint on top of an intact clearcoat will look worse than the dull spot did.
Primer visible: touch-up stick
Once the clearcoat or base color is abraded so the primer shows through, BMW authorizes a matching touch-up paint stick. The bulletin notes one stick is sufficient for approximately 10 vehicles, which gives you a sense of how little paint a repair actually uses.
Polestar draws this line at the metal instead of the primer. If the damage hasn’t reached the metal and an undamaged paint layer remains, direct touch-up works. If it has reached the metal, primer goes on first.
Bare metal or rust: full repaint
This is where DIY stops. BMW’s taillamp bulletin says if there’s bubble formation under the paint (lifting) or rust formation, the damaged area must be repaired and the entire tailgate repainted. An NHTSA cause analysis bulletin from BMW goes further on the headlamp side: if the primer is damaged and paint or rust is visible, the fender comes off completely.
GM’s matte bulletin is the strictest of the three. Any scratch or scuff that would need buffing means the panel gets repainted, full stop. GM allows a matte touch-up pen for minor chips, but any scratch that would need buffing means panel repaint.
If you can see metal at the bottom of the chip, primer goes on before anything else. No exceptions, no shortcuts, no “it’s just a tiny spot.”
If you’re working on something that’s already through the clearcoat, deep scratches need different handling than surface chips. Same for paint chips on the leading edge of a hood, which take more abuse than a door chip and often need a second coat.
The mistake I see most often is skipping the degreasing step, then watching the new paint peel within a season.
Matte vs gloss: two different repair regimes
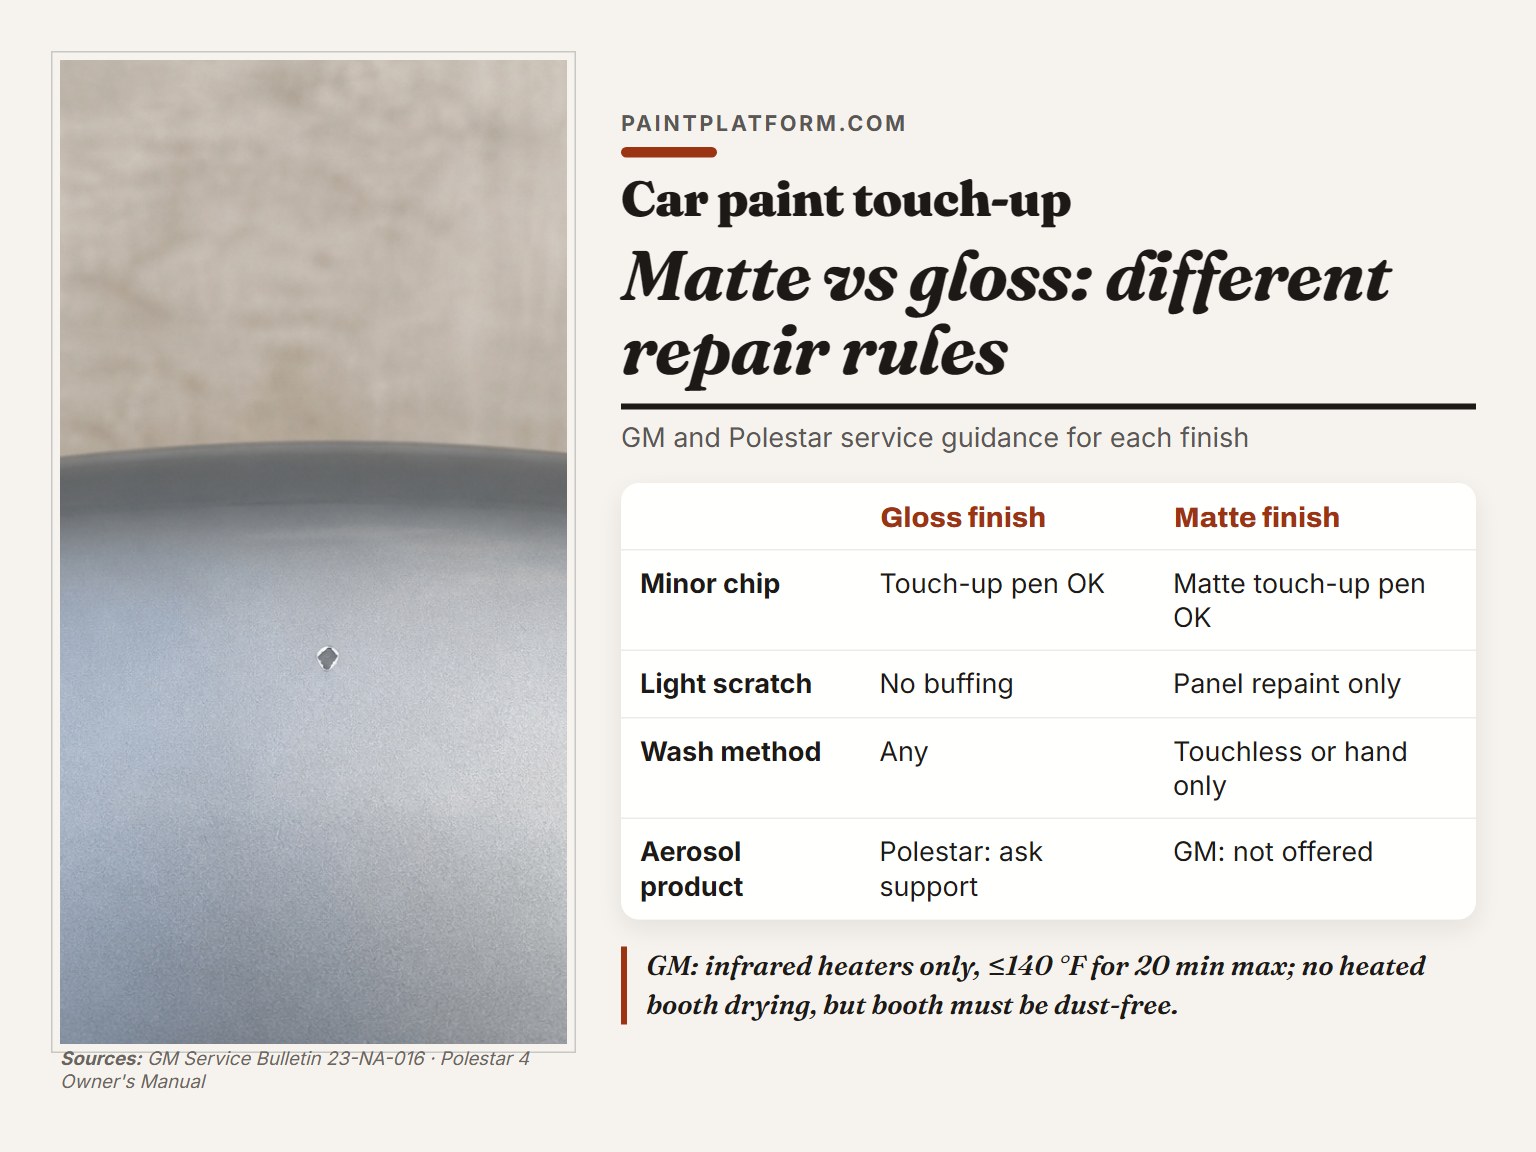
Matte paint and gloss paint run on different repair rules, so the how to touch up car paint approach splits accordingly. Different rules, different tools, different failure modes. Mixing them up is how people ruin a matte finish.
Tesla’s Model 3 service manual treats gloss paint correction as a sanding-and-polishing procedure, scoped to flat or near-flat metal panels with original factory paint. On body lines, Tesla reduces cutting time from 15 seconds to 5 seconds at a time and cuts buffer speed by 40-50% to avoid burning through the edges.
An NHTSA information bulletin PDF from GM says the opposite for matte. Do not attempt to buff out scratches or scuffs on matte paint, because buffing polishes the finish and reduces or eliminates the matte appearance. GM says the only correction for scratches that would need buffing is panel repaint, using the Axalta authorized matte refinish paint repair system, though minor chips can use the matte touch-up pen.
| Step | Gloss finish | Matte finish |
|---|---|---|
| Minor chip | Touch-up pen OK | Matte touch-up pen OK |
| Light scratch | Polish or buff | Panel repaint only |
| Wash method | Any | Touchless or hand only |
| Aerosol product | Polestar: ask support | GM: not offered |
| Buffing | Tesla: allowed on flat panels | GM: never |
GM also sets specific heat limits for matte repair. Infrared heaters only, not exceeding 140 F for 20 minutes max. No heated booth drying, but the booth has to be dust-free.
Worth knowing before you start: A brushed automatic car wash will scratch a matte finish in a way you cannot buff out. GM recommends touchless or hand washing only, and the scratches from a brushed wash are permanent.
I’ll admit I’ve never owned a matte-finish car, but the bulletin is clear enough that I wouldn’t try a DIY repair on one.
When touch-up is the wrong call
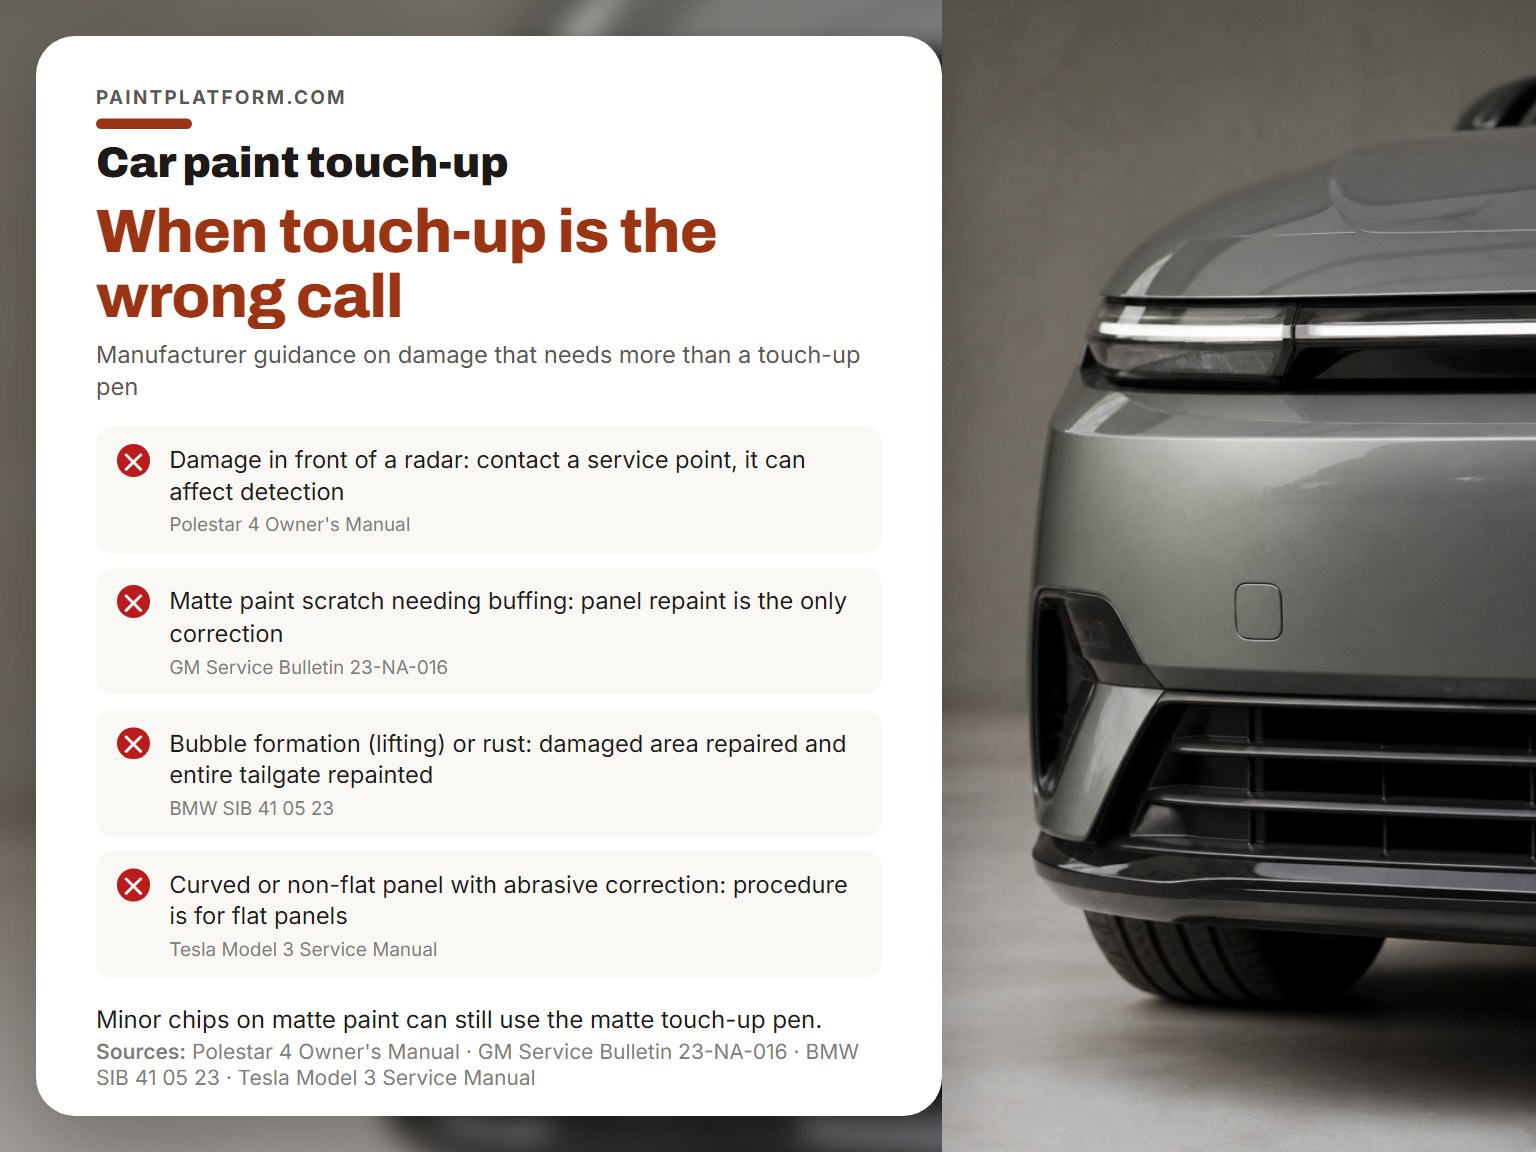
Some damage looks like a touch-up job and isn’t. The manufacturers are clearer about this than the aftermarket is.
- Damage in front of a radar. Polestar’s manual says paintwork damage in front of a radar can affect the radar’s detection capabilities. Contact a service point for repairs if you find damage close to the radars. This is a safety system. Treat it like one.
- Any scratch on matte paint that would need buffing. GM’s bulletin says buffing polishes the matte finish and reduces or eliminates the appearance, so panel repaint is the only correction, though minor chips can use the matte touch-up pen.
- Damage with rust or bubbling underneath. BMW escalates to full panel repaint. Touch-up over rust just hides the problem.
- Damage on a curved or non-flat panel, if you’re doing abrasive correction. Tesla’s procedure is designed for flat or near-flat metal panels. On body lines, the sanding, cutting, and polishing steps all change.
- Any damage where you’re not sure of the depth. Tesla’s manual says if you’re uncertain about a defect, follow up with a paint correction expert. Follow up with a paint correction expert when you’re uncertain about a defect.
If you’re dealing with a scratch that’s already through the clearcoat, car paint scratches covers the wider repair picture, and the touch up paint selection matters more than most people realize.
I’ll say this up front: I wouldn’t attempt a full repaint without proper prep and ventilation. Small touch-ups are one thing. A full respray is a different animal.
Frequently Asked Questions
Can I touch up car paint myself?
Yes, for chips and scratches that haven’t reached the metal. Polestar’s manual recommends contacting a service point for any paintwork damage, but it also walks through a DIY procedure as a fallback. BMW authorizes DIY touch-up sticks once the primer is visible. GM allows a matte touch-up pen for minor chips. The line is different for each automaker, and the damage depth decides where it sits.
