
How to Fix Car Paint Scratches: Match the Finish First
This post contains affiliate links. As an Amazon Associate, we earn from qualifying purchases.
How to fix car paint scratches depends on the finish: gloss clearcoat takes wet sanding and compound, matte paint cannot be buffed at all, and stainless steel panels need a full-plane refinish. Then check depth with a fingernail. Anything over 2.0 mm on a flat panel goes to a body shop.
The matte clause matters more than it sounds. GM’s bulletin on the 2024 HUMMER EV SUV Edition 1 spells out that buffing a low-gloss finish polishes it, and the only fix after that is a full panel repaint. Gloss clearcoat gives you room to sand and compound. Matte gives you one wrong move.
What follows: how to read a scratch’s depth, the exact thresholds Tesla publishes for its own panels, the sanding and buffing sequence that doesn’t eat clearcoat, and the point where you should stop and hand it to a body shop.
Key Takeaways
- Match the repair to the finish first. Gloss clearcoat takes compound; matte paint cannot be buffed at all.
- A fingernail test beats a guess. If your nail catches on the scratch, the damage is deeper than the clearcoat.
- 1.5 mm is the flat-panel low-risk ceiling. Tesla flags anything above 2.0 mm on a flat panel as high-risk and escalates it to a body shop.
- Off-color inclusions skip the size rule. They go to a body shop regardless of diameter.
- Character lines need a third of the cut time and 40-50% less buffer speed than flat panels.
What Actually Decides If a Scratch Comes Out?
Two things decide whether a scratch comes out: the finish it sits on, and how deep it goes. Get either wrong and you’ll either polish for an hour for nothing or sand straight through the clearcoat.
Start with depth. Run a nitrile-gloved hand over the area and you’ll feel a faint tick where the inclusion sits. If the surface feels smooth, the scratch is shallow enough to sand and compound. If your nail catches, the damage has left the clearcoat.
The same logic applies to scratch-removal kits. If the nail catches, or you can see metal, the scratch goes to a professional.
Scratch depth determines the repair path. A surface scratch that cannot be felt by hand sits inside the clearcoat and responds to wet sanding followed by compound. A scratch that can be felt by hand has broken through to the color layer, and polishing stops working at that depth.
Finish comes next. A gloss clearcoat is the forgiving one. It has a UV-protected top layer you can thin down and polish back. Matte and low-gloss finishes don’t have that layer in the same way. Stainless steel panels don’t have paint at all.
I’m still learning auto paint. My canvas habits carry over more than I expected, especially the “test on scrap first” one. That habit has saved me from a lot of bad decisions on panels I actually care about.
If you’re hunting for the right compound or pad before you start, the scratch removers most people reach for first are a fine-cut compound and a soft foam pad. Keep it simple.
The 1.5 mm Rule: How Tesla Triages Its Own Paint Defects
Under 1.5 mm is the threshold Tesla uses to decide if a flat-panel defect is low-risk. The Model Y service manual splits paint defects into two buckets by diameter, and the split changes what you’re allowed to do next.
What Counts as Low-Risk
Tesla’s manual lists low-risk defects as anything under 1.5 mm on flat or near-flat panels and under 1.0 mm on or near character lines. That bucket also includes high or low spots, basic surface inclusions, holograms, swirls, solvent pop, overspray, and light-to-medium scratches. Those are the ones you can correct in-house with sanding and buffing.
What Counts as High-Risk
Anything over 2.0 mm on a flat panel or over 1.0 mm on a character line is high-risk, as are high or low spots over 2.0 mm and any off-color inclusion. So is any off-color inclusion, and so are high or low spots over 2.0 mm. High-risk defects get escalated to a body shop in Tesla’s procedure. No polishing, no sanding, no exceptions.
| Defect | Tesla Threshold | Action |
|---|---|---|
| Low-risk, flat panel | Under 1.5 mm | Correct in-house |
| Low-risk, character line | Under 1.0 mm | Correct in-house |
| High-risk, flat panel | Over 2.0 mm | Body shop |
| High-risk, character line | Over 1.0 mm | Body shop |
| Off-color inclusion | Any size | Body shop |
Tesla’s manual is the most specific published source I found, but it’s written for its own panels. Treat the numbers as a starting point, not gospel. A different manufacturer may use different thresholds, and most don’t publish them at all.
Common mistake: Treating every defect the same size. A 1.5 mm inclusion on a character line is high-risk by Tesla’s rule; the same size on a flat panel is low-risk. The line changes the answer.
Can You Buff Out a Scratch on Matte Paint?
Not universally: GM’s bulletin says buffing a matte finish polishes the paint and kills the low-gloss look, while the Automotive Technology Resource Library holds that light scratches can often be removed without refinishing. The NHTSA technical service bulletin 23-NA-016 is blunt about it: do not attempt to buff out scratches or scuffs on matte paint, and the only way to correct this damage is to have the panel repainted.
This is where sources disagree, and the disagreement is worth understanding before you touch a matte panel.
The GM Position
GM’s bulletin says buffing polishes the matte finish, which reduces or eliminates the low-gloss appearance. Their only documented fix is a full panel repaint using the Axalta authorized matte refinish system. No aerosol touch-up either; GM will only offer a matte paint pen for chips.
The ATRL Position
The Automotive Technology Resource Library says light scratches on paint surfaces can often be removed without refinishing. Their method is 1500 to 2000 grit sandpaper followed by a buffer and compound, done carefully to avoid destroying the UV protection in the clearcoat.
Both positions are correct for their finish. ATRL is describing gloss clearcoat. GM is describing low-gloss matte, where the diffused surface is the finish, not a coating on top of it. Polish the matte and you’ve turned a soft sheen into a glossy spot under shop lighting.
Before you start: Per GM’s bulletin, buffing a matte panel polishes it flat, though the Automotive Technology Resource Library holds that light scratches can often be removed without refinishing. The low-gloss finish is gone the moment the pad touches it, and no compound brings it back. GM’s only documented fix is a full panel repaint.
Ever wonder why body shops quote a full panel repaint for a scratch the size of a grain of rice? On matte, GM’s bulletin says a full panel repaint is the only move that brings the finish back, while the Automotive Technology Resource Library holds that light scratches can often be removed without refinishing.
How to Fix Car Paint Scratches on Gloss, Matte, and Stainless Steel
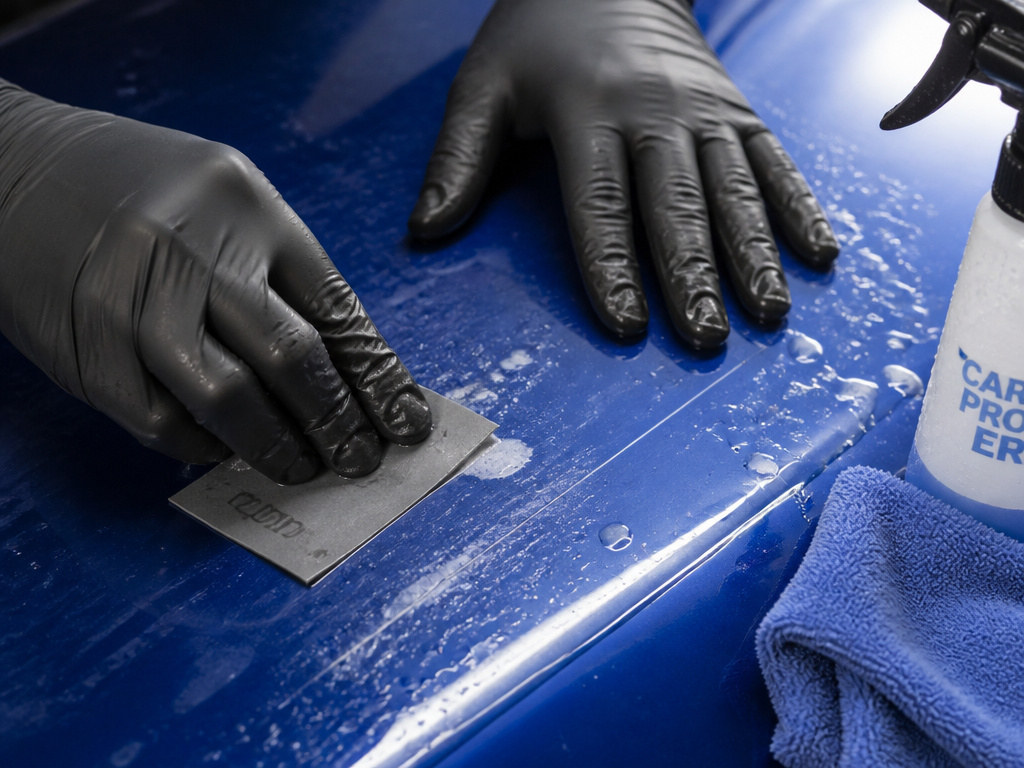
Three finishes, three completely different repair paths. Gloss is the forgiving one. Matte is the one that punishes you. Stainless is the one that expands the job.
| Finish | Repair Method | What Breaks It |
|---|---|---|
| Gloss clearcoat | Wet sand 1500-2000, then compound | Sanding through the UV layer |
| Low-gloss matte | Full panel repaint (Axalta system) | Any buffing or polishing |
| Stainless steel (Cybertruck) | Blendex discs, full plane refinish | Skipping the plane across the vehicle |
For gloss, the ATRL procedure is the standard: 1500 to 2000 grit sandpaper to remove the scratch, then a buffer and compound to remove the fine sanding marks. The sanding step is where people wreck their clearcoat. Go slow, keep the panel wet, and stop the moment the scratch disappears.
For matte, GM’s bulletin says the choice is a repaint or a touch-up pen for chips, while the Automotive Technology Resource Library holds that light scratches can often be removed without refinishing. Nothing in between. GM’s bulletin lists the touch-up pen as the only chip fix and prohibits aerosol versions entirely.
For stainless, the Tesla Cybertruck service manual requires refinishing the entire plane of the panel plus the same plane across all panels on the same side of the vehicle. That’s a bigger scope than GM’s panel-level repaint rule. If you own a Cybertruck and the scratch is real, plan for a bigger job than you expected.
If you’re pricing out your options before committing, paint repair kits range from a single compound bottle to a full wet-sanding setup. Buy for the finish you actually have, not the one in the video.
The Sanding and Buffing Sequence That Doesn’t Eat Your Clearcoat
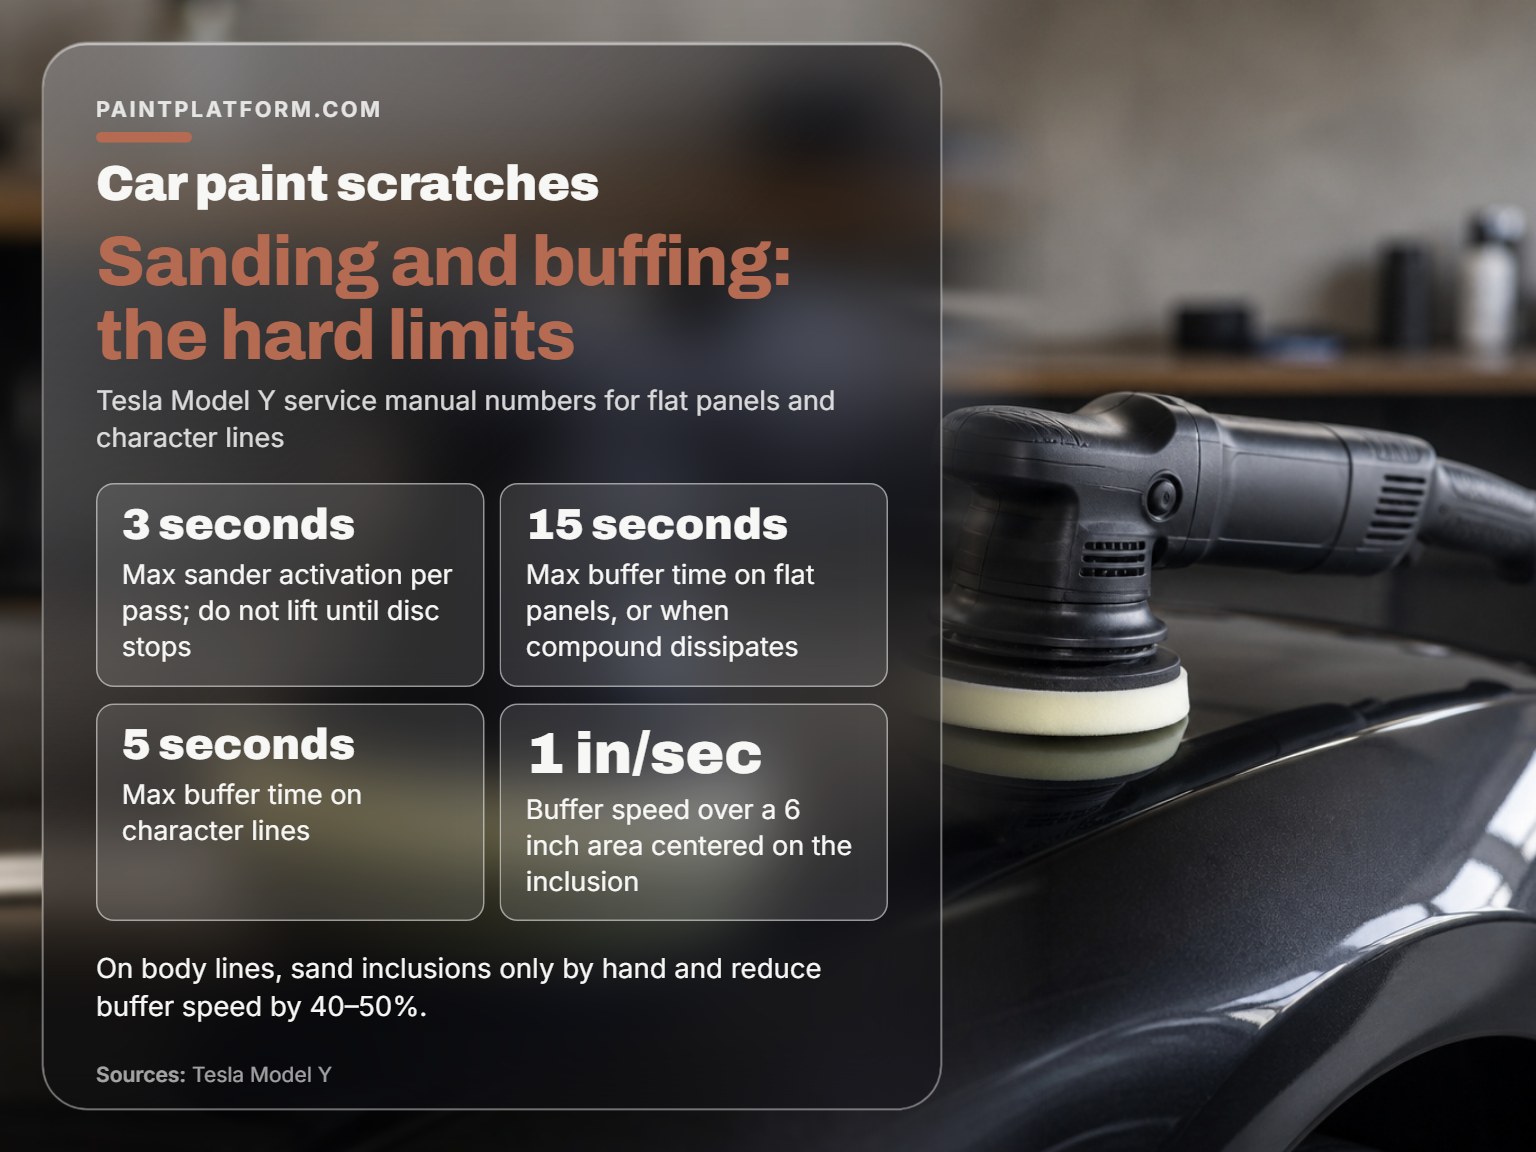
The sequence below comes from Tesla’s Model Y service manual, and it’s tighter than most YouTube tutorials. Every step has a number attached for a reason.
- Clean the area with isopropyl alcohol and a microfiber towel. Skip this and the sanding disc picks up grit that scratches the panel worse than the original defect.
- Nitrile glove bump check. Run your hand over the area. If you feel fine bumps, clay the panel first. Sanding over contamination drives it into the paint.
- Detail spray and a decontamination mitt. Use light, straight passes until the mitt stops dragging. Dragging mitt means there’s still bonded contamination.
- New sanding disc, sprayed with water. A used disc has loaded abrasive and cuts unevenly.
- Sander off, disc flush on the inclusion, 3 seconds on. Do not run the sander for more than 3 seconds per activation. Do not lift the sander until the disc stops spinning.
- Inspect the inclusion. If it’s reduced 50-90%, continue. If it’s reduced about 90%, restart from step 1. If it’s not reduced by at least 50%, stop and take the vehicle to a body shop.
- Buffer on, pressure until the buffer begins to stall, then back off. Stalling tells you the pad is loaded; back off until it rotates normally.
- Move the buffer at 1 inch per second over a 6 inch area centered on the inclusion. Keep the tool level and continuously moving.
- Turn the buffer off after 15 seconds or when the cutting compound begins to dissipate. Remove the buffer only when the pad stops spinning.
The compound goes from a wet paste to a thin oily film under the pad. That film is your signal to stop and wipe.
The 3-second cap on the sander is a hard ceiling. Run it longer and the disc heats the clearcoat faster than you can see it happening. By the time the panel looks glossy, you’ve already burned through.
Character Lines Need Different Numbers
Tesla’s manual makes specific adjustments for body lines, and this is where most tutorials skip a step. On a character line, sand paint inclusions only by hand. Reduce cutting time from 15 seconds to 5 seconds (a third of the flat-panel time). Reduce buffer speed by 40-50%. Apply less pressure. Avoid excessive heat buildup. Do not let the compounds dissipate.
ATRL doesn’t carve out a character-line exception. Their guidance is that the sanding procedure must be done carefully to avoid destroying the UV protection in the clearcoat, full stop. If you’re working a line and you’re not sure, hand-sand and skip the machine.
I practiced the 3-second cap on a junkyard fender before I touched anything I cared about. The first pass taught me that a spinning disc on a body line will cut a crescent faster than you can react.
The sanding before painting basics carry over here. If you’re going to wet-sand, use the right grit and keep the panel wet. The paint correction compounds and polish you finish with matter less than the sanding you do first.
Where this goes sideways: Lifting the sander off the panel before the disc stops. The spinning disc catches an edge and cuts a crescent you can’t polish out.
When to Stop and Hand It to a Body Shop
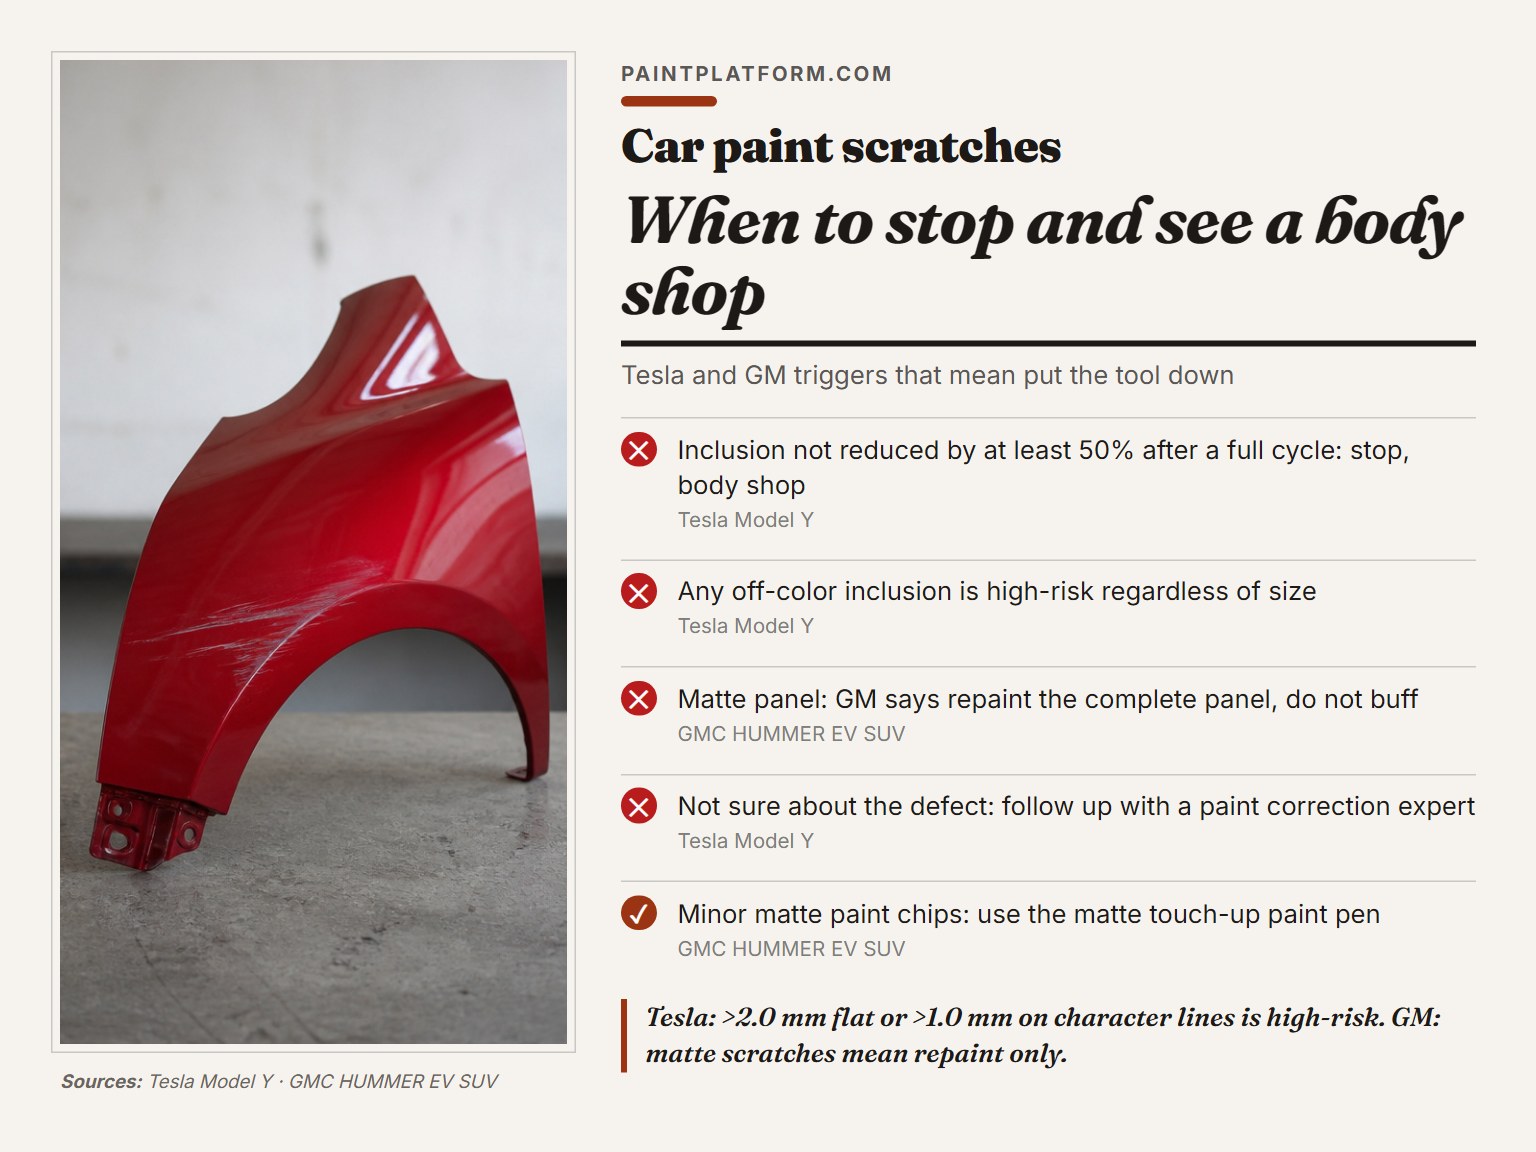
The hardest call in paint work is knowing when to put the tool down. Tesla’s manual gives you specific triggers, and every one of them is a stop sign.
- The inclusion isn’t reduced by at least 50% after a full cycle. Continuing just burns clearcoat without moving the defect.
- The inclusion is off-color. Any off-color inclusion is high-risk regardless of size, per Tesla’s triage.
- The panel is matte. GM’s bulletin says any scratch on a low-gloss finish means a full panel repaint, while the Automotive Technology Resource Library holds that light scratches can often be removed without refinishing.
- You’re not sure. Tesla’s own manual says to follow up with a paint correction expert when uncertain.
For chips that don’t need a repaint, a touch-up pen is the tool. A touch-up pen matched to your paint code is the tool, and the color matching is the part that matters most. Get the paint code off the door jamb before you order anything.
Don’t buy a full paint repair kit for one chip. A touch-up pen beats a kit you’ll use once. If you’re doing a larger area, the touch up car paint process is a different job than scratch removal, and the auto touch-up paint for a deep scratch is a different product again.
My default when I’m not sure is to stop and ask someone who does this daily. Do you really want to learn on a panel you care about?
Frequently Asked Questions
Can you fix a deep scratch without repainting?
Sometimes. ATRL’s procedure for a deep scratch uses feather edging with a dual action sander and 220 grit sandpaper, then base/clear repaint of that area, while the Cybertruck manual uses a 3-inch Twist Blendex U grinding disc, then 600 grit, then Medium and Fine Blendex discs, and GM’s bulletin says matte scratches can only be corrected by full panel repaint. If the scratch has gone through to primer or metal, you’re into paint work, not polishing. The Cybertruck manual uses a 3-inch Twist Blendex U grinding disc, then 600 grit, then Medium and Fine Blendex discs for its stainless panels.
How do you tell if a scratch is through the clearcoat?
Use the fingernail test. If your nail feels the scratch but doesn’t catch on it, the damage is in the clearcoat and can often be sanded and polished out. If your nail catches, or you can see metal or primer, the scratch has gone deeper and needs paint.
Why can’t you buff matte paint?
Per GM’s bulletin, buffing polishes the surface, while the Automotive Technology Resource Library holds that light scratches can often be removed without refinishing. On a matte finish, GM’s bulletin says the diffused look is the finish itself and polishing it turns that spot glossy, while the Automotive Technology Resource Library holds that light scratches can often be removed without refinishing. GM’s bulletin says the only way to correct a matte scratch is a full panel repaint using the Axalta authorized matte system.
Do touch-up pens actually work?
For small chips, yes. GM only offers a matte touch-up pen for the HUMMER EV and explicitly will not offer an aerosol version. For gloss, a touch-up pen matched to your paint code handles small chips. For anything larger, the pen leaves a visible edge.
What’s the difference between polishing and compounding?
Compound cuts faster and removes sanding marks. Polish refines the surface after compounding and brings back gloss. Tesla’s Model Y procedure uses a cutting compound after sanding, then inspects for remaining sanding marks before finishing. Skipping the compound step and going straight to polish leaves the sanding scratches visible under direct light.
The Bottom Line
How to fix car paint scratches comes down to two questions you should answer before you touch the panel: what finish is it, and how deep is the scratch? Gloss clearcoat and a shallow scratch is the easy case. Matte and anything you can feel with a fingernail is the hard case, and the hard case usually means a body shop.
One rule most guides skip: if you’re outside North America and following Tesla’s Model Y procedure, the manual lists APAC and EMEA sander speeds as TBD. That’s not a typo in the manual, it’s a gap. If you’re in those regions and want to try the procedure, start at the lowest speed and treat every panel as a test panel until you’ve dialed in what works.
The concession: this whole article assumes you’re working on a panel you can afford to learn on. If you’re not, the answer is a body shop, and that’s fine. The money you save doing it yourself is real, but so is the cost of a repaint when a 3-second pass runs long.
Fair warning: the first scratch you fix yourself will probably look worse than the scratch did. That’s normal. Do the second one on a junkyard fender.
