
How to Paint Cinder Blocks: Step-by-Step
This post contains affiliate links. As an Amazon Associate, we earn from qualifying purchases.
To paint cinder blocks, clean the face, confirm the block is dry and cured, fill the pores with a block filler, then topcoat with a masonry paint rated for exterior use. On bare new block, the first coat sinks into the pores and dries patchy without that filler step.
Dry and cured are two different clocks, and they run on different schedules. Cure is a chemical wait measured in weeks. Dry is a moisture reading you can check yourself in about sixteen hours with a square of plastic.
What follows is the order I actually work in: test, clean, fill, topcoat, with the temperature window and the walk-away cases at the end.
Key Takeaways
- Cure beats enthusiasm. New block needs 30 days minimum before coating, and PPG’s data sheet pushes for 90.
- Test moisture with plastic, not a fingertip. An 18 inch by 18 inch sheet of 4-mil plastic taped down for 16 hours tells you more than the surface ever will.
- Block filler is standard on bare block. MPI calls it usual practice on new block; PPG’s self-priming claim applies to specific products, not the whole category.
- Stay inside 50 to 90°F and at least 5°F above the dew point, with 24 hours of stable temperature after the coat goes on.
- Never coat block that sits on grade. PPG won’t back it, and trapped moisture blows the film off from behind.
Why Cinder Block Drinks Paint
The first roller pass disappears. A wet stripe goes down and then sinks into the face, leaving a dry matte patch that looks untouched.
That’s not a bad can of paint. That’s the how to paint cinder blocks question doing what block does.
Cinder block is cast from cement, sand, and aggregate, then cured 14 to 30 days before shipping. The face stays open and porous, so the first coat of filler or primer sinks into the pores instead of sitting on top. Sealing those pores gives the finish coat an even sheen.
MPI, the Master Painters Institute, states it plainly: new concrete blocks have a very porous surface that usually requires a block-filler as a primer. That’s the whole reason your first coat vanishes.
I learned the how to paint cinder blocks arithmetic on a garage wall. The filler went on and just kept going, and I ended up mixing far more than I’d guessed. A stiff, thick-nap roller pushed it into the holes instead of skating across the top.
Buy for the second coat before you start the first.
A block filler coat is the sear before the braise. Skip it and the finish never quite gets there, no matter how good the topcoat is. Any cinder block paint you choose will read the surface honestly, pores and all.
Does New Cinder Block Need to Cure Before Painting?
Thirty days is the number three manufacturers print, and one of them would rather you waited ninety.
Sherwin-Williams asks for at least 30 days at 75°F on concrete and mortar. Valspar’s block filler data sheet agrees. PPG’s Speedhide 6-15XI sheet goes further: 30 days minimum, 90 days preferred, on both concrete and mortar.
MPI adds a wrinkle for repairs. Patch a wall with fresh mortar and that patch needs 28 days before it gets coated.
Then there’s pH, where the sources spread out.
| Source | Cure before coating | Surface pH |
|---|---|---|
| Sherwin-Williams | 30 days at 75°F | 6 to 9 |
| PPG Speedhide 6-15XI | 30 days, 90 preferred | Under 10 |
| MPI | 28 days for repairs | 7.0 to 8.5 |
| Valspar Block Filler | 30 days | Not stated |
Those three pH windows differ: Sherwin-Williams requires 6 to 9, MPI requires 7.0 to 8.5, and PPG requires under 10, so check which applies to your coating.
The chemistry behind it hasn’t moved much in decades. NIST Letter Circular 915 formally superseded the older porous masonry guidance, and the alkaline-salt problem it describes still drives the cure rule today.
If your wall is poured rather than stacked, the painting concrete walls sequence runs a little differently.
I’d rather wait the extra time than repaint later. That’s a boring opinion and I stand by it.
How Do You Test Cinder Block for Moisture Before Painting?
Eighteen inches by eighteen inches, four mils thick, sixteen hours minimum. That’s the whole test, and it costs you a scrap of plastic and some tape.
Tape all four edges of the sheet to the bare surface. Wait at least 16 hours. Then look for moisture, discoloration, or condensation on the block or on the underside of the plastic.
Sherwin-Williams notes that concrete moisture seldom drops below 15%. What matters is whether moisture is actively moving.
If the sheet shows moisture, find the source and fix it before you open a can. That’s the manufacturer’s instruction, not mine.
MPI gives a hard number where the others don’t: substrate moisture must not exceed 12%. PPG skips the number entirely and just requires a completely dry surface. Three sources, three levels of strictness.
Where this goes sideways: Coating a damp block face. The film skins over, vapor pushes from behind, and MPI lists that trapped moisture among the leading causes of blistering and peeling failures.
Cleaning Decides the Job Before the Paint Does
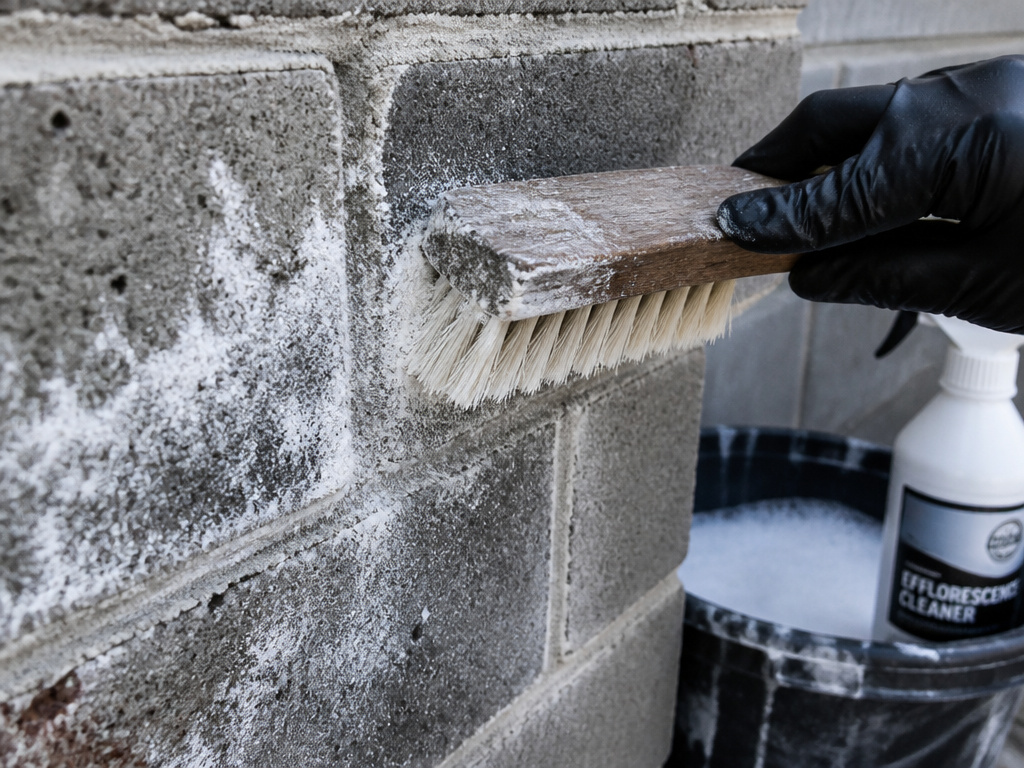
Dirt is the cheapest failure to prevent and the most common one to skip.
Every source in this stack agrees on the list: mildew, oil, dust, dirt, loose rust, peeling paint, grease, tar, glaze, laitance, efflorescence, loose mortar. Any of those left on the face becomes the weak layer the whole system fails at.
Before you start: Scraping or sanding old paint can release lead dust, and PPG’s data sheet warns that exposure can cause serious illness, especially in children. Wear a properly fitted NIOSH-approved respirator, keep it off your skin, and clean up with a HEPA vacuum and a wet mop. The USEPA National Lead Information Hotline is 1-800-424-LEAD.
Here’s the cleaning order I use:
- Scrub mildew with a bleach solution, let it sit 30 minutes, then rinse thoroughly. Skipping the dwell time leaves spores in the pores and the stain ghosts back through the new coat.
- Wash oil and grease off with detergent or solvent, then rinse with clear water. Paint won’t grip grease, and you’ll see fisheyes in the first pass.
- Take off loose and flaking paint by hand tool, power tool, or pressure washing. Blisters get removed and their edges feathered.
- Treat heavy efflorescence mechanically first, then acid-etch, scrub while it bubbles, and rinse with a lot of water. Then let it dry completely.
- Remove rust stains with oxalic solution worked in with a brush, rinsed and dried. MPI notes only qualified tradesmen should do this one.
Efflorescence is the chalky white powder that comes off on your hand when you rub the block. It looks like salt and behaves like a symptom.
Valspar is blunt about it: find the water entry first, whether that’s a cracked parapet cap, an open joint, or a hairline crack, and repair it before painting. Painting over efflorescence is a countdown to failure.
For a wider run through the surface prep on stacked walls, the painting cinder block walls walkthrough covers the same order of operations.
Block Filler or a Self-Priming Coating?
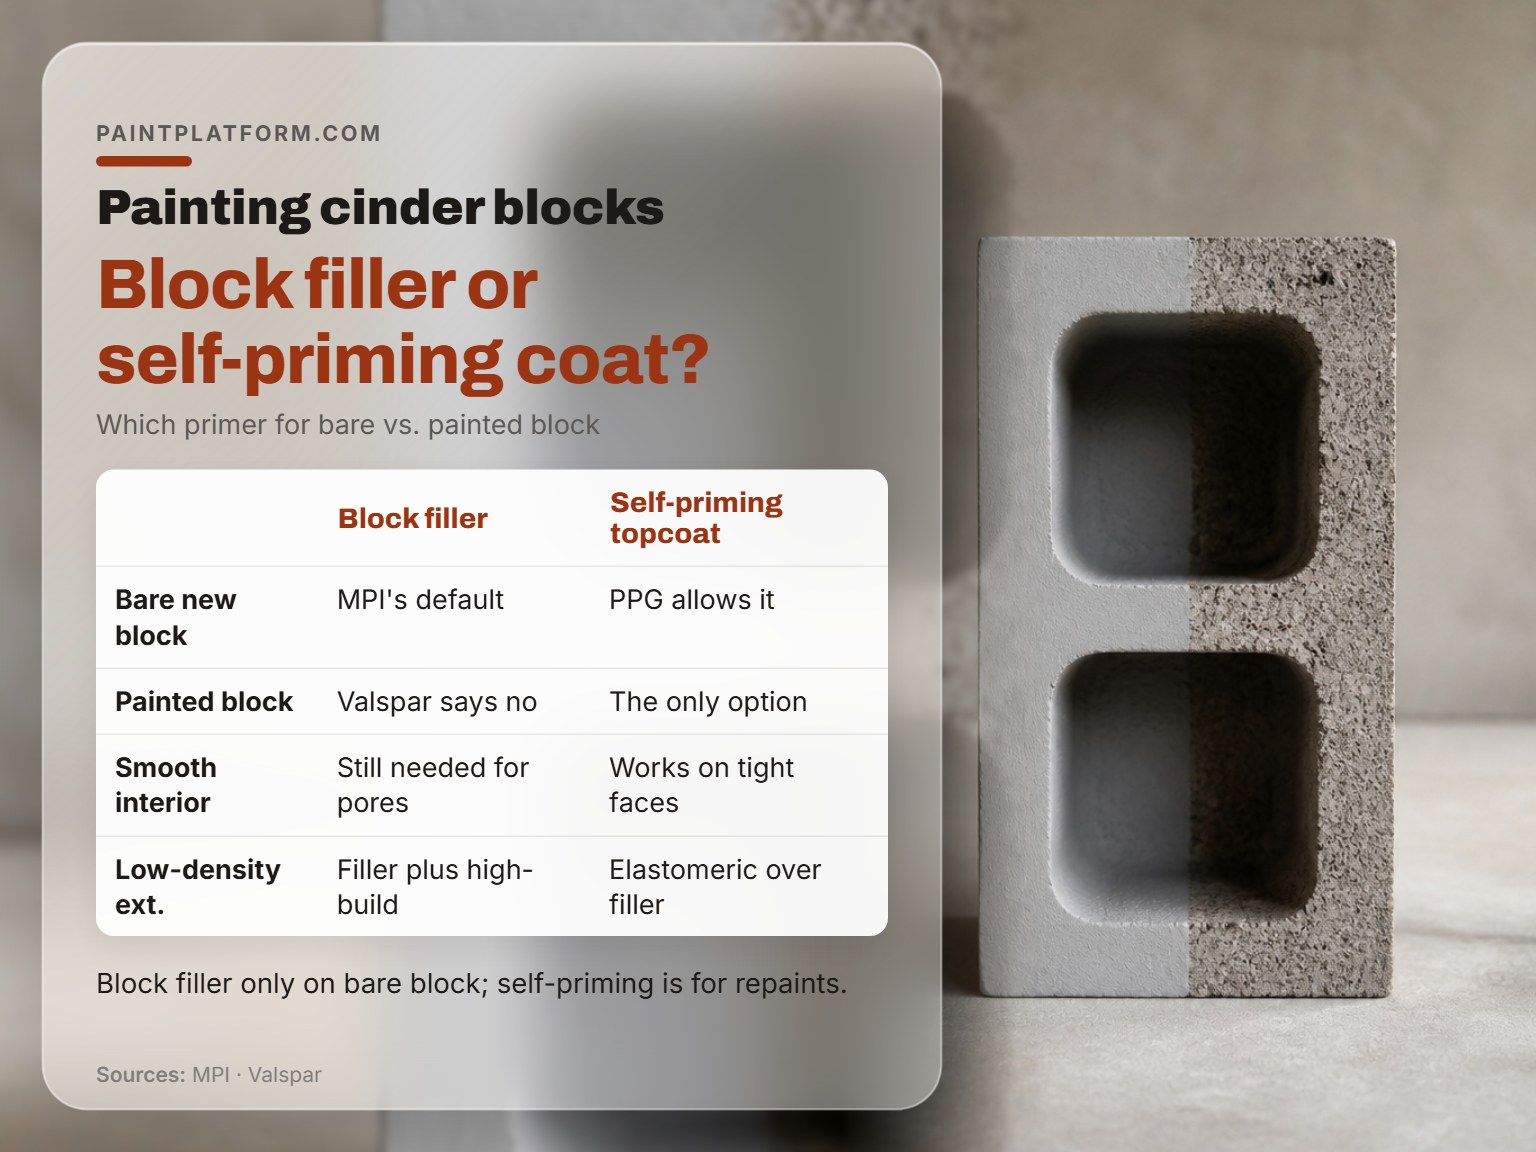
PPG’s Speedhide 6-15XI is self-priming in most applications. MPI says new block usually needs a block filler. Both statements are true at once, and knowing which one applies saves you a coat of work.
Common mistake: Slapping latex block filler onto a wall that’s already painted. Valspar’s data sheet says not to do it, and MPI restricts filler to block prepped back to bare condition. On a repaint, you’re topcoating, not filling.
| Situation | Block filler | Self-priming topcoat |
|---|---|---|
| Bare new block | MPI’s default | PPG allows it |
| Previously painted block | Valspar says no | The only option |
| Smooth interior block | Still needed for pores | Works on tight faces |
| Low-density exterior | Filler plus high-build | Elastomeric over filler |
When Block Filler Earns Its Coat
Bare block, interior or exterior, is filler territory. MPI is clear that even smooth-faced interior block needs a filler to close the pores and give a uniform finish.
Valspar Professional Block Filler is the one I reach for on new block. It’s fast-drying, seals porous masonry, and fills the voids in cement and cinder block so the finish coat goes further. Exterior use needs a topcoat over it.
For a deeper comparison of filler types, the block filler breakdown covers which primers suit which block densities.
When a Self-Priming Coat Is Enough
PPG Speedhide 6-15XI is self-priming in most applications, and the same sheet lists Concrete/Masonry 4-503, 4-603XI, and 17-921XI as alternates. If you’re coating a wall that’s already sealed and sound, that’s a legitimate shortcut.
It isn’t a shortcut on raw, thirsty block. PPG also warns that too thick a film plus multiple coats can cut the system’s permeance and cause blistering later.
If you’re still weighing topcoats, concrete block paint options differ mostly in breathability, and breathability is the thing that keeps a wall out of trouble.
How to Paint Cinder Blocks So the Coat Actually Bonds
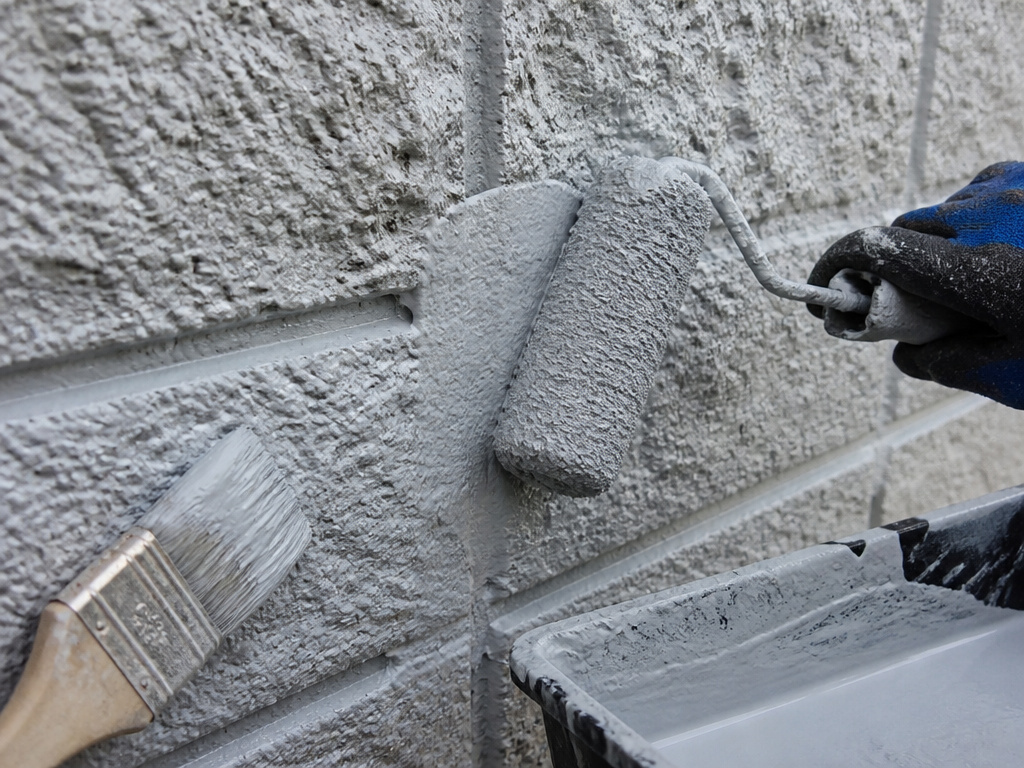
Back rolling is the step that separates a pinhole-free face from a speckled one.
MPI recommends back rolling or brushing because it fills the irregular surface for an even appearance and prevents bridging on scored block. Bridging is where the roller skips across a groove and leaves a thin film over a hollow. That film cracks first.
The temperature window is narrower than most people expect. PPG wants air, surface, and product all between 50°F and 90°F, at least 5°F above the dew point, with those temperatures held for 24 hours after application.
Valspar sets its own floor at 50°F, with dry-to-touch in 2 to 6 hours and recoating anywhere from 1 to 72 hours at 77°F and 50% relative humidity.
Sherwin-Williams adds a caveat for cold-weather work: no exterior painting below 50°F unless the coating is rated down to 35°F. Some coatings are rated down to 35°F, but check the can rather than assuming.
Skip direct sunlight and hot surfaces. Skip late-day application when dew is coming. PPG also says to hold off if rain is expected within 48 hours.
Brush, Roller, or Spray on Split-Face Block
Split-face, scored, and fluted block are uneven by design, and MPI notes hand tooling during prep may be necessary because of it. On scored block, any groove that’s bridged or filled in gets ground out and the edges brushed with primer.
A brush gets into the grooves. A thick-nap roller covers field fast. Spray is fastest and the least forgiving on a windy day. For rough faces generally, the painting textured walls approach applies here too: work the material in, then lay it off.
Cement-water paints follow a different curing rhythm entirely. The Letter Circular 747 PDF recommends misting the coated surface two or three times a day between coats and for 2 days after the final coat, starting 6 to 12 hours after application once the paint has set.
That’s the old way, and it still works on open-textured block.
When You Should Walk Away From the Block
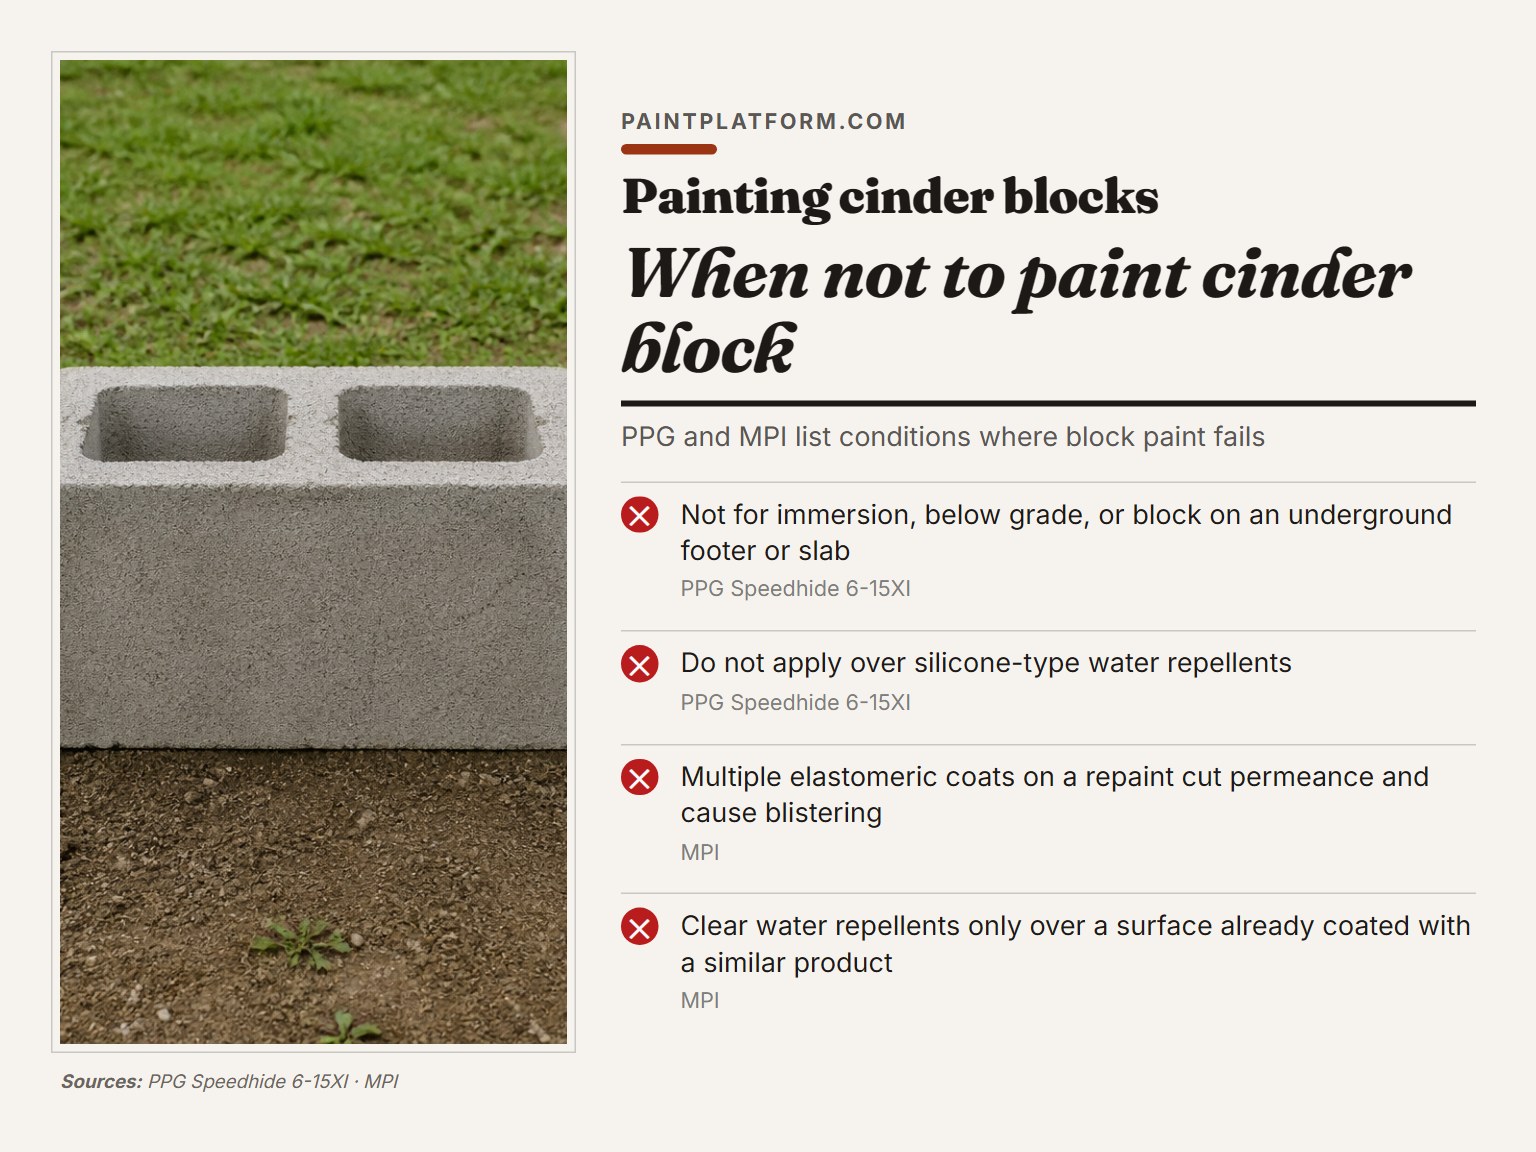
Some walls shouldn’t get paint at all, and PPG names most of them in a single paragraph.
The Speedhide sheet says the product is not recommended for immersion service, below grade, or where the block rests directly on an underground footer or slab in contact with the earth. The reason is simple enough: moisture comes up through the block, gets behind the filler, and pushes the whole system off.
Other cases worth flagging:
- Silicone water repellents. PPG says do not apply over them. Nothing bonds to a silicone-treated face.
- Multiple elastomeric coats on a repaint. MPI warns this cuts permeance until interior vapor can’t escape, which causes blistering and peeling. The same product is right on new low-density block and wrong on a repaint.
- Clear water repellents. MPI restricts them to surfaces already coated with a similar product.
- Block sitting on grade. Same problem as the footer case, and no topcoat fixes it.
For below-grade walls, the honest answer is a basement cinder block walls system built for moisture, not a wall paint.
A block wall that stays wet will fail under any coating. Fix the water, then pick the paint. Reversing that order costs you the whole job twice.
Brick deserves its own warning. Once it’s painted, it’s committed, and stripping it later is a nightmare. I test a hidden corner and live with it before deciding.
Frequently Asked Questions
Do I have to use a block filler on cinder block?
On bare new block, MPI treats it as standard practice, and the pores will eat your topcoat if you skip it. On a previously painted wall, Valspar says not to apply latex block filler at all. PPG’s self-priming products cover the middle ground.
What happens if I paint cinder block before 30 days?
You trap moisture and alkaline salts still moving out of the block. The film can blister or peel, and the failure shows up after the coating looks cured. Sherwin-Williams, Valspar, and PPG all set 30 days as the floor, and PPG prefers 90.
Can I use regular wall paint on cinder block?
Standard interior wall paint won’t handle the porosity or the exterior moisture cycle. Use a coating rated for masonry, and topcoat any block filler with an exterior-rated product as Valspar requires.
How long before I can put on a second coat?
Valspar lists a recoat window of 1 to 72 hours at 77°F and 50% relative humidity. PPG requires holding air and surface temperature for 24 hours after application, so plan the second coat around that.
Can I paint cinder block in cold weather?
Below 50°F, Sherwin-Williams says no exterior painting unless the coating is rated down to 35°F. PPG’s window tops out at 90°F on the other end, so spring and early fall are the realistic slots.
Why is my cinder block paint peeling?
Moisture behind the film is the usual answer. PPG names it directly, and MPI lists moisture vapor, non-breathable systems, and too-thick films as the main failure causes. Peeling is a symptom of water, not of bad paint.
The Bottom Line
Here’s the trigger that decides everything else: if the plastic square shows condensation or a dark patch after 16 hours, stop. Don’t buy paint. Find the water first.
Everything after that is scheduling. Thirty days of cure, a dry face, a filler coat on bare block, and a coat applied between 50°F and 90°F with 24 hours of stable temperature behind it.
The concession worth stating out loud: if your block sits on grade or below it, none of this applies. PPG won’t recommend a coating there, and no topcoat beats water finding its way up.
So start with the ten-minute version. Cut an 18 inch square of 4-mil plastic, tape all four edges to the block, and write the date on the tape with a marker. Come back tomorrow and look.
That’s the whole first step, and it’s the one that decides whether the rest of the job lasts.
