
How to Repair Stucco Before Painting: Step-by-Step
This post contains affiliate links. As an Amazon Associate, we earn from qualifying purchases.
To repair stucco before painting, cut through the damaged area only as deep as the metal mesh, patch with a base coat matched to the existing stucco thickness, and let the patch cure to the manufacturer’s schedule before any finish goes on. The cure window decides whether the repair holds; the patch itself is the easy part.
The cure window is the stretch after the patch goes on, and it’s where the how to repair stucco before painting question either locks in or starts cracking. Stucco cures by hydration, which means the patch needs moisture to keep reacting with the cement. Let it dry out too fast and shrinkage cracks open up under the paint.
What follows is the order that matters: cut, mesh, bond, patch, cure, then finish. The temperature and moisture numbers below come from the manufacturers and the industry spec, and where they disagree, you’ll see both positions side by side.
Key Takeaways
- Stop at the mesh. A cut that goes into the moisture barrier turns a patch into a leak, and the leak shows up as a blister.
- Match the patch depth. Stucco from 3/8 inch to 1/2 inch thick takes a single pass; anything thicker needs a scratch coat and a brown coat.
- Respect the 40°F floor. Both the industry spec and QUIKRETE agree on 40°F as the lower bound; they split at the top (95°F vs 100°F).
- Cure time depends on the product. The industry spec says 75% humidity for at least 48 hours; Sika/Parex says 6 days; QUIKRETE says skip the moist cure if you’re painting.
- Hairline cracks get elastomeric coating. Sika says no routing for cracks up to 1/32 inch; QUIKRETE says chisel them open first.
Why the Cure Window Decides Whether Your Patch Holds
A patch that looks perfect on day one can show a hairline crack by the end of the week. The difference is almost never the mix. It’s how the patch was kept while it cured.
Stucco cures through hydration, a chemical reaction between cement and water that continues for days after the surface feels hard. The patch needs moisture to keep reacting. If the surface dries too fast, the cement stops hydrating and the patch shrinks, which opens cracks under the finish.
The industry spec calls for roughly 75% humidity for at least 48 hours. Sika/Parex goes longer: moist cure the patch and allow 6 days before applying finish. QUIKRETE takes a different route entirely, saying that if the repair will be painted, moist curing is impractical and the patch is paintable after 2 hours.
I’ve learned to treat the cure window as the real deadline, not the trowel work. The trowel work is visible. The cure is not.
Where this goes sideways: Painting over a patch that hasn’t finished curing. The Standard Spec and Sika/Parex would have you moist cure first, while QUIKRETE says a repair to be painted should not be moist cured and is paintable after 2 hours.
Once the patch is cured, you can paint stucco with a water-based coating, but the film thickness matters as much as the product. If you want the full industry sequence, the TSIB Portland cement plaster repair guide is the place to start.
What Temperature Range Actually Works for Stucco Repair?
The two main sources split by 5 degrees at the top of the range, and that gap matters more than it sounds. Five degrees matters.
The Standard Stucco Repair Specification says no repairs below 40°F or above 95°F, or if those temperatures are expected within 24 hours after the repair. QUIKRETE FastSet Stucco Patch says no application below 40°F or above 100°F, and no application when temperatures are expected to fall below 40°F within a 24-hour period.
| Source | Lower Bound | Upper Bound | 24-Hour Rule |
|---|---|---|---|
| Standard Stucco Repair Specification | 40°F | 95°F | Both bounds apply if expected within 24 hours |
| QUIKRETE FastSet Stucco Patch | 40°F | 100°F | 40°F floor applies within 24 hours |
| Conditioned exception (Standard Spec) | Below 40°F or above 95°F | Allowed if area stays conditioned until cure | Not applicable |
The 40°F floor is the one number both sources agree on. The conditioned exception is the spec’s escape hatch: you can work outside the range if you keep the repaired area conditioned until curing is complete.
The temperature window applies to the patch, but when you compare a how to repair stucco before painting, the coating has its own limits. QUIKRETE also says no application when rain is expected within 2 hours.
The Tools and Materials That Match Your Patch Depth
The patch depth decides which materials you need. From 3/8 inch to 1/2 inch, one pass of base coat does the job; thicker than that, you’re building in two stages.
Sika/Parex lays out the rule: if the existing stucco is 3/8 inch to 1/2 inch thick, apply a single pass of Stucco Base to level with the existing stucco. If it’s greater than 1/2 inch thick, apply a scratch coat followed by a brown coat once the scratch coat is firm enough to hold the brown coat. Do not exceed 7/8 inch total stucco base thickness.
Here’s what I keep on the bucket:
- QUIKRETE FastSet Stucco Patch (Product No. 1139-76) for small repairs; mixes with 3.5 pints of water per 20 lb pail and sets in 30 to 60 minutes.
- SikaWall Stucco Base for deeper fills; single pass up to 1/2 inch, double back method beyond that.
- Parex 121 or Parex 121 Dry Base Coat for skimming the existing finish before the new coat.
- Thoro Acryl 60 or Sonneborn StuccoBond as the bonding agent in the slurry coat.
- SikaWall SRT Mesh or Parex 355 Standard Reinforcing Mesh to bridge the patch to the existing lath.
- A stiff brush, a sponge, and a margin trowel.
Mixing QUIKRETE FastSet Stucco Patch
Mixing the patch is like seasoning a soup. You add the water a little at a time and check the consistency; dumping the whole 3.5 pints in at once makes a mess you can’t fix.
The data sheet is specific: place the water in the container, then slowly add the patch and mix for 2 to 3 minutes. Mix only as much material as you can apply in 15 to 25 minutes. Excessive water delays setting, reduces strength, and delays the ability to paint.
Common mistake: Adding portland cement, lime, sand, or an admixture to QUIKRETE FastSet Stucco Patch. The data sheet says not to add any of these, and the extra material throws off the set time and the color.
Before any of this, the wall needs to be clean and sound. Exterior wall prep is where most of the long-term adhesion comes from.
How to Repair Stucco Before Painting: The 7-Step Sequence
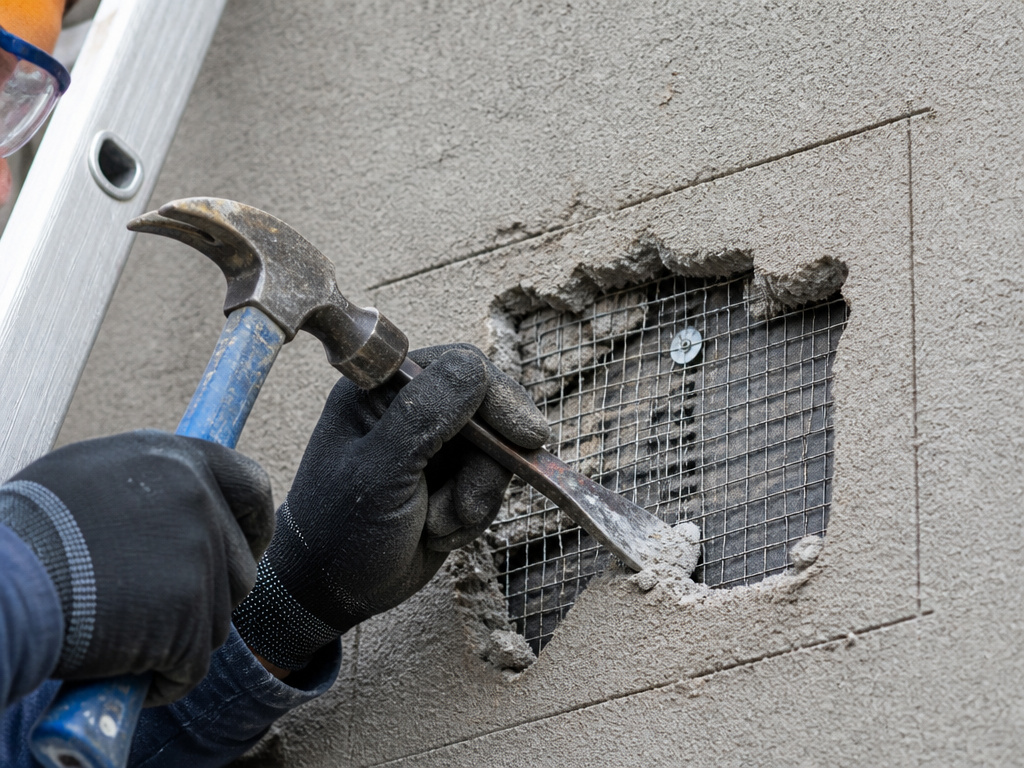
The cut is where a patch either holds or fails. Go too shallow and the patch sits on top of loose stucco; go too deep and you’ve punctured the moisture barrier.
Before you start: QUIKRETE FastSet Stucco Patch causes severe skin burns and serious eye damage, and prolonged inhalation of dust may cause lung damage or cancer. Wear nitrile gloves, a mask, and eye protection, and read the Safety Data Sheet before you open the pail. Cutting tools and ladders add their own risks; keep the work area clear and stabilize the ladder before you climb.
- Cut through the stucco around the damaged area. Cut deep enough to clear the metal mesh but not into the moisture barrier or sheathing. Skip this and the patch sits on unstable material.
- Score 2 inches past the cut and chip out the stucco from the mesh. The extra 2 inches gives the new mesh something to overlap. Skip it and the patch edge lifts.
- Install new moisture barrier and flashing as needed. Overlap the barrier at least 2 inches where possible and tape the seams with acrylic, asphalt, or rubber flashing tape. Skip it and water finds the seam.
- Install new mesh so it overlaps the old mesh by 1 to 2 inches. Tie the layers together with .0475-inch galvanized annealed steel wire every 6 inches. Skip the tie and the mesh shifts under the patch.
- Dampen the edges of the existing stucco so they’re wet but not glistening. Then apply a slurry coat of 1 part cement, 1 part sand, and a liquid bonding agent mixed to pancake batter consistency. Skip the slurry and the new patch won’t bond to the old edge.
- Within 1/2 hour, apply the new stucco per ASTM C926 with the bonding agent substituted for 1/3 of the water. ASTM C926 is the standard specification for application of portland cement-based plaster. For One-Coat stucco, use the original product as specified with no bonding agent unless the manufacturer allows it. Skip the timing and the slurry dries out before the patch goes on.
- Moist cure the patch. The industry spec calls for roughly 75% humidity for at least 48 hours; Sika/Parex says 6 days before finish. Skip the cure and the patch cracks.
The Slurry Coat and the 1/2-Hour Window
The slurry coat is the bridge between old stucco and new. It’s a mix of 1 part cement, 1 part sand, and a liquid bonding agent, and the spec recommends Thoro Acryl 60 or Sonneborn StuccoBond.
The 1/2-hour window is real. Once the slurry goes on, the new stucco has to follow within 30 minutes, or the bond weakens. I’ve seen a patch fail because the phone rang and the slurry sat too long.
The Standard Stucco Repair Specification says the wall has to be clean and dry before any of this starts, while QUIKRETE says to dampen the surface thoroughly prior to application. Clean exterior walls with a stiff brush and let them dry fully, because a damp surface changes how the slurry bonds.
Matching Texture and Color So the Repair Disappears
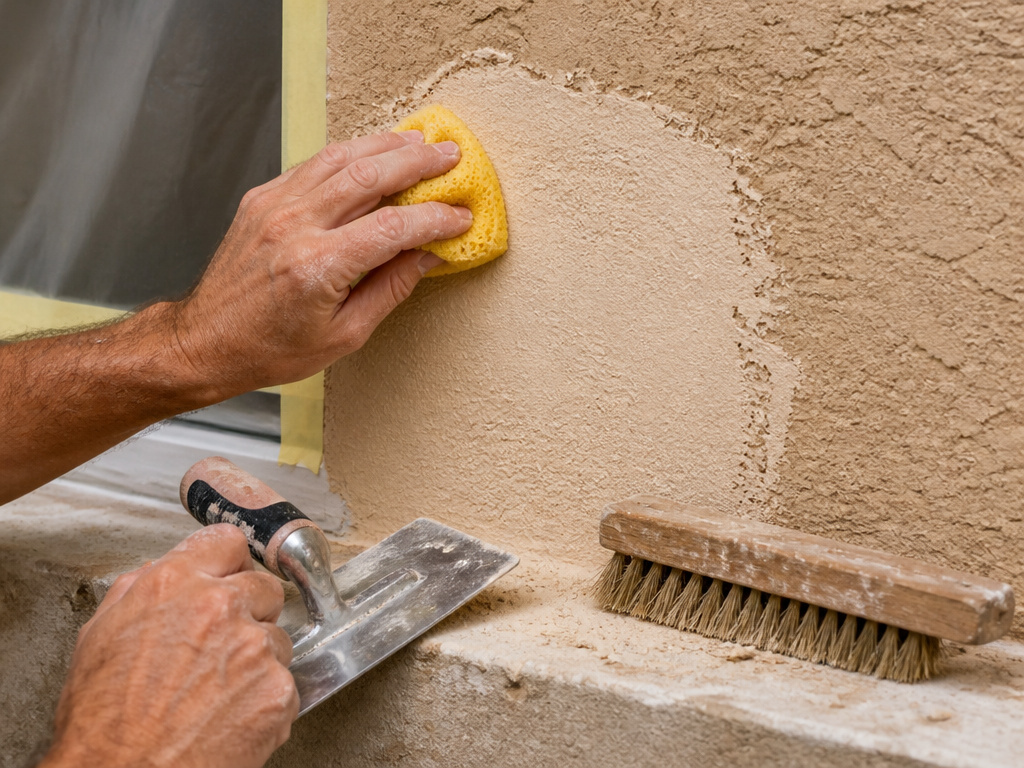
The first time I tried to match a patch texture, I used a crumpled paper bag. It looked like a bad sponge painting, and I spent the next hour trying to sand it back.
The sponge won. A damp sponge dabbed into the fresh finish gives you a texture that reads as stucco from the sidewalk. A stiff brush works for the edges where the patch meets the old wall. The paper bag trick sounds clever, but it leaves a pattern that looks nothing like the surrounding finish.
I keep a sponge and a stiff brush within arm’s reach every time I patch. The sponge gives you a texture that reads as stucco; the brush is for the edges where the patch meets the old wall. The paper bag trick sounds clever, but it leaves a pattern that looks nothing like the surrounding finish.
Sika/Parex has a separate step for a seamless repair: skim the existing finish with SikaWall Stucco Surface Leveler, Parex 121, or Parex 121 Dry Base Coat to fill the texture and provide a flat surface for the new finish. Apply the pre-selected Parex Finish with a stainless-steel trowel to the thickness of the largest aggregate in the finish, then scrape to uniform thickness and float.
Remove masking tape before the finish is dry, and touch up edges with a small paint brush. For aesthetic reasons, resurfacing should be terminated at a control joint, change in plane, or change in elevation.
The texture match doesn’t have to be perfect. It has to be close enough that the eye reads it as stucco from the sidewalk. The sponge wins.
Once the texture matches, the masonry paint you choose matters: QUIKRETE says a painted repair should not be moist cured, while the Standard Spec and Sika/Parex call for moist curing before finish. The masonry walls themselves need to be dry before any coating goes on.
When to Call a Pro Instead of Patching It Yourself
Sometimes the right move is to put down the trowel and call someone. Call it.
The patch is bigger than 8 square feet. QUIKRETE caps a single patch at 8 ft², and going bigger risks a weak bond and a visible seam.
The crack keeps coming back. Recurring cracks usually mean water is getting in somewhere, and the patch is treating the symptom. Sto Corp. Says to isolate the source of water intrusion and repair it before repairing blisters, or the blister comes back.
The stucco is blistered or bubbling. Sto says to remove the blistered finish with a scraper or other hand tool to adjacent well-adhered finish, but only after the water source is fixed.
The damage is near a corner bead. Sika/Parex calls for removing stucco a minimum of 6 inches above and below the damaged bead and 4 inches laterally from the corner in each direction. That’s more than most DIY patches cover.
Skip this if: The crack runs in a straight line. That’s a stress crack, and it usually means a control joint should have been there. Patching over it without addressing the joint is a temporary fix.
When the Crack Keeps Coming Back
A crack that returns after a patch is telling you something. The crack is moving, and the patch is stronger than the wall around it. Chase the movement, not the crack.
Sika/Parex recommends a thorough pre-construction evaluation, including test cuts at selected locations, to fully evaluate the cause and extent of visible distress. That’s a fancy way of saying: figure out why the wall is cracking before you fill the crack.
If the paint is cracked but the stucco underneath is sound, the fix is different. Repair cracked paint on exterior walls covers the coating side.
How Do You Treat Hairline Cracks vs Wider Ones?
The first hairline crack I patched came back within a single winter. I’d skipped the caulk and painted straight over the crack, and the paint split along the same line.
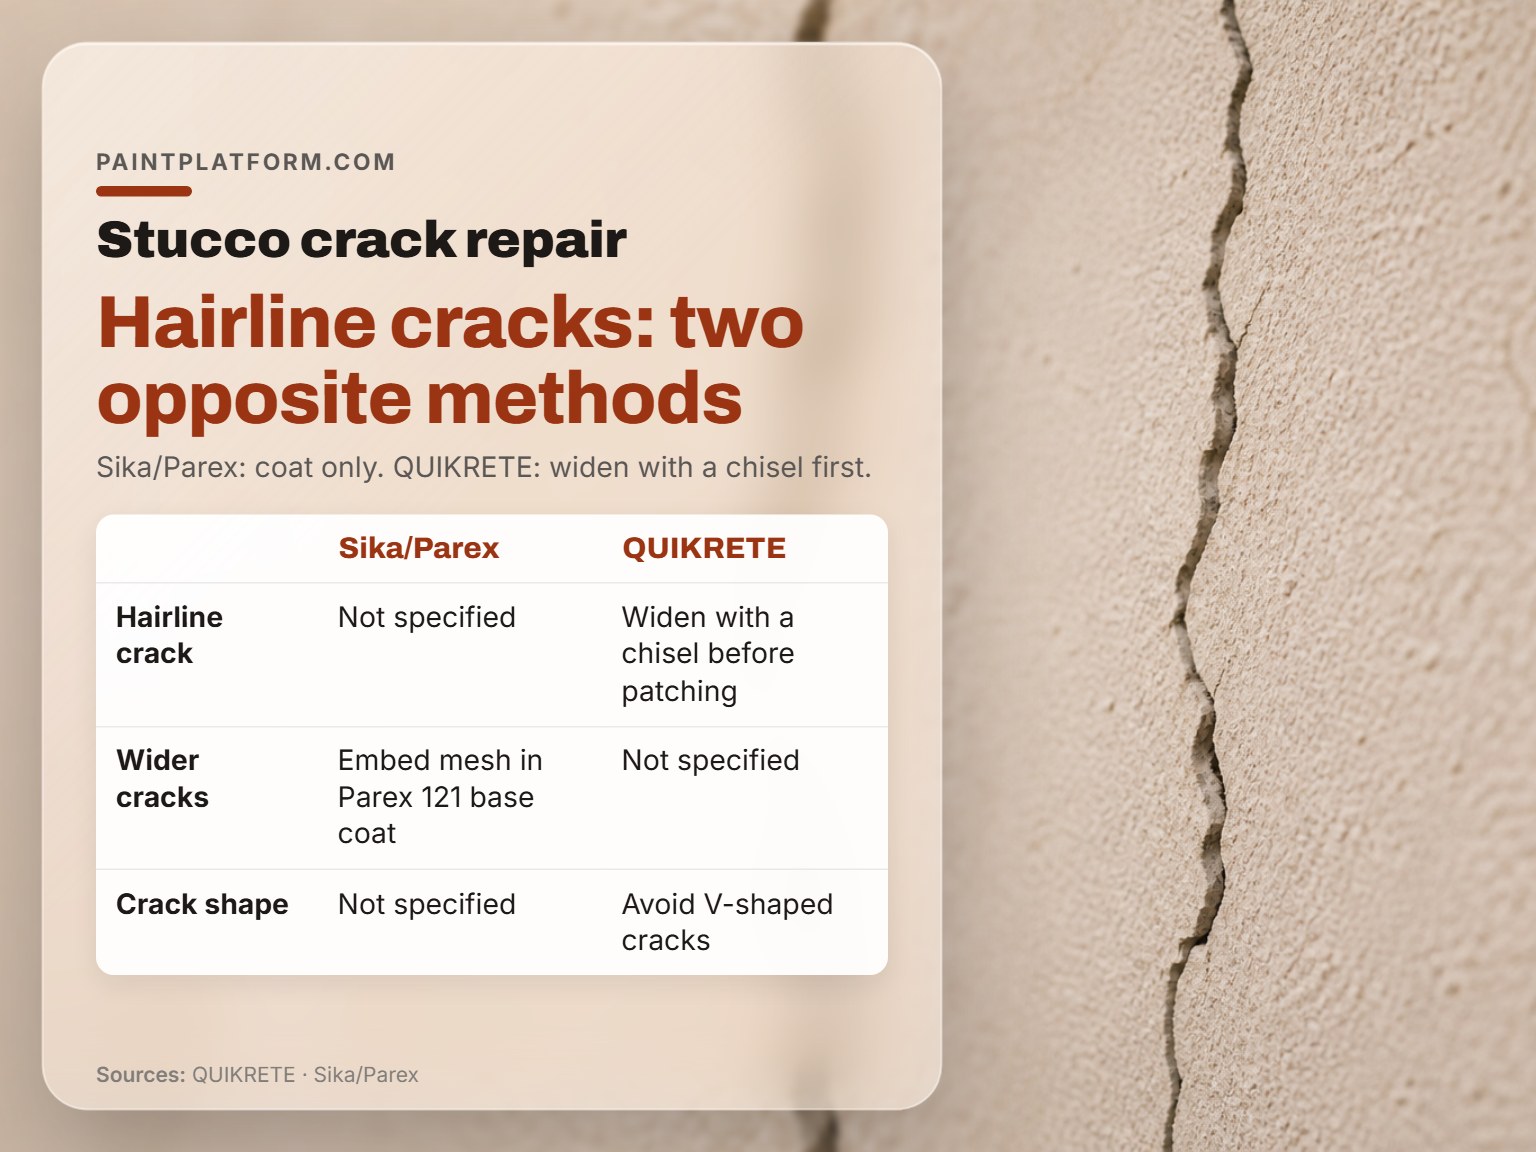
Sika/Parex treats hairline cracks up to 1/32 inch with elastomeric coating only, no routing. No routing. For wider cracks, embed SikaWall SRT Mesh or Parex 355 mesh in Parex 121 or Parex 121 Dry base coat.
QUIKRETE takes the opposite approach for the same hairline crack. The data sheet says hairline cracks should be widened with a chisel prior to application, and to avoid V-shaped cracks.
| Crack Width | Method | Source |
|---|---|---|
| Up to 1/32 inch | Two coats of elastomeric coating, no routing | Sika/Parex |
| Wider cracks | Embed SikaWall SRT Mesh or Parex 355 mesh in Parex 121 base coat | Sika/Parex |
| Hairline (any width) | Widen with a chisel before patching | QUIKRETE |
The two positions don’t reconcile. Sika says the elastomeric coating flexes with the crack. QUIKRETE says the chisel gives the patch something to grab. Which one you follow depends on whether the crack is moving or stable.
A hairline crack that comes back after a patch is telling you something. The crack is moving, and the patch is stronger than the wall around it. Chase the movement, not the crack.
If the crack is in the paint film rather than the stucco, you’re dealing with cracks in walls that need a coating fix, not a patch. The TSIB stucco patching methods bulletin is the companion reference for crack treatment.
Frequently Asked Questions
Can I paint over a stucco patch the same day?
QUIKRETE says the patch can be painted after 2 hours with a water-based latex paint. Sika/Parex and the industry spec take a longer view, calling for a moist cure of 6 days and at least 48 hours respectively before finish. For a small cosmetic patch, the 2-hour window is fine; for a deeper patch, follow the longer cure.
What’s the minimum temperature for stucco repair?
Both the Standard Stucco Repair Specification and QUIKRETE put the floor at 40°F. The spec adds that the 40°F floor applies if temperatures are expected within 24 hours after the repair. Below
