
Glazing Technique in Painting: Build Depth in Layers
This post contains affiliate links. As an Amazon Associate, we earn from qualifying purchases.
Glazing technique in painting means brushing a thin, translucent layer of color over a dry base coat so the layer underneath still shows through. Each glaze adds depth without hiding what’s below. The layer has to be thin, the base has to be dry, and the color has to be transparent enough to see through.
That transparency comes from pigment load. A glaze carries very little pigment suspended in a lot of binder, so light passes through the film, hits the base coat, and bounces back to your eye carrying both colors at once. Add too much pigment and the light stops traveling. The layer turns into paint.
What follows is the part that actually decides whether a glaze works: working time, recoat windows, cure time, colorant limits, and temperature floors. Five brands publish five different answers to the same questions, and knowing which number belongs to which can is worth more than any blending tutorial.
Key Takeaways
- Thin layer over a dry base. A glaze only reads as depth when the coat under it is fully dry and the new layer is thin enough to see through.
- Working time typically runs 15 to 45 minutes on Golden Paintworks Glazing Medium 000D204, depending on product mixture, technique and substrate.
- Recoat windows disagree across brands. BEHR says 4 hours, Golden Paintworks says a minimum of 4 hours, and General Finishes says 3+ hours at 70°F and 50-70% humidity. Follow the can in your hand.
- Cap your colorant. General Finishes warns against more than 50% paint in a glaze, because past that there’s too much pigment to wipe back; Golden and Benjamin Moore publish different limits.
- Below 50°F, stop. Golden specifies application between 50°F and 90°F, while Benjamin Moore says not below 50°F (10°C).
What Glazing Technique in Painting Actually Does
A glaze is a thin, translucent layer brushed over a dry base coat, and its whole job is to let light pass through to the color underneath.
Glaze differs from paint in pigment load. A glaze suspends a small amount of pigment in a large volume of binder, so the dried film stays translucent. Paint carries enough pigment to hide the surface entirely. Both contain the same two ingredients. The ratio decides whether light reaches the base coat.
The old Circular 69 report on paint and varnish from the National Bureau of Standards treats that pigment-to-vehicle proportion as the thing separating an opaque coating from a clear one. Same chemistry, different ratio, completely different result on the surface.
This is why glazing for realism works at all. The layers stack optically instead of physically. You’re not mixing a color on the panel. You’re letting two colors sit on top of each other and do the mixing in your eye.
If you work in acrylic, the same logic drives layering acrylic paint: thin, dry, repeat. Thick and wet gives you mud.
Here’s the messy truth. My first real attempt at glazing ended with a palette holding one muddy brown puddle by the third swatch, because I kept mixing in the same spot. Now I rinse between colors and keep a clean corner for fresh mixes. A glaze that starts muddy stays muddy.
Why Does a Glaze Turn Cloudy Instead of Clear?
Why does a glaze that looked clear on the test board turn milky on the wall?
Trapped moisture. General Finishes is blunt about it: rushing dry time can cause clouding or blush in the topcoat because moisture gets sealed between coats. The haze forms under the finish, which means it shows up after everything looks done.
Where this goes sideways: Recoating before the layer is genuinely dry. General Finishes warns that moisture trapped between coats clouds the topcoat, and the haze surfaces once the finish already reads as finished.
The tell is visual. A clear glaze has a faint sheen and you can still see the base color through it. A blushing one looks like breath on a cold window. Once you’ve seen the difference on a scrap board, you won’t miss it on a wall.
General Finishes also gives you a physical test. A water-based finish is dry when light sanding with a fine-grade foam pad in the 220-320 grit range produces a powder. No powder means wait longer. That’s a better test than the back of your hand.
Humidity over 80% stretches dry time further, and so does a thick coat, a sealed existing finish, or a product from another brand. Water-based glazes respond to blending acrylic paint technique the same way: keep the edge moving or leave it completely alone. Half-blended is the worst of both.
Four Numbers That Decide Whether Your Glaze Behaves
Four numbers decide whether your glaze behaves: working time, recoat window, cure time, and temperature floor.
| Glaze product | Recoat window | Full cure |
|---|---|---|
| Golden Paintworks Glazing Medium 000D204 | 4 hr minimum between coats | Up to 4 weeks |
| BEHR Faux Glaze No.748 | 4 hr | 30 days |
| General Finishes Glaze Effects | 3+ hr at 70°F, 50-70% humidity | Not published in the sheet |
Three brands, and not quite the same recoat number for the same operation. That’s not a typo on anyone’s part. It’s formulation.
Working Time Is a Range, Not a Promise
Golden Paintworks publishes a working window of typically 15 to 45 minutes on Glazing Medium 000D204, and that range depends on your mixture, your technique, and your substrate.
The Golden Paintworks Glazing Medium technical data sheet also notes that sealing the surface with a satin or semi-gloss base gives you maximum working time, while flat house paint cuts it short. That one line changes how you should prep.
Cure Time Is Not Dry Time
BEHR puts full cure on Faux Glaze No.748 at 30 days. Golden puts a full water-resistant cure at up to four weeks. Touch-dry is a different number entirely, and it depends on conditions. BEHR’s touch-dry figure is 1 hour at 75°F and 50% relative humidity.
If you’re building your own medium instead of buying one, acrylic glazing medium is the piece that buys you open time. More medium, longer window. Less medium, faster set.
How Much Colorant Can You Actually Add?
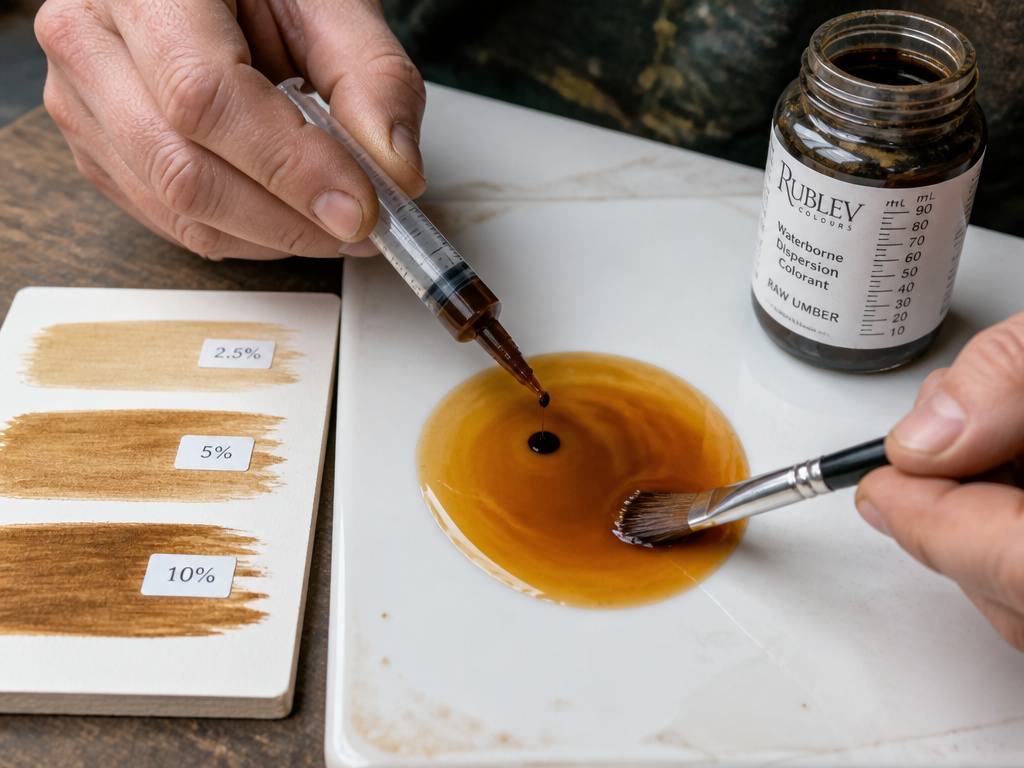
How much colorant can you actually add before the glaze stops being a glaze?
| Product | Colorant limit | Starting point |
|---|---|---|
| Golden Paintworks 000D204 | Up to 5:1 glaze to dispersion | 3% colorant addition |
| Benjamin Moore Alkyd Glaze 409 | 4.0 fl oz per gallon | Tint as received first |
| General Finishes Glaze Effects | No more than 50% paint | Mix and test proportions |
Start at 3% colorant and test on a scrap. Golden Paintworks publishes that number for a reason. Adding pigment is easy. Taking it back out is not.
Notice how far apart these limits sit. Golden allows a 5:1 ratio with waterborne dispersion colorants. Benjamin Moore caps Color Preview colorants at 4.0 fluid ounces per gallon. General Finishes draws the line at 50% paint by volume, and warns that past that point there’s so much pigment it’s difficult to wipe the finish back.
Golden also flags one thing worth knowing: universal colorants aren’t recommended because of the high glycol level. Use waterborne dispersion colorants instead.
Lapping Is What Ruins Glaze Jobs
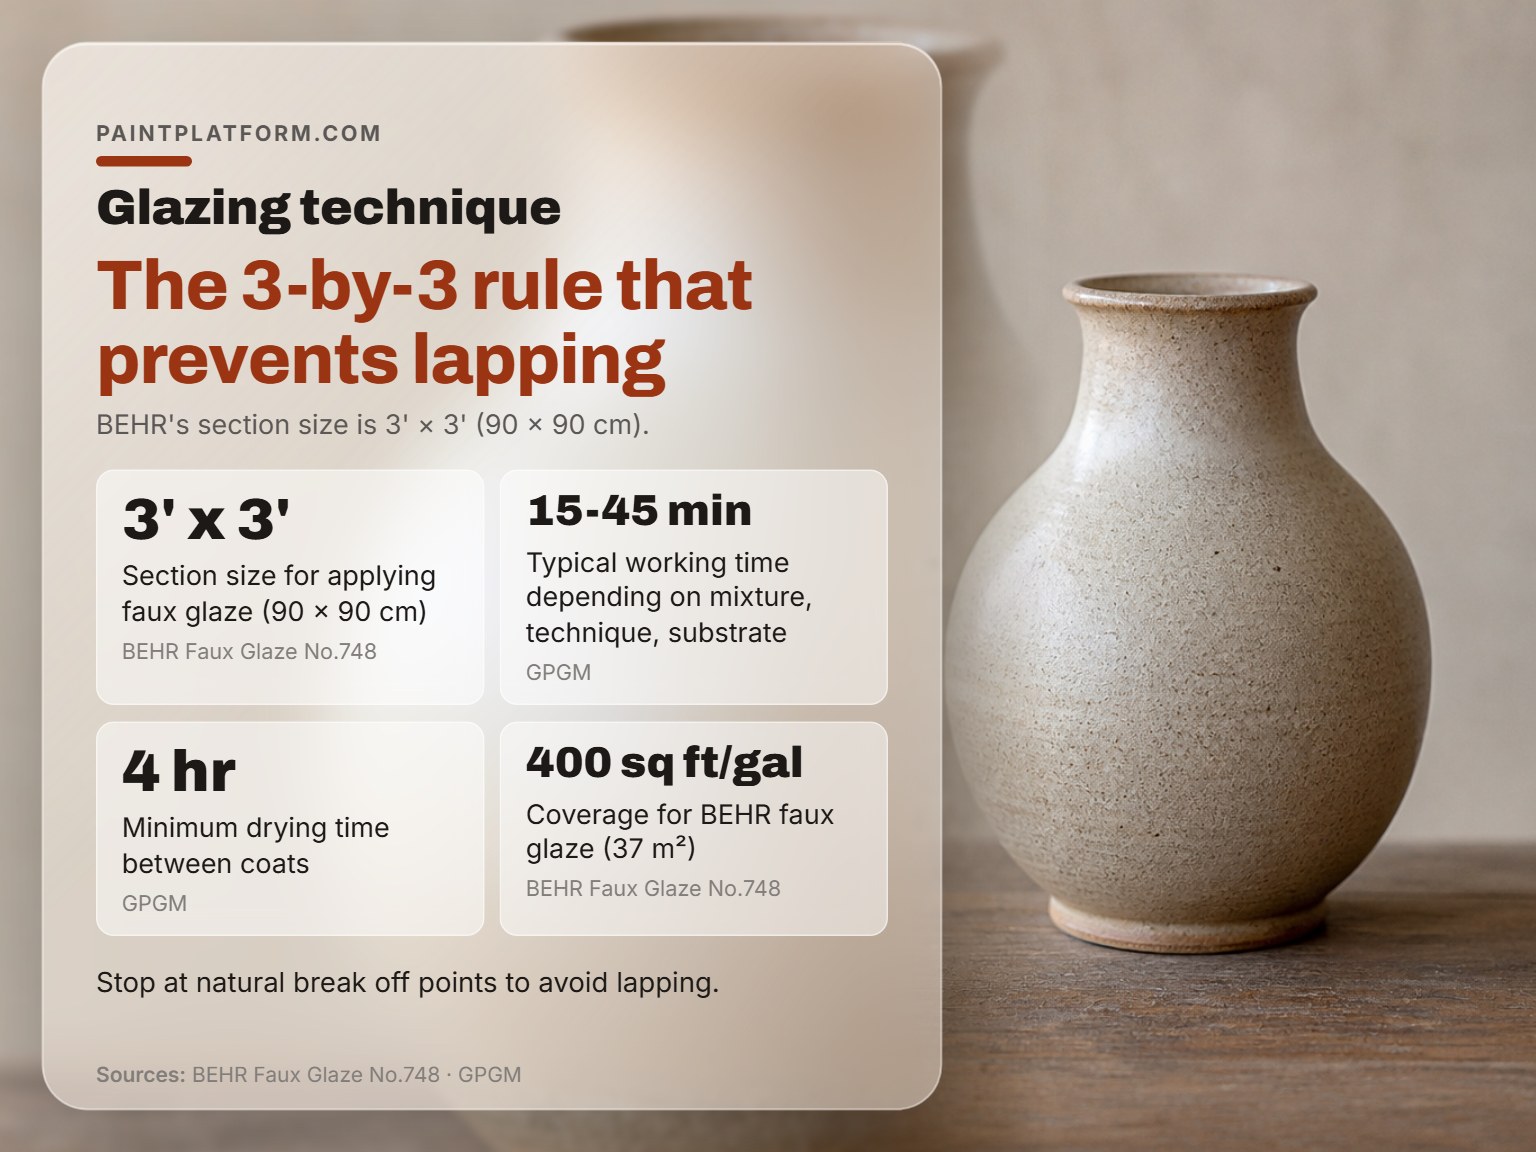
Lapping is the mistake that ruins more glaze jobs than bad color.
Before you start: Scraping or sanding old paint can release lead dust, so wear a NIOSH-approved respirator and clean up with a HEPA vacuum and a wet mop. Oil-based glazes carry real solvent load (Jotun Lady Design Glaze is rated 475 g/l VOC), so ventilate. If you spray, General Finishes calls for NIOSH-approved respiratory and eye protection.
Here’s the sequence that avoids it.
- Clean and dull the surface first. Benjamin Moore says hard, glossy areas need fine-grit sandpaper before anything will stick. Skip it and the glaze beads instead of grabbing.
- Seal the base coat. Golden Paintworks wants at least two coats of a high quality acrylic architectural coating, ideally satin or semi-gloss.
- Mark your sections before you mix. BEHR works in 3′ x 3′ (90 x 90 cm) blocks. Decide the breaks while your hands are clean.
- Shake or stir, depending on the brand. Golden says shake vigorously or you get lumps and uneven consistency, while General Finishes says stir to lift settled solids. Follow the can, not the habit.
- Apply thin, then stop touching it. Golden warns that overworking causes the glaze to cloud or foam. Both are permanent.
- Stop at a natural break. Benjamin Moore’s instruction is to stop at natural break off points to avoid lapping.
- Wait the full recoat window. Rushing traps moisture and you get the blush from the last section.
The 3-by-3 Rule
BEHR’s section size is 3′ x 3′ (90 x 90 cm), and it’s smaller than most people guess. That’s the point. A section you can finish inside the working window beats a section you have to chase.
Stopping at a Natural Break
A corner, a trim line, a change in plane. Anywhere the eye already expects a seam. Benjamin Moore builds this into its specialty finish instructions for a reason.
I’d rather see a glaze stop at a corner than watch someone run a wet edge across a whole wall. Two slightly different panels read as intentional. One smeared seam reads as a mistake.
Try it on a scrap first. A practice board will teach you more about your working window than an hour of reading.
Where Glazing Goes Wrong: Temperature, Humidity, and Base Coats
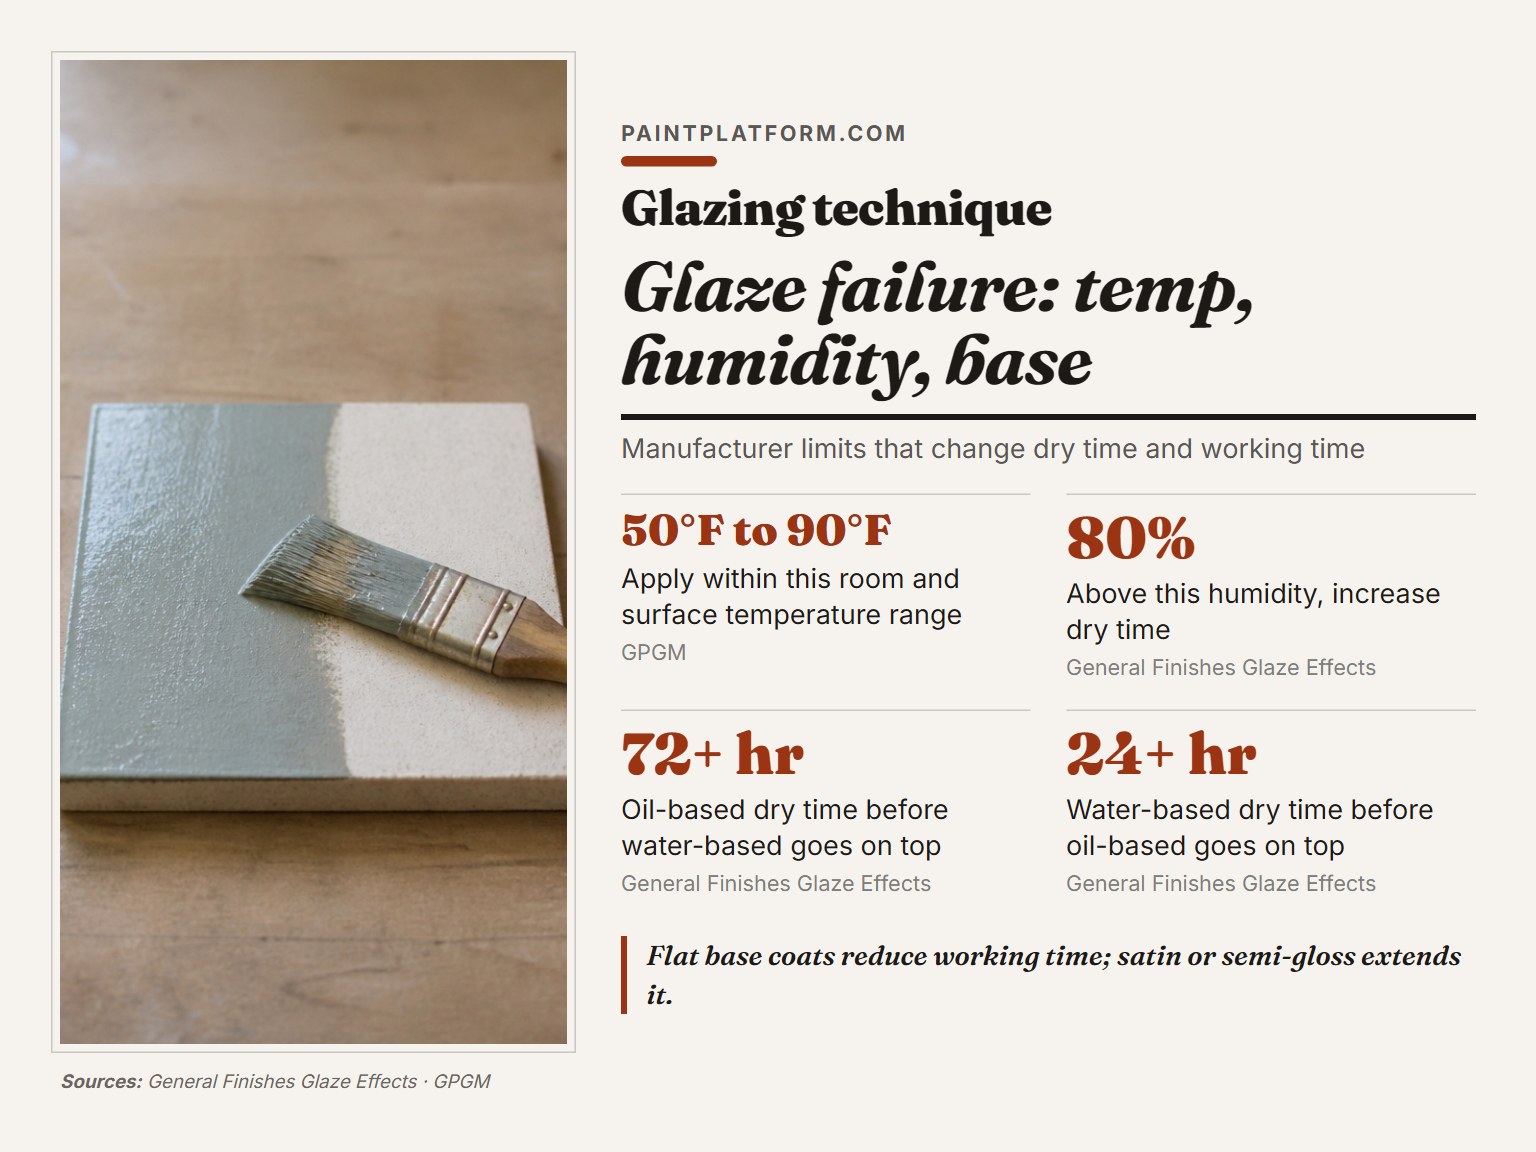
It’s warm in the room and the glaze is still tacky well past the point it should be. That’s not a bad batch. That’s humidity, and it changes every number on the can.
- Below 50°F, don’t start. Golden specifies application between 50°F and 90°F. Benjamin Moore says not below 50°F (10°C).
- Above 80% humidity, add time. General Finishes says increase dry time, and the penalty for ignoring it is blush.
- Flat base coats steal your window. Golden states plainly that flat house paint reduces working time. Satin or semi-gloss extends it.
- Oil and water don’t layer casually. General Finishes says let oil-based products dry 72+ hours before water-based goes on top, and 24+ hours the other direction.
- Alkyd glazes yellow. Benjamin Moore notes all alkyd enamels yellow somewhat, faster in dark or poorly ventilated rooms, and points to its latex glaze if that’s a problem.
The glaze drags and foams under the brush when you push it too far. Foam is not normal.
Surface prep matters more than most people think, and less than some people claim. The USDA Forest Service’s Forest Products Laboratory spent years chasing “mill glaze,” the idea that planing burns a slick layer into wood that kills adhesion. The mill glaze myth or reality study couldn’t reproduce it. In every failure they investigated, the real culprits were raised grain, UV damage before painting, thin coating, bad prep, or moisture.
If you’re layering over an oil-based glaze, the rules for thinning oil paint apply instead of the water-based ones. And when the piece is finally done, varnishing oil paintings is a separate skill with its own dry-time traps.
The part nobody mentions: Benjamin Moore’s alkyd glaze isn’t compatible with water-based paint or enamels. Golden’s medium wants an acrylic base. Check what’s already on the surface before you buy anything.
Glazing vs Scumbling: Which One Adds What
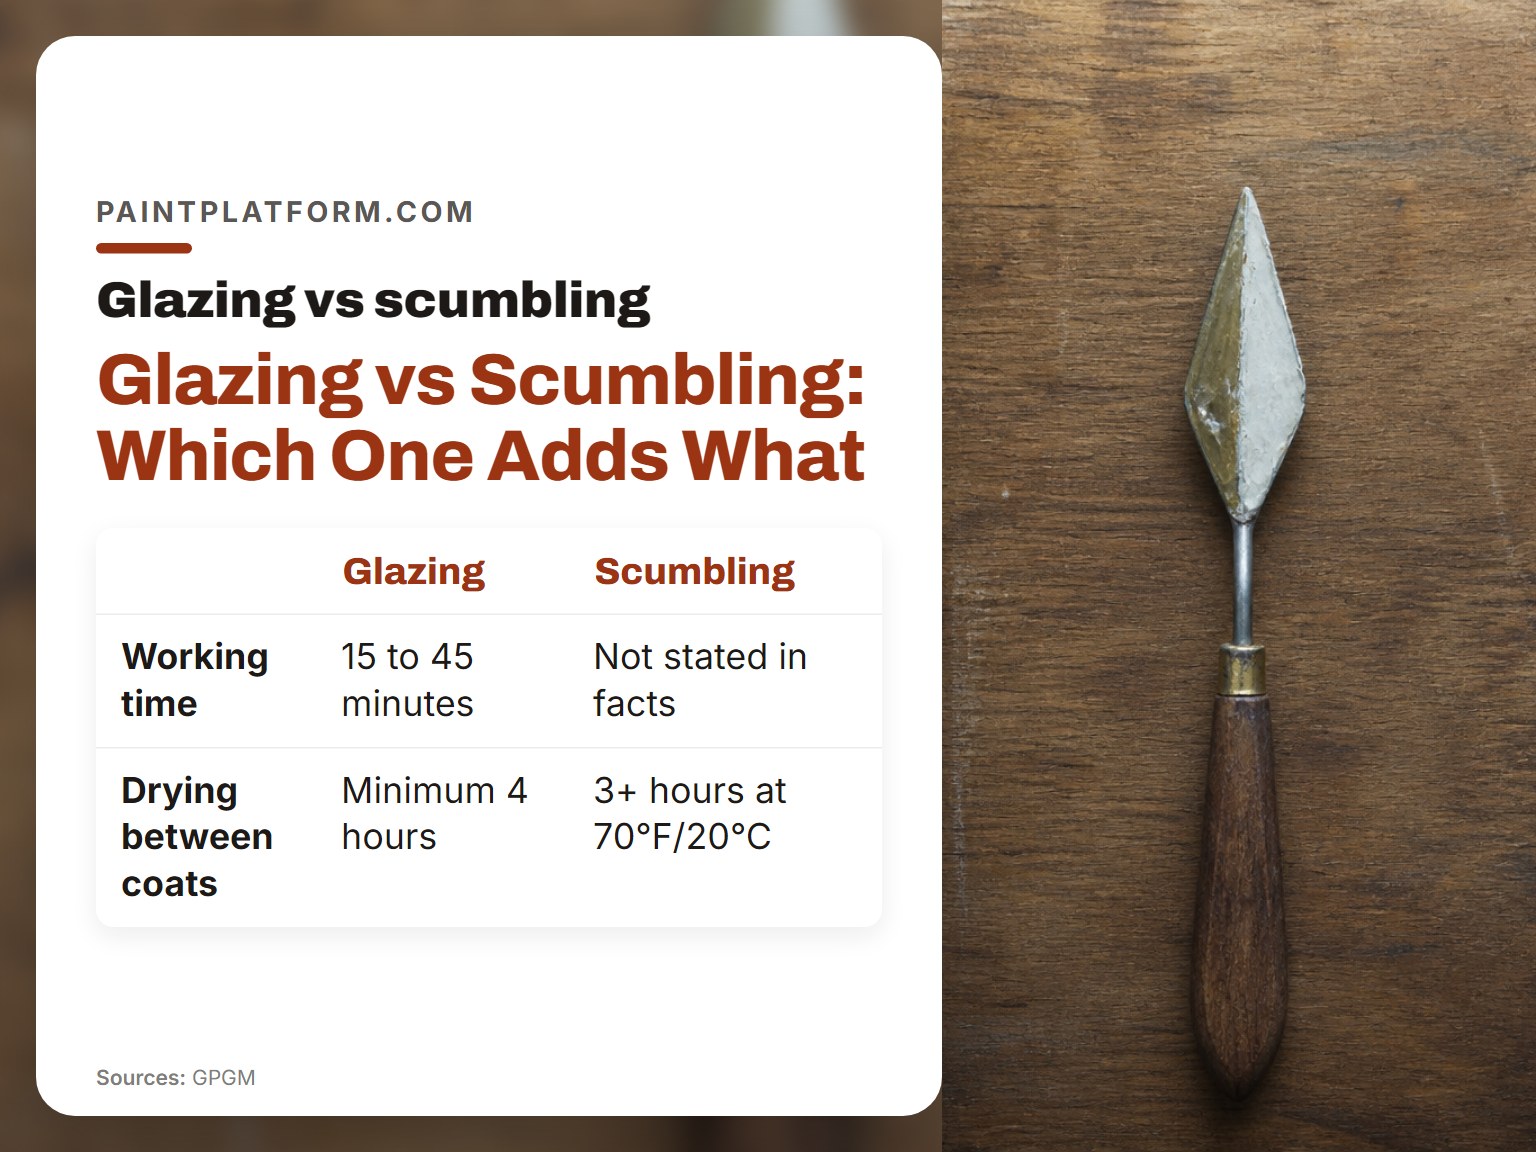
Golden Paintworks publishes a typical 15-to-45-minute working window on Glazing Medium 000D204, and that range tells you exactly what glazing is for: blending time you can control.
Scumbling is the opposite tool. You drag a small amount of opaque or semi-opaque color lightly over a dry surface so the texture underneath catches it. Glaze sinks into the film. Scumble sits on top of it.
When Glazing Wins
Glazing wins when you want depth without texture. Skin tones, sky gradients, shadow that needs to stay transparent. It also wins over an underpainting that already has the values right, because the glaze just pushes them warmer or cooler.
When Scumbling Wins
Scumbling wins when you want broken color and visible surface. Weathered wood, stone, dry brush texture on a wall. If you’re reaching for a rag to lift color back off, you probably wanted scumble.
The honest answer for most beginners: glaze first, scumble later. Glazing forgives a slow hand. Scumbling punishes one.
Frequently Asked Questions
How long should I wait between glaze coats?
Follow the can you’re holding. BEHR says 4 hours on Faux Glaze No.748. Golden Paintworks says a minimum of 4 hours on Glazing Medium 000D204. General Finishes says 3+ hours at 70°F and 50-70% humidity. When in doubt, wait longer than the shortest number.
Can I glaze over a flat base coat?
You can, but your working window shrinks. Golden Paintworks states that flat house paint reduces working time, while a satin or semi-gloss base allows for maximum working time. If you already painted flat, plan smaller sections.
Why did my glaze dry cloudy?
Moisture trapped between coats. General Finishes warns that rushing dry time causes clouding or blush in the topcoat. High humidity, thick coats, and recoating early all make it worse. Sanding won’t fix it once it’s under the topcoat.
Do I shake or stir a glazing medium?
Depends on the product. Golden Paintworks says shake vigorously before opening, and that failing to do so leaves lumps and uneven consistency. General Finishes says stir to reincorporate settled solids before and during application. Read your own label.
Can I mix oil-based and water-based glazes?
Not directly. Benjamin Moore states that water-based paint and enamels aren’t compatible with its alkyd glaze. General Finishes allows layering but requires 72+ hours of oil dry time before water goes on top, and 24+ hours the other way.
Before You Go
One threshold worth taping to your easel: if your room is under 50°F, don’t start a glaze; if humidity is over 80%, increase dry time. Golden specifies application between 50°F and 90°F, Benjamin Moore says not below 50°F, and General Finishes specifically calls out humidity over 80% as a dry-time stretcher.
Here’s my concession, though. None of these numbers matter if your base coat is still soft. Test the base with a fingernail in an inconspicuous spot before you mix anything.
And if you take one thing from all of this, take the small one. Glazing technique in painting rewards a thin layer over a dry base. Start with a scrap board and one color. Small steps still count.
