
How to Fix Spray Paint Drips: Step-by-Step
This post contains affiliate links. As an Amazon Associate, we earn from qualifying purchases.
To fix spray paint drips, turn down the air flow and the material flow, hold the gun 6-8 inches from the surface, and move faster without flexing your wrist. Wagner’s FLEXiO 2500 troubleshooting guide maps runs and sags to too much air and too much material, plus a gun held too close or moved too slowly.
That 6-8 inch figure is the one that gets ignored first. It feels farther than it looks on a door panel, and the drips I’ve chased started with the gun creeping closer as my arm got tired.
What follows is the order I use now: read the finish first, fix what’s already on the panel, then set the gun so the next pass doesn’t do it again.
Key Takeaways
- Turn down both air and material flow when runs and sags appear; Wagner’s FLEXiO 2500 guide names that pair first.
- Hold the gun 6-8 inches away and perpendicular to the surface, and move faster without flexing your wrist.
- Overlap each pass by at least 50% on large surfaces so each coat can stay light.
- Clean the nozzle before you touch the settings. Dried material at the tip causes a faulty spray on a Binks Model 115.
- Never pull the trigger with the turbine off on a Wagner Control Spray 250; paint drips from the nozzle.
How to Fix Spray Paint Drips: Three Variables Behind Every Run
Every run on a sprayed panel traces back to one of three things: air flow, material flow, or the distance and speed of the gun.
A run forms when the coating arrives faster than the surface can hold it. Too much air and too much material push wet paint past the film’s ability to stay put, and a gun held too close or moved too slowly gives the paint time to pool before it flashes off.
Wagner’s own FLEXiO 2500 troubleshooting matrix lists the same three suspects. Runs and sags come from too much air and too much material, a gun held too close, or a hand moving too slowly. The fix is the mirror image: turn down both flows, step back to 6-8 inches, and speed up while staying steady.
Five things cause a run: too much air, too much material, a gun held too close, a hand moving too slowly, and dried material at the nozzle. The first four are settings. The fifth is maintenance.
A run announces itself in stages. The pass looks glossy and even at first, then a wet line thickens at the bottom edge and starts to slide. By the time it reaches the tape, the paint has pooled.
I’ve watched that slide happen on a cabinet door more times than I want to admit. It always starts in the same place: the last inch of the pass, where my wrist dipped. Same place every time.
If you want the preventive version in one place, the guide to avoid runs when spray painting walks through the same three variables on a full panel.
What Do Runs, Sags, and Clumpy Finish Actually Tell You?
The finish is talking. The question is whether you’re reading it correctly.
Rule of thumb: Match the fix to the symptom, not to your mood. Turning up the material flow because the coat looks thin is how a thin coat becomes a run two passes later.
| What you see | What it means | What to change |
|---|---|---|
| Runs and sags | Too much air and material | Turn both flows down |
| Clumpy, textured finish | Too little air, too much material | Raise air, lower material |
| Thin, see-through coverage | Too little air and material | Raise both flows |
| Drips at the nozzle | Trigger pulled with turbine off | Start the turbine first |
Reading the finish is the first step in how to fix spray paint drips. Wagner’s FLEXiO 2500 support page maps each pattern to a specific setting pair. Clumpy finish means too little air and too much material, so the air goes up and the material comes down. Poor coverage is the reverse: too little of both, so both go up.
If the settings don’t fix a latex pattern, Wagner suggests adding Paint Easy to condition the paint before you blame the gun.
The same read applies to vertical surfaces, where gravity helps the run along. The walkthrough for fix paint drips on walls covers the wall-specific version.
How Do You Fix a Run You’ve Already Sprayed?
Before you start: Solvent vapors from spraying and cleanup can ignite, so keep the area ventilated and away from pilot lights. Wear a respirator, eye protection, gloves, and protective clothing; Titan’s GPX33 manual lists all of these. Unplug the unit before you touch the tip or the hose.
The panel is already hanging, the run is already there, and it’s still wet. It’s still wet. What you do in the next two minutes decides whether you sand it or respray the whole face.
- Stop spraying and let the run set up slightly. Wiping wet paint smears the surrounding coat and leaves a flat spot you’ll see under raking light.
- Wipe the run with a lint-free cloth over your fingertip, in one direction. Dragging back and forth pulls paint off the edges and leaves a ridge.
- Let it dry fully before sanding. Sanding a soft film clogs the paper in seconds and gouges the layer underneath.
- Sand the ridge with fine paper and feather the edges into the intact coat. Stopping at the ridge leaves a visible halo under the next coat.
- Recoat in thin passes rather than one wet pass. A heavy recoat re-wets the run and pulls it open again.
Sanding a Cured Run Without Wrecking the Coat
Wait until the film stops smelling like solvent before you touch it with paper. A run that still smells wet is still shrinking, and sanding it just moves the problem around.
Recoating Too Soon Is How You Get a Second Drip
The recoat window matters more than the grit. Solvent in the new coat re-wets the old one, and a wet film under a fresh pass sags exactly where the first run was.
The transition between the sanded spot and the intact coat is where most repairs show. Blend spray paint edges with a light pass that starts off the panel and crosses the repair.
If the run has fully cured and sanding won’t level it, the last resort is stripping. The guide to remove spray paint covers the solvents and the scrape.
The Settings and Distance That Stop Drips Before They Start
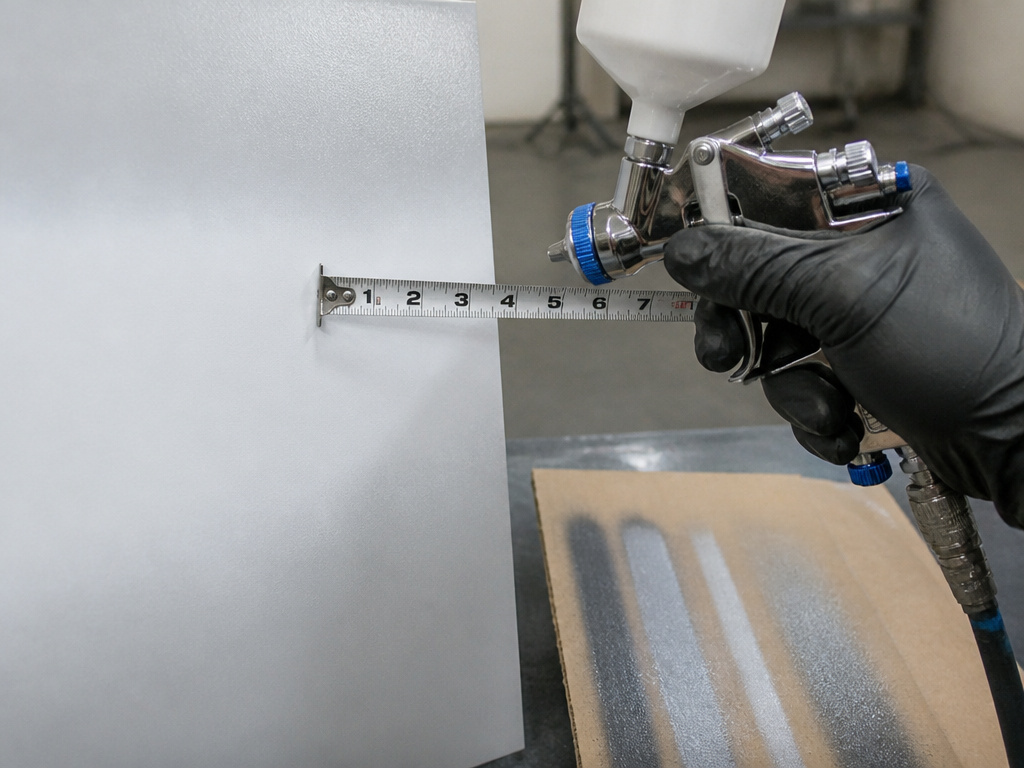
Wagner specifies 6-8 inches for the FLEXiO 2500, measured perpendicular to the surface, not at an angle.
- Air flow: down for runs, up for clumpy finish or poor coverage.
- Material flow: down for runs and clumps, up for thin coverage.
- Distance: 6-8 inches, perpendicular, no wrist flex.
- Speed: faster for runs, slower for thin coverage, steady either way.
- Overlap: at least 50% on large surfaces.
Overlap is the setting people skip. Half-overlap means each pass carries less paint and still covers, which gives you a smooth finish without flooding the panel. The spray painting technique that produces an even coat depends on that overlap more than on any single dial.
Fair warning: material flow is like seasoning a soup. You add a little, test, and add more. Dumping in the whole jar is how beginners ruin both.
If you’re working from a rattle can instead of a gun, the number changes. How far to hold a spray can covers the can-specific distance.
My own habit is to set the material flow lower than feels right, then sneak it up one notch at a time on scrap cardboard. The gun tells you when it’s too low because the coverage goes streaky (and yes, I’ve sanded that mistake off more than once).
When the Drips Come From the Gun, Not Your Technique
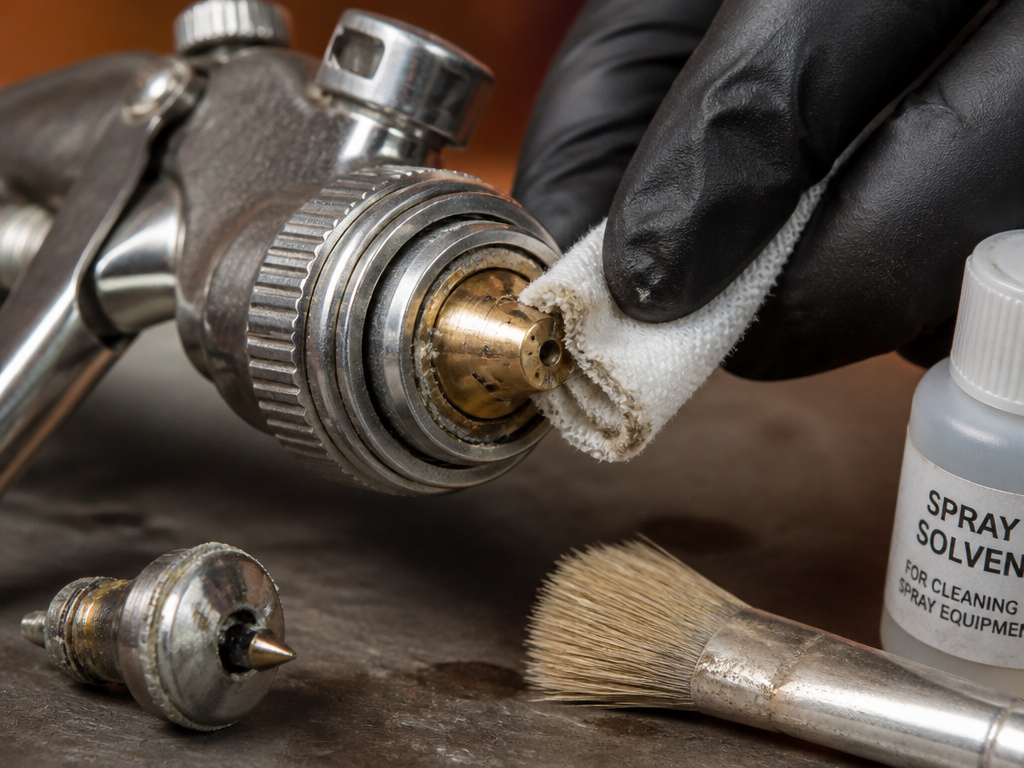
Sometimes the gun is the problem.
The Binks Model 115 service manual traces a faulty spray to improper cleaning or dried material around the fluid nozzle tip or in the air nozzle. Soak those parts in a solvent that softens the dried material, then remove it with a brush or cloth.
- Soak the tip in compatible solvent before you scrub.
- Use a brush or cloth, never a wire or a pick.
- Replace a damaged nozzle. A scratched air or fluid nozzle won’t spray cleanly again.
I keep a soft brush and a squeeze bottle of solvent next to the gun and clean the nozzle before I change any setting. The “bad batch of paint” turned out to be dried material at the tip more than once. The other culprit was a nozzle I’d scratched with a wire.
The Nozzle Damage You Can’t Fix With Cleaning
Binks is blunt about this: never use metal instruments to clean the air or fluid nozzles. Those parts are machined, and any damage causes a faulty spray. If either nozzle is damaged, the part has to be replaced before a perfect spray comes back.
Small parts show nozzle faults first because there’s no room to hide them. Spray paint small objects with a clean tip and the fault shows up in the first pass instead of the third.
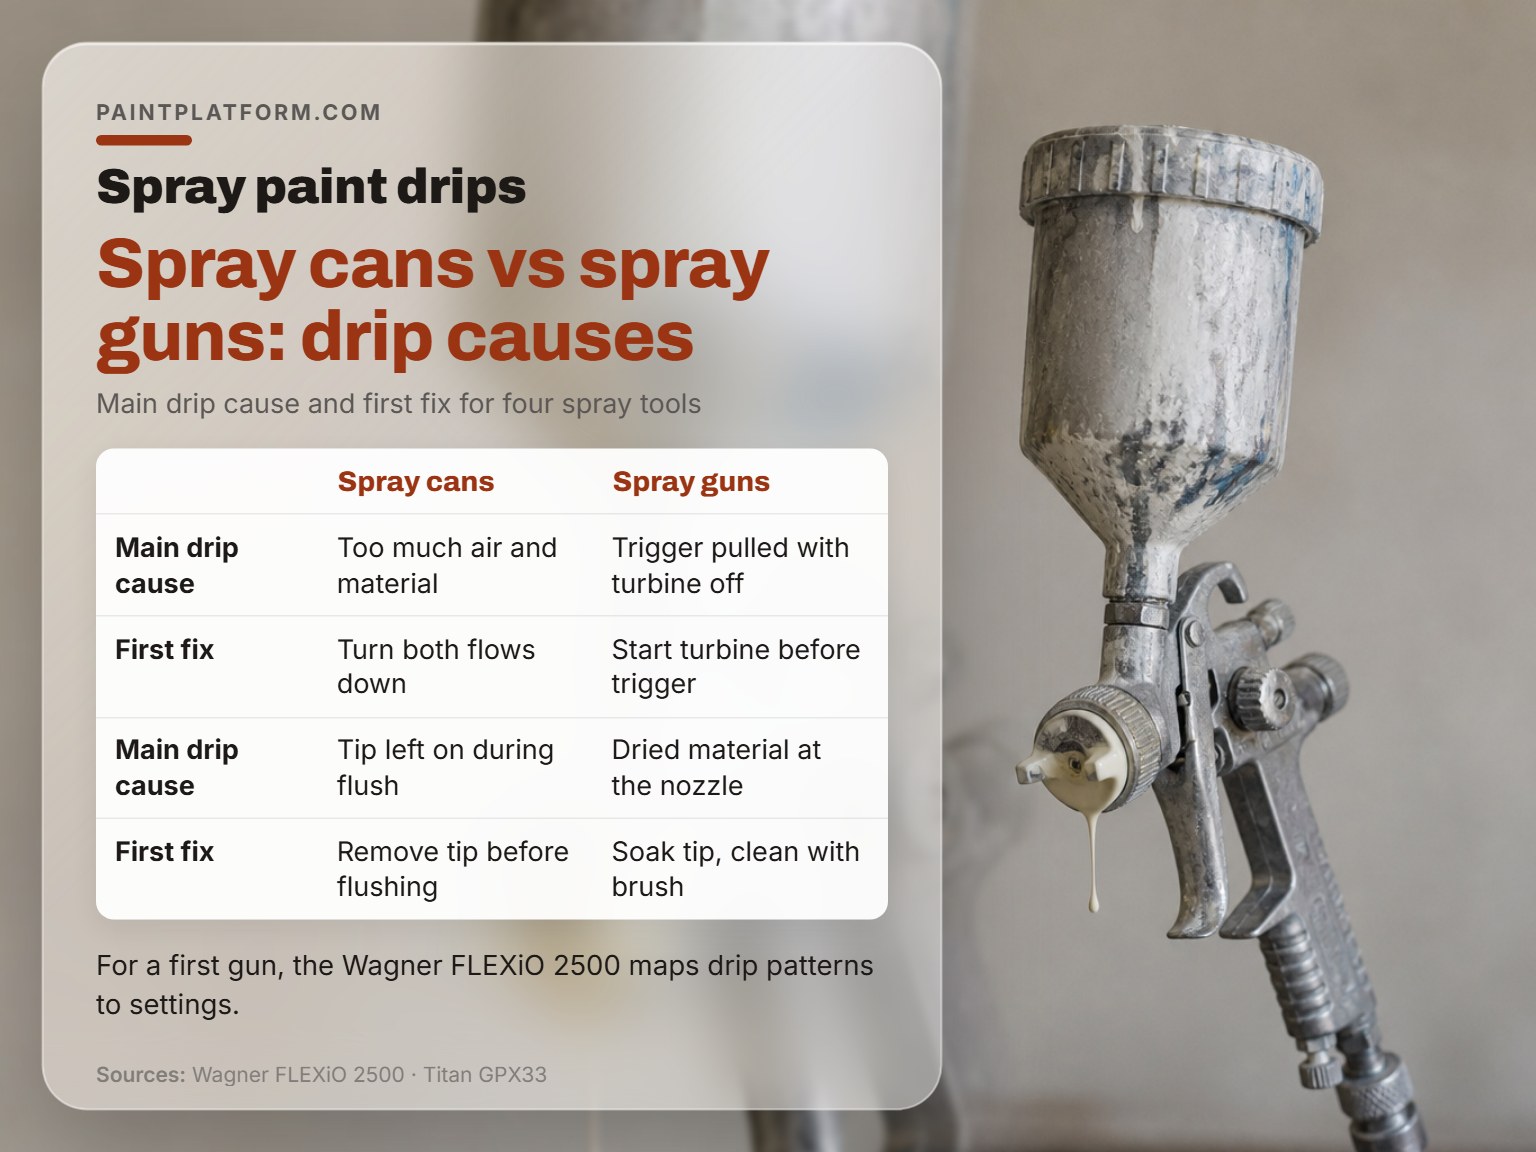
Spray Cans vs Spray Guns: Where Drips Come From Differently
My first rattan chair got gloppy in the weave because I brushed it, and it took forever to dry. The second one I sprayed in light passes and rotated as I went, and the difference was the tool as much as the technique.
| Tool | Main drip cause | First fix |
|---|---|---|
| Wagner FLEXiO 2500 | Too much air and material | Turn both flows down |
| Wagner Control Spray 250 | Trigger pulled with turbine off | Start turbine before trigger |
| Titan GPX33 airless | Tip left on during flush | Remove tip before flushing |
| Binks Model 115 | Dried material at the nozzle | Soak tip, clean with brush |
For a first gun, the Wagner FLEXiO 2500 is the one I’d point you to, because its support page maps every common drip pattern to a setting in one place.
Overspray is the other side of the same coin: paint that misses the panel lands somewhere and dries there. Avoid overspray by slowing the pass and keeping the gun perpendicular.
For furniture, drip risk goes up because of all the edges and turnings. Spray paint furniture in light coats and rotate the piece rather than reaching around it.
Solvents, Flashpoints, and Where the Manuals Disagree
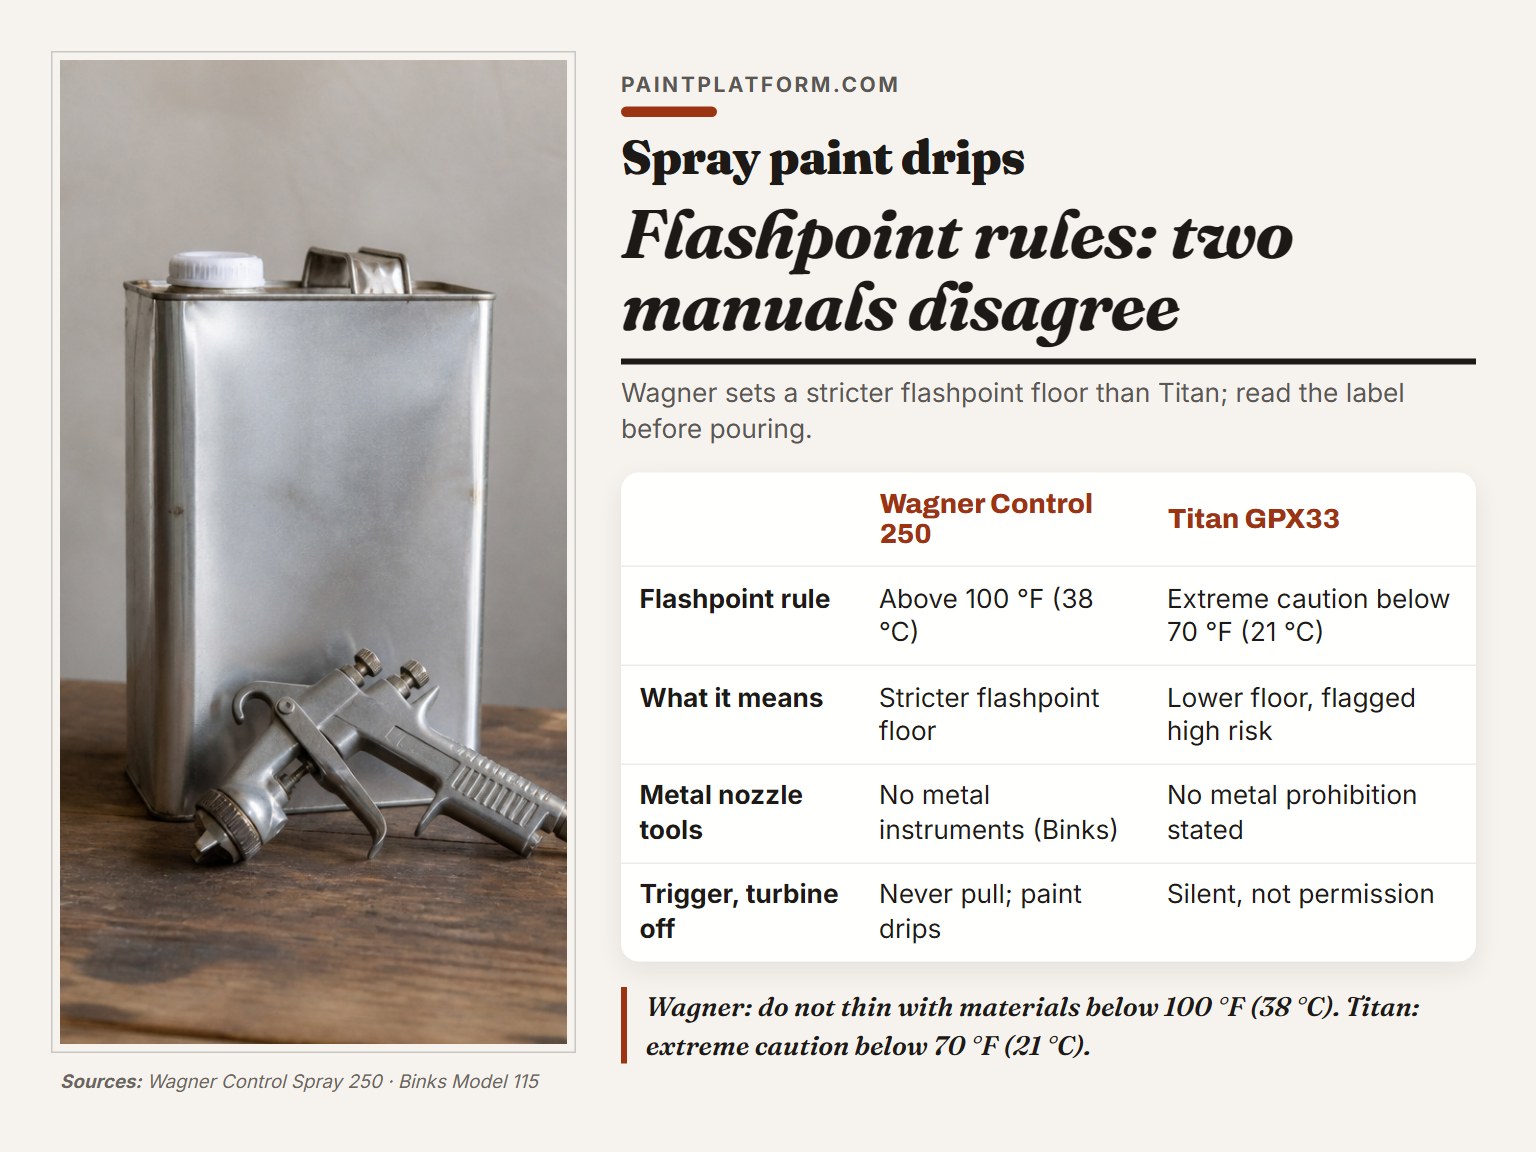
100 degrees F (38 degrees C). That is the flashpoint floor Wagner sets for the Control Spray 250, and it is not the same floor Titan uses.
| Manual | Flashpoint rule | What it means in practice |
|---|---|---|
| Wagner Control Spray 250 | Above 100 F (38 C) | Stricter floor for solvents and thinners |
| Titan GPX33 | Extreme caution below 70 F (21 C) | Lower floor, but flagged as high risk |
The Control Spray 250 owner’s manual is the stricter of the two. The Titan GPX33 owner’s manual allows lower-flashpoint materials but tells you to use extreme caution. Read the label on your solvent before you pour it into either gun.
The manuals also split on cleaning tools. Binks says never use metal instruments on the air or fluid nozzles because they’re machined and any damage causes a faulty spray. Wagner’s FLEXiO 2500 page recommends the included cleaning brush for the pick-up tube and around the nozzle, and doesn’t state a metal prohibition.
Wagner’s Control Spray 250 is alone among these manuals in warning against pulling the trigger with the turbine off. Paint drips from the nozzle when you do. Titan’s GPX33 manual is silent on it, and silence is not permission.
Solvent smell is the tell that the area isn’t ventilated enough. If the air in the garage makes your eyes water before the first pass is done, stop and open a door.
Frequently Asked Questions
Can you fix a spray paint drip after it dries?
Yes. Let it cure fully, then sand the ridge with fine paper, feather the edges, and recoat in thin passes. Sanding a soft film clogs the paper and gouges the layer underneath.
Why does my spray gun drip at the nozzle?
On a Wagner Control Spray 250, pulling the trigger with the turbine off makes paint drip from the nozzle. On a Binks Model 115, dried material around the fluid nozzle tip or in the air nozzle causes a faulty spray. Clean the tip first.
Should I turn up the material flow if the coat looks thin?
No. Thin coverage means too little air and too little material on the FLEXiO 2500, so both go up. Raising material alone gives you a clumpy finish instead.
How far should the gun be from the surface?
Wagner specifies 6-8 inches for the FLEXiO 2500, held perpendicular to the surface. A gun held too close causes runs and sags; too far causes poor coverage.
Can I use metal tools to clean the nozzle?
Binks says never use metal instruments on the air and fluid nozzles because they are machined and any damage causes a faulty spray, while Wagner’s FLEXiO 2500 page recommends the included cleaning brush and states no metal prohibition.
The Bottom Line
Here’s the trigger I use now: if a run shows up on the second pass of a panel, stop and reset the gun before the third. One run is a technique slip. A second one on the same panel means a setting is wrong, and more passes just make more runs.
Flat-laying a door is the single change that bought me the most. Pulled off the hinges and laid across two sawhorses, the runs along the edges stopped, where before I was fixing drips on hanging doors more often than not.
One caveat: this all assumes the material is compatible with the gun. Titan’s manuals rule out bleach, chlorine, and halogenated solvents because they attack aluminum. Spray those through the wrong gun and no amount of technique saves the finish.
That is the short version of how to fix spray paint drips: read the finish, reset the gun, and speed up while staying steady. Let it be messy first. The first pass on scrap cardboard is where you find the setting, not on the door you just sanded.
