
How to Stretch a Canvas: Step-by-Step
This post contains affiliate links. As an Amazon Associate, we earn from qualifying purchases.
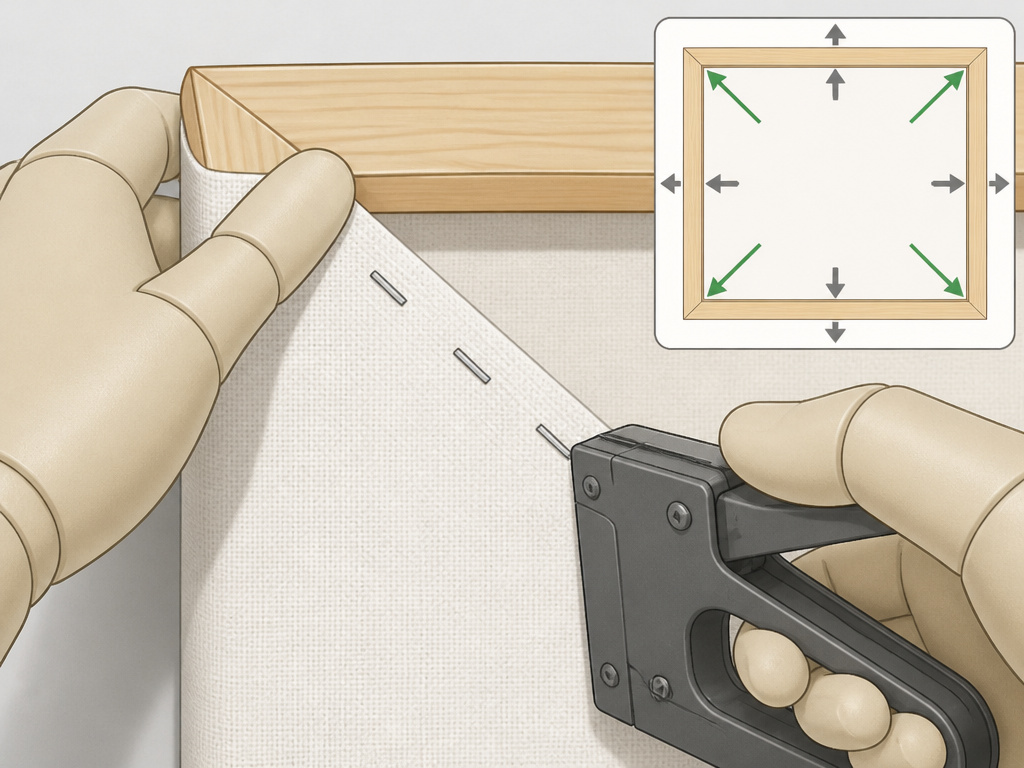
To stretch a canvas, square the frame, align it with the weave, and staple from the center outward, alternating opposite sides in 1.5 to 2 inch steps (Fredrix, Opus). Fredrix stops 3 inches short of each corner, while Upper Canada Stretchers leaves about 6 inches unstapled at each end of the top and bottom bars; fold the corners in two parts, and hold the keys until the canvas is primed and dry.
That staple spacing is doing more work than it looks. Every staple pins a small patch of weave, and the tension has to arrive at each corner from two directions at once. Set them too far apart and the canvas sags between the pins, which is exactly where those scalloped puckers along the edge come from. This is the same principle behind how to stretch a canvas.
What follows: two frame checks before the canvas comes off the roll, a cut-allowance table where four manufacturers flatly disagree, the bias-versus-traditional argument, and a fix order for wrinkles that starts with one staple instead of the whole edge.
Key Takeaways
-
Match the diagonals before anything else. A frame that is off-square cannot be stapled straight, no matter how hard you pull.
-
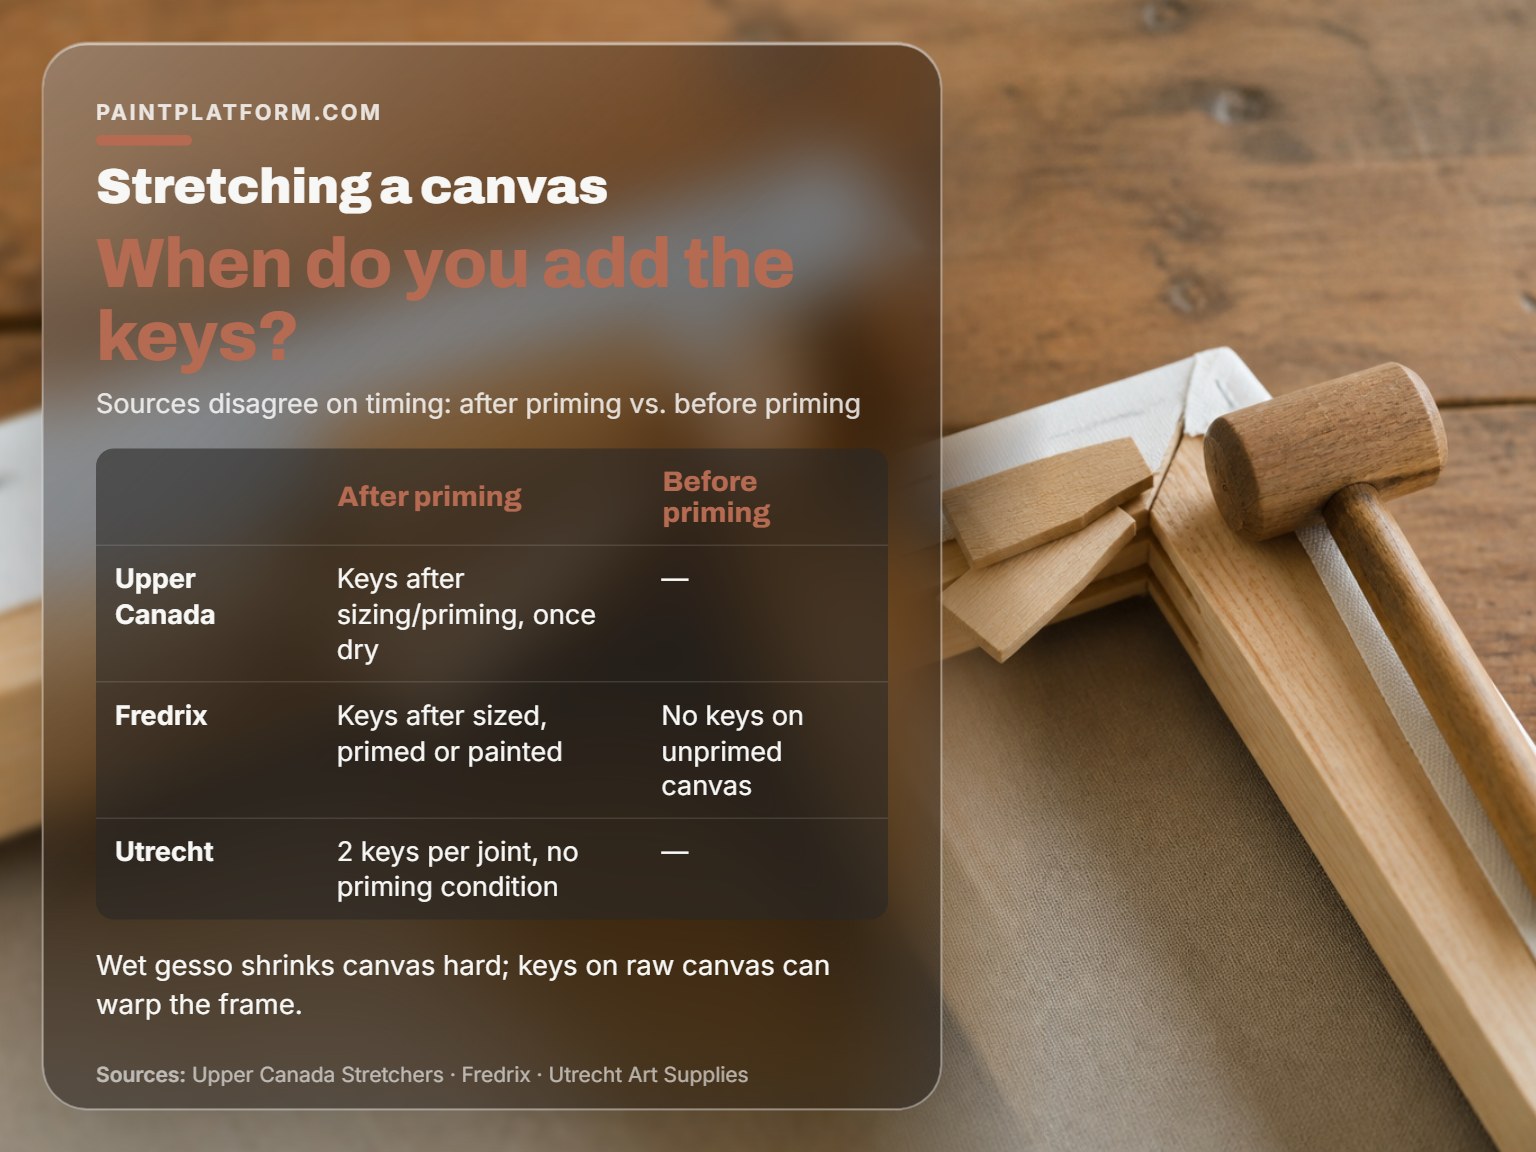
Upper Canada Stretchers holds the keys until after priming and drying, while Canvasi inserts wedges before priming and Utrecht treats keying as a general tightening step. Wet gesso shrinks raw canvas hard, and keys added early push that strain into the joints.
- Stretch dry canvas only. Utrecht notes that fibers are at their longest when dry, so a damp stretch goes slack as it dries.
The Two Checks That Happen Before the First Staple
Two checks happen before the canvas comes off the roll. First, measure across both diagonals of the assembled frame; they have to match. Second, lay the frame on the canvas with the weave running parallel to the bars.
A stretcher frame is square when the two diagonal measurements are equal. The canvas is then centered face down and rotated until the warp and weft threads run parallel to the bars. Frame alignment to the weave is specified by Fredrix and by Upper Canada Stretchers, and a frame that is off-square cannot be corrected with staple tension.
Squareness is the one thing you cannot staple your way out of when you compare a how to stretch a canvas. A frame that is out of square will pull the canvas into a parallelogram, and every staple after that fights the one before it.
Here is the short list of what actually needs to be on the table:
- Canvas pliers. The spring-loaded kind. Bare hands work on small frames but become impractical as frames get larger.
- A heavy duty staple gun
- A rubber mallet, for the keys, later
- A tape measure you trust enough to bet a painting on
- Stretcher strips sized to the piece
Larger frames need heavier strips. Fredrix warns that an undersized frame can break or warp during sizing or priming, which is a slow, quiet way to lose a weekend and a canvas both.
A square frame sits flat with no rock. Press one corner with your palm. If it tips, stop and re-seat the joints before you cut anything.
How Much Extra Canvas Do You Actually Need?
Four manufacturers give four different answers, and all four of them are workable. The numbers look contradictory until you notice that two of them are measured from the frame edge and two are measured from the bar depth.
| Source | Allowance per side | Reason given |
|---|---|---|
| Fredrix | 4 inches on all four sides | Leaves fabric for remounting later |
| Upper Canada Stretchers | Frame depth plus about 2 inches | Covers bar depth, then wraps back |
| Opus Art Supplies | At least 2 inches | Enough to grip with pliers |
| Canvasi | 5-6 cm standard, 7-8 cm XXL | XXL bars are twice as deep |
The gap between 2 inches and 4 inches is not a rounding error. It is the difference between a canvas you can re-stretch in two years and one you cannot.
Cut generous on your first few. Excess canvas folds to the back and disappears. Short canvas is a permanent problem, and Fredrix points out that trimming flush with the frame makes remounting to the same size harder.
Canvasi’s figures are metric and model-specific, which is why they sit oddly next to the others. Their XXL bars are 4 cm deep, twice the depth of standard bars, so more fabric goes into the wrap and less comes back around.
The fabric changes the math too. Cotton vs linen stretch and shrink differently under gesso, and linen is the one that bites.
Work From the Middle Out, Alternately, and Stop Short of the Corners
Center first. Then the opposite side. Then the two short bars. Pulling one edge all the way to the corner before touching the others is how you end up with a wavy far side, and every source here warns against it in some form of how to stretch a canvas.
The sequence that works:
- Staple the center of one long bar, then the center of the opposite bar, pulling until a straight crease runs across the canvas. Skip the crease check and you staple slack into the first bar, which shows up later as a soft band down the middle.
- Staple the centers of the two short bars. Fredrix notes the canvas will show a diamond-shaped wrinkle at this point. That is normal, not a defect.
- Work outward from each center staple, adding one staple to the left and one to the right, then crossing to the opposite side. Stapling one edge straight through loads it unevenly and produces the scalloped puckers Utrecht describes at the tack points.
- Too wide and the canvas sags between pins. Too tight and the weave tears at the staple line.
- Opus and Blick place staples diagonally across the weave, while Utrecht inserts staples diagonally in a tight grouping parallel to one another. Opus explains why: canvas tears more easily along the weave line than across it, so a diagonal staple gives the thread no straight run to split along.
- Stop short of the corners. Fredrix stops 3 inches out. Upper Canada Stretchers leaves about 6 inches unstapled at each end of the top and bottom bars. Staple into the corner and you have nowhere to put the fold.
The Straight Crease Test
Fredrix’s instruction is to pull until a straight crease forms across the canvas, then staple while holding that tension. The crease is your only reliable feedback in the first two staples, before the weave has anything to push against.
A staple that seats flush makes a flat, dead click. One that stands proud rings hollow when you tap it, and Fredrix’s fix is to hold tension with the pliers and hammer it down until it sits flush with the wood.
Bias Stretch or Traditional Pull: Which One Wins?
Ever watched someone staple one whole edge and then wonder why the far side came out wavy? That is the traditional method done wrong, and it is the reason two sources argue for a completely different approach.
Blick and Utrecht both advocate the bias method: pull diagonally across the frame so the entire network of warp and weft shifts together. Utrecht’s reasoning is that pulling straight across the bars produces uneven tension from spot to spot, and that matching corner tension to mid-bar tension is hard even with pliers.
Fredrix, Upper Canada Stretchers, Opus, and Canvasi all describe the traditional center-out method instead.
For a first canvas, the traditional method is one option: Fredrix, Upper Canada Stretchers, Opus, and Canvasi describe it, while Blick and Utrecht advocate the bias method for more even tension. Switch to bias when you are fighting the same wavy edge for the third time on the same size frame.
One catch: Blick notes the bias method requires staples, so tacks are not an option if you go that route.
Where the Traditional Method Still Wins
Small frames. There is not enough span for the spot-to-spot unevenness Utrecht describes to show up, and the center-out sequence is faster. The result is indistinguishable.
I would not put a beginner on the bias method first. It distributes tension better, and it is also harder to feel, because the pull never lines up with the bars. Learn what a tight canvas feels like the traditional way, then switch. That is the order I would teach it in.
Paper behaves differently under tension entirely, so if you are working on stretching watercolor paper instead, the wetting-and-taping routine replaces all of this.
When Do You Add the Keys?
Upper Canada Stretchers puts one condition on the keys that the other guides skip entirely, and it is the word “after.”
Their instruction is to hold the keys until the canvas has been sized or primed and has thoroughly dried, because wet gesso on raw canvas develops very high tension as it shrinks. Fredrix lands in the same place from a different angle: do not use pegs to pull wrinkles out of unprimed canvas, since it can throw the frame out of square or damage the canvas. Pegs are for tightening canvas that has already been sized, primed, or painted.
Canvasi’s own sequence puts the wedges in right after the corner folds, before any priming. Utrecht treats keying out as a general tightening step and does not tie it to priming at all.
- Upper Canada Stretchers: keys after sizing or priming, once dry.
- Fredrix: keys on canvas that has been sized, primed, or painted, never on raw canvas to chase wrinkles.
- Canvasi: wedges in immediately after the corners, before priming.
- Utrecht: 2 keys per joint as a general tightening step, no priming condition stated.
Upper Canada Stretchers advises waiting on a raw canvas headed for gesso, since gesso tightens the canvas on its own as it dries; Canvasi instead inserts wedges before priming. Add keys afterward only if slack remains.
If you are unsure how much tightening to expect, the applying gesso walkthrough covers coat count and drying time.
Before you start: Keep the nose of the staple gun flat on the wood and your off hand behind the bar, never in front of it. Keys are small and they fly, so tap them with a mallet, not a hammer swung at full force, and wear glasses. Canvas pliers bite hard when they slip off a taut edge.
Adding keys to a raw canvas before priming is how frames warp. Wet gesso shrinks the canvas hard, especially on large formats and on linen, and the strain goes straight into joints you have already expanded. You will not see it on day one. You may not see it immediately, but eventually the frame will not sit flat on the wall.
Keys on a Frame That Has to Fit a Rabbet
Utrecht flags a case the other guides skip. If the painting is scaled to an existing frame or an architectural niche, keying out may not be an option at all, because expanding the stretcher can push it past the rabbet and it will not go back in.
That is a decision to make before you build. If the piece is going into a moulding, read up on how to frame a canvas first and size the stretcher to the opening rather than the other way around.
Fixing Wrinkles Without Starting Over
You have a pucker the size of a thumbnail near a corner, and it survived the last round of staples. Work up the ladder. Most wrinkles come out at the first rung, and the ones that do not tell you something useful.
| What you see | Likely cause | First fix |
|---|---|---|
| Scalloped pucker at a staple | Uneven tension between staples | Pull the staple, re-tack with tension |
| Wavy edge along one bar | One side stapled all at once | Remove that run, redo center-out |
| Ripple across the middle | Damp canvas or overstretch | Re-stretch dry, ease the pull |
| Loose canvas after priming | Keys not yet added | Key out once the canvas is dry |
| Wrinkle that survives everything | Bad weave alignment | Re-stretch from the frame |
Spot-Fixing a Single Pucker
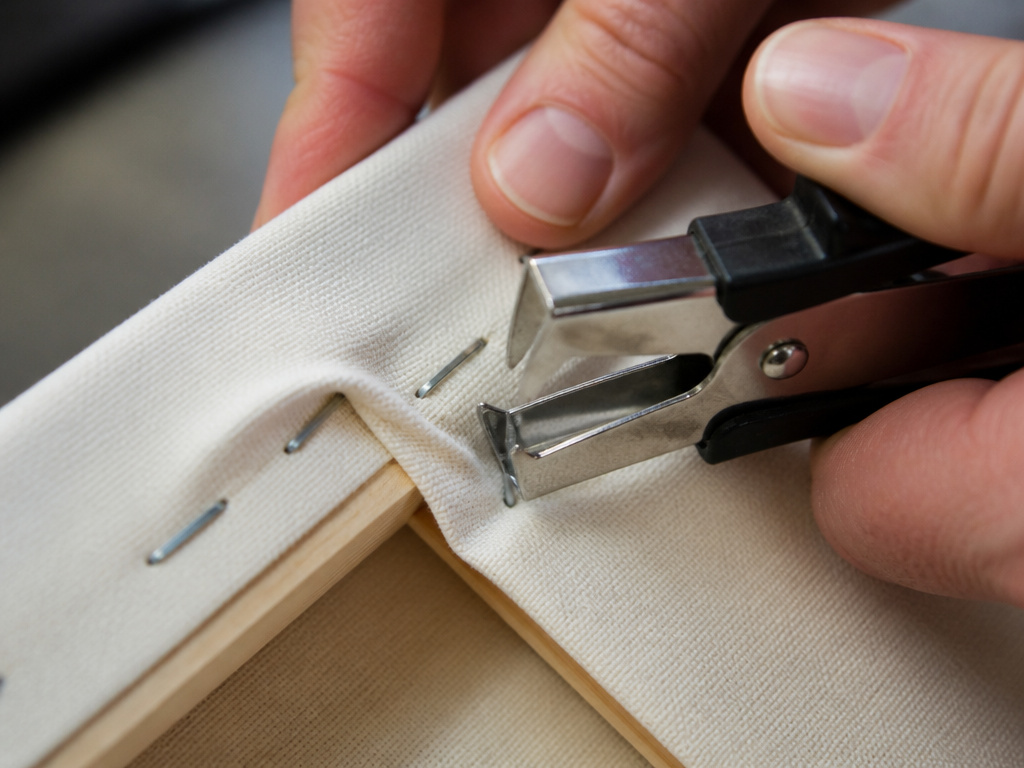
Utrecht’s spot fix is the first thing to try: remove the single staple nearest the pucker, adjust the tension by hand, and re-tack. It works on stiff primed fabric too, which is the case where people assume they have to start over.
Fredrix says the same for unprimed canvas. Pull the staples in the affected area and re-stretch just that section.
Before you do either, check whether the ripple will survive priming anyway. Fredrix notes that small indentations and ripples in unprimed canvas may even out during priming as the canvas shrinks. Re-stretching a canvas that was going to fix itself is wasted work.
Tightening spray is the next rung. Utrecht describes it as a fast-drying liquid that induces shrinkage, with sizing built in to make the effect permanent. It handles pressure dimples and small isolated wrinkles well. Larger wrinkles may reappear once the canvas relaxes.
When the wrinkling is extensive, Utrecht is blunt: take the canvas off the stretchers and try again.
Correct distortions before sizing, not after. Utrecht is explicit about that order, and it lines up with everything in priming a canvas.
The Sizes and Bars Where the Standard Method Stops Working
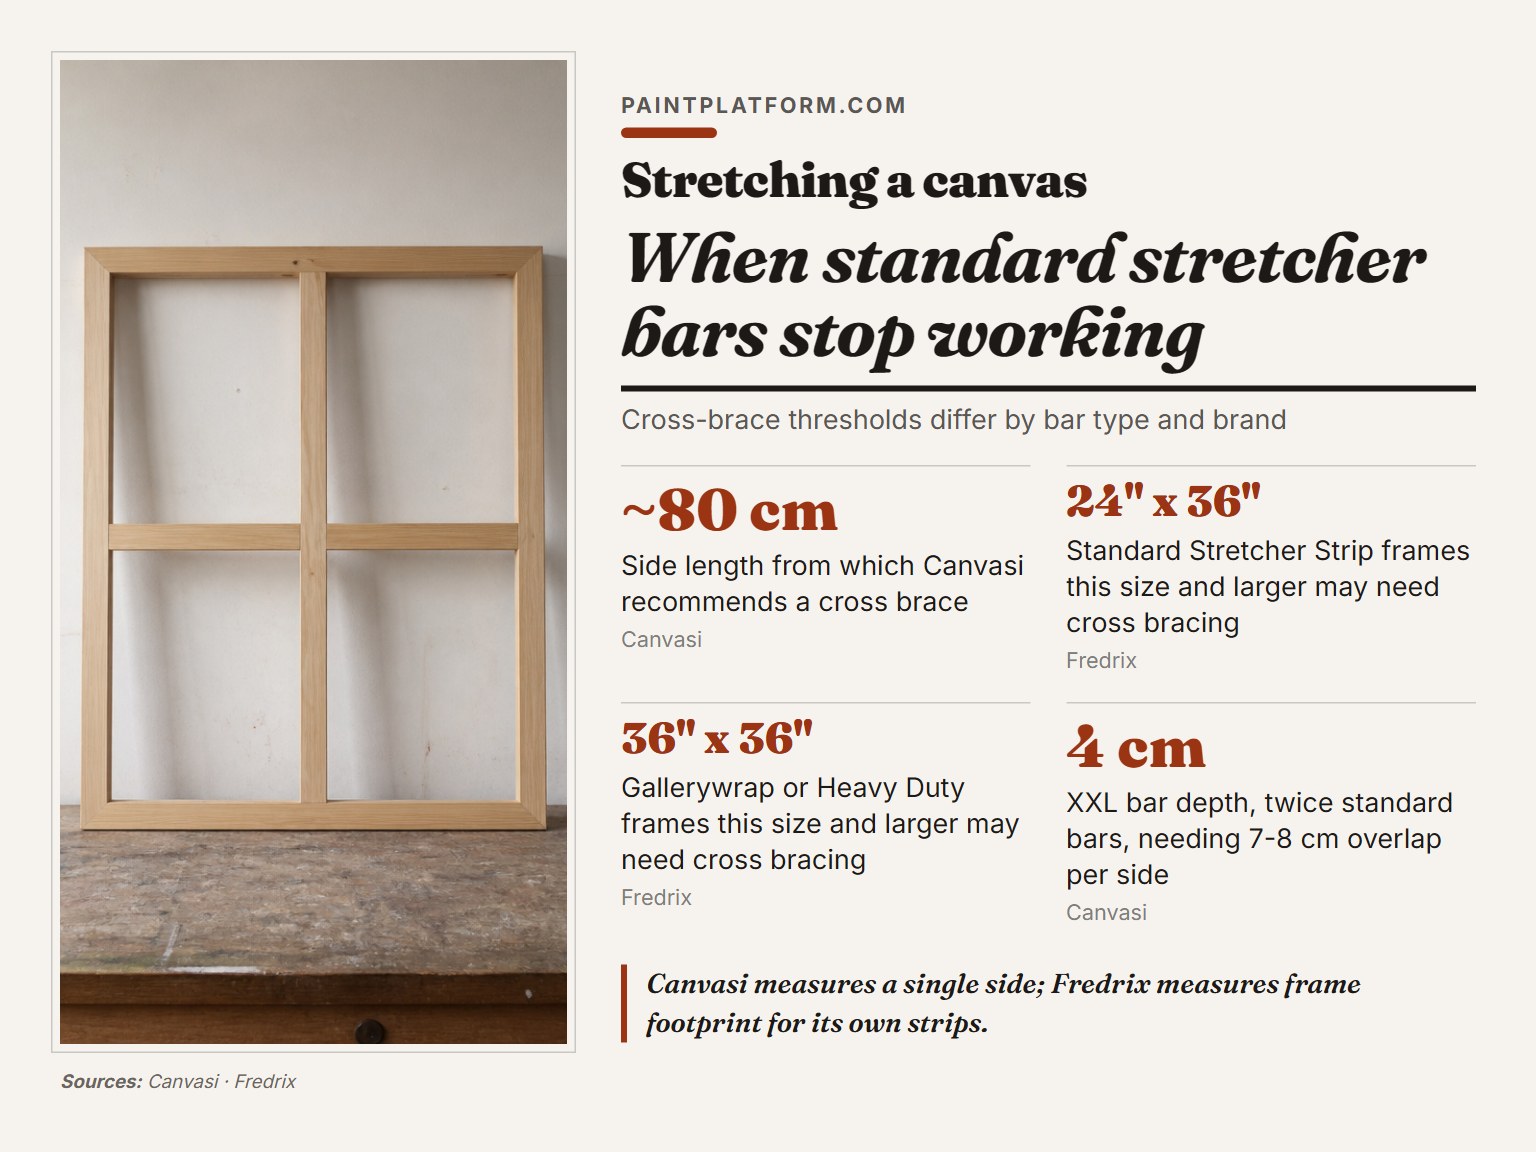
From roughly 80 cm of side length, Canvasi recommends a cross brace. Fredrix draws the line at 24 by 36 inches for standard strips. Those are not the same measurement, and they are not meant to be.
Canvasi is talking about a single side length. Fredrix is talking about a frame footprint, and their numbers are specific to their own product line: Standard Stretcher Strips at 24 by 36 inches and larger may need cross bracing, while Gallerywrap or Heavy Duty strips at 36 by 36 inches and larger may need it.
Canvasi’s XXL bars are a different animal. At 4 cm deep they are twice the depth of standard bars, which is why the overlap jumps to 7-8 cm per side and the bar length deduction jumps to 14-16 cm.
Undersized bars are the failure nobody plans for. Fredrix warns that a frame that is not strong enough can break or warp during sizing or priming.
If you are picking a size from scratch, choosing canvas size comes before any of this, and it is far easier to get right than to fix.
For the frame itself, standard stretcher strips are a reasonable place to start. Most of the numbers here come from their documentation, so the cross-brace guidance applies directly. If you are going big, use heavier duty stretcher strips rather than bracing a light bar past its limit.
My honest preference for a first stretch: buy a few small stretched canvas or panels and treat each one as practice.
Try it on a scrap first. Stretching a throwaway piece teaches you more about tension than any set of instructions, and you will not care when it goes wrong.
Frequently Asked Questions
Do you stretch a canvas wet or dry?
Dry. Utrecht notes that canvas fibers are at their longest when dry, so canvas stretched damp will tend to become slack as it dries. If a canvas felt perfect during the stretch and went soft overnight, dampness is the usual explanation.
How tight should a stretched canvas be?
Firm, not rigid. Fredrix warns against overstretching because unprimed canvas can go out of alignment or damage the stretcher frame when it shrinks during priming. Gesso takes it the rest of the way.
Can you stretch a canvas that is already primed?
Yes, and it is harder. Fredrix states plainly that unprimed canvas is easier to stretch than primed. Primed fabric is stiffer, so tension has to be worked in gradually and spot fixes are more likely to be needed.
What can I use instead of stretcher keys?
Not much. Fredrix notes that staples are easier to mount canvas with than tacks, and that inexperienced use of tacks may cause puckers and ripples. Blick notes the bias method requires staples as well. A staple gun is the tool for this job.
How long should a stretched canvas sit before painting?
Until it is fully dry, and that covers both the stretch and the priming. Upper Canada Stretchers warns that keys added before sizing or priming has dried can warp the frame. Give the primed canvas a complete dry before you key out or start painting.
Before You Go
Here is the threshold I would give anyone: if a wrinkle survives spot fixes and keying out, stop. Take the canvas off and start fresh. Repeated attempts at the same pucker cost more time than a clean stretch, and the clean one will be better.
All of this assumes dry, unprimed canvas on a frame that is square. If you are re-stretching something already primed and painted, half the advice above does not apply, and Utrecht’s warning is the one to keep: never wash canvas that has been synthetic-sized, primed, or painted.
This week, do one thing. Measure the diagonals of whatever frame is sitting in your studio. If they match, you are ready to go. If they do not, you just saved yourself an afternoon.
