
How to Choose a Canvas Size: Aspect Ratio First
This post contains affiliate links. As an Amazon Associate, we earn from qualifying purchases.
To choose a canvas size, start with the aspect ratio your subject needs, then check the face area against the wall, then subtract what the bleed folds around the frame. An 18×24 canvas gives 3 sq ft of face at 3:4; a 16×20 gives 2.22 sq ft at 4:5.
The bleed clause is the one that costs people a repaint. Canvas ships at a nominal size, and the outer band folds around the stretcher bars and disappears, so the picture you actually see is smaller than the number on the box.
What follows is the order I use for how to choose a canvas size: ratio, face area, bleed, then weight and substrate. Three of those you can settle with a tape measure and a calculator.
Key Takeaways
- Pick the ratio before anything else. A 2:3 composition doesn’t fit a 4:5 canvas without cropping, and cropping after you’ve painted means starting over.
- Nominal size is not visible size. Bleed folds around the frame, so a 16×20 delivers less than its nominal 16×20 of visible picture.
- Weight labels don’t compare across brands. Utrecht’s number-weave runs backwards from Indeutsch’s ounce figures, and Canson prints g/m² instead.
- Stay inside 10-29 °C and 30-65% relative humidity. Outside that band, Canson reports banding, slow drying, and ink flashing with third-party inks.
- Buy small multipacks first. A box of 4 oz canvas boards beats one big blank panel you’re scared to touch.
What Aspect Ratio Does to a Canvas Size
Aspect ratio is the one decision in how to choose a canvas size that you can’t fix later. Crop a 2:3 composition onto a 4:5 canvas and you either lose the edges or repaint the whole thing.
A standard 16×20 inch canvas carries a 4:5 aspect ratio and 2.22 square feet of face area. The 3:4 family, which includes 18×24 and 36×48, holds a taller proportion that suits a standing figure. Square formats run 1:1, from 12×12 at 1 square foot up to 48×48 at 16 square feet.
The Four Ratio Families
Nearly everything sold falls into four families. Once you know which one your subject wants, the size question mostly answers itself.
| Canvas size | Aspect ratio | Face area |
|---|---|---|
| 8×10 in | 4:5 | 0.56 sq ft |
| 12×12 in | 1:1 | 1 sq ft |
| 16×20 in | 4:5 | 2.22 sq ft |
| 18×24 in | 3:4 | 3 sq ft |
| 24×36 in | 2:3 | 6 sq ft |
| 36×48 in | 3:4 | 12 sq ft |
A 4:5 canvas sits closer to square than a 2:3, so a standing figure fills more of the height before you cut off the feet. That’s why portrait painters drift toward 16×20 and 8×10 without ever measuring anything.
The 2:3 family (4×6, 24×36) is the one that matches a camera frame. Landscapes and photographs land there naturally. The 3:4 family (18×24, 36×48) is the middle ground, and 1:1 is the format that makes a single object look deliberate instead of lonely.
I keep a small notebook of thumbnail sketches in two ratios, and the 4:5 version almost always crops the hands. Worth trying before you commit to a big surface.
If you want the shortlist of sizes that actually sell and hang well, there’s a solid rundown of canvas sizes that covers the common formats.
The 16×20 Lie: Nominal Size Is Not Visible Size
Bleed eats more picture than any other single item on this list.
Print-on-demand vendors publish the rule plainly. Dreamship’s canvas template notes define the print area as everything inside the dash, with a safe zone marked by a purple line for key details. The bleed sits outside the dash, and that grey band is the part folded and pinned to the frame.
So according to Dreamship, the visible image is smaller than the nominal size, while a standard-sizes dataset lists the full nominal face area without deducting bleed. Dreamship also warns that a design submitted at the wrong dimensions gets cut off, which is the failure mode you’re trying to avoid.
Here’s where the sources split. Dreamship treats bleed as a real deduction, so a nominal 16×20 delivers less than 16×20 of visible image. A standard-sizes dataset lists 16×20 at a full 2.22 sq ft of face area and doesn’t deduct anything. Both are correct for their own purpose. One describes the printed object, the other describes the panel.
The part nobody mentions: A gallery wrap pulls part of the image around each edge. On a small canvas that’s a meaningful bite, and faces placed near the border come back missing a chin.
What survives the fold:
- Faces and hands stay well inside the purple line, because anything in the bleed wraps around the bar and never comes back.
- Signatures go in the same safe zone. A signature that touches the edge loses its last letter.
- Long straight edges need the most margin. A horizon line that folds across a bar reads as a printing error.
- Background color can live in the bleed. Dreamship suggests filling it with plain color or a simple pattern.
If you’re sizing for a wall rather than a subject, work backwards from the wall instead. There’s a useful breakdown of canvas wall art sizes that starts from viewing distance.
How Do You Read Canvas Weight When Every Brand Labels It Differently?
How do you compare a 12 oz canvas against a 440 gsm one? Short answer: you can’t, not directly, because the three labeling systems in common use measure different things.
| Label system | Who uses it | What the number means |
|---|---|---|
| Number weave (e.g. 12) | Utrecht | Higher number means lighter canvas |
| Ounces (4, 7, 10, 12 oz) | Indeutsch | Fabric weight per square yard |
| g/m² plus oz/yd² (440 g/m² / 14.5 oz/yd²) | Canson | Direct weight in metric and imperial |
Utrecht states the number-weave convention outright: higher numbers are assigned to lighter weights, and the heavier the canvas, the lower the number. That runs opposite to how most people read a number. A “12” from Utrecht is a lighter cloth, not a heavier one.
Indeutsch skips numbers entirely and lists fabric weight in ounces: 7 oz and 10 oz on the standard line, with a 7/10/12 oz heavier line. Canson goes metric, listing its Museum Canvas Water Resistant Matte 440gsm at 440 g/m², which it also prints as 14.5 oz/yd².
That Canson figure is the useful bridge. 14.5 oz/yd² is a genuinely heavy canvas, and it sits well above Indeutsch’s 12 oz top end. If you’re comparing across brands, Utrecht labels weight by product number (higher means lighter), Indeutsch by ounces, and Canson by g/m² and oz/yd², so convert to a common unit where you can.
Number Weaves vs Ounce Fabrics
Utrecht is blunt about which one to paint on. Double-thread Number Weaves resist sagging on the stretcher and are tightly woven enough to stop primer striking through, which is why Utrecht calls them the best choice for painting.
The mechanism is straightforward. A double-thread weave uses two threads from opposite sides of the loom, so the cloth is denser and pulls against itself when stretched. Single-thread ounce fabrics are lighter and looser, and Utrecht positions them for small works and sketches.
Texture is a separate decision from weight. Utrecht advises smooth canvas for portraits and fine detail, and coarse canvas for landscape and large-scale work where a broken brushstroke helps. Plain-weave is the default for painting because it stretches easily under sustained, even tension.
One more thing Utrecht notes that rarely comes up: polyester canvas is unaffected by humidity, mold, and pests, and conservation specialists expect it to outlast natural fibers. Oil-primed linen may yellow in storage, but Utrecht says the change is reversible and doesn’t mean the canvas degraded.
There’s a fuller comparison of types of canvas for painting if you’re deciding between cotton, linen, and polyblend before you decide on size.
Why a 19 mm Stretcher Profile Changes What You Can Hang
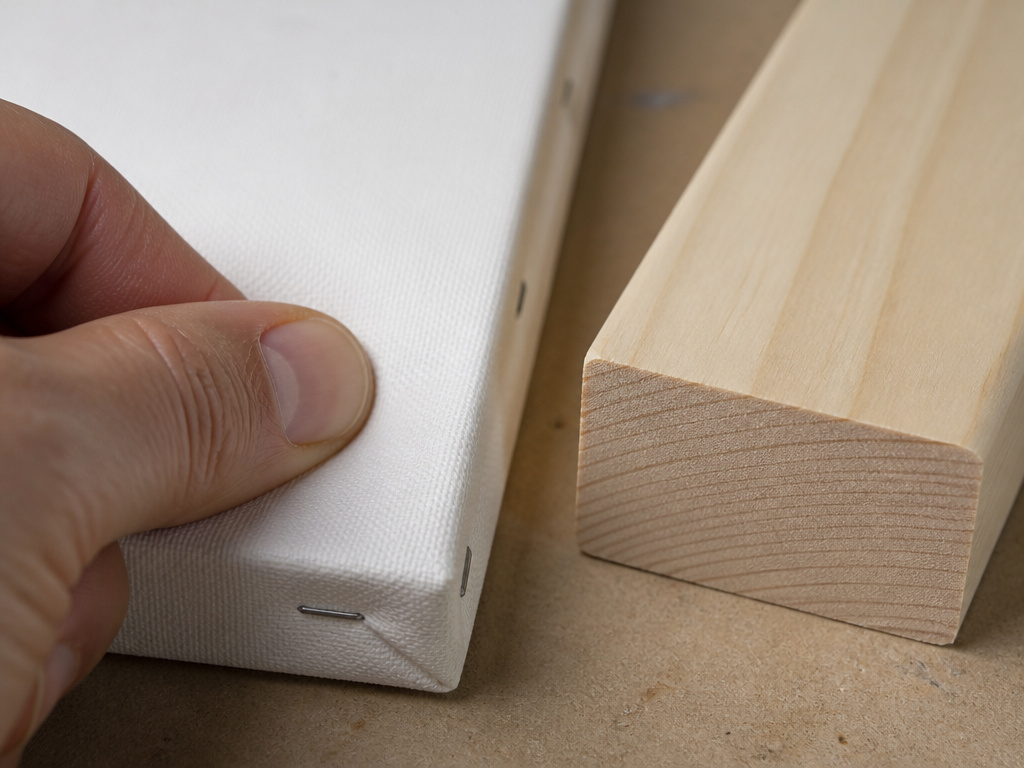
Indeutsch builds every stretched cotton canvas up to 24×36 on a 19 mm x 38 mm pine profile. That’s a fixed number, not a range, and it’s the only hard bar tolerance in the sources I checked.
Above that size the profile changes. The heavier Indeutsch line runs 7/10/12 oz fabric on a 38 mm x 38 mm pine bar. The lighter 4 oz line runs on a 16 mm x 30 mm bar. Canvas boards use 4 oz fabric on 3.0 mm particle board.
Pack counts shift too. Indeutsch ships 10 pieces per box up to 24×36, then drops to 5 pieces per box at 24×48 and larger. The 4 oz lighter line packs 36 per box, and the boards pack 12.
Where this goes sideways: Ordering a 24×48 without checking the box count. You get half as many canvases per carton as the 24×36 you bought last time, and the shipping math changes with it.
A 19 mm bar has a little give if you press your thumb against the middle of a long edge. A 38 mm bar is stiffer. You feel the difference in handling, and it tells you which one will stay flat on a wall for years.
Utrecht doesn’t specify a bar profile at all. It only states that plain-weave canvas stretches easily with sustained, even tension. So the profile numbers above are Indeutsch’s own tolerance, and you shouldn’t assume another brand matches them.
I’d take the shallow 19 mm bar on smaller works. The deeper profile pushes the face off the wall and the shadow underneath starts to look like furniture instead of a painting.
If you’re building the thing yourself rather than buying it pre-stretched, the sequence matters more than the bar. Here’s how to stretch a canvas without pulling the corners out of square.
What Happens to Canvas Outside 10-29 °C and 30-65% Humidity?
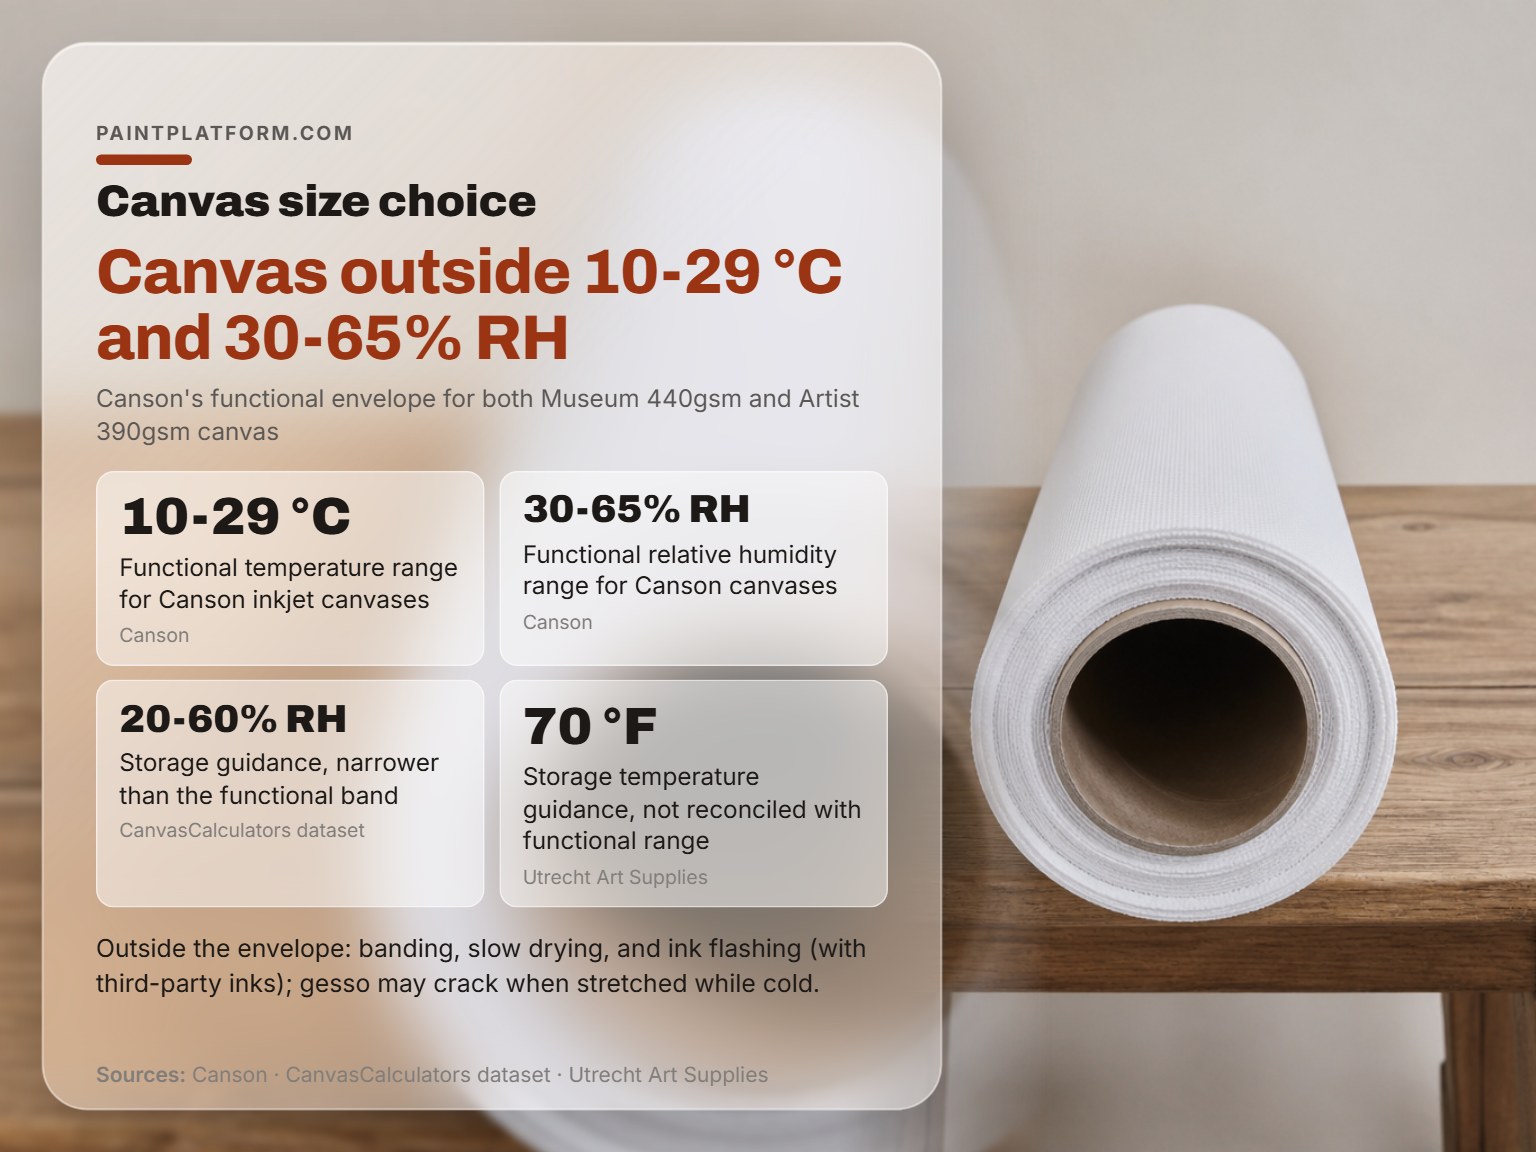
Ten to twenty-nine degrees Celsius is the entire operating window Canson gives its inkjet canvases. That’s 50 to 85 °F, paired with 30 to 65% relative humidity.
Both the Museum Canvas 440gsm and the Artist Canvas 390gsm share that envelope. Canson lists it once and applies it to both, so the heavier canvas doesn’t buy you a wider working range.
Here’s the part that trips people up. The same Canson document gives storage guidance of around 70 °F and 20-60% RH, which is narrower than the 30-65% functional band. The document never reconciles the two figures. If you’re storing canvas in a garage or a shed, that gap is the one to think about.
Skip this if: You print and frame in the same conditioned room year round. The envelope only becomes a live problem when the canvas travels between climates before it’s sealed.
A canvas that spent the night in a cold car comes in stiff, and the surface goes dull and chalky instead of holding its usual slight sheen. That flat look is your warning sign, not a lighting problem.
What Changes Outside the Envelope
Canson is specific about the failure modes outside the band:
- Banding appears as horizontal or vertical stripes across the print.
- Slow drying means the ink sits on the surface far longer than it should.
- Ink flashing shows up with third-party inks at high temperature.
- Gesso cracking happens when a pre-primed canvas is stretched while cold.
That last one is a sizing decision disguised as a temperature problem. Gesso is a polymer film, and it stiffens as it cools, so it can’t stretch with the weave when you pull the canvas over the bars. Warm the canvas first. It costs you a little time and saves the surface.
Why a Narrow Platen Gap Ruins a Canvas Print
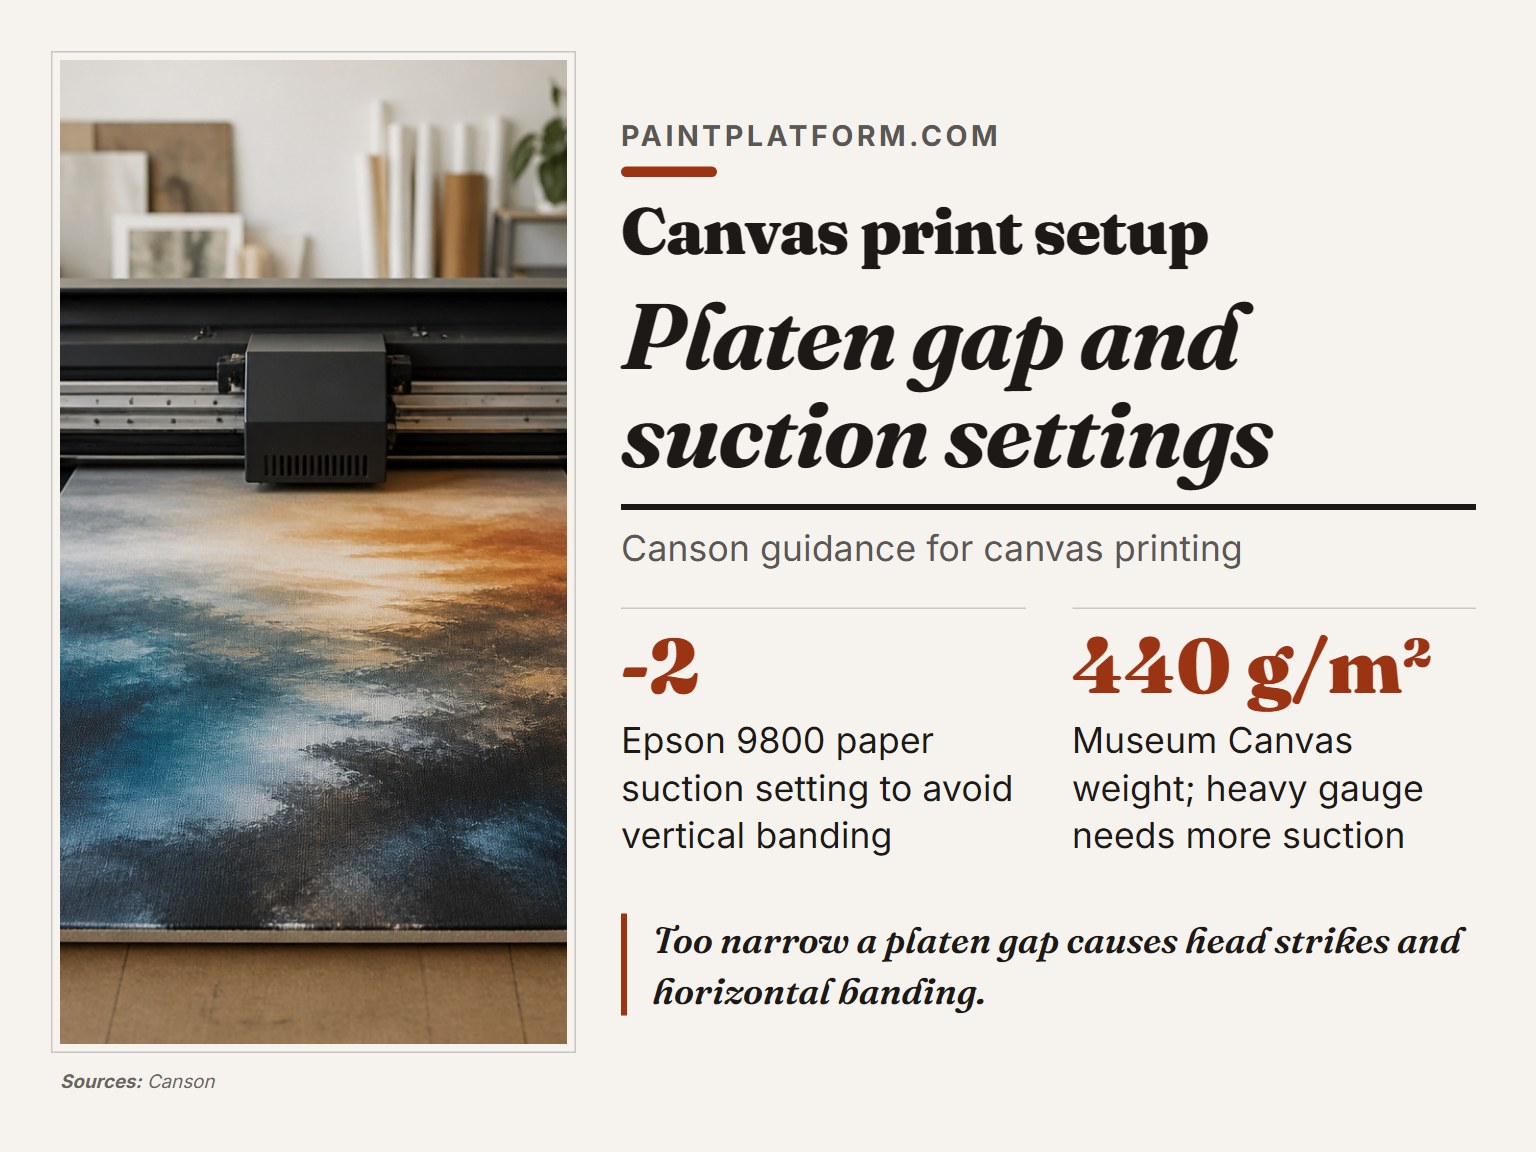
Platen gap is the distance between the print head and whatever you’re feeding it. Canvas is thick, so the gap has to be adjusted to match.
Canson warns that too narrow a gap causes head strikes, which can damage the media, the printer, or both. Horizontal banding is the gentler symptom. Every printer ships with a guide covering thick and thin media, and the caliper of each Canson canvas is printed on its spec sheet.
Suction is the other setting people ignore. Canson notes that Museum Canvas is a very heavy gauge product needing more suction, while the Artist Canvases are finely woven and need less. Too much suction pulls the canvas into the vacuum ridges and produces vertical banding.
On an Epson 9800 specifically, Canson reports that reducing paper suction from standard to -2 gave excellent results. If you’re seeing vertical banding on a wide-format printer, Canson links it back to vacuum settings almost every time.
The 48-Hour Wait Before You Frame a Canvas Print
A canvas comes back from the framer with a faint haze trapped under the glass, and it looked perfect going in.
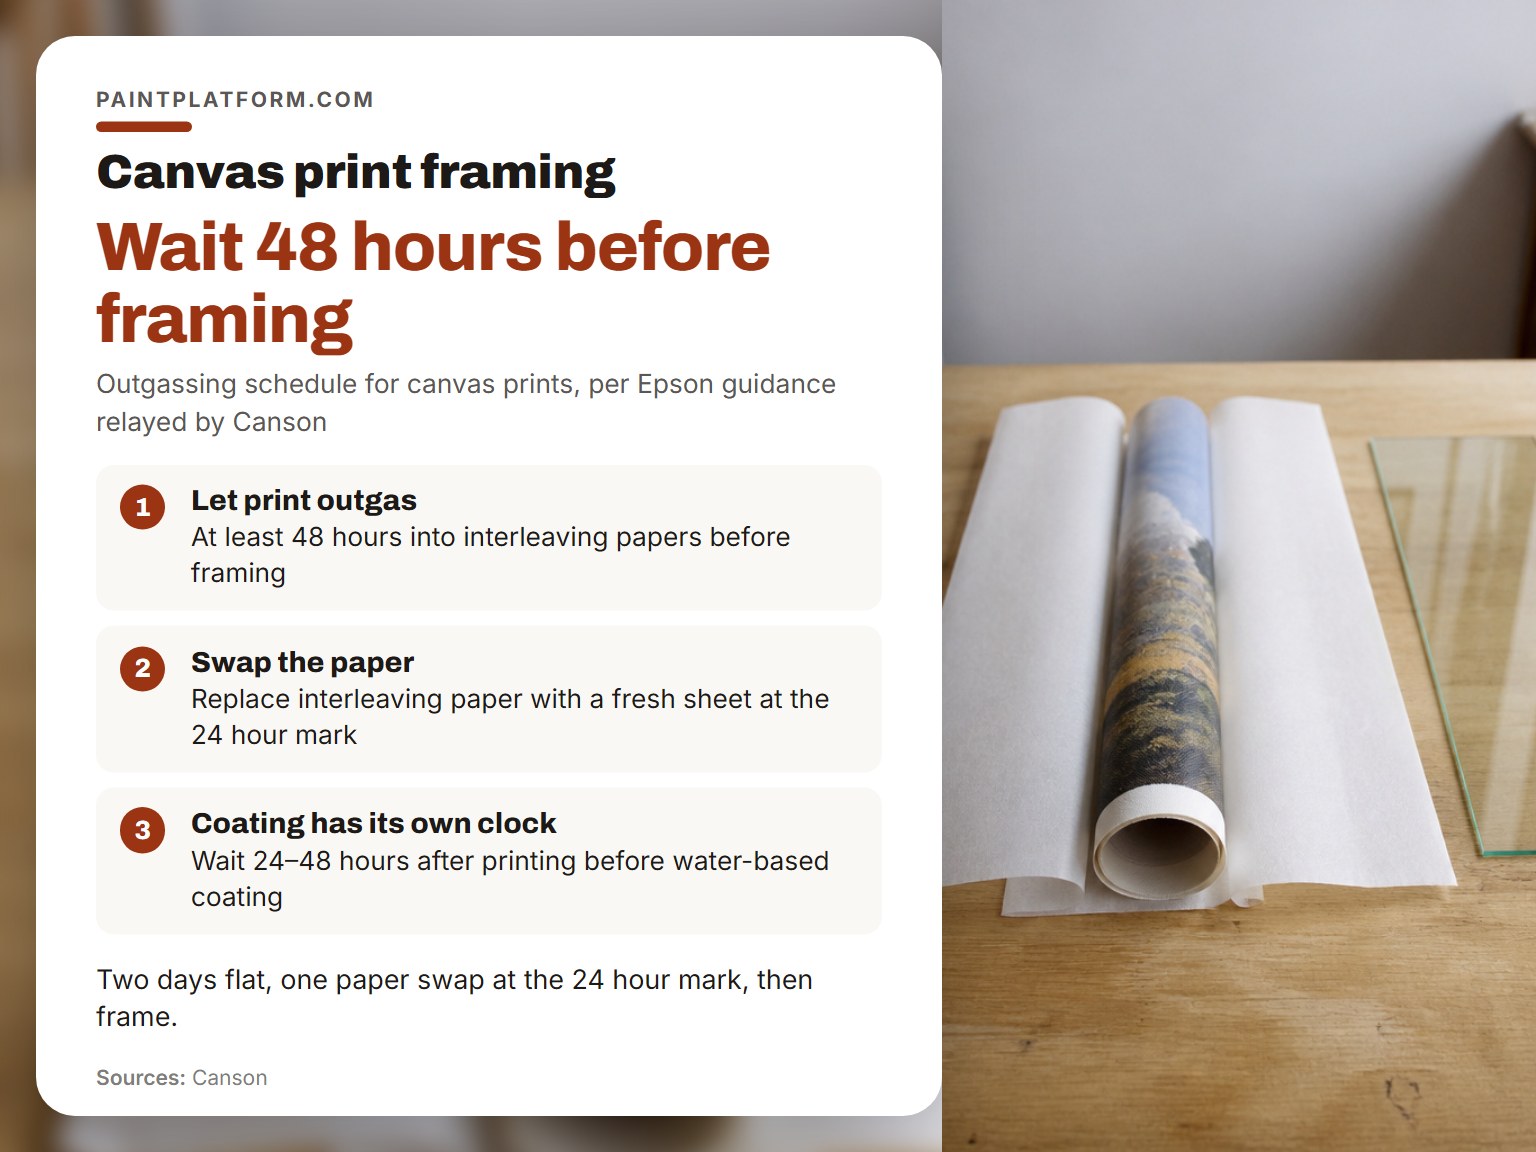
The cause is outgassing. Canson quotes Epson’s guidance directly: let prints outgas into interleaving papers for at least 48 hours before framing, and replace the interleaving paper at the 24 hour mark with a fresh sheet. Epson’s interleaving papers work for this step.
Framing procedure matters as much as the wait. Epson’s guidance, as Canson relays it, calls for no contact between the print and the inside of the glass or UV acrylic.
Coating has its own clock. Canson recommends waiting 24 to 48 hours after printing before applying a water-based coating to canvas, so the ink has time to settle before you seal it.
Two days flat, one paper swap at the 24 hour mark, then frame. The swap is the step everyone skips, and it’s the step the ink manufacturer actually specified.
If the frame is the part you’re unsure about, there’s a walkthrough on how to frame a canvas that covers the no-contact rule and the hardware.
How to Choose a Canvas Size When You’re Buying Your First Pack
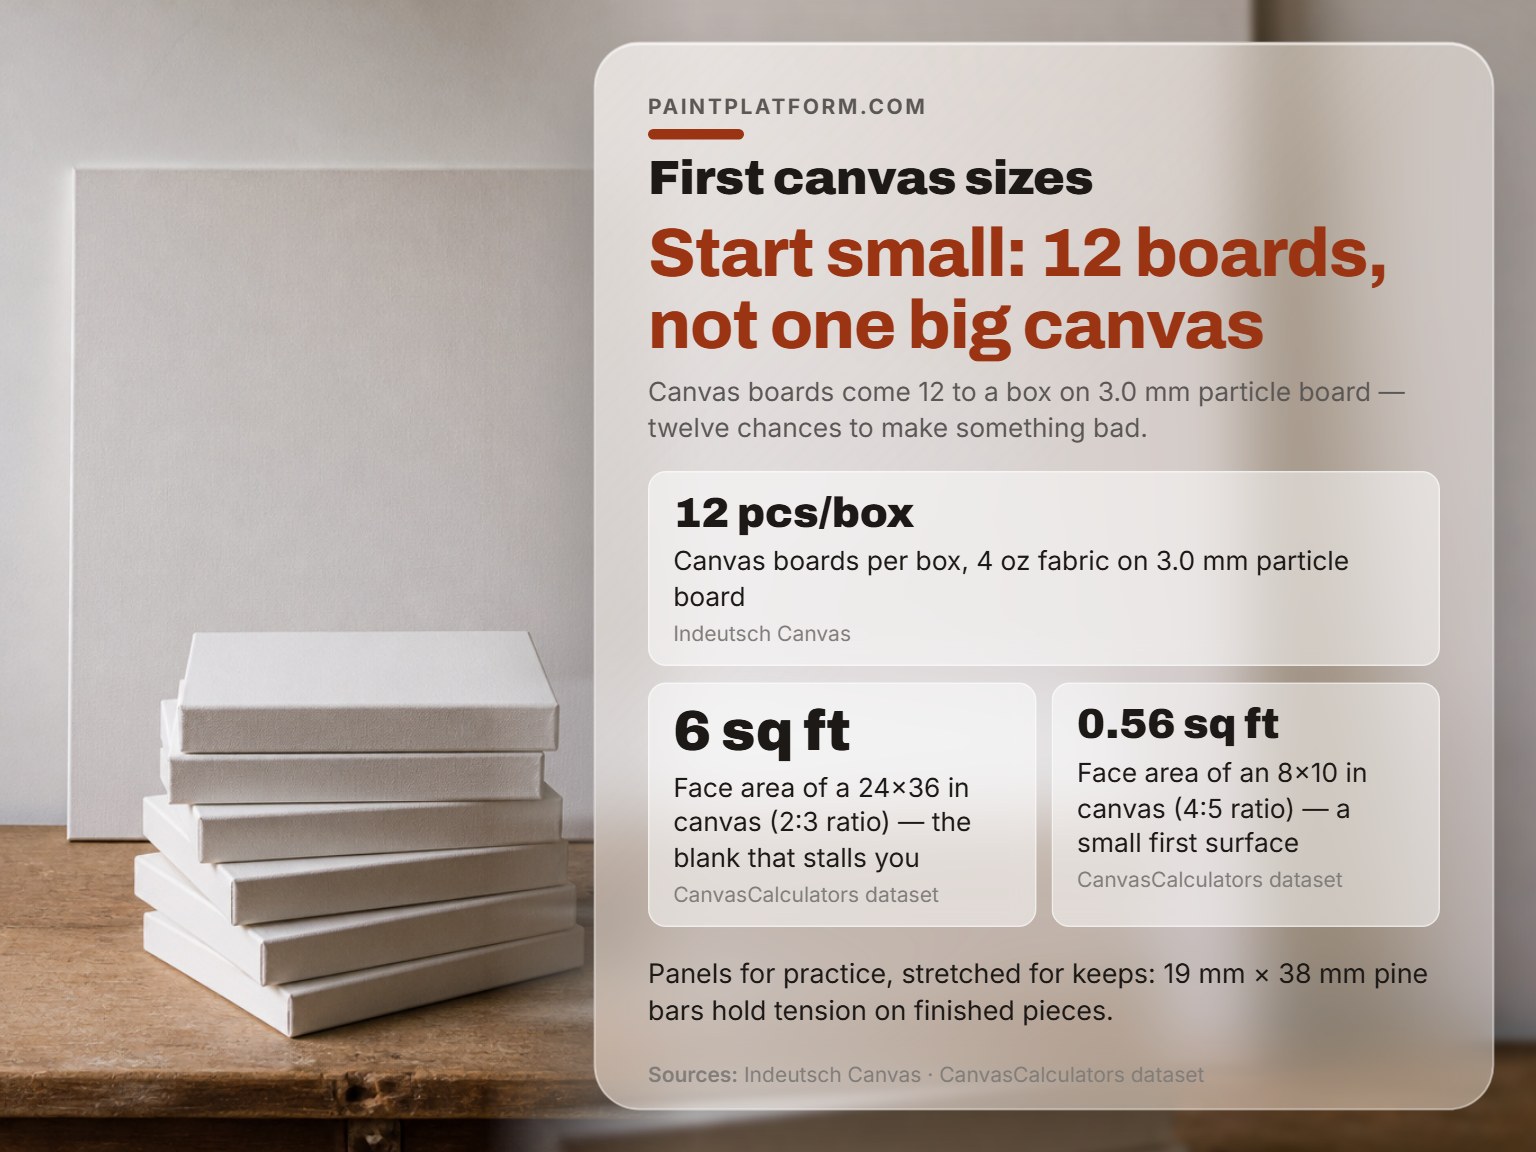
Everyone tells you to go bigger than you think. On a first canvas, that advice is backwards.
I have a 24×36 leaning against my studio wall that’s been blank since spring. It’s not a painting, it’s a rebuke. Every time I think about starting it, the surface wins the argument.
Small surfaces don’t do that. A 4 oz canvas board is rigid, it stacks in a drawer, and it costs you nothing emotionally to ruin. Indeutsch packs those boards 12 to a box on 3.0 mm particle board, which is exactly the quantity you want when you’re still figuring out whether you even like the medium.
This is the same lesson sketchbook paper taught me years ago. Thin paper buckles the moment a wet wash or a marker hits it, and I ruined more pages than I’d like to admit before I started choosing the paper for the medium instead of the other way around. Canvas works the same way.
The Order I’d Actually Buy In
- A 12-pack of small canvas boards first. You get twelve chances to make something bad, which is the whole point of the first month.
- A canvas paper pad second. It takes acrylic and oil, it stores flat in a drawer, and it’s the cheapest way to test a composition at full size before committing.
- One stretched canvas in the size you actually want third. One. Not four. Buy the real thing after you’ve filled a few boards.
Many art suppliers sell canvas panels in multipacks, and small stretched multipacks are a reasonable step up once you’re past the board stage. Any of the three will get you through a first year without a single precious surface in the house.
Where stretched canvas wins is the finished piece. If the painting is going on a wall and staying there, a 19 mm pine bar with properly folded corners holds tension in a way a panel never will. That’s the trade: panels for practice, stretched for keeps.
The comparison that actually matters for a beginner is stretched canvas vs canvas panel, and panels win the first year on almost every count except permanence.
If you’re printing rather than painting, the same logic scales up. Big large canvas prints look impressive on a wall and are miserable to store, ship, or rehang, so order the small proof first.
Frequently Asked Questions
What is the most common canvas size?
16×20 in is the workhorse, and it carries a 4:5 aspect ratio with 2.22 sq ft of face area. It’s large enough to read as a real painting on a wall and small enough to finish in a few sessions. 18×24 at 3:4 is the other common default.
Does canvas size include the frame?
No. Nominal canvas size describes the panel or the stretched face, not the outer frame dimension. Framing adds width on every side, and on a gallery wrap the bleed folds around the bar so the visible image is smaller than the nominal figure.
Is a bigger canvas always better?
Not for a beginner. Large surfaces raise the cost of every mistake and make it easier to stall before the first mark. Buy small multipacks, fill them, then size up once you know what you’re doing with the space.
How much should I size up from my sketch?
Keep the aspect ratio identical and scale the long edge. A 2:3 sketch scales cleanly to 4×6 or 24×36. Change the ratio and you’re recomposing, not enlarging.
Can I stretch a canvas in a cold room?
Canson warns that gesso may crack when canvas is stretched while cold. Let the canvas come up to room temperature first, ideally inside the 10-29 °C functional range, before you apply tension.
The Bottom Line
Here’s the threshold I’d give anyone: if the canvas you’re eyeing is much larger than the biggest thing you’ve finished so far, buy the smaller one. That’s not a rule from a manual. It’s the pattern from every blank panel I’ve owned.
The rest of it is measurable. Ratio first, because it’s the only choice you can’t undo. Face area second, because that’s what the wall sees. Bleed third, because that’s what the frame eats. Weight and substrate last, and only after you’ve converted every brand’s label to the same unit.
One concession, though. If you’re choosing a size for someone else’s wall, or for a print you’re ordering rather than painting, all of the above flips. The wall measurement wins, and you work backwards through the ratio to find the size that fits. Start messy, refine later.
Try it on a scrap first.
