
How to Paint Around Ceiling Fixtures: Step-by-Step
This post contains affiliate links. As an Amazon Associate, we earn from qualifying purchases.
To paint around ceiling fixtures, you have three routes: remove the fixture, tape and plastic it in place, or pull a recessed trim ring down and wedge it. Michigan State University’s interior painting standard mandates removal, while working painters tape and drape instead. Match the method to the fixture in front of you.
That split between the institutional spec and the trade method is the whole how to paint around ceiling fixtures argument. The MSU interior painting construction standards put removal first and allow surface protection only when a fixture is too big or too heavy to take down. The Master Painters Institute wants the trim off and stored before a brush comes out.
What follows walks all three methods, the fixture types that flip the how to paint around ceiling fixtures answer, and the two failures that show up a week after the ladder goes back in the garage.
Key Takeaways
- Removal is the spec default. The MSU standard mandates fixture removal and the MPI guide calls for trim removal, while MB Jessee’s painters tape and drape fixtures in place.
- Tape and plastic is a real method with its own rules, not a shortcut for people who can’t be bothered.
- Hold the room above minimum temperature for 24 hours before, during, and after application, per the MPI spec.
- Speaker grilles are the trap. QSC warns that over-painting a tight AcousticCoverage grille can stop it seating back in the ceiling.
- Score the tape edge with a utility knife before you pull, or you’ll take a fringe of fresh paint with it.
Do You Have to Remove a Ceiling Fixture Before Painting?
The MSU standard says yes and mandates removal, the MPI guide calls for trim removal, and MB Jessee’s painters say remove only if you can do it safely and otherwise tape and drape in place. That’s the honest state of the advice, and pretending otherwise is how people end up guessing.
Section 3.2.A of the Michigan State University interior painting standard requires removal of lighting fixtures and electrical panel box doors before painting begins. Surface-applied protection is permitted only when removal is impractical or impossible because of size or weight. Reinstallation must be performed by workers skilled in the trades involved.
That last clause matters more than it looks. The spec assumes a crew that can disconnect a fixture, store it without cracking a diffuser, and reconnect it correctly. If that isn’t you, the spec is telling you something.
The MPI guide specification 09 91 23, revised April 2022, is narrower but stricter in one spot. It requires light fixture trim to be removed and securely stored before painting, then carefully cleaned and replaced on completion. It also bans solvent or reactive cleaning agents on anything with a lacquer finish, because they’ll mar the surface you just spent an hour protecting.
Then there’s the contractor method. MB Jessee’s painters treat tape and plastic as a primary approach and removal as an optional upgrade, noting that many smaller fixtures come down with a couple of screws and go back in minutes. The same remove-first logic applies when you’re painting around electrical outlets, where a cover plate comes off in seconds and buys you a clean edge.
Read all three positions together and a practical rule falls out. If the fixture comes off easily and you can see how it reattaches, take it off. If it’s heavy, awkward, or wired in a way you don’t trust, protect it.
| Method | Who specifies it | Best for | Main risk |
|---|---|---|---|
| Remove the fixture | MSU IPF 09 91 23, MPI 09 91 23 | Small fixtures on a couple of screws | Reinstall needs a skilled hand |
| Tape and plastic in place | MB Jessee (contractor method) | Fixtures you can’t safely drop | Paint bridges the tape seam |
| Wedge the trim ring down | MB Jessee (recessed cans) | Spring or wire-hook trim rings | Ring pops loose mid-roll |
How to Paint Around Ceiling Fixtures With Tape and Plastic
Blue tape, a sheet of painter’s plastic, and a brush you trust. That’s the whole kit for a fixture that’s staying put.
Before you start: Kill the power at the breaker before you touch a fixture, even for a masking job, because a loose wire nut doesn’t care that you’re only taping. Wear safety glasses while painting overhead, since ceiling paint drips fall straight down. And keep the ladder feet off loose drop cloths, which slide under weight.
- Tape the seam where the fixture meets the ceiling with blue or green painter’s tape. Skip it and the roller edge slaps paint onto the housing, which you’ll be picking at with a fingernail once it cures.
- Tape painter’s plastic over the rest of the fixture. Without it, splatter from a loaded roller reaches the diffuser, and dried droplets read as grit under the glass.
- Load the brush about half an inch and scrape the excess against the inner rim of the can. Overloading sends a run down your wrist and across the tape line you just set.
- Cut a perimeter four to six inches around the fixture with the brush, then roll. Roll first and the wet edge dries before you get back to it, which is exactly where lap marks are born.
- Let the paint dry, then score the tape seam before pulling. Pull cold and the tape takes a ragged white fringe of new ceiling paint with it.
Set out drop cloths before any of this, because the one time you skip them is the one time the brush slips off the tape.
The Utility Knife Trick That Saves the Ceiling Line
Run a thumbnail along the tape edge before you pull and you’ll feel a faint ridge where paint bridged the seam. That ridge is what tears.
MB Jessee’s fix is simple: wait until the paint is dry, then use a utility knife to gently cut a small seam at the tape edge. The tape then comes away clean instead of pulling at fresh paint. I’ve pulled tape too early and watched a strip of half-set ceiling paint come up with it, and there is no tidy repair for that. Let it dry properly.
Once the fixture is protected, the rolling itself is normal work. If your ceiling comes out banded, the problem is usually stroke direction rather than the fixture, and the fix lives in rolling a ceiling properly.
Recessed Trim Rings: Wedge Them or Pull Them Out?
Recessed cans are the exception that saves you an hour. Most have a trim ring you can move without disconnecting anything.
The two common ring types behave differently:
- Spring-held rings pull down a little, and you can wedge them in place with a small object while you brush paint behind the edge. It’s not elegant. It works.
- Wire-hook rings pull down several inches and stay there on their own, or you can take them off completely for the duration of the job.
- Fixed rings on older cans don’t move at all, so tape and plastic is your only path.
This is where the sources genuinely part company. MPI requires trim to be removed and securely stored, with replacement on completion. Wedging a ring in place isn’t contemplated in that document at all. MB Jessee’s method is the opposite: pry it down, wedge it, paint behind it, release it.
My read is that wedging is fine for a spring ring on a can you can reach comfortably, and removal is the better call when the ring is wire-hooked and comes off in one motion. The same remove-and-store logic applies to crown molding at the wall line, where masking a profile is slower than taking it down.
Common mistake: Wedging a trim ring and then loading the brush heavily behind it. Paint pools in the gap, the ring seats back into wet paint, and you get a hard ring-shaped ridge that shows under raking light.
When the Fixture Itself Is the Surface Being Painted
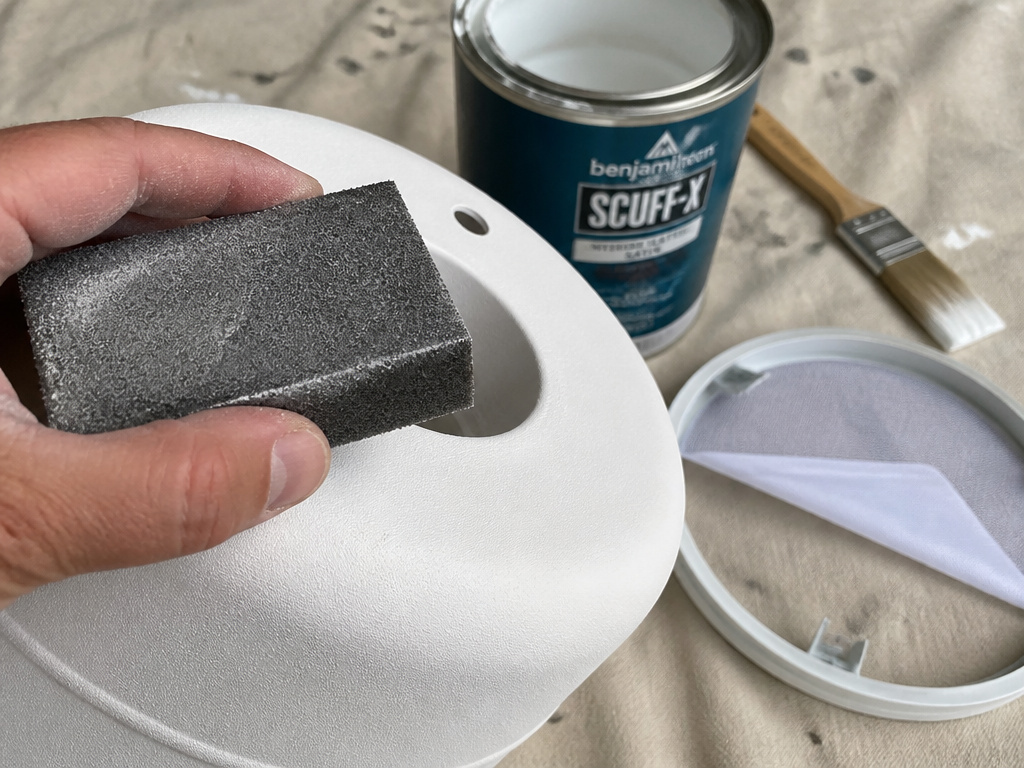
QSC’s service note on AcousticCoverage grilles is blunt about paint buildup. The grilles have a noticeably tight fit, and excessive paint may not allow the grille to be reattached properly. Their AcousticDesign fittings carry slightly more leeway, which is not the same as unlimited leeway.
Two rules come out of that note. Grille and speaker must be painted separately, and the cloth backing has to come off before painting and go back on with 3M spray glue once the grille is dry.
Then there’s the disagreement about whether a fixture is a paint surface at all. MSU lists light fixtures among pre-finished items not to be painted, full stop. A19 publishes detailed instructions for painting its bare bisque ceramic fixtures, which is the opposite position.
Both are right about their own hardware. A factory-finished metal housing gets protected. A raw ceramic body made to be painted gets painted.
Speaker Grilles: Why Over-Painting Locks Them Out
A tight-fit grille has almost no clearance in the ceiling cutout. Every coat you add to the rim eats into that clearance, and the failure isn’t gradual. The grille goes from snug to not-going-in, and you find out at the end of the job when the ceiling is already painted.
Bare Bisque Ceramic: Sand It, Don’t Wipe It
Bare bisque is porous, and A19 says liquid is not recommended for cleaning it. Smudges come off with light sanding using fine sandpaper instead. Sealed finishes are a different story and tolerate diluted dish soap.
For paint, A19 recommends water-based on its fixtures. Oil-based or spray paint needs an appropriate primer first, or it won’t hold.
| Fixture type | Paintable? | Prep | Failure if wrong |
|---|---|---|---|
| QSC AcousticCoverage grille | Grille only, painted separately | Remove cloth, re-glue with 3M spray after drying | Grille won’t seat back in the ceiling |
| QSC AcousticDesign grille | Grille only, painted separately | Same steps, more buildup tolerated | Flush fit lost at the rim |
| A19 bare bisque ceramic | Yes, water-based | Light sand with fine paper, no liquid | Oil paint without primer won’t hold |
| Pre-finished metal housing | No (MSU spec) | None, protect instead | Rating plate becomes unreadable |
Where this goes sideways: Painting over an independent testing-agency label or an equipment rating plate. The MSU standard forbids it outright, and the practical result is a fixture whose certification can no longer be read by anyone inspecting it later.
What Temperature and Ventilation Actually Require
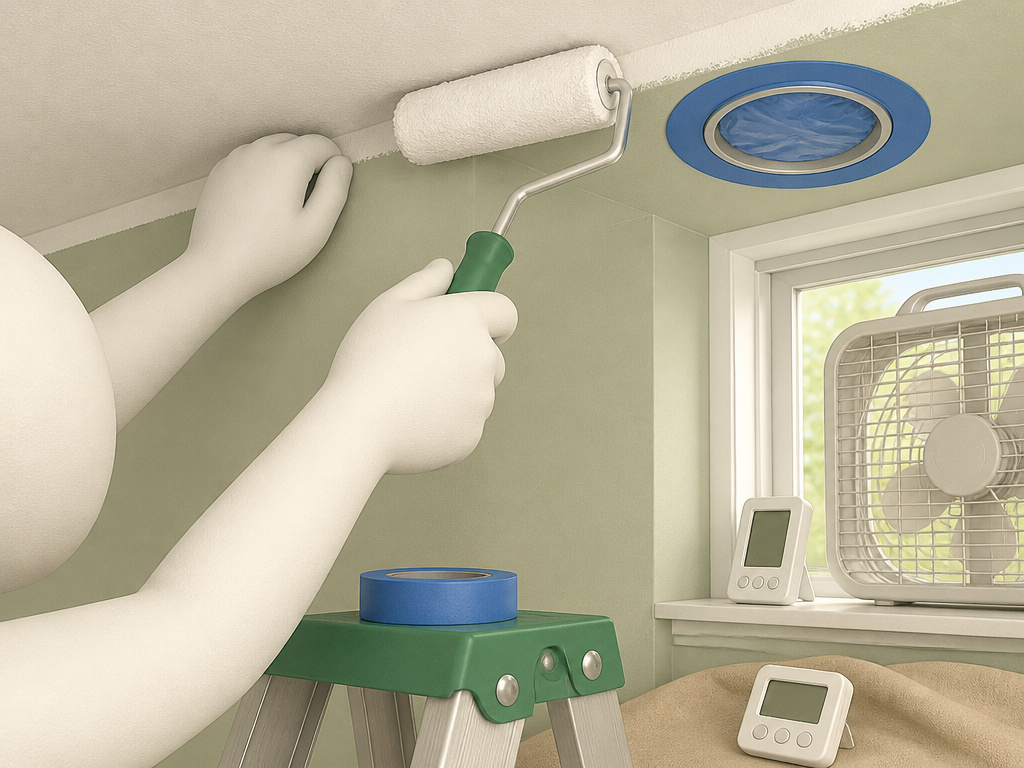
The MPI spec gives a 24-hour window, and it runs in both directions. No interior painting unless adequate continuous ventilation and sufficient heating hold ambient air and substrate temperatures above the minimum for 24 hours before, during, and after application.
That’s a wider window than most people plan for. It means the day before the job and the day after are part of the job.
A closed room with no airflow smells sharply of solvent within the first half hour, and for most people that smell is the only ventilation gauge they own. Open a window, run a fan, and keep air moving through the whole cure.
MSU’s standard addresses fixture removal and protection, not paint storage temperatures. Cold paint doesn’t flow, and paint that doesn’t flow goes on thick at the edges.
If the room can’t hold its temperature for a full day on either side of the job, you’re painting into a moving target. Wait for a better week.
Cutting In Around a Fixture Without a Wobbly Edge
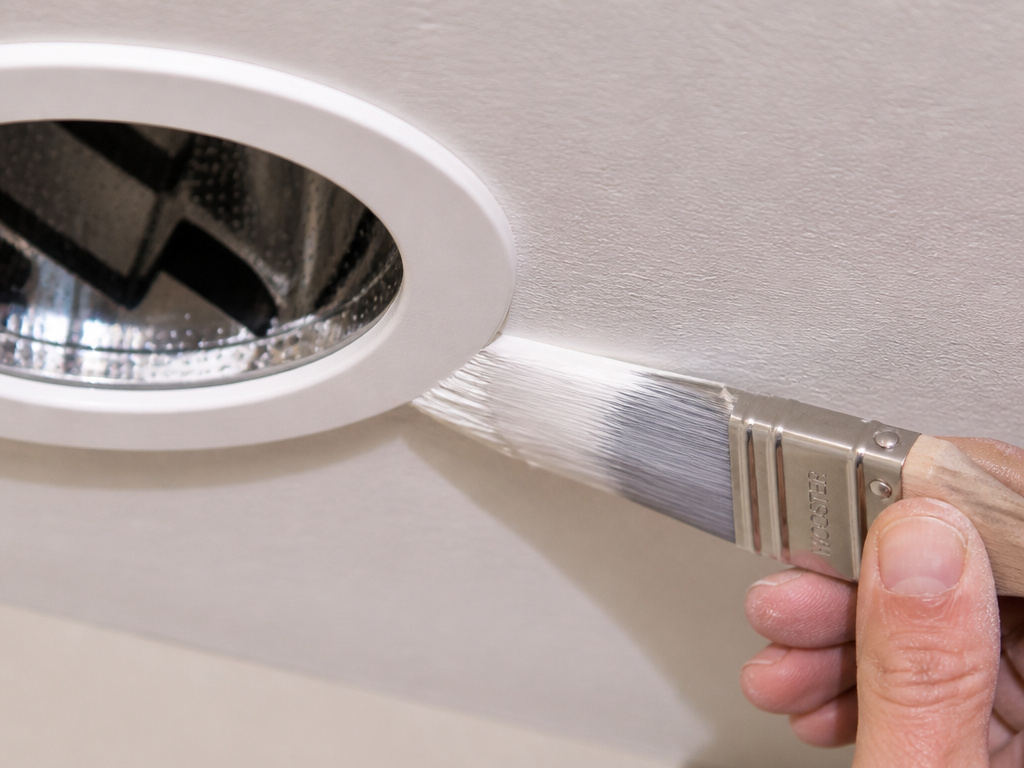
A clean line at a fixture comes from wrist control and a brush you trust. The tool matters less than people hope.
I used to buy the cheapest brushes in the bin, the sparse ones with springy bristles. One of them let go of a hair into a nearly dry cut-in line and I spent ten minutes chasing it with a fingertip while the paint set around it. Now I own fewer brushes and I check the ferrule with a thumb before I start.
Easy to miss: Hold a work light low and to the side while the paint is still wet. Raking light reveals the thin spots and skipped edges that flat overhead light hides completely.
The rest is loading discipline. Dip about half an inch, scrape the rim, and work in one direction toward the light so your overlaps fall in the same place. If you’d rather skip tape altogether, cutting in without painter’s tape is a learnable skill, and a fixture edge is a place to practice because the housing hides small wobbles.
For the wider ceiling line, cutting in a ceiling is the same motion at a longer reach. Try it tonight on a scrap of drywall first.
Mistakes That Show Up a Week After the Paint Dries
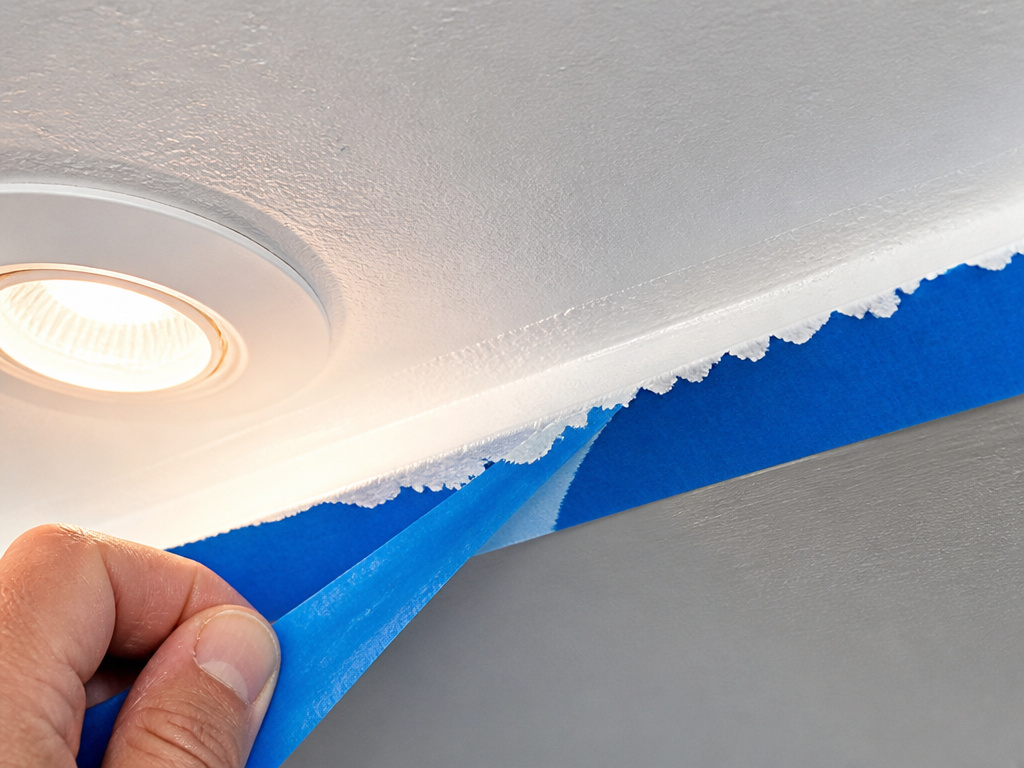
Three things go wrong after the ladder is put away: lap lines, tape ridges, and paint where it should never have gone.
- Rolling in short back-and-forth strokes. The stipple dries unevenly and bands appear once furniture is back and the light rakes across the ceiling. One direction, every roll.
- Pulling tape while the paint is tacky. You get a torn edge that no amount of touch-up hides, because the ridge sits proud of the field.
- Painting a rating plate. The label becomes unreadable, and the fixture’s certification can’t be verified by anyone who inspects it later.
- Skipping the caulk on an exterior sconce. A19 calls for caulk behind the sconce and installation per the orientation labeling so the socket stays sheltered. Miss it and moisture finds the connection.
If the streaks are already there, the recovery path is in painting a ceiling without streaks, and it starts with a second coat rather than a heavier first one.
For the paint itself, a flat white ceiling paint is the standard choice. A flat white and a work light tell you far more about what you missed than a color shift does. A flat white and a work light tell you far more about what you missed than a color shift does.
Frequently Asked Questions
Do I need to turn off the power to paint around a ceiling light?
Yes, if there’s any chance you’ll touch the fixture or remove it. MB Jessee’s guidance is blunt: never remove a light fixture without first making sure the power is off at the breaker. For a pure tape-and-plastic job the risk is lower, but the breaker costs you ten seconds.
Can I paint the ceiling light fixture itself?
Depends on the fixture. MSU’s standard lists light fixtures among pre-finished items not to be painted. A19, by contrast, publishes painting instructions for its bare bisque ceramic fixtures, recommending water-based paint. Factory-finished metal gets protected, not painted.
How do I keep paint off the fixture without removing it?
Tape the seam where the fixture meets the ceiling with blue or green painter’s tape, then tape painter’s plastic over the rest of the housing. Cut in a perimeter four to six inches around the fixture with a brush before you start rolling.
What should I do with recessed can trim rings?
Spring-held rings can be pulled down slightly and wedged with a small object while you paint behind them. Wire-hook rings pull down several inches and stay, or come off entirely. MPI’s spec prefers removal and secure storage, so either path is defensible on a can you can reach safely.
How long should I wait before pulling the tape?
Wait until the paint is dry. If the paint is being torn as the tape lifts, MB Jessee’s fix is to score a small seam at the tape edge with a utility knife first. Pulling while the paint is still tacky is how torn edges happen.
The Bottom Line
Here’s the threshold I’d use. If your fixture comes down with a couple of screws and you can see how it goes back, take it down. That single test matches the institutional spec and costs you minutes.
Everything else gets tape and plastic. Recessed cans get the wedge.
One concession worth stating plainly: exterior sconces are a different job with a different failure mode. A19’s instructions call for caulk behind the sconce and installation per the orientation labeling so the socket stays sheltered. Get that wrong and you’ll be repainting the wall, not the ceiling.
Start with the breaker tonight, before the ladder comes out.
