
How to Paint a Buffalo Check Wall: Step-by-Step
This post contains affiliate links. As an Amazon Associate, we earn from qualifying purchases.
To paint a buffalo check wall, lay out a square grid with tape, paint every other band in a mid-tone, then cross it with vertical bands and block the intersections in the darkest color. The Ace/Clark+Kensington plan uses a 12-inch grid, four colors, and one gallon of base coat.
The grid is doing one job: building three values out of two or three paint colors. The base is the lightest, the second color covers every other band, and the darkest sits only where the bands cross. That’s why a buffalo check reads as woven fabric instead of as a checkerboard. This is the same logic behind how to paint a buffalo check wall.
What follows is the layout math, the tape-timing argument that three manufacturers cannot settle, and the room condition that ruins the whole thing before the first stripe is dry.
Key Takeaways
- Tape timing depends on the source. Sherwin-Williams waits at least an hour until the film turns tacky, while Ace and Dutch Boy pull it while the paint is still wet or damp.
- Grid size varies by source. Ace/Clark+Kensington uses 12-inch increments, Lydi Out Loud used 10-inch squares on a nursery wall, and Sherwin-Williams derives size from wall dimensions divided by square count.
- Four colors or two, not four patterns. Ace uses four colors, Dutch Boy a base plus one glaze wash, and Sherwin-Williams two (more allowed); base, mid-tone, and a dark intersection square do all the work.
- Wait overnight before the vertical pass if you follow Ace, Dutch Boy, or Lydi Out Loud, who call for an overnight or 24-hour dry; Sherwin-Williams only specifies at least an hour before pulling tape.
- Keep the room between 50 and 95 F and off damp walls if following UH spec 099123, though no consumer brand page mentions it.
What Makes a Buffalo Check Read as Fabric
A buffalo check is three values stacked in a grid, and that’s the entire pattern.
The Clark+Kensington method uses four colors from light to dark: Before the Storm EXTCC-53 as the base, then Charcoal Cashmere N-C14, Black Chiffon N-C15, and Midnight Stroll N-C16. Each side of the wall is marked in 12-inch increments from the top down, and tape runs horizontally edge to edge. Two coats cover every other stripe.
The lightest value fills the whole wall as a base coat. The mid-tone covers every other horizontal band. The darkest color lands only where a horizontal band crosses a vertical one, which is why the crossings look deeper than anything else on the wall.
That overlap is the mechanism. Two bands crossing at 90 degrees read as a third, darker tone even when both are solid paint.
Ace builds this with four colors. Sherwin-Williams gets the same effect from two, because the topcoat still sits over the base at every intersection. A diamond pattern runs on identical logic, just rotated.
Prep Work That Decides the Whole Wall
You’re standing in front of a bare wall with a sanding sponge and a tube of spackle, and the urge is to skip ahead to tape.
Don’t. Ace’s instruction sheet puts patching and sanding first for a reason. Every bump shows up twice under a check, once in a light band and once in a dark one.
Wipe the wall with a clean, damp cloth and lay down a drop cloth before you open anything, which is where the Dutch Boy buffalo check project starts. Sherwin-Williams adds one more step: ventilate the room before the lid comes off any can.
Before you start: Open a window or set a fan running before the first can is opened, because fumes build fast in a closed room. Use a step stool rather than a chair for the top tape line, and keep the drop cloth flat so it doesn’t slide under your feet.
Latex paint gives off a flat, sweetish smell the moment the lid comes off, and it hangs in the room even with a fan going.
The Tools That Actually Earn Their Place
- A 9-inch roller for the wide fields plus a mini roller for tight bands, which is the exact mix Ace recommends
- Low-tack painter’s tape, since Sherwin-Williams specifies it for marking squares and it releases without lifting the base coat
- A laser level. Ace calls it the tool that makes this job easy, and you set the tape seam with a swipe from a wet rag
- An angled brush for cutting in at corners and along trim
- A pencil, a carpenter’s level, and a step stool
Skip the specialty pattern kits. Tape, a level, and a roller cover the whole job.
Pick Your Colors: Four, Two, or a Glaze Wash
Four colors, one gallon of base, three quarts. That’s the Ace/Clark+Kensington shopping list, and it’s the most specific plan anyone publishes.
The Four-Color Route
Ace runs a light-to-dark ramp: Before the Storm EXTCC-53 as base, Charcoal Cashmere N-C14 second, Black Chiffon N-C15 third, and Midnight Stroll N-C16 darkest. Buy one gallon of the base and one quart of each of the other three.
That quart sizing works because the darker colors only cover fractions of the wall. The base does the bulk of the square footage.
The Two-Color Route
Sherwin-Williams builds its version from two coordinating colors and notes that more than two are allowed. The lightest color always acts as the base coat. Lydi Out Loud went a step further and used two shades plus white.
When you compare a how to paint a buffalo check wall to color blocking, it is basically color blocking with a grid laid over it. The intersections still darken, so you get three apparent values from two cans.
The Glaze Wash Route
Dutch Boy mixes one part paint with four parts glaze and rolls it between the taped stripes with a mini foam roller, using an angled brush along corners.
That mix gives a see-through wash, not a solid stripe. It is a different look from the Ace and Sherwin-Williams versions, and the two approaches are not interchangeable. Mixing a glaze is like thinning a sauce: add a little at a time and check the color on the wall, not in the bucket.
Contrast is the pattern. Two shades sitting next to each other on the color deck give a soft check, and skipping several steps down the deck gives you the bold one.
How Do You Lay Out a Buffalo Check Grid?
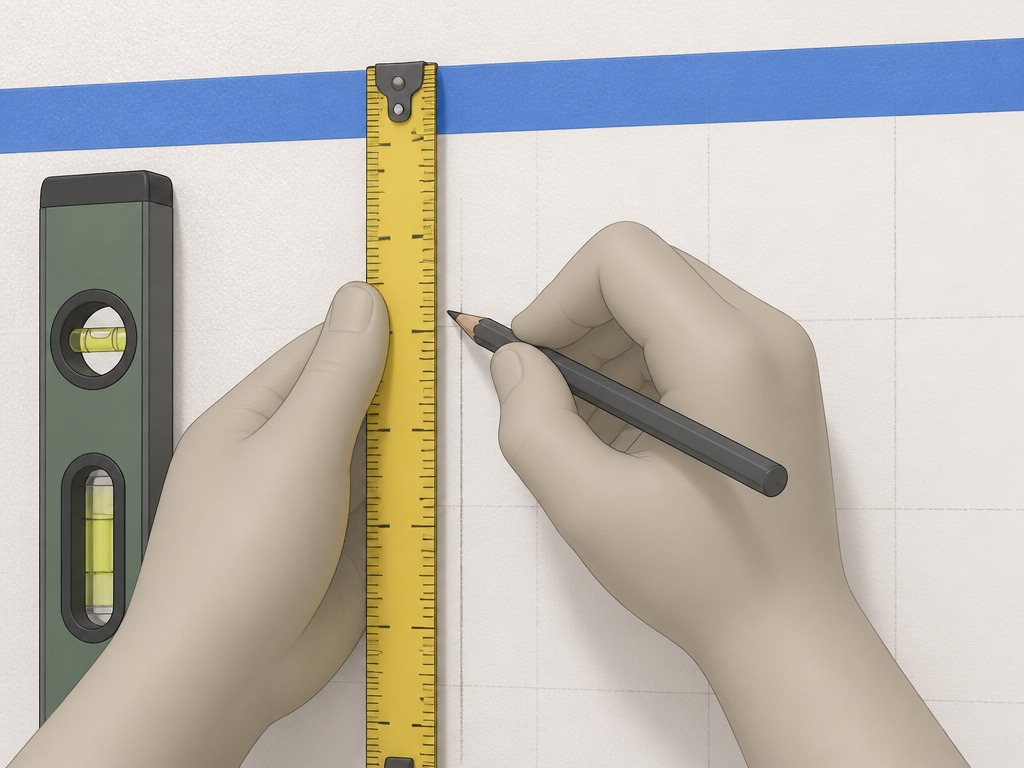
Pick a square size first, then check that it divides into your wall without leaving a sliver at the corner.
Ace marks each side of the wall in 12-inch increments, working from the top down, then tapes horizontal lines from edge to edge; Dutch Boy marks intervals along the bottom of the wall starting at the center and working outward, then uses a level and pencil to mark vertical lines the full height; Sherwin-Williams instead divides the wall length and height by your desired square size or square count, and the sources disagree on which grid size to use.
Lydi Out Loud used 10-inch squares, while Ace/Clark+Kensington uses 12-inch increments and Sherwin-Williams derives size from wall dimensions; there is no canonical number here.
The taping a square grid sequence stays the same whatever size you choose. Measure, mark light, tape outside the squares you plan to paint, and check the lines with a level as you go.
A soft pencil line is enough. Press hard and you’ll be sanding graphite off the wall later.
Painting the Horizontal Bands
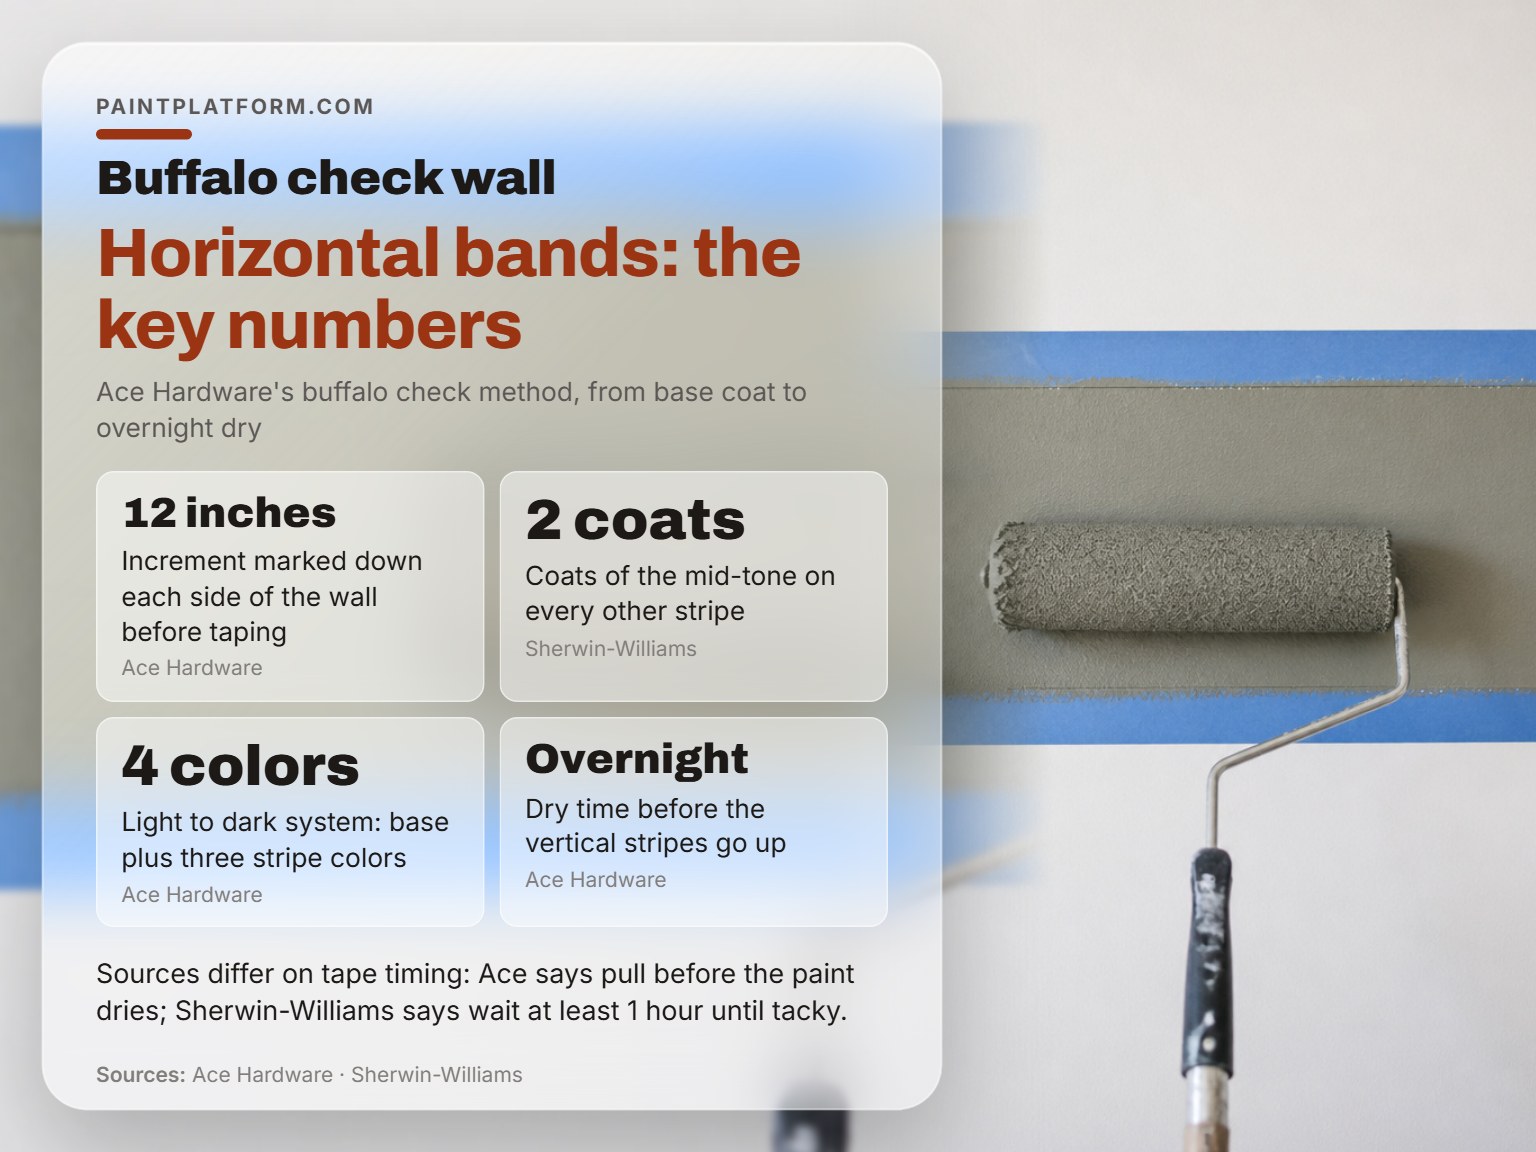
The horizontal pass is the easy half of how to paint a buffalo check wall.
- Roll the base coat first. Cut in with a brush, roll the rest, and let it dry thoroughly before any tape goes up. Taping a wet base coat pulls the finish and leaves a gummy edge that never lays flat.
- Mark and tape the horizontal lines. Measure 12-inch increments down both sides of the wall and run tape edge to edge. Skipping the level check here means every band drifts a little further off true as you work down.
- Paint every other stripe in the mid-tone. Cut in with an angled brush, roll between, and use two coats. One thin coat looks chalky and lets the base color ghost through at the edges.
- Pull the tape before the paint dries. Ace is direct about this: removing it early is cleaner, and waiting lets the film bridge the tape edge and tear.
- Let it dry overnight. Ace calls for an overnight dry before the vertical stripes, and starting early smears the bands you just finished.
If you’ve done painted stripes before, this pass will feel familiar. Same rhythm, just repeated across the wall.
Common mistake: Taping over a dusty wall. Sanding dust keeps the tape from sealing, paint creeps under the edge, and you get a fuzzy border that no amount of touch-up hides.
Why Do the Manufacturers Disagree About Tape?
You pull the first strip and the edge comes up ragged, with a fringe of paint stuck to the tape instead of staying on the wall.
I stopped chasing perfect lines on pattern walls a while back. A slightly wobbly edge from pulling the tape a bit early looks charming, and I’ve seen people prefer it to the razor-crisp version. Let it be messy first.
But the manufacturers genuinely contradict each other on timing, and you should know which sheet you’re following.
| Source | When to pull the tape | Stated reason |
|---|---|---|
| Ace / Clark+Kensington | While the paint is still wet | “It is cleaner if you remove before it dries” |
| Dutch Boy | While the paint is still damp | Same wet-pull approach, applied to the glaze wash |
| Sherwin-Williams | After at least 1 hour, while tacky | Wet paint risks seepage; fully dry paint risks lifting |
Ace and Dutch Boy both pull wet, while Sherwin-Williams waits at least an hour until the paint is tacky and warns that pulling too early lets paint seep under the edge; all three agree that fully dry tape lifts paint.
You get crisp lines from pressure and timing, not from the brand printed on the roll. Press every tape edge down with a fingernail before the roller touches the wall.
The Vertical Pass and the Dark Intersections
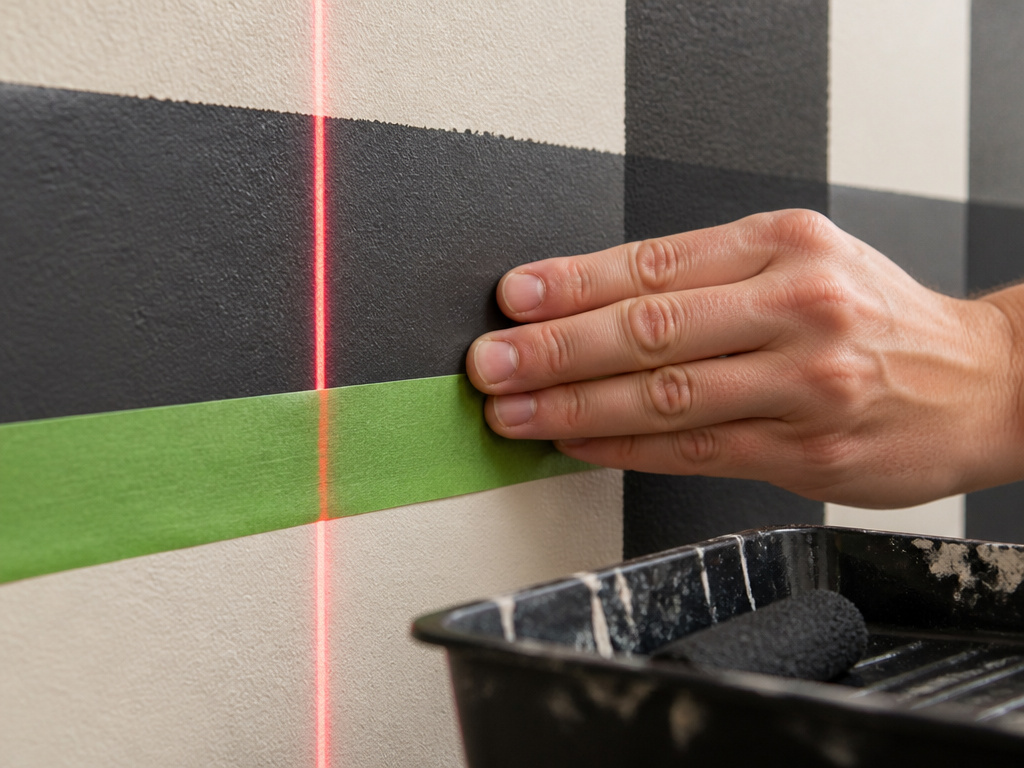
A laser level does the measuring on the vertical pass, and it earns its keep here.
Ace lays straight tape lines with the laser, measuring 12 inches between each one; then Black Chiffon N-C15 goes on with a brush at the edges and a roller in the middle, and Ace pulls the tape before the paint starts to dry, while Sherwin-Williams waits at least an hour until tacky.
Lydi Out Loud used Frog Tape on the vertical pass and taped along the existing crisp paint line instead of re-measuring. That’s the smarter move once the horizontal bands are down, because the painted edge is already true. Lydi Out Loud used Frog Tape here, taping along the existing crisp paint line.
The last step is the intersections. Tape off each crossing to make a square, overlap the lighter colors slightly, and roll on Midnight Stroll N-C16. This is where the pattern layout either locks in or falls apart.
The tape comes up with a soft crackle when the paint is at the right stage for your chosen source: Ace and Dutch Boy pull while wet or damp, while Sherwin-Williams waits at least an hour until tacky; when it’s too dry, it peels with a snap and takes a scab of paint with it.
When the Room Fights Back
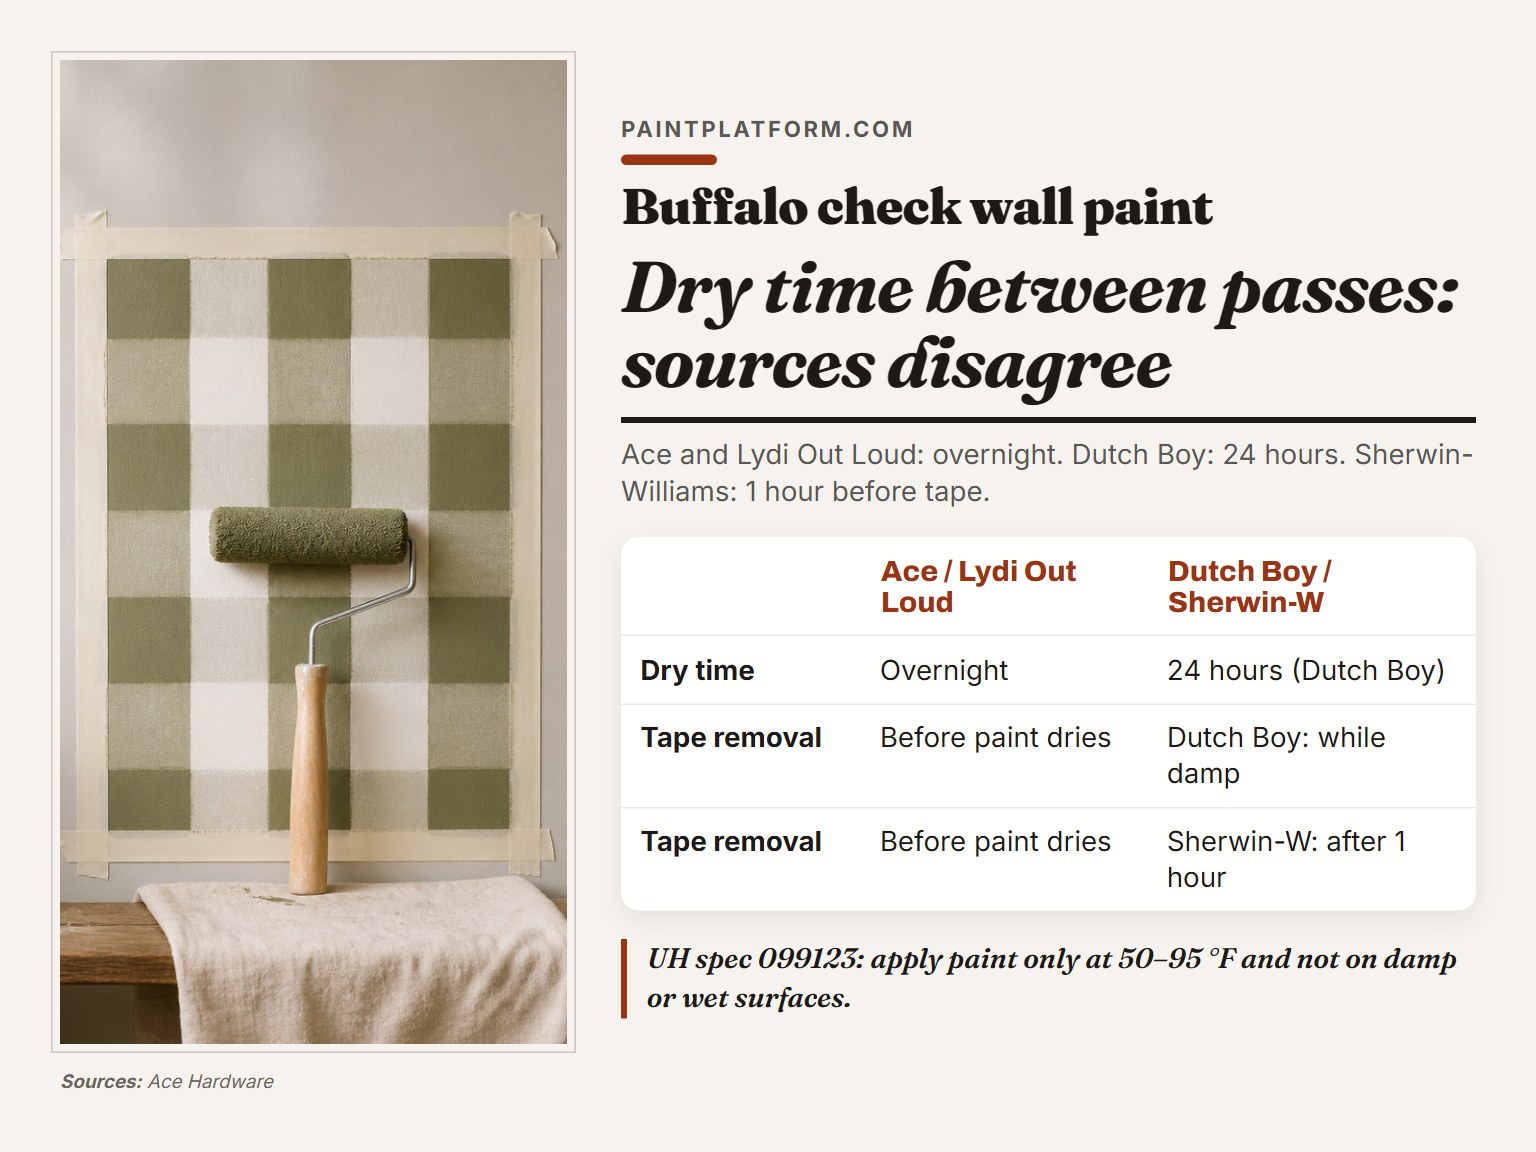
50 to 95 F. That’s the window UH spec 099123 sets for paint application, and no consumer brand page mentions it.
The same spec says not to apply paint to damp or wet surfaces. The same spec also says not to apply paint to damp or wet surfaces. A cold garage in November or a steamy bathroom in July will both break the film before it bonds.
Dry time between passes varies by source: Ace and Lydi Out Loud let it dry overnight, Dutch Boy 24 hours, and Sherwin-Williams only specifies at least an hour before pulling tape.
| Source | Dry time before the next pass | Coats |
|---|---|---|
| Ace / Clark+Kensington | Overnight | Two coats per stripe |
| Dutch Boy | 24 hours | One glaze pass |
| Lydi Out Loud | Overnight | Two coats per color |
| Sherwin-Williams | Not stated; pull tape after 1 hour | Topcoat squares only |
Where this goes sideways: Rolling paint below 50 F or onto a damp wall. The film skins over before it bonds, and you’ll see blushing and peeling within a week, usually right at the tape line where the coat is thinnest.
Frequently Asked Questions
How long does a buffalo check wall take?
Plan on a long dry between the horizontal and vertical passes. Ace, Dutch Boy, and Lydi Out Loud all call for an overnight or 24-hour dry between the horizontal and vertical passes, and that gap is not optional.
Can I use two colors instead of four?
Yes, though sources disagree: Sherwin-Williams builds its version from two coordinating colors (more allowed), Dutch Boy uses a base plus a single glaze wash, and Ace uses four colors. The intersections still darken, so the pattern still reads.
Do I need a laser level?
It helps, though sources disagree: Ace recommends a laser level for the vertical lines and shows how to set the tape seam with a wet rag, while Sherwin-Williams and Dutch Boy get by with a carpenter’s level and a pencil.
Why did my tape pull the paint off?
The paint was too dry when the tape came up. Sherwin-Williams waits at least an hour so the film is tacky and warns that fully dry paint lifts with the tape, while Ace and Dutch Boy pull while the paint is still wet or damp.
Should I erase my pencil marks?
Sherwin-Williams warns that small, light pencil marks may show through the topcoat, while Lydi Out Loud erases every visible mark before painting and erases the ones under tape afterward; the sources disagree on whether erasing is necessary.
What if my wall isn’t an even multiple of my square size?
Adjust the square size to fit the wall, which is Sherwin-Williams’ instruction, though Ace uses 12-inch increments and Lydi Out Loud used 10-inch squares; dividing the wall length and height by your square count gives you a size that lands flush at both corners.
The Bottom Line
Before you tape a single line, cut a scrap of drywall or a piece of primed board and test your tape timing on it. Pull one strip wet, one at the one-hour mark, and one after a full day. You’ll know in an afternoon which approach your paint and your room actually want, and you won’t learn it on a 10-foot wall.
My money is on pulling early, though sources disagree: Ace and Dutch Boy pull while wet or damp, while Sherwin-Williams waits at least an hour until tacky. The wet-pull camp gets a cleaner edge, and a slightly loose line reads as hand-painted rather than printed.
One hard stop: if the room is under 50 F or the wall feels damp to the back of your hand, wait. No tape trick saves a coat that never bonded, and you’ll be sanding it back to bare drywall by the weekend.
