
How to Paint a Checkerboard Floor: Step-by-Step
This post contains affiliate links. As an Amazon Associate, we earn from qualifying purchases.
To paint a checkerboard floor, sand the surface, roll a base coat in the lighter color, tape a grid, then paint the alternate squares and pull the tape while the paint is still wet. Square size is a judgment call: Resene specifies 40mm, while This Old House sizes squares to the wall.
Pulling tape while the paint is wet is the step that separates a cut edge from a torn one. A drying film skins over and bridges the tape line. Once that skin sets, lifting the tape rips the film along the seam instead of releasing it cleanly, and no amount of touch-up hides a ragged edge on a contrast square. This is why how to paint a checkerboard floor depends on timing the tape pull correctly.
What follows walks the parts that genuinely vary: square size, grid orientation, three different bleed fixes, and cure numbers that three sources put in three different places.
Key Takeaways
- Pull the tape while the paint is wet. Resene, This Old House, and Addicted 2 Decorating all land on the same answer here.
- Square size has no universal value. Resene fixes it at 40mm; This Old House divides wall length by the square count you want.
- Bleed has three fixes, not one. A putty knife, a base-color seal, or no tape at all with chalk lines and freehand.
- Cure times run from 2 hours to 30 days depending on which source and which product system you follow.
- Concrete needs a moisture barrier first. Simiron squeegeed MVB at about 16 mils before any color coat went down.
Prep Decides Whether the Paint Stays
Sand the existing finish with a 150-grit sanding sponge before anything else. This Old House specifies that grit for two jobs at once: dulling the old finish so new paint can grip, and leveling high spots left by old stain or filler.
Wipe the floor with a damp cloth and let it dry completely. Then tape plastic under the doors, because airborne dust settles into wet paint and stays there until the coat cures around it.
This Old House specifies a 150-grit sanding sponge for dulling the existing finish and leveling high spots, followed by a damp wipe and a full dry. Dust barriers go under the doors before the first coat, because airborne grit settles into wet paint and stays locked in once the film cures.
Before you start: Xylene is the solvent Simiron specifies for cleaning paint bleed, so ventilate the room and keep it away from pilot lights and heaters.
Here is the whole prep list, and none of it is optional:
- Sand, wipe, wait. Damp cloth, full dry, no shortcuts on the wait.
- Plastic sheeting under every door in the room.
- A vacuum with an attachment that does not have a beater bar for the dust you can’t see.
- Floor-rated paint, not wall paint. Wall paint is formulated for a surface nobody walks on.
Resene’s own project sheet names Resene Quick Dry as the primer and Resene Waterborne Sidewalk as the topcoat, in Alabaster for the base and Black for the squares. That is a complete system from one manufacturer, which removes a variable before you start. If you’re still deciding what to roll, my guide to the best paint for floors covers the waterborne versus oil-based trade-off.
What Size Should Checkerboard Squares Be?
There is no single answer, and the three most detailed sources land in wildly different places. Resene fixes the grid at 40mm. This Old House gives no dimension at all and tells you to divide the wall length by the number of squares you want. Simiron’s 10,000 square foot job worked out to roughly 8 square feet per square.
| Source | Square size | Where it fits |
|---|---|---|
| Resene | 40mm fixed grid | Small rooms, sample boards, furniture |
| This Old House | Wall length divided by square count | Room-scale wood floors |
| Simiron | About 8 sq ft per square (1,250 squares over 10,000 sq ft) | Garage and workshop scale |
Simiron’s crew went through roughly 5.3 miles of blue tape and spent about three weeks taping that floor. Smaller squares mean more tape, more corners, and more places for paint to creep under an edge.
So pick the square count by eye first, on the floor, with a chalk line, when you compare a how to paint a checkerboard floor. A 40mm grid on a room reads as texture from standing height. A grid of roughly 2.8-foot squares reads as a floor. Both are legitimate. They just belong in different rooms.
Straight Grid or Diagonal? The Sources Split
This is the one place where two credible sources give opposite instructions for the same design. Resene lays a straight orthogonal grid, using 40mm parallel masking strips in both directions at 90 degrees and a set square to keep it true. This Old House goes diagonal, starting with perfect half-square triangles against the most visible wall, and argues the angle makes a room feel larger and more dynamic.
Both are right, for different rooms.
Tape grids aren’t your only option, either. A buffalo check wall uses the same overlapping-band math, and a diamond pattern is just a checkerboard rotated 45 degrees with the outer corners trimmed off.
Lay both out in chalk before you commit. Chalk wipes off. Tape doesn’t.
How Do You Stop Paint Bleeding Under the Tape?
Paint creeping under a tape edge is the single most common failure on this project, and the three sources solve it three different ways. None of them is wrong. They just cost different amounts of time.
Drag a putty knife along the tape edge
This Old House seals the tape by dragging a putty knife over the tape’s edge, pressing the adhesive into the floor so paint has nowhere to travel. It takes a few seconds per square and it’s the fastest of the three methods.
Seal the tape with the base color
Addicted 2 Decorating paints over the tape edges with the base color (Classic Gray in that project) before the contrast color (Polar Bear) goes down. Any paint that bleeds under the tape is base color bleeding onto base color, so it disappears. The blogger is explicit that the marking, taping, erasing pencil marks, and sealing are the slow parts, and the actual painting goes fast once they’re done.
Skip tape and paint freehand
This Old House also documents painter Peter rejecting tape outright on a magazine project. His reasoning: paint will always migrate under the tape. He worked from chalk lines and painted freehand.
Whichever method you pick, the same sealing logic applies to walls. Getting a crisp paint line on a vertical surface uses identical mechanics, minus the gravity problem.
| Problem | Cause | Fix |
|---|---|---|
| Paint creeps under tape | Tape edge never sealed | Drag a putty knife along the edge |
| Bleed shows on the contrast square | Sealed with the contrast color | Seal with the base color instead |
| Ragged edge when tape lifts | Tape pulled after the film set | Pull while wet, peel up and away at an angle |
| Rounded corners on squares | Tape torn by hand | Tear the tape against a putty knife |
Where this goes sideways: Sealing the tape with the contrast color instead of the base. Any bleed then lands as contrast paint on a base square, which is exactly the mess you were trying to prevent.
Painting the Squares Without Painting Yourself Into a Corner
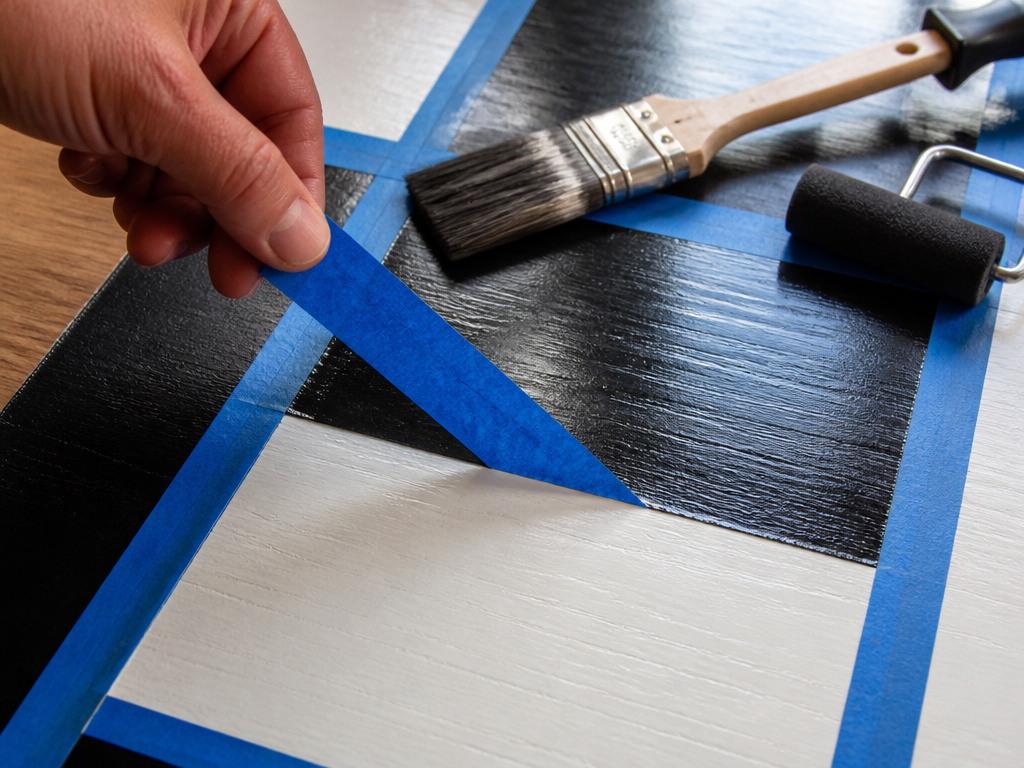
Start on the side opposite the door. This Old House is blunt about why: work from the far corner toward your exit and you never have to walk across wet squares to leave the room.
Here is the sequence, with what breaks if you skip a step.
- Cut in each square with a 2-1/2-inch brush, starting every stroke on the tape and pulling inward. Start the stroke in the middle instead and the brush pushes paint under the edge.
- Fill the square with a mini roller, rolling in the direction of the floorboards. Roll across the boards and the texture telegraphs through the finish under raking light.
- Wait about 40 minutes before the second coat. Addicted 2 Decorating used that interval. Paint a second coat onto a tacky first and the roller drags the film.
- Pull the tape immediately after the second coat, while the paint is very wet. Peel up and away from the paint at an angle. Wait for it to dry and you’ll take a strip of the new coat with you.
- Wipe drips with a damp rag while they’re still wet. A cured drip on a contrast square means sanding and repainting that square.
- Clean any bleed with xylene if you’re on a Simiron system. On a waterborne system like Resene Waterborne Sidewalk, xylene is the wrong solvent entirely, so wipe with a damp rag and touch up instead.
Step four is the one people get wrong, and it’s the one that shows.
Concrete Floors Need a Moisture Test First
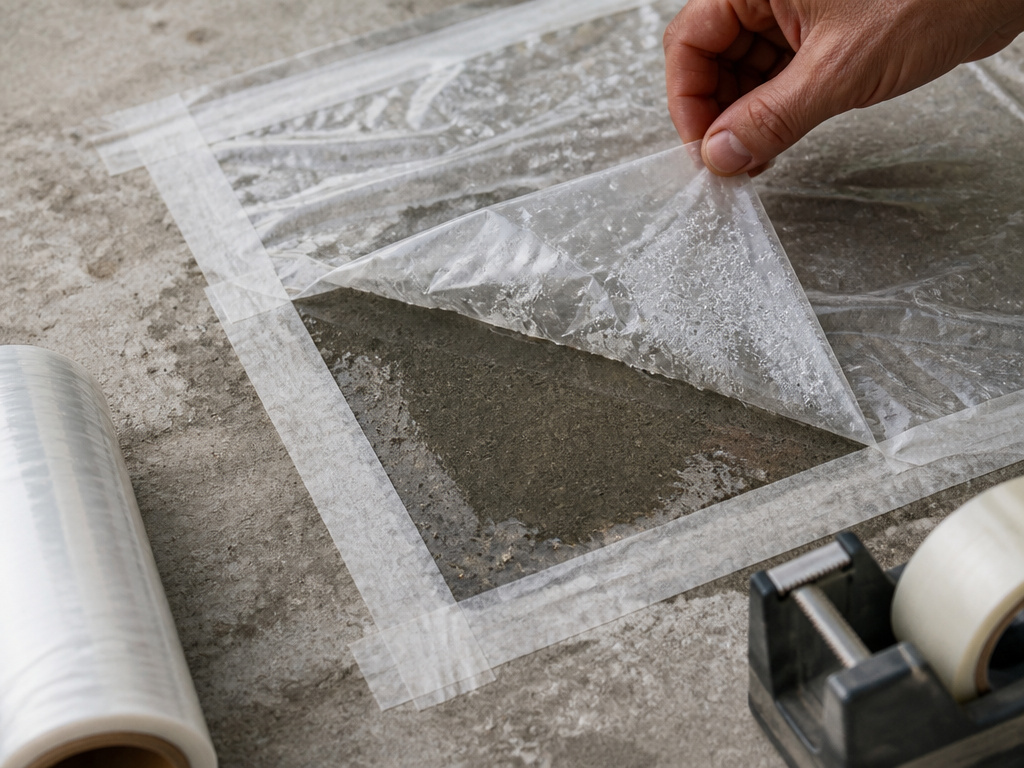
Tape a square of clear plastic to the slab and leave it for a while. If there’s fog or dark damp patches underneath when you lift it, stop and deal with moisture before any paint goes down.
Simiron’s concrete job treated this as a required step. Their crew squeegeed and back-rolled Simiron MVB at about 16 mils, adding white tint packs on the second pass, then applied one white coat of Simiron 1100SL at 10 to 30 mils. A wood-floor guide like This Old House’s has no equivalent step, because wood doesn’t wick moisture the same way.
If you’re prepping a slab from scratch, the concrete floor paint decision and the moisture decision are the same decision. Get them wrong in that order and nothing downstream saves you. The full sequence for a garage floor is worth reading before you buy anything.
When Can You Actually Walk on It?

Two hours. That’s Resene’s minimum final cure before the floor is used, and it’s the shortest number here by a wide margin.
The other two sources are nowhere near it. This Old House says wait a couple of days before walking on the floor or bringing furniture back. Addicted 2 Decorating puts full cure at about 30 days, though the blogger covered the floor with protective paper and moved heavy tables onto it well before that. Three sources, three timelines, and each one is describing a different product system.
Here’s my read. Use Resene’s 2-hour number only if you’re using Resene’s specified system and you’re talking about light foot traffic. The 30-day figure is the honest one for full hardness.
The topcoat question splits the same way. This Old House applies a coat of water-based polyurethane to high-traffic areas for durability. Simiron went further, applying two coats of Simiron 971EPS clear gloss and sanding between coats with a 20-inch slow-speed buffer. Addicted 2 Decorating deliberately skipped a clear coat, on the reasoning that it would complicate spot touch-ups and defeat the point of a painted floor you can sand and re-coat.
If the floor takes shoes and dog claws, topcoat it. If it’s a studio where you’ll drip resin and want to spot-fix a square quickly, skip it.
Keeping the Finish Sharp Without Waxing It
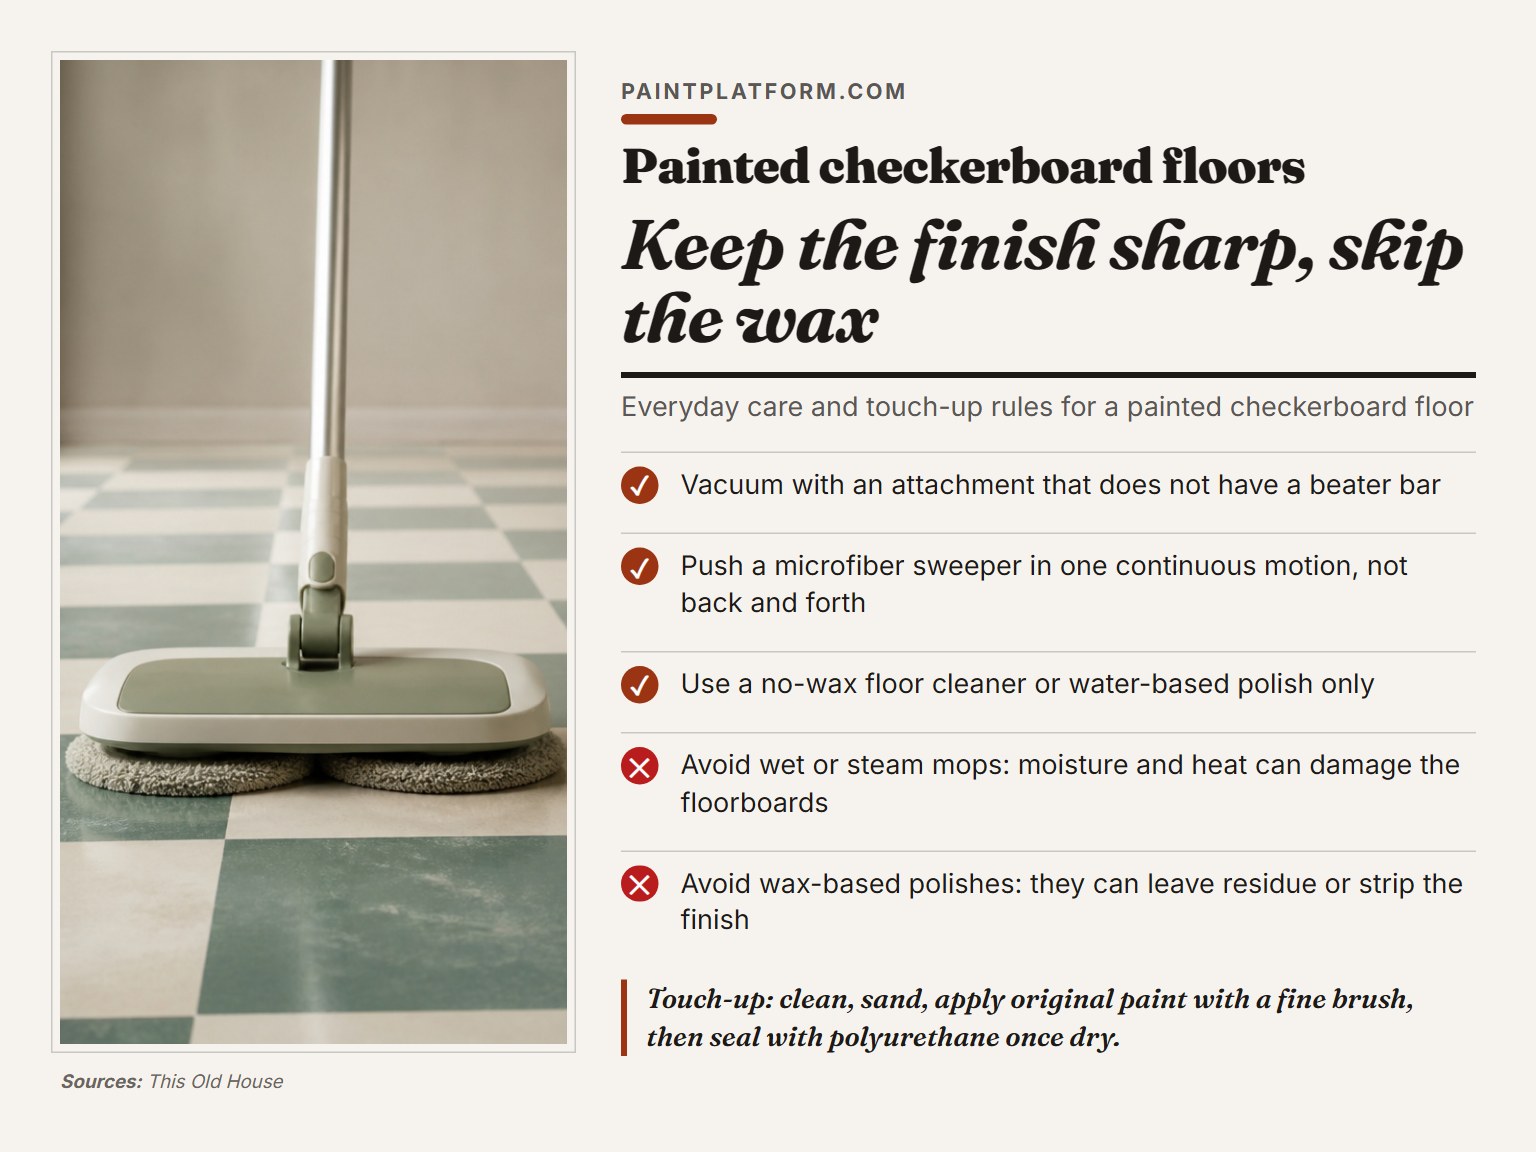
Skip the wet mop entirely. This Old House warns that moisture and heat from a wet or steam mop can damage the floorboards underneath, and a painted floor hides that damage until the paint lifts.
The everyday routine is shorter than most people expect:
- Vacuum with a beater-bar-free attachment.
- Push a microfiber sweeper in one continuous motion, not back and forth.
- Felt pads under every furniture leg, no exceptions.
- A no-shoes rule, which costs nothing and buys years.
- No-wax floor cleaner or a water-based polish only. Wax-based polishes leave residue or strip the finish.
Clean spills immediately with a damp cloth.
When a square does chip, the repair is four steps: clean the spot, sand it lightly, apply the original paint with a fine brush, then seal with polyurethane once it’s dry. That’s the whole touch-up procedure, and it’s why a checkerboard is more forgiving than a solid color. One damaged square is a square, not a floor.
Frequently Asked Questions
Do you have to pull the tape while the paint is still wet?
All three sources say yes. Resene instructs removing the masking tape before the paint dries. This Old House specifies peeling up and away from the paint at an angle. Addicted 2 Decorating pulled tape immediately after the second coat while the paint was still very wet. None of them give a numeric open time, so work fast.
Can you paint a checkerboard on a concrete floor?
Yes, but the prep is different. Simiron’s concrete job required a moisture vapor barrier at about 16 mils before any color coat. Test the slab with a plastic sheet for 24 hours first. If moisture shows under the plastic, the barrier comes before the pattern.
What’s the fastest way to get sharp corners on each square?
Tear the tape against a putty knife instead of cutting or pulling it by hand. This Old House uses that trick to get perfect corners, and it works because the torn edge compresses slightly and seats tighter than a cut edge.
Should you seal a painted checkerboard floor?
It depends on traffic. This Old House applies water-based polyurethane to high-traffic areas. Simiron used two coats of clear gloss with sanding between. Addicted 2 Decorating skipped it on purpose to keep touch-ups simple. Pick based on whether you’d rather protect the finish or repair it fast.
Is there a way to avoid tape altogether?
Yes. This Old House documents painter Peter working from chalk lines and painting freehand, on the reasoning that paint always migrates under tape. He wanted a less perfect line. It’s a real option, and it’s faster once your hand is steady.
Before You Go
Everything above assumes a dry substrate. If you’re on a slab, the plastic sheet test comes before any of it, and if that plastic fogs, none of the taping advice matters yet.
So here’s your first move, tonight: tape a two-foot square of clear plastic to the floor, leave it 24 hours, and check it in the morning. That single test decides whether you’re painting this weekend or fixing moisture first.
And if you’re on wood in a dry room, stop overthinking the grid. Lay a chalk line, count the squares by eye, and tape it. The layout work is the slow part, and the painting goes faster than you expect once the tape is down.
