
How to Paint a Ceiling With a Roller: Step-by-Step
This post contains affiliate links. As an Amazon Associate, we earn from qualifying purchases.
To paint a ceiling with a roller, cut in a 2 to 3 inch border with an angled brush, then roll in 3 by 3 foot sections while the edge is still wet. Use a 9 inch roller with a 3/8 to 1/2 inch nap on smooth ceilings, and a 3/4 inch nap on textured ones.
Fine Homebuilding pins the nap at 3/8 to 1/2 inch on a 9 inch cover. Sherwin-Williams only says low-nap for smooth ceilings and 3/4 inch for textured, and neither source explains how to paint a ceiling with a roller.
Here’s the order that holds up: protect the room, cut in the border, roll in small sections, and lay off before the paint sets. I’ll flag where the sources split on primer and second-coat direction, and say which answer survives contact with a real ceiling.
Key Takeaways
- Cut in a 2 to 3 inch border with an angled brush, then roll while that edge is still wet.
- Match nap to texture: 3/8 to 1/2 inch on a 9 inch cover for smooth, 3/4 inch for textured.
- Roll 3 by 3 foot sections, roughly one roller-load, then lay off with light passes.
- Primer is conditional: Benjamin Moore says most ceilings skip it; Sherwin-Williams says use it on stains.
- Recoat times: latex 2 to 4 hours at 60F or warmer, oil-based 24 hours.
What You Need Before the Roller Comes Out
Fine Homebuilding’s tool list is the tightest: a 9 inch roller cover with 3/8 to 1/2 inch nap, a frame, a tray, an extension pole, and a 2 to 3 inch angled brush for the cut-in. Benjamin Moore adds a 2½ inch angle sash brush and a step ladder.
Fine Homebuilding rolls out paint in 3-ft. By 3-ft. Sections, about one roller-load of paint. Use a higher-nap roller cover, like 3/4-inch, for textured ceilings so paint reaches deeper pockets. Nap choice follows ceiling texture, not personal preference.
The rest of the kit matters less than people assume when you compare a how to paint a ceiling with a roller. A canvas drop sheet or plastic sheeting, not an old bed sheet, because British Paints points out that bed sheets let paint soak straight through. Painter’s tape along the wall-ceiling edge, unless the walls are getting painted next, in which case Sherwin-Williams says skip the tape and paint a few inches down the wall instead.
And if the ceiling is high enough that a step ladder stops feeling safe, the extension pole does most of the work for you.
What to gather before you start:
- 9 inch roller cover, 3/8 to 1/2 inch nap for smooth ceilings
- 3/4 inch nap cover for textured ceilings
- 2 to 3 inch angled brush for cutting in
- Extension pole so you’re not standing under the roller
- Canvas drop sheet or plastic, not bed sheets
Why Does My Ceiling Show Streaks and Lap Marks?
Streaks almost always trace back to one of three things: a dry roller pressed too hard, a section rolled past the point where paint stopped flowing, or a cover that shed fibres into the finish.
| Symptom | Likely Cause | Fix |
|---|---|---|
| Visible streaks | Dry cover, heavy pressure | Reload sooner, lighten up |
| Lap marks at section edges | Rolling into drying paint | Overlap only into wet edge |
| Patchy coverage | Too little paint on the cover | Three to four tray passes |
| Fuzz in the finish | Cover not rinsed first | Wash and spin dry before use |
British Paints names the loading rule that prevents most of this: three to four passes in the tray to distribute paint evenly. Too little and the ceiling goes patchy. Too much and you get tracks or lines.
Common mistake: Pressing harder on a nearly-dry roller to stretch the last of the paint. The cover stops releasing evenly, the nap lays down uneven texture, and the streak shows up under raking light once the coat sets.
The fix was reloading the 9 inch cover more often and finishing every section with light top-to-bottom passes. That single change did more than any product swap. If you want the longer version, there’s a full walkthrough on how to paint a ceiling without streaks, and a separate piece on avoid lap marks for the section-edge problem specifically.
The Cut-In Border: 2 to 3 Inches, Then Roll
Every source I checked agrees on this number, which is rare. Sherwin-Williams and Fine Homebuilding both call for a 2 to 3 inch border where the ceiling meets the walls and around all moldings.
The technique matters more than the width, and the how to paint a ceiling with a roller question starts here. Sherwin-Williams says to start each stroke away from the edge and work toward the tape, feathering as you go. Fine Homebuilding adds the follow-up: roll within 1/2 inch to 1 inch of the wall line so the roller texture covers your brush marks.
What finally worked was slowing down. A lightly loaded 2½ inch angle sash brush, a slow stroke, and a wet edge I never let sit. From standing height on the floor, the line reads clean. Up close on a ladder it isn’t perfect, and it doesn’t need to be.
Before you start: Turn off power at the breaker before you detach any light fixture or vent, because Sherwin-Williams flags live wiring as the main hazard on this job. Keep the pole below shoulder height so you aren’t fighting gravity with a loaded roller.
How Do You Load a Roller Without Drips?
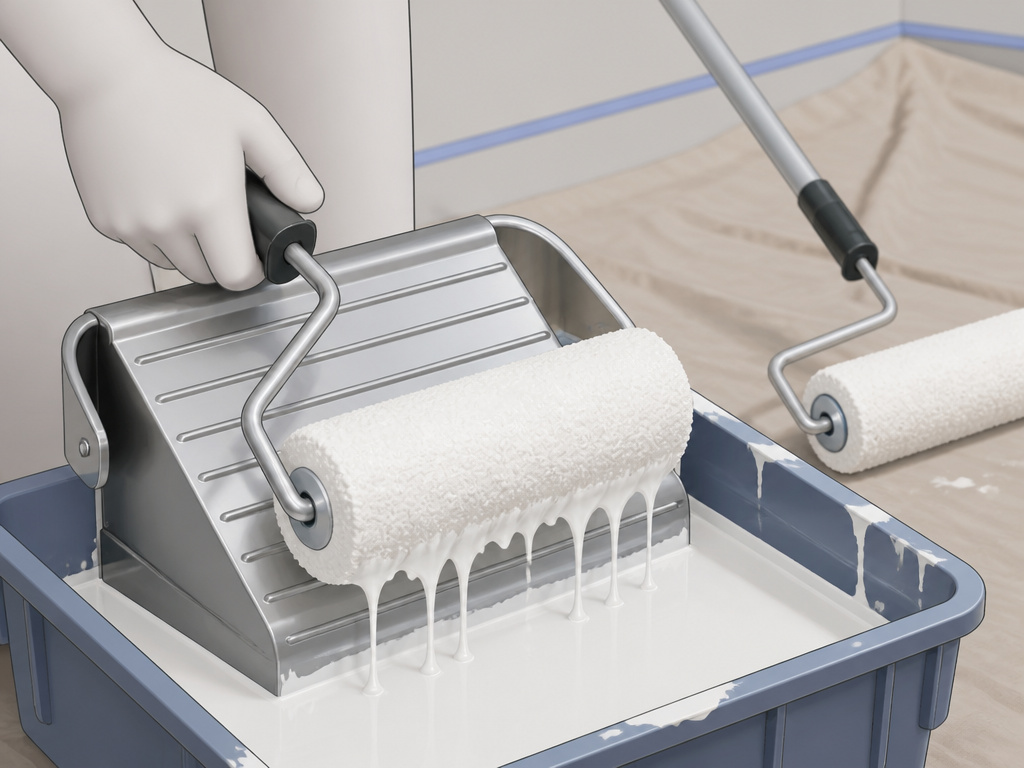
British Paints gives the number: three to four passes in the tray. That’s it. Enough to saturate the nap evenly, not so much that the cover is heavy.
Fine Homebuilding’s version is to run the roller up and down the bucket ramp several times when loading, which knocks off the excess and cuts mist. Behr’s warning is the same idea from the other end: after you attach the extension, make sure the roller isn’t overly saturated, or you’ll get drips on the drop cloth and on you.
Where this goes sideways: Overloading the cover to save time. The first pass throws a heavy bead of paint at the wall line, and the drip runs down behind the tape before you notice. Reload more often with less paint and the job actually goes faster.
There’s a longer breakdown on loading a paint roller if you keep getting drips no matter what you try.
Rolling Sequence: 3 by 3 Sections and the Lay-Off
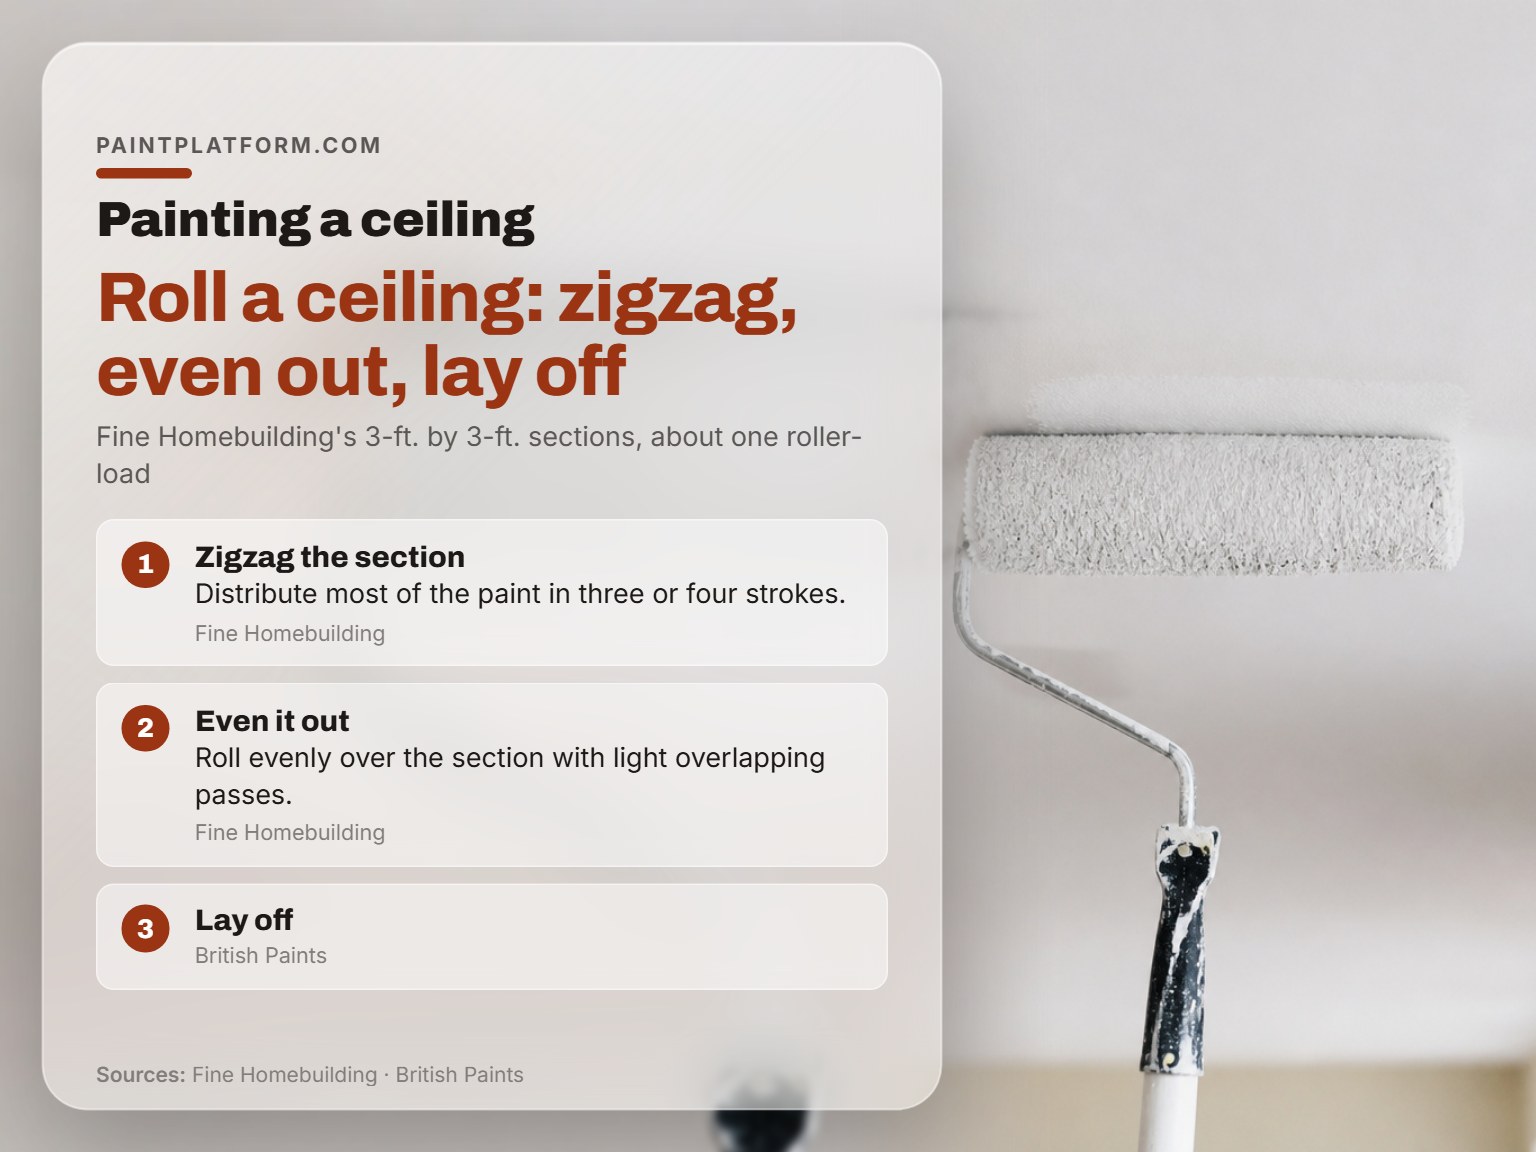
Fine Homebuilding’s section size is 3 feet by 3 feet, about one roller-load.
Inside each section, the sequence is zigzag first, then even out. Fine Homebuilding describes rolling a zigzag pattern that distributes most of the paint in three or four strokes, then going back over it evenly. British Paints calls the same move painting a “W” several times, then laying off.
The Zigzag and the Lay-Off
Laying off, per British Paints, means gently pulling the roller with no paint in one stroke toward you, overlapping the original roll in the same direction. That’s the step that kills streaks, and it’s the one people skip.
The full sequence, with what happens if you cut a corner:
- Cut in the border. Skip it and the roller can’t reach the wall line, so you get a bare strip.
- Load the cover. Too little and the section goes patchy; too much and you get tracks.
- Zigzag the section. Skip the zigzag and the paint sits in one spot and dries uneven.
- Even it out. Light overlapping passes keep the texture uniform.
- Lay off. Skip this and the nap marks stay raised instead of leveling.
- Move to the next section while the edge is wet. Let it dry and you get a lap mark.
Direction of travel is where the sources genuinely split. Fine Homebuilding says work across the narrowest dimension of the room. Behr says roll up and down from the outside in. Sherwin-Williams says start in a corner and paint straight overlapping rows. Benjamin Moore says start in a corner and roll toward a window so you can see light reflecting off the wet paint.
I go with Benjamin Moore’s version. The light trick is free feedback, and it shows you missed spots while you can still fix them. If you want more on stroke mechanics, there’s a full piece on roller technique.
Do You Need Primer on a Ceiling?
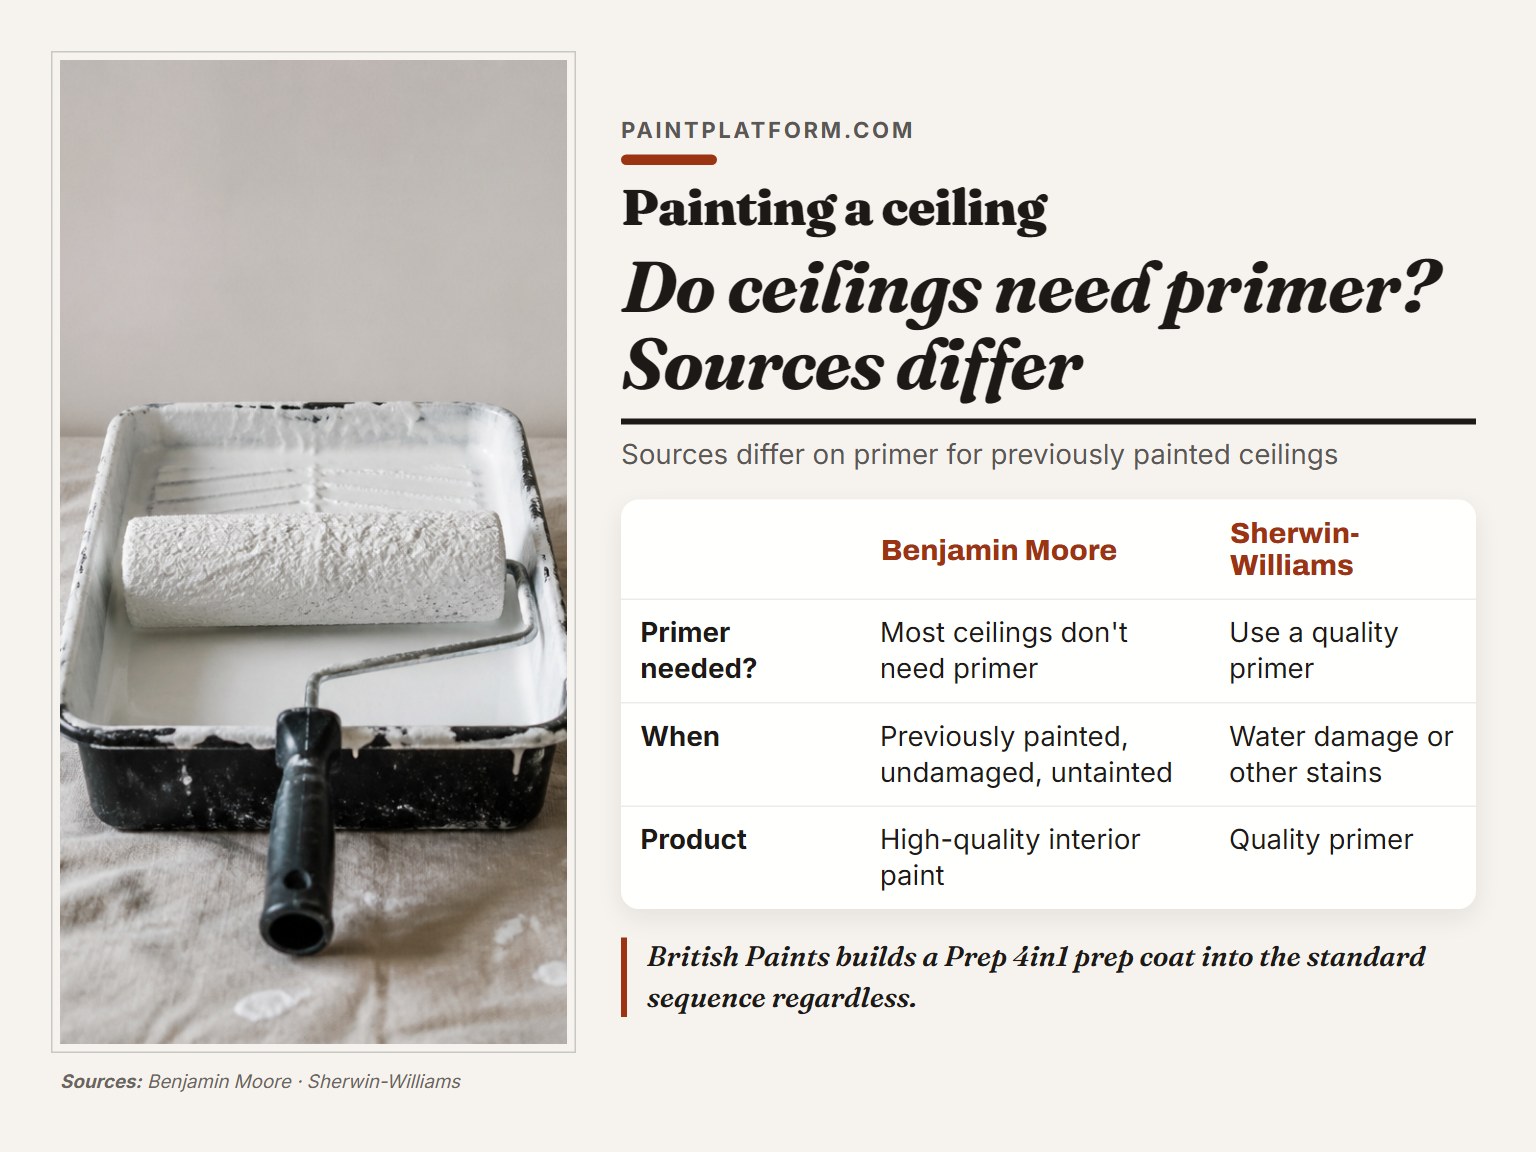
| Source | Position | Condition |
|---|---|---|
| Benjamin Moore | Most ceilings don’t need primer | Previously painted, undamaged, untainted |
| Sherwin-Williams | Use a quality primer | Water damage or other stains |
| British Paints | Use a Prep 4in1 prep coat | Standard step before ceiling paint |
Benjamin Moore’s line is the bluntest: most previously painted, undamaged, untainted ceilings don’t need priming, especially with a high-quality interior paint. Sherwin-Williams narrows it to stained or water-damaged ceilings and recommends a stain-blocking primer for those. British Paints builds a prep coat into the standard sequence regardless.
So the practical answer depends on the source: Sherwin-Williams recommends a primer for ceilings with water damage or other stains, Benjamin Moore says most previously painted, undamaged, untainted ceilings don’t need priming, and British Paints builds a prep coat into the standard sequence regardless. That’s a decision rule, not a rule of thumb. If you’re still choosing the topcoat, ceiling paint types covers the flat versus washable split.
Textured vs Smooth: Which Nap Goes Where

Sherwin-Williams splits it cleanly. Low-nap for smooth, untextured ceilings. A higher nap, like 3/4 inch, for textured ceilings so the paint reaches deeper pockets and the finish comes out uniform.
Smooth Ceilings
Fine Homebuilding is the only source that gives a hard number: 3/8 to 1/2 inch nap on a standard 9 inch cover. That’s the spec I’d start with.
Textured Ceilings
Go 3/4 inch, per Sherwin-Williams. The thicker cover carries more paint into the pockets. It also leaves a heavier stipple, which is fine on a textured surface and wrong on a smooth one. There’s a fuller treatment on painting textured ceilings if yours is a popcorn or knockdown finish.
One thing British Paints flags that nobody else does: some rollers need washing and preparing before use, or they shed fibres onto the surface. A shedding cover leaves a fine fuzz on the ceiling that you won’t see until the paint dries to a matte finish and the light catches it. Rinse the cover, spin it dry, then load it.
Drying, Recoating, and When to Stop
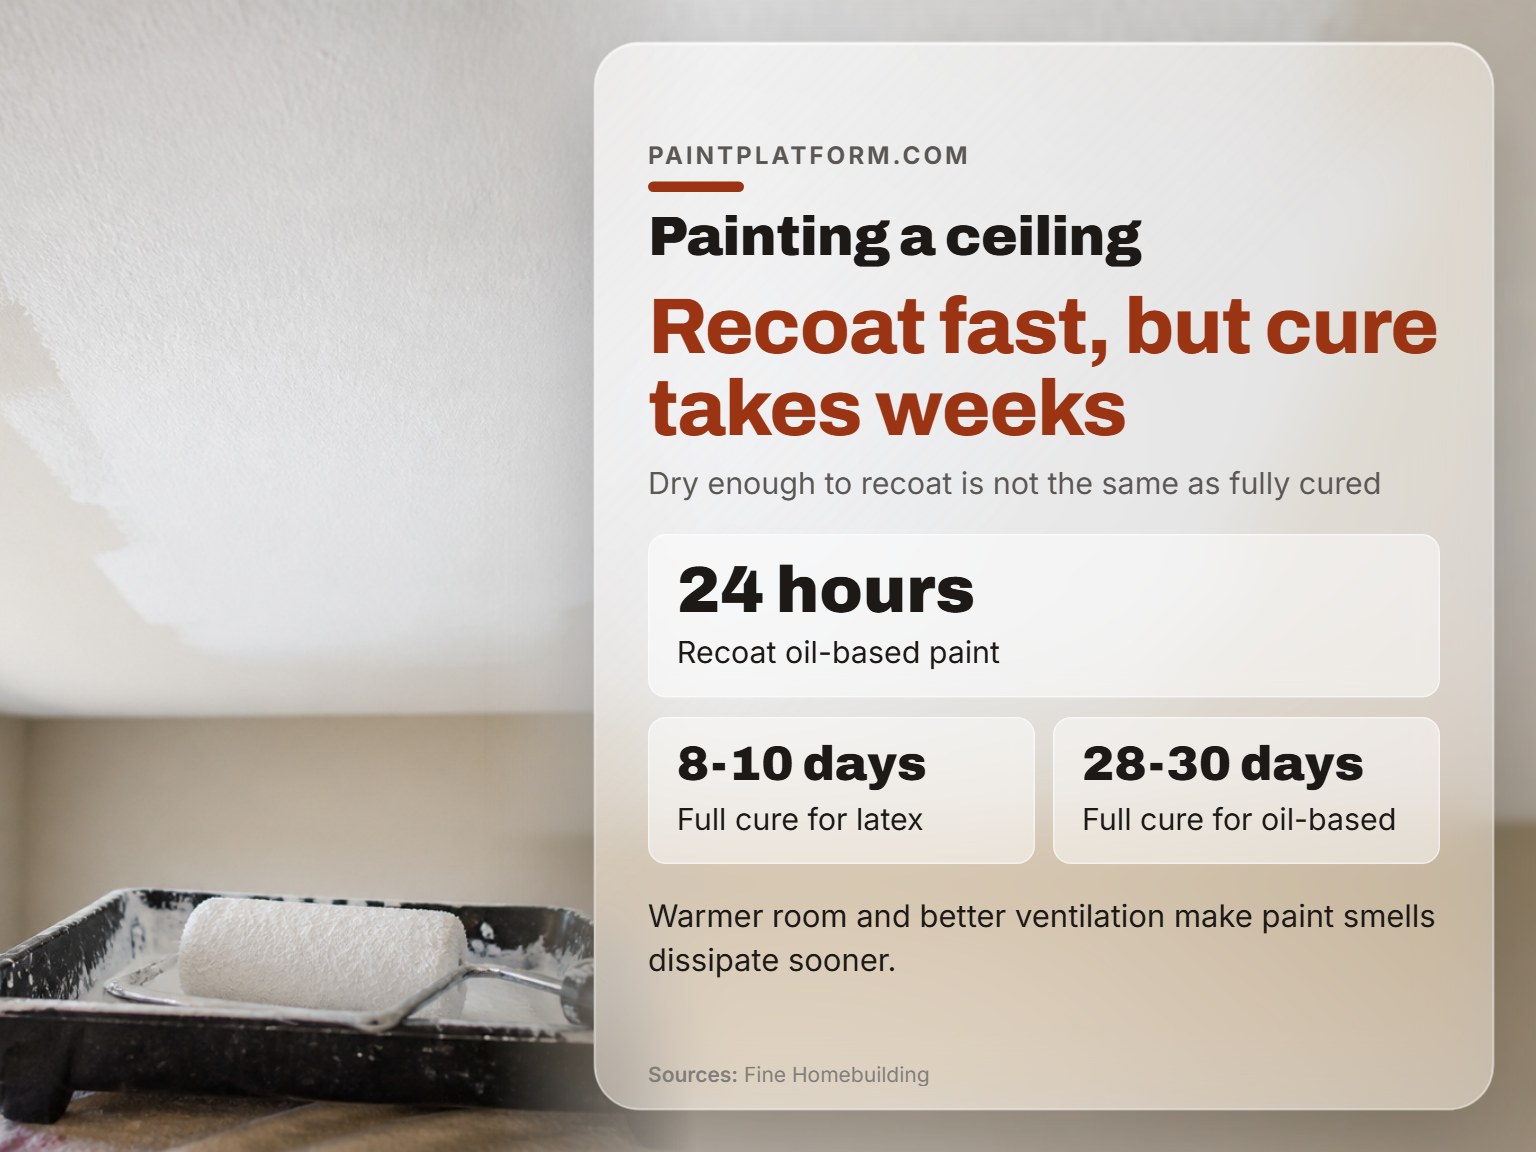
Fine Homebuilding gives the numbers.
Full cure runs longer. Fine Homebuilding puts it at 8 to 10 days for latex and 28 to 30 days for oil-based, which is why the smell hangs around after the paint feels dry. Latex stops smelling like paint somewhere around day 8 or 10. Oil-based keeps a faint solvent edge for close to a month.
The color-changing paints are a nice idea. I’ve never needed one, because a work light held low and sideways shows missed spots just as well while the paint is still wet.
Frequently Asked Questions
Can one person paint a ceiling alone?
Yes, with an extension pole. A pole lets one person reach the ceiling without standing right under the roller and its fine paint rain.
How long before I can paint the second coat?
Acrylic latex is recoatable in two to four hours in a room at 60F or warmer, per Fine Homebuilding. Oil-based paint needs 24 hours. Check the can label, since Benjamin Moore points out that dry times vary by product.
What if my ceiling has water stains?
Prime it first. Sherwin-Williams recommends a stain-blocking primer for ceilings with water damage or other stains, so the marks don’t bleed through the topcoat.
Should I tape the walls?
Only if you’re painting the ceiling alone. If the walls are next, Sherwin-Williams says skip the tape and paint a few inches down the wall, then tape the ceiling when you get to the walls.
How do I stop the roller from splattering?
Roll slower. Sherwin-Williams says fast motions cause paint to flick off the cover, and a ceiling paint formulated to minimize spatter helps too. Loading with several passes up and down the ramp, per Fine Homebuilding, also cuts mist.
Do I need to sand the ceiling first?
The Bottom Line
Here’s the trigger I’d give a friend: if the ceiling is bare drywall, stained, or a color you’re covering, prime it and plan on two coats. If it’s clean white going white again, one coat and a lay-off will do it.
Everything else is patience with a loaded roller. Reload before the cover feels light. Lay off every section. Keep the edge wet.
And the ceiling is the one surface in the room where good enough from the floor is the actual standard. Nobody lies on the couch judging your nap marks.
