
How to Paint Cabinet Doors: Step-by-Step (No Peeling)
This post contains affiliate links. As an Amazon Associate, we earn from qualifying purchases.
To paint cabinet doors, remove and label them, degrease with a TSP substitute, scuff glossy faces (Behr recommends 150 to 220 grit, while Dulux specifies P400), prime bare or wrapped surfaces, then apply two thin coats and let them dry at least 24 hours before rehanging.
The how to paint cabinet doors degreasing step is the one that decides whether the job lasts. Kitchen grease sits in a thin film around the handles and along the bottom rail of every door, and paint that lands on top of it lets go in sheets.
What follows is the order I actually work in: label and strip, clean until the rag comes back clean, degloss or sand, prime the right faces, then coat thin and wait longer than you want to.
Key Takeaways
- Degrease until the rag comes back clean. Grease around handles is the top cause of peeling, and a TSP substitute beats a general-purpose cleaner.
- Sand glossy faces or degloss them, and know which your paint maker wants. Rust-Oleum sells deglosser as a sanding replacement; Dulux calls for P400 abrasion and Behr calls for scuff-sanding or deglossing.
- Two thin coats beat one thick one, per Lowe’s, with a recoat window of 2 to 3 hours on Rust-Oleum Bond Coat; Dulux notes more than 2 coats may be required going dark to light.
- Wait at least 24 hours before rehanging, per Sherwin-Williams and Lowe’s. Sherwin-Williams says the longer the better, while Behr says wait until the paint is completely dry.
- Check the primer requirement on vinyl-wrapped doors. Dulux requires a dedicated Plastic & Laminate Primer, while Rust-Oleum says its Bond Coat adheres to laminate/melamine without a separate primer.
The Temperature and Humidity Window Nobody Checks
50 to 90 degrees Fahrenheit. Below 60 percent relative humidity.
Rust-Oleum publishes both numbers for Cabinet Transformations, and the humidity ceiling is the one that catches people. Lowe’s gives the same temperature band with no humidity limit at all. Behr doesn’t publish one either. Follow the retailer guidance in a damp basement and you land outside the coating’s stated window without knowing it.
Cabinet coatings cure in two stages: solvent or water evaporates first, then the film hardens. Rust-Oleum specifies an application window of 50 to 90 degrees Fahrenheit with relative humidity below 60 percent. Above that ceiling, the surface skins over before the moisture underneath escapes. The result is a coat that stays soft and tacky for days.
A garage at 48 degrees in October feels perfectly fine to bare hands. It’s still outside the window, and the coat will stay soft well past the point where you want to rehang.
Worth knowing before you start: Only Rust-Oleum publishes a humidity ceiling. If you’re painting in a basement or a garage, buy a cheap hygrometer and check it before you open the can.
The full application spec is in the Rust-Oleum Cabinet Transformations instruction sheet, and it’s worth reading before you buy anything.
Number Every Door Before You Pick Up a Screwdriver
Doors, all the same size, all off their hinges, all leaning against the same wall.
The first time I skipped labeling, I spent an entire evening playing hinge-hole jigsaw, holding each door up to a frame and guessing. They all looked identical until they didn’t fit.
Now every door gets a strip of painter’s tape on the back with a number, and the matching number goes inside the frame on a second strip. Hinges and screws go into a zip bag taped to that same door. My studio is already a mess of jars and rags, so any system that survives a week is a win.
Here’s what actually earns its place on the drop cloth:
- Painter’s tape and a marker. Two strips per door, one on the door and one in the frame.
- Zip bags, one per door. Screws and hinges stay with the door they came off.
- A rough sketch of the kitchen, with each door numbered to match.
- A screwdriver and a cordless drill for the hinges.
While the doors are off, the cabinet frames get their own pass, and they’re easier to reach with nothing hanging on them.
Degreasing Decides Whether the Paint Stays
Grease is what kills cabinet paint.
This Old House recommends a TSP substitute for doors that aren’t too dirty and a stronger degreaser when the grime is thick. Dulux goes further: scrub everything with Selleys Sugar Soap, then rinse with clean water at least twice, and skip abrasive detergents entirely. Behr names dirt, grease, dust, moisture, and glossy residue as the four things that interfere with adhesion and cause peeling or bubbling.
Before you start: Degreaser strips oils from skin, so wear nitrile gloves and keep a window open. Sanding dust is the bigger hazard on older doors, and a P100 respirator plus a damp wipe-down keeps it out of the air.
The test is visual and it’s not subtle. Wipe a door with a clean rag and look at what comes off. A rag that comes back grey means there’s still a film on the surface.
A rag that comes back grey is telling you the door is still dirty. Keep going until it comes back the color it went on.
I’ve watched paint let go around handles more than once. Every one of those doors had been wiped once and called clean.
Common mistake: Cleaning the flat face and skipping the edges and the bottom rail. Grease collects where hands and steam reach, and that’s exactly where the first bubble shows up.
Do You Have to Sand, or Is Deglosser Enough?
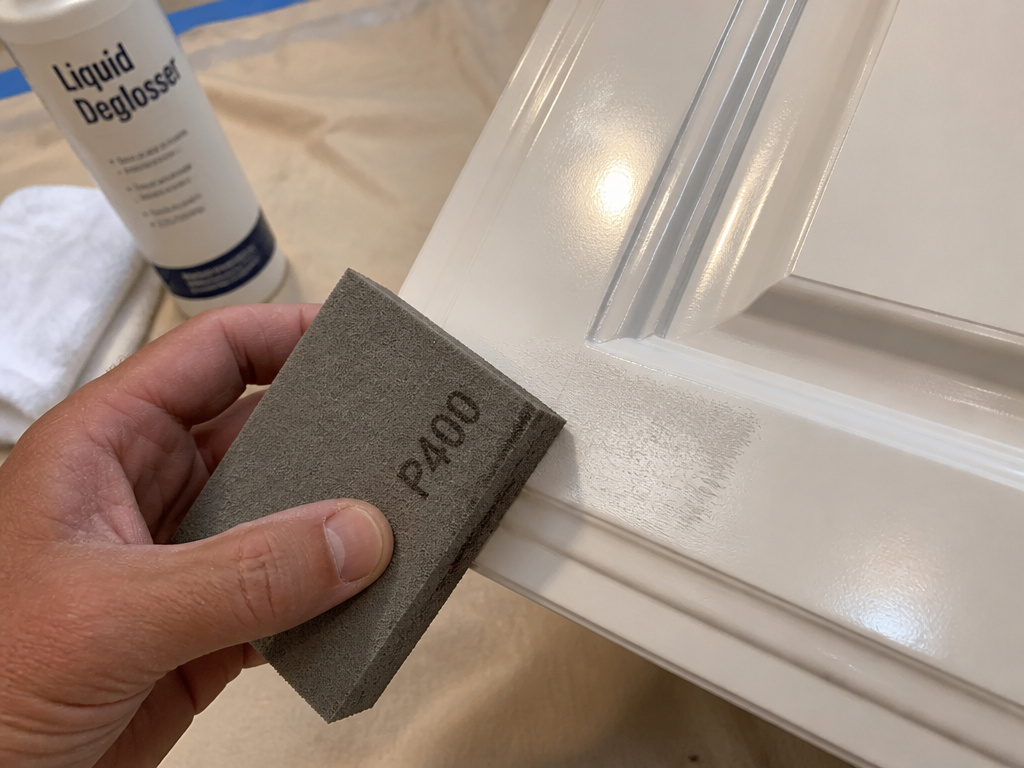
Rust-Oleum’s Deglosser is sold as a replacement for sanding and priming. Dulux tells you to sand glossy and semi-gloss finishes to a dull flat finish with P400 paper. Those two positions can’t both be right for your doors.
They’re written for different products on different substrates, and the honest answer is that both manufacturers are describing what their own coating needs. Here’s how the four major guides line up.
| Source | Prep before topcoat | Primer on laminate or wrapped |
|---|---|---|
| Rust-Oleum | Deglosser only, no sanding | Bond Coat needs no separate primer |
| Dulux | Sand glossy to dull, P400 | Plastic & Laminate Primer required |
| Behr | Scuff sand or degloss, 150 to 220 grit | Clean, scuff sand, then prime |
| Sherwin-Williams | Fine-grit scuff sand after primer | Guide doesn’t address it |
Dulux also wants loose and flaking paint removed completely, cracks filled with Selleys Spakfilla Rapid, and dust wiped off with a damp cloth before coating.
My read: deglosser handles a sound, factory-finished surface that just needs to lose its shine. It doesn’t fix flaking, chalking, or a coating that’s already failing. If you can scrape a fingernail along the door and lift paint, you’re sanding.
If you’re going the chemical route, here’s how to degloss cabinets without over-wetting the surface. The full Dulux procedure is in the Renovation Range Cabinet Doors project guide, and Behr’s grit range is on their cabinet painting page.
Rust-Oleum Says You Can Skip Primer. Dulux Says You Can’t.
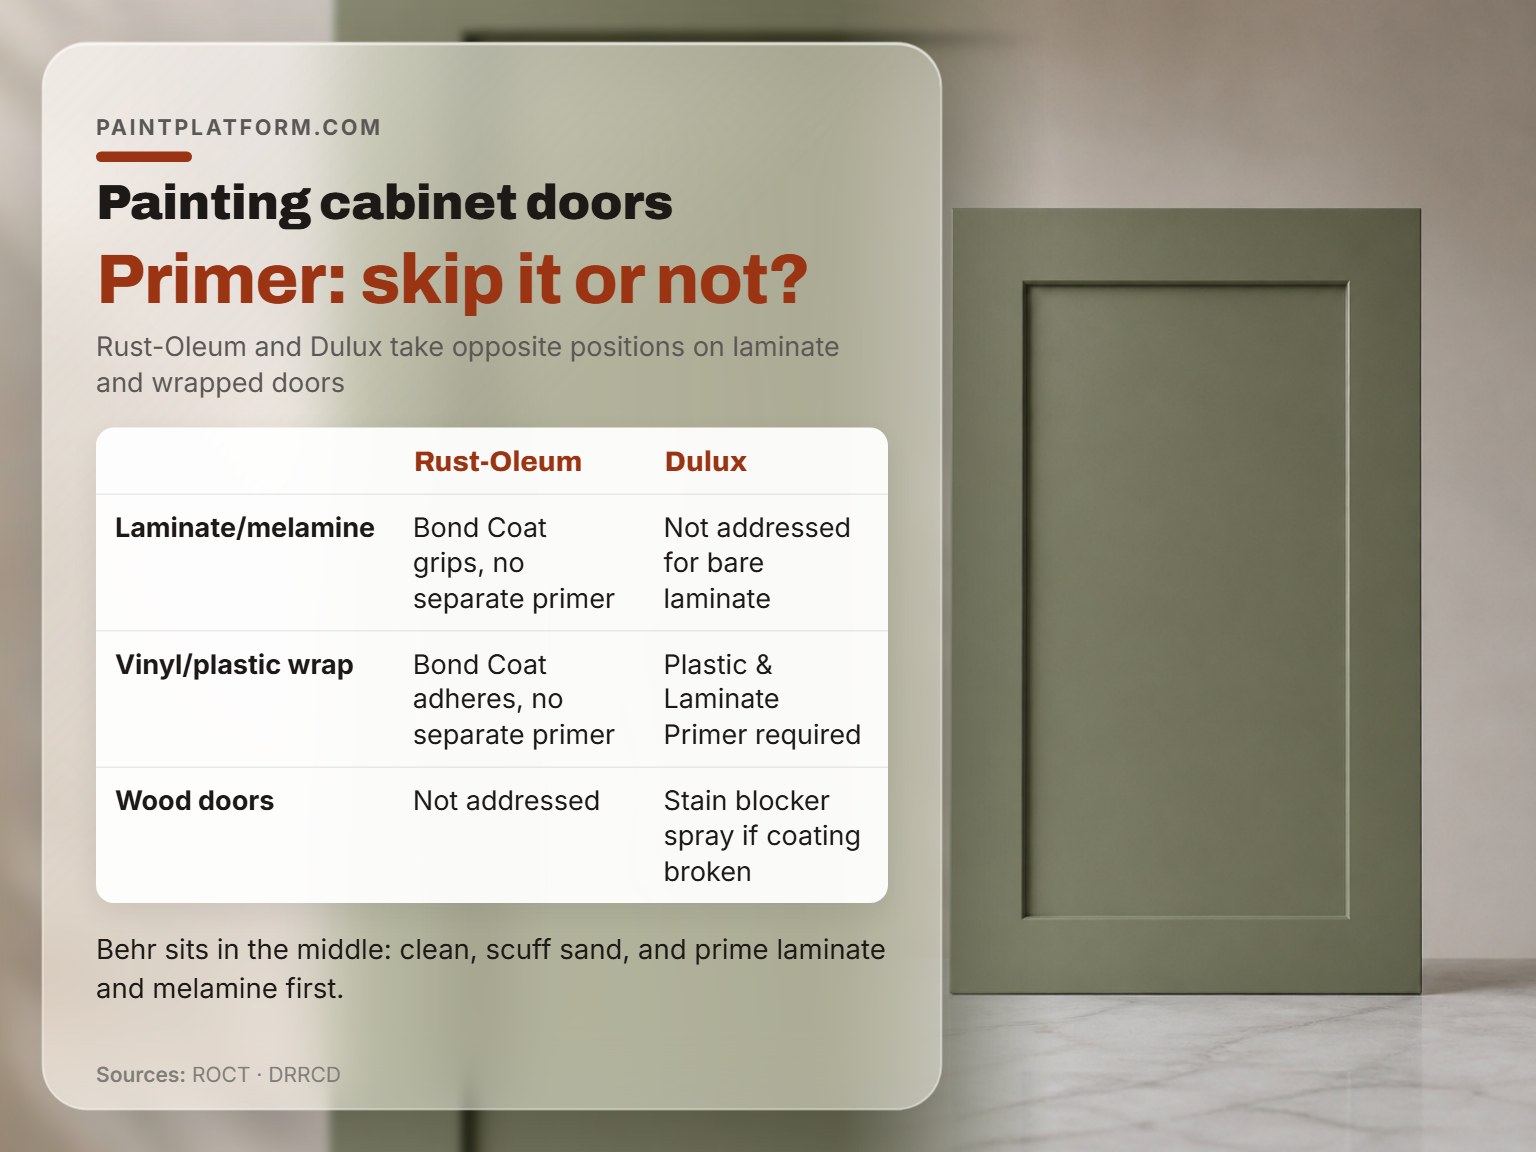
This is the split that decides whether your doors last, and the two manufacturers take opposite positions.
Rust-Oleum’s Bond Coat is formulated to adhere to laminate and melamine without a separate primer. Dulux requires the Renovation Range Plastic & Laminate Primer on vinyl and plastic-wrapped doors and panels before any topcoat. Behr sits in the middle: laminate and melamine can be painted if the surface is cleaned, scuff sanded, and primed first.
Bare and New Wood
Behr calls for a coat of primer on new cabinets before the topcoat. On wooden doors and kick boards, Dulux adds a step if the existing coating has breaks or scratches: spray Dulux PRECISION Stain, Smoke & Odour Blocker over the damage before the topcoat, so the repair doesn’t telegraph through.
Laminate and Melamine
Three sources, three answers. Rust-Oleum says its Bond Coat grips directly. Behr says clean, scuff sand, and prime. Dulux doesn’t address bare laminate, only wrapped doors. If you’re using a kit, follow the kit. If you’re using a standalone paint, check the manufacturer’s guidance: Behr calls for priming laminate and melamine, while Rust-Oleum says its Bond Coat needs no separate primer.
Vinyl and Plastic-Wrapped Doors
Dulux is unambiguous here, and the US guides don’t cover this substrate at all. Dulux says wrapped doors need the dedicated Plastic & Laminate Primer, while Rust-Oleum says its Bond Coat adheres to laminate/melamine without a separate primer. Dulux says paint straight onto a vinyl wrap relies on adhesion the coating wasn’t formulated for, while Rust-Oleum says its Bond Coat adheres to laminate/melamine without a separate primer.
I reach for Sherwin-Williams Emerald Urethane on kitchen doors that get wiped daily. That’s a preference, not a manufacturer claim.
The part nobody mentions: A primer’s job on a wrapped door is to give the topcoat something to grab. Skip it and the first coat may look fine for weeks, then lift at the corners where your hand pulls the door open.
The step-by-step for the primer stage is covered in this guide on how to prime cabinets before you start coating.
How to Paint Cabinet Doors: Two Thin Coats and a Recoat Window
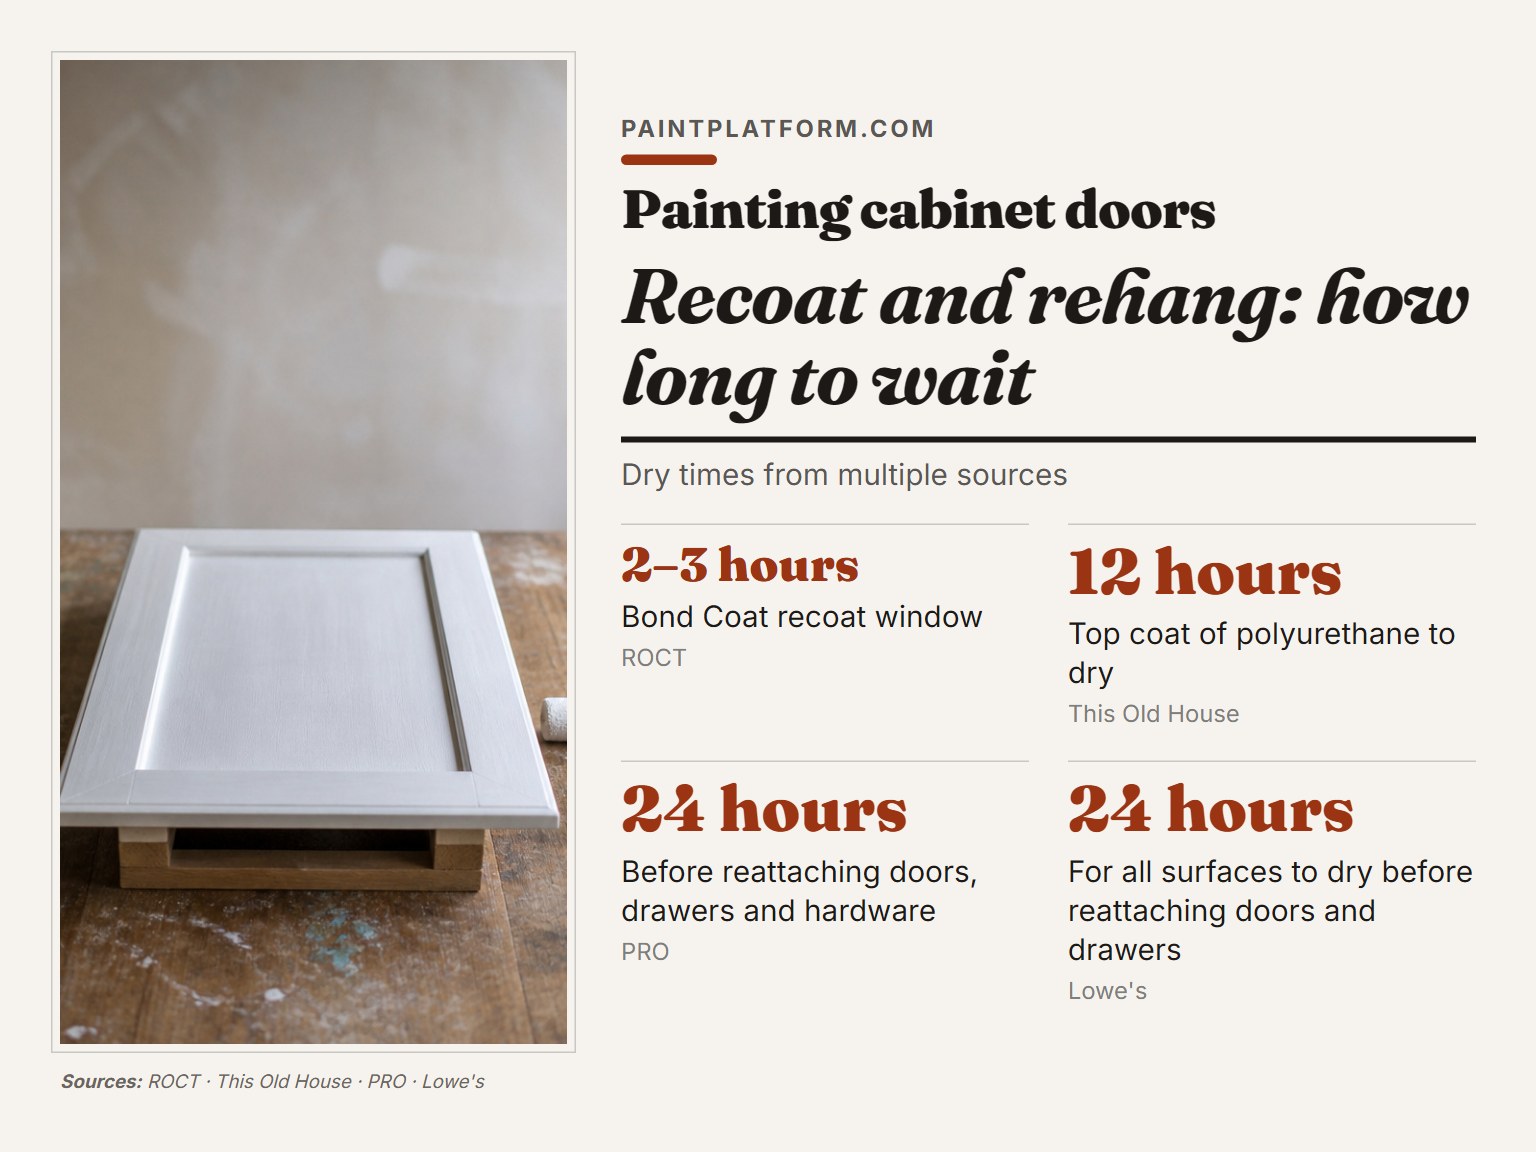
Two hours. Three hours. Twelve. Twenty-four.
That’s the spread on dry times across four sources, and it’s the number people get wrong most often. Rust-Oleum puts the Bond Coat recoat window at 2 to 3 hours. This Old House allows 2 hours on the first bond coat before flipping the door, then 12 hours on the polyurethane topcoat. Lowe’s says several hours between coats and 24 hours before rehanging. Sherwin-Williams says at least 24 hours before the doors, drawers, and hardware go back on, and adds that longer is better.
The safe reading: recoat when the coat is dry to the touch, and rehang only after a full day, though This Old House allows 12 hours on the polyurethane topcoat.
Here’s the coating sequence that keeps the two-thin-coats rule intact:
- Coat the recessed panels and grooves first, working from the inside out, so you’re not dragging a wet edge across a dry field.
- Lay off each section by running an unloaded roller over it in one direction with minimal pressure. This is what flattens the texture.
- Let it dry to the touch, then apply the second thin coat. Behr specifies two coats for its Cabinet, Door & Trim Enamel, and Lowe’s is blunt that two thin coats beat one thick one.
- Add a third coat if you’re going from a dark color to white or a light color. Dulux warns that more than two coats may be needed for that color change.
Where this goes sideways: Recoating at the two-hour mark when the film still feels tacky. The second coat traps the solvent in the first, and the door stays soft for a week.
Timing surprises people in cold rooms. A two-hour recoat window in a warm kitchen runs longer in a cold garage, and the can won’t tell you that.
If you’re still choosing the coating itself, the best cabinet paint comparison covers which formulations hold up in a kitchen. Sherwin-Williams recommends Emerald Urethane Trim Enamel for kitchens and frequently cleaned areas, and ProClassic Waterborne Interior Acrylic Enamel for low-traffic cabinetry. Their full PRO Cabinet Refinishing Guide also covers the scratch testing behind those recommendations.
Brush, Roller, or Spray: Pick Your Finish
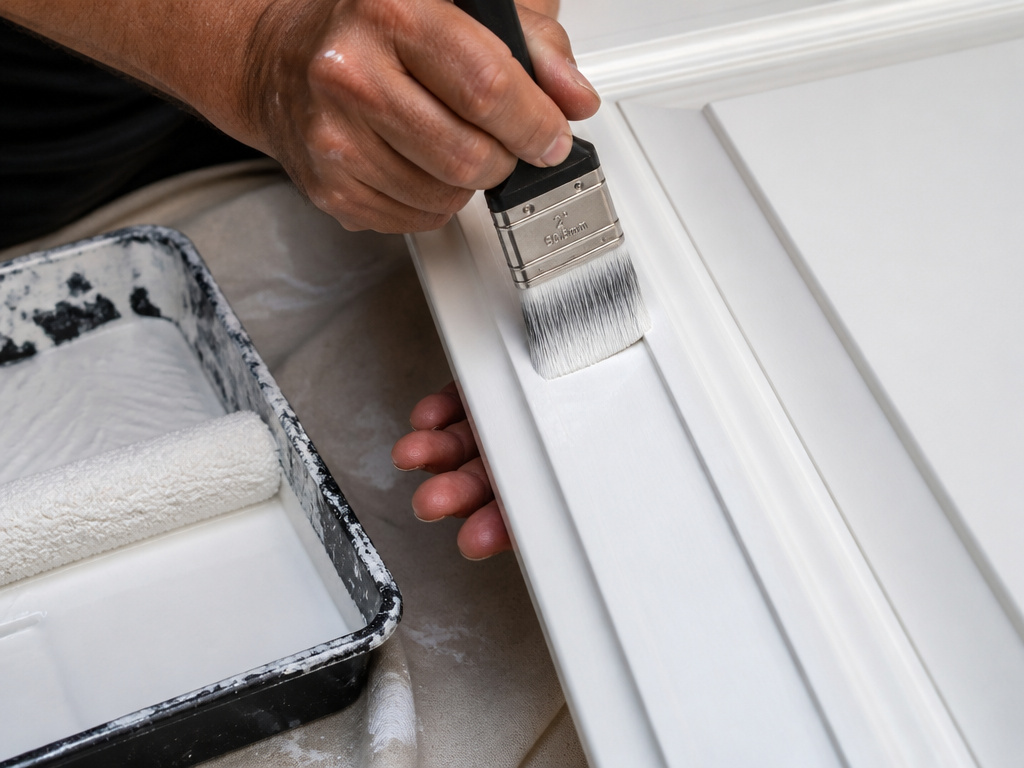
Three tools, three different finishes, and the choice depends more on your doors than on your skill.
A brush is for cutting in and for the frame. Behr recommends a 2 to 2½ inch brush, Dulux specifies a 38 to 50mm angled sash cutter, and This Old House uses a 2-inch synthetic-bristle brush. This Old House uses a 2-inch synthetic-bristle brush for the bond coat.
A roller is for the flat fields. Dulux specifies a 4mm nap, 100mm wide microfibre roller. Lowe’s suggests a foam roller or a fine nap mini roller on the framework, with as few strokes as possible. Sherwin-Williams pairs its Emerald Urethane with Purdy Clearcut brushes and Contractor Series Soft Woven rollers.
Spray is the fastest route on paneled doors, because grooves are where a brush leaves every pass visible. It also needs the doors fully off and a space you can afford to fog.
Here’s the honest split:
- First kitchen, doors already off: brush and roller. It’s slower, but you can fix a run without respraying a whole door.
- Paneled or shaker doors with deep grooves: spray, if you have the space.
- One or two doors you’re touching up: brush only. Setting up a sprayer for two doors wastes more time than it saves.
If you’re leaning toward a sprayer, spray painting cabinet doors covers the setup, and the spray vs brush breakdown gets into finish differences. For raised panels and recessed grooves, paneled cabinet doors need a different order than a flat slab.
Four Finish Problems and What Actually Caused Them
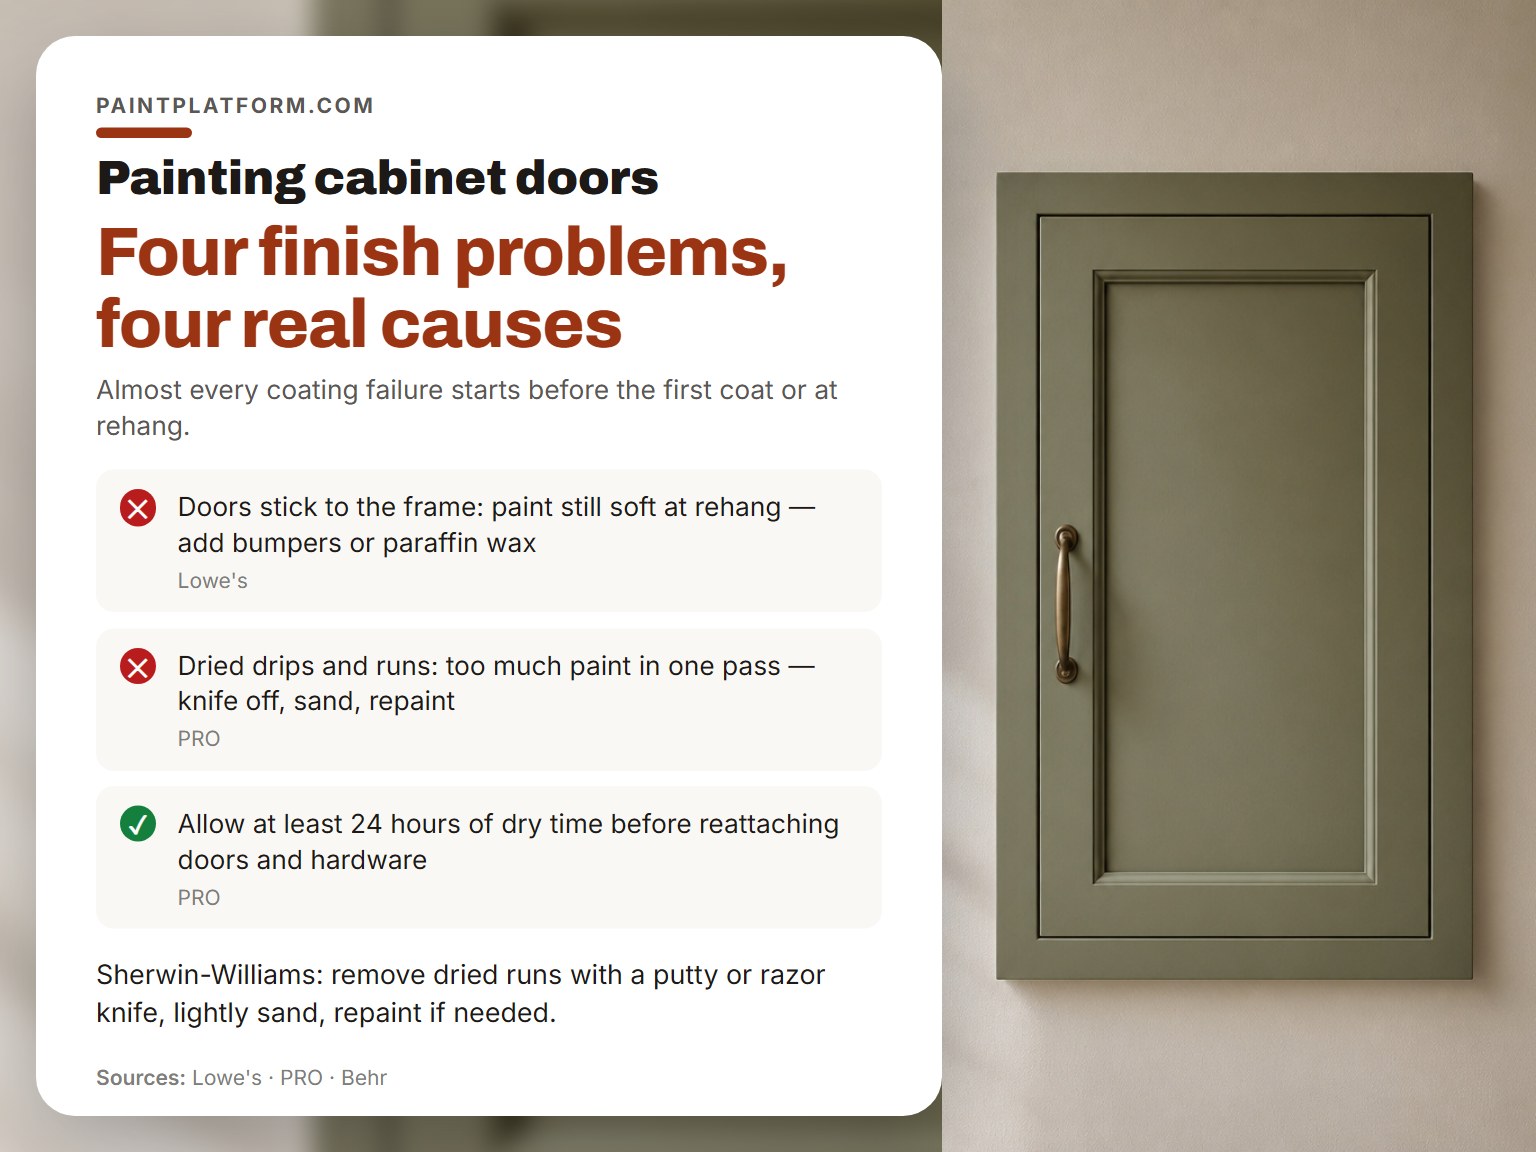
Peeling around a handle is a grease failure, not a paint failure.
Almost every cabinet coating problem traces back to something that happened before the first coat went on, or to a door that went back on the frame too soon. Here’s the diagnostic version.
| Symptom | Likely cause | Fix |
|---|---|---|
| Peeling around handles | Grease left on the surface | Strip, degrease, recoat |
| Visible brush marks | Too many passes with a drying brush | Sand flat, thin the coat, lay off |
| Doors stick to the frame | Paint still soft at rehang | Add bumpers or paraffin wax |
| Dried drips and runs | Too much paint in one pass | Knife off, sand, repaint |
Sherwin-Williams gives the fix for dried runs directly: remove them with a putty or razor knife, lightly sand the affected area, and repaint if needed. For brush texture, the technique that matters is fewer strokes, not a softer brush, and there’s a full breakdown on how to avoid brush marks if texture is your recurring problem.
Rehanging Doors Without Fingerprints
Hang them too early and you’ll leave a palm print in the topcoat.
Sherwin-Williams says allow at least 24 hours of dry time before reattaching doors, drawers, and hardware, and adds that longer is better. Lowe’s gives the same 24 hours or the manufacturer’s recommendation. Behr says wait until the paint is completely dry, then replace doors and drawers before reinstalling hardware.
The fingerprint problem has a cheap fix. This Old House suggests screwing cup hooks into the door edges so you can carry and hang them without touching the face, plus a pronged drying rack made from scrap wood and screws so you can flip a door the moment it’s dry to the touch.
Sticking is the other failure. Lowe’s recommends bumpers or a small amount of paraffin wax on the surfaces that touch, because painted cabinets keep curing after you hang them and two fresh coats will bond to each other.
Easy to miss: Hardware goes back on last, not with the door. Behr’s order is doors and drawers first, then hardware, so you’re not handling a freshly painted door with a screwdriver in your hand.
If you added a protective topcoat, the timing shifts again, and seal painted cabinets covers how long that layer needs before anything touches it. Lowe’s publishes the rehang sequence in its cabinet painting guide.
Frequently Asked Questions
How long should cabinet doors dry before you rehang them?
At least 24 hours. Sherwin-Williams specifies 24 hours minimum and notes that longer is better, and Lowe’s gives the same figure or whatever the paint manufacturer recommends. Painted cabinets keep curing after rehang, which is why bumpers or paraffin wax on contact surfaces matters.
Can you paint cabinet doors without sanding?
It depends on the coating. Rust-Oleum markets its Deglosser as a replacement for sanding and priming, while Dulux requires sanding glossy and semi-gloss finishes to a dull flat finish with P400 paper and Behr recommends 150 to 220 grit. Rust-Oleum says deglosser eliminates the need to sand or prime, while Dulux calls for P400 sanding and Behr calls for scuff-sanding or deglossing; deglosser works on a sound surface and doesn’t rescue failing paint.
Do you have to remove cabinet doors to paint them?
You can paint them hanging, but the edges and the door surrounds are where a brush shows every miss. Dulux explicitly recommends removing doors for easy coating of edges and door surrounds. Removing them also lets you lay each door flat, which is how Behr says to paint them.
Why does paint peel around cabinet handles?
Grease. Behr lists dirt, grease, dust, moisture, and glossy residue as the things that interfere with adhesion and cause peeling or bubbling. Handles and the bottom rail of the door collect the most kitchen grease, so they’re where the failure shows first.
Can you paint vinyl-wrapped cabinet doors?
Yes, with the right primer. Dulux requires the Renovation Range Plastic & Laminate Primer on vinyl and plastic-wrapped doors and panels before the topcoat, while Rust-Oleum says its Bond Coat adheres to laminate/melamine without a separate primer. The US guides from Behr and Lowe’s don’t address wrapped substrates at all, so don’t assume a standard kit covers them.
How many coats does a cabinet door need?
Two thin coats is the baseline, though Dulux notes more than 2 coats may be required going from a dark color to white or a light color. Behr specifies two coats for its Cabinet, Door & Trim Enamel, and Lowe’s notes that two thin coats finish better than one thick one. Going from a dark color to white or a light color may need more than two, per Dulux.
The Bottom Line
If your doors are vinyl or plastic wrapped, check the primer requirement: Dulux requires a dedicated Plastic & Laminate Primer, while Rust-Oleum says its Bond Coat adheres to laminate/melamine without a separate primer. That product decision matters, and it’s the one the US guides skip entirely, though Rust-Oleum says its Bond Coat needs no separate primer on laminate/melamine.
The first hour of this job is a sketch and a roll of tape. Label every door, bag every hinge, and match the numbers to the frames. That’s the hour that saves the weekend, and it’s the one I skipped exactly once.
One last thing about how to paint cabinet doors: the prep steps are the ones that get shortened when you’re tired, and they’re the only ones that decide whether the finish survives a year of wiped-down handles. Clean twice. Sand when the surface argues with you. Wait the full day before you hang anything.
Grab a rag and test one door right now. If it comes back grey, you already know where your afternoon is going.
